Installing PostgreSQL
Now that you know how a typical PostgreSQL installation is arranged on disk, it's time to actually create a typical installation. In the next few sections, I'll show you how to install PostgreSQL on Unix/Linux hosts and on Windows hosts. In either environment, you can install PostgreSQL from prebuilt installation packages, or you can compile PostgreSQL from source code to create a fully customized installation.
Unix/Linux
PostgreSQL was originally written for Unix, so you will find that installing PostgreSQL on a Unix host is very easy. Installing PostgreSQL on a Linux host is even easier because of the availability of prebuilt distributions.
From Binaries
The easiest way to install PostgreSQL on a Unix (or Linux) system is to use a precompiled package, such as a RPM installer. You can find RPM packages for PostgreSQL at the PostgreSQL web site (www.postgresql.org or ftp.postrgesql.org).
The process of installing PostgreSQL using a RPM package is described in Chapter 1, "Introduction to PostgreSQL and SQL." Refer to the section titled "Installing PostgreSQL Using a RPM" for more information.
From Source
Given the choice between building a package (such as PostgreSQL) from source and installing a package from a precompiled package, I'll always choose to build from source. When you build from source, you have complete control over the optional features, compiler options, and installation directories for the package. When you install from a precompiled package, you're stuck with the choices made by the person who constructed the package. Of course, using a precompiled package is much simpler. If you want to get up and running as quickly as possible, install from a binary package. If you want more control (as well as a better understanding of the options), build your own copy from source code.
There are four steps to follow when you install PostgreSQL from source code. If you have built other open-source products from source, you're probably comfortable with this procedure. If not, don't be afraid to try the build procedure yourself; it's really not difficult.
We'll walk through the four steps in this section, which are
|
1. |
Downloading and unpacking the source code |
|
2. |
Configuring the source code |
|
3. |
Compiling the source code |
|
4. |
Installing the compiled code |
Downloading and Unpacking the Source Code
The first step is to load the source code onto your system. PostgreSQL source code is distributed in a set of compressed archive (tar) files. The exact content of each archive can vary from release to release, but since release 7.1, the PostgreSQL source code is composed of the following archives:
postgresql-base-8.0.1.tar.gz 9.7 MB
postgresql-docs-8.0.1.tar.gz 2.4 MB
postgresql-opt-8.0.1.tar.gz 143.6 KB
postgresql-test-8.0.1.tar.gz 1 MB
postgresql-8.0.1.tar.gz 13.2 MB
The file sizes shown here are for release 8.01.
The "base" archive (postgresql-base-8.0.1.tar.gz) contains all the source code necessary to build a PostgreSQL server, the psql client, administrative tools, and contributed software. The "docs" archive contains the PostgreSQL documentation in HTML form (the base archive contains the PostgreSQL man pages). Optional features (that is, things that you have to specifically enable when you build from source code) are included in the "opt" archive. The "test" package contains a suite of regression tests that will ensure that your copy of PostgreSQL is functioning as expected.
The last archive (postgresql-8.0.1.tar.gz) contains all the source code combined into a single archive.
If you want to install as little software as possible, download the base package. If you want to be sure you have everything that you might need, download the combined package.
Table 21.2 shows the detailed contents of each package[1].
[1] With release 7.3, some of the optional features of PostgreSQL have been removed from the source distribution and moved to another site (http://gborg.postgresql.org). If you want to build the Perl client interface, for example, you'll have to download the base package (or combined) and the pgperl package from gborg.postgresql.org.
The RPM-based distributions are packaged a bit differently. As of release 8.0, PostgreSQL distributes the RPM packages shown in Table 21.3
In the discussion that follows, I'll assume that you have downloaded the combined package.
Configuring the Source Code
After you have downloaded the source package that you want, you can unpack the archive with the following command[2]:
[2] The -z flag is an extension that is available only if you are using the GNU version of tar. If tar complains about the -z flag, you can achieve the same result using the command: gunzip -c postgresql-8.0.1.tar.gz | tar -xvf -.
$ tar -zxvf postgresql-version.tgz
The source package extracts to a directory named postgresql- version.
The next step is by far the most complex: configuration. Configuration is not difficult, it just requires a bit of thought. When you configure source code, you select the set of features that you want and define compiler and linker options. Like most open-source packages, PostgreSQL source code is configured using the configure command. The set of configurable features and options varies from release to release, so you should study the output from the configure help command carefully. Here is a sample of the output from this command:
$ cd postgresql-8.0.1
$ ./configure help=short
'configure' configures PostgreSQL 8.0.1 to adapt to many kinds of systems.

Usage: ./configure [OPTION]... [VAR=VALUE]...

To assign environment variables (e.g., CC, CFLAGS...), specify them as
VAR=VALUE. See below for descriptions of some of the useful variables.

Defaults for the options are specified in brackets.

Configuration:
 -h, help display this help and exit
 help=short display options specific to this package
 help=recursive display the short help of all the included packages
 -V, version display version information and exit
 -q, quiet, silent do not print 'checking...' messages
 cache-file=FILE cache test results in FILE [disabled]
 -C, config-cache alias for 'cache-file=config.cache'
 -n, no-create do not create output files
 srcdir=DIR find the sources in DIR [configure dir or '..']

Installation directories:
 prefix=PREFIX install architecture-independent files in PREFIX
 [/usr/local/pgsql]
 exec-prefix=EPREFIX install architecture-dependent files in EPREFIX
 [PREFIX]

By default, 'make install' will install all the files in
'/usr/local/pgsql/bin', '/usr/local/pgsql/lib' etc. You can specify
an installation prefix other than '/usr/local/pgsql' using 'prefix',
for instance 'prefix=$HOME'.

For better control, use the options below.

Fine tuning of the installation directories:
 bindir=DIR user executables [EPREFIX/bin]
 sbindir=DIR system admin executables [EPREFIX/sbin]
 libexecdir=DIR program executables [EPREFIX/libexec]
 datadir=DIR read-only architecture-independent data [PREFIX/share]
 sysconfdir=DIR read-only single-machine data [PREFIX/etc]
 sharedstatedir=DIR modifiable architecture-independent data [PREFIX/com]
 localstatedir=DIR modifiable single-machine data [PREFIX/var]
 libdir=DIR object code libraries [EPREFIX/lib]
 includedir=DIR C header files [PREFIX/include]
 oldincludedir=DIR C header files for non-gcc [/usr/include]
 infodir=DIR info documentation [PREFIX/info]
 mandir=DIR man documentation [PREFIX/man]

System types:
 build=BUILD configure for building on BUILD [guessed]
 host=HOST cross-compile to build programs to run on HOST [BUILD]

Optional Features:
 disable-FEATURE do not include FEATURE (same as enable-FEATURE=no)
 enable-FEATURE[=ARG] include FEATURE [ARG=yes]
 enable-integer-datetimes enable 64-bit integer date/time support
 enable-nls[=LANGUAGES] enable Native Language Support
 disable-shared do not build shared libraries
 disable-rpath do not embed shared library search path in executables
 disable-spinlocks do not use spinlocks
 enable-debug build with debugging symbols (-g)
 enable-depend turn on automatic dependency tracking
 enable-cassert enable assertion checks (for debugging)
 enable-thread-safety make client libraries thread-safe
 enable-thread-safety-force force thread-safety in spite of test failure
 disable-largefile omit support for large files

Optional Packages:
 with-PACKAGE[=ARG] use PACKAGE [ARG=yes]
 without-PACKAGE do not use PACKAGE (same as with-PACKAGE=no)

 with-docdir=DIR install the documentation in DIR [PREFIX/doc]
 without-docdir do not install the documentation
 with-includes=DIRS look for additional header files in DIRS
 with-libraries=DIRS look for additional libraries in DIRS
 with-libs=DIRS alternative spelling of with-libraries
 with-pgport=PORTNUM change default port number 5432
 with-tcl build Tcl modules (PL/Tcl)
 with-tclconfig=DIR tclConfig.sh is in DIR
 with-perl build Perl modules (PL/Perl)
 with-python build Python modules (PL/Python)
 with-krb4 build with Kerberos 4 support
 with-krb5 build with Kerberos 5 support
 with-krb-srvnam=NAME name of the service principal in Kerberos [postgres]
 with-pam build with PAM support
 with-rendezvous build with Rendezvous support
 with-openssl build with OpenSSL support
 without-readline do not use Readline
 without-zlib do not use Zlib
 with-gnu-ld assume the C compiler uses GNU ld [default=no]

Some influential environment variables:
 CC C compiler command
 CFLAGS C compiler flags
 LDFLAGS linker flags, e.g. -L if you have libraries in a
 nonstandard directory
 CPPFLAGS C/C++ preprocessor flags, e.g. -I if you have
 headers in a nonstandard directory
 CPP C preprocessor
 LDFLAGS_SL
 DOCBOOKSTYLE
 location of DocBook stylesheets

Use these variables to override the choices made by 'configure' or to help
it to find libraries and programs with nonstandard names/locations.

Report bugs to .
If you want to configure your source code to build a plain-vanilla version of PostgreSQL, you can simply run configure (without any options) and watch the blinking lights. The configure program performs a series of tests to determine what kind of operating system you are using, what kind of CPU you have, which compilers and linkers you have installed, and so forth. configure creates a new set of header files and makefiles that reflect your configuration choices.
The most interesting configuration options are the with- package options. Using the with- package options, you can build optional features such as the PL/Tcl language and the libpq++ client interface library.
Table 21.4 shows the package-related configure options. The second column lists the set of files that result from building each package. If you ever need to know what configure options you need to (for example) build the libpq++ shared library or the pgtclsh shell, consult Table 21.4.
|
configure Option |
Files Added to Basic Installation |
|---|---|
|
with-tcl |
|
|
Tcl client API and PL/Tcl |
bindir/pltcl_delmod_ |
|
server-side language |
bindir/pltcl_listmod_ |
|
bindir/pltcl_loadmod_ |
|
|
datadir/unknown.pltcl |
|
|
libdir/postgresql/pltcl.so with-python |
|
|
PL/Python server-side language |
libdir/postgresql/plpython.so with-perl |
|
PL/Perl server-side language |
libdir/postgresql/plperl.so |
I mentioned earlier that configure runs a number of tests to find a wealth of information about the build environment and runtime environment on your system. This can take quite awhile on a slow or heavily used system. If you want to experiment with different configuration options, you may want to enable configure's cache mechanism:
$ ./configure config-cache
This tells configure to record its test results in a cache file (named config.cache) so that the next time you run configure, it won't have to repeat the tests. After you have finished compiling and installing PostgreSQL, you can run the program pg_config to find the set of options used to configure your copy of PostgreSQL:
$ pg_config configure
prefix=/usr/local/pg801 enable-debug
The easiest way to add a configuration to a previously installed copy of PostgreSQL is to feed the result from pg_config back into the configure script. For example, to add PL/Python support to your existing configuration, you can run the following command:
$ eval ./configure $(pg_config -configure) with-python
The configure program produces three files that you may be interested in examining.
config.log contains a log of the entire configuration process. This file contains a list of all the configuration tests along with the result of each test. config.log also shows you the changes that the configure program made to your source code (actually, configure leaves the original source code intact and constructs a working copy of each file that it needs to modify). If you run into any configuration or build errors, you may want to examine the config.log file to see how configure arrived at its decisions.
The config.status file is a shell script that you can run to reproduce your original configuration choices. Executing config.status is equivalent to running ./configure'pg_config configurè. The advantage that config.status offers is that you can reproduce your configuration choices without having a functional copy of PostgreSQL. The advantage to the second option is that you can add configuration options to an existing copy of PostgreSQL.
The src/include/pg_config.h file is modified to reflect many of the configuration options that you select. This file contains a few extra configuration options (such as database block size, default number of buffers, and so on) that you can't adjust using the configure program; to change these options you must edit the include/pg_config.h file (or the template, include/pg_config.h.in) by hand. You will probably never need to change this file, but you may want to glance through it so that you know what your options are.
Compiling the Source Code
After you have configured the PostgreSQL source code, compiling it is easy; just execute the make command:
$ make
The make program compiles only those portions of the source code requiring recompilation. If you are building PostgreSQL for the first time, make will compile everything. If you have already compiled PostgreSQL a few times, make will compile only the source files that you have changed, or that depend on changes that you have made. If you have made configuration changes, make is likely to recompile everything. If you want to be absolutely sure that make builds everything, execute the following command[3]:
$ make clean && make
After several minutes (or several hours, depending on the speed of your system), the build will complete.
If an error occurs during compilation, you might be able to fix the problem yourself by examining the error message and correcting the cause of the problem. If you're not comfortable wading through the PostgreSQL source code, search for specific error messages at the PostgreSQL web site; you will usually find an answer there.
Installing the Compiled Code
The final step is installation. In most cases, you should be logged into your system with superuser privileges (that is, log in as user root) to ensure that you can write into the installation directories. To install the compiled code, execute the following command:
# make install
The make utility copies the programs, shell scripts, and data files from your build directories into the install directories.
Completing the Installation Process
At this point, you should have all PostgreSQL components installed into their respective directories. Now, it's time to complete the installation process. When you install PostgreSQL from an RPM script, RPM will create a postgres user account for you. When you build PostgreSQL from scratch, you have to do that yourself. Consult your OS documentation for more information on how to create user accounts.
You'll also want to be sure that the PostgreSQL executables (particularly the client applications, such as psql) appear in your users' search path. The easiest way to accomplish this is to modify the /etc/profile (or equivalent) shell script.
Finally, you will want to create your initial set of databases and arrange for server startup and shutdown. Those topics are covered in other parts of this chapter.
Windows
Prior to release 8.0, you could run the PostgreSQL server on a Windows host, but you had to install a Unix compatibility library (Cygwin) first and then install PostgreSQL. In release 8.0, the PostgreSQL developers introduced a new version of PostgreSQL that runs as a native Windows application. The new version runs much faster than the Cygwin version, operates as a true Windows service application, and includes a spiffy new installer that makes installation a trivial (even gleeful) process. You'll need a modern version of Windows (XP, 2000, 2003, or beyond) and an NTFS filesystem.
From Binaries
To install PostgreSQL on a Windows host, download the postgresql-version.zip file from the win32 section of the PostgreSQL download server (http://www.postgresql.org) and unpack the archive into a work directory (you can delete the work directory when the installer completes its work). Open a copy of Windows Explorer and navigate to the work directory, then click (or double-click if needed) the PostgreSQL installer (there are two installers in this package; choose the smaller of the two).
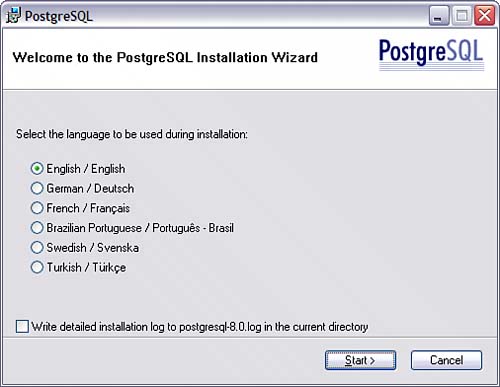
The installer begins by offering you a choice of (human) languages, as shown in Figure 21.1.
Figure 21.1. Windows InstallerChoose a Language.
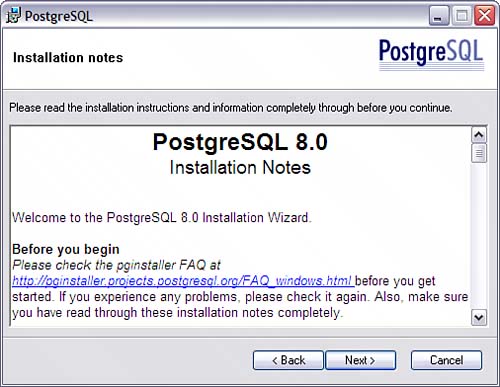
Select a language (preferably a language that you understand, but that's up to you) and click Start. After a bit of clicking and whirring, the installer warns you to shut down all other programs before proceeding. Click Next and PostgreSQL displays the window shown in Figure 21.2.
Figure 21.2. Windows InstallerInstallation Notes.
Be sure to read through the installation notes; there's some good (and important) information in there. Click Next and you'll arrive at the Installation Options window (see Figure 21.3).
Figure 21.3. Windows InstallerInstallation Options.
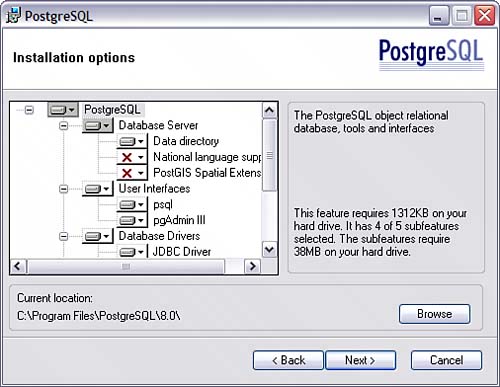
Select the options that you want to install and click Next.
The next dialog window (see Figure 21.4) gives you a chance to install the post master as a Windows service (a service is analogous to a daemon process in the Linux/Unix world).
Figure 21.4. Windows InstallerService Configuration.
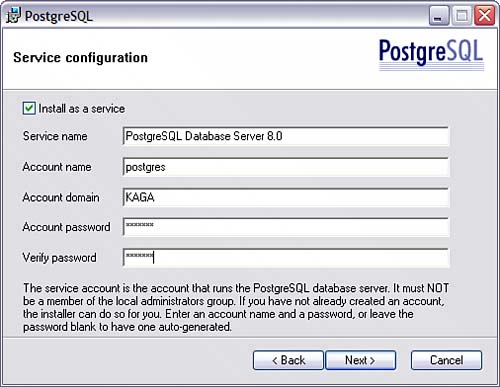
If you choose not to create a service, you'll have to start the postmaster by hand (but you can use pg_ctl to do the heavy lifting). A Windows service runs with the privileges assigned to a specific user account. You can choose an existing account or the installer will create a new one for you (the PostgreSQL installer won't let you choose an account that holds administrator privileges).
Click Next and the window shown in Figure 21.5 appears.
Figure 21.5. Windows InstallerInitialize DatabaseCluster.

On this window, the PostgreSQL installer is asking you to define the cluster superuser (and the superuser's password). Make any changes you deem necessary, fill in the passwords, and click Next.
The next window (Figure 21.6) lets you choose which procedural languages to install.
Figure 21.6. Windows InstallerProcedural Languages.

At the time we are writing this, the only choice is PL/pgSQL (which you probably want to install). Make your selection(s), click Next, and the window shown in Figure 21.7 appears.
Figure 21.7. Windows InstallerContributed Modules.
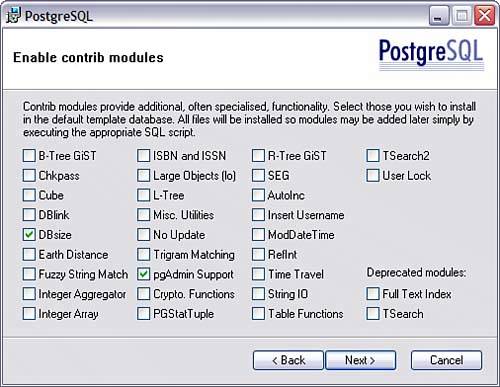
Now you're getting to the fun stuff. From this window, you can choose which contributes software modules you want to install into the template database (anything you install in the template database is automatically copied into each new database as you create it). Unfortunately, the PostgreSQL installer doesn't give you too many clues about what these modules actually dosee the PostgreSQL-related web sites for more information (http://gborg.postgresql.org, http://pgfoundry.org, and http://www.postgresql.org). I can't resist installing the Time Travel module.
Choose the modules you want to install and click Next. The installer gives you one more chance to alter your choices and then it's off and running. When the installation process completes, you have a fully installed, fully configured PostgreSQL server (and a few client applications). If you chose to install the postmaster as a Windows service, PostgreSQL will automatically start each time you boot your computer.
From Source
If you want to compile PostgreSQL from source code in a Windows environment, you'll need to install a number of tools. You can find the list (and the most recent instructions) at http://www.postgresql.org/files/documentation/faqs/FAQ_MINGW.html. After you have installed the necessary tools, you can follow the same procedure described earlier for building PostgreSQL from source on a Unix host.
Completing the Installation Process
Arriving here, you should have all necessary PostgreSQL components installed on your system. To complete the installation, you'll want to make any configuration changes that you require, create a few initial databases, and create PostgreSQL user accounts. These last few steps are described elsewhere in this chapter.
Part I: General PostgreSQL Use
Introduction to PostgreSQL and SQL
- Introduction to PostgreSQL and SQL
- A Sample Database
- Basic Database Terminology
- Prerequisites
- Connecting to a Database
- Creating Tables
- Viewing Table Descriptions
- Adding New Records to a Table
- Installing the Sample Database
- Retrieving Data from the Sample Database
- The CASE Expression
- Aggregates
- Multi-Table Joins
- UPDATE
- DELETE
- A (Very) Short Introduction to Transaction Processing
- Creating New Tables Using CREATE TABLE...AS
- Using VIEW
- Summary
Working with Data in PostgreSQL
- Working with Data in PostgreSQL
- NULL Values
- Character Values
- Numeric Values
- Date/Time Values
- Boolean (Logical) Values
- Geometric Data Types
- Object IDs (OID)
- BLOBs
- Network Address Data Types
- Sequences
- Arrays
- Column Constraints
- Expression Evaluation and Type Conversion
- Creating Your Own Data Types
- Summary
PostgreSQL SQL Syntax and Use
- PostgreSQL SQL Syntax and Use
- PostgreSQL Naming Rules
- Creating, Destroying, and Viewing Databases
- Creating New Tables
- Adding Indexes to a Table
- Getting Information About Databases and Tables
- Transaction Processing
- Summary
Performance
- Performance
- How PostgreSQL Organizes Data
- Gathering Performance Information
- Understanding How PostgreSQL Executes a Query
- Execution Plans Generated by the Planner
- The ARC Buffer Manager
- Table Statistics
- Performance Tips
Part II: Programming with PostgreSQL
Introduction to PostgreSQL Programming
- Introduction to PostgreSQL Programming
- Server-Side Programming
- Client-Side APIs
- General Structure of Client Applications
- Choosing an Application Environment
- Summary
Extending PostgreSQL
- Extending PostgreSQL
- Extending the PostgreSQL Server with Custom Functions
- Returning Multiple Values from an Extension Function
- The PostgreSQL SRF Interface
- Returning Complete Rows from an Extension Function
- Extending the PostgreSQL Server with Custom Data Types
- Internal and External Forms
- Defining a Simple Data Type in PostgreSQL
- Defining the Data Type in C
- Defining the Input and Output Functions in C
- Defining the Input and Output Functions in PostgreSQL
- Defining the Data Type in PostgreSQL
- Indexing Custom Data Types
- Summary
PL/pgSQL
- PL/pgSQL
- Installing PL/pgSQL
- Language Structure
- Function Body
- Cursors
- Triggers
- Polymorphic Functions
- PL/pgSQL and Security
- Summary
The PostgreSQL C APIlibpq
- The PostgreSQL C APIlibpq
- Prerequisites
- Client 1Connecting to the Server
- Client 2Adding Error Checking
- Client 3Simple ProcessingPQexec() and PQprint()
- Client 4An Interactive Query Processor
- Summary
A Simpler C APIlibpgeasy
- A Simpler C APIlibpgeasy
- Prerequisites
- Client 1Connecting to the Server
- Client 2Adding Error Checking
- Client 3Processing Queries
- Client 4An Interactive Query Processor
- Summary
The New PostgreSQL C++ APIlibpqxx
- The New PostgreSQL C++ APIlibpqxx
- Prerequisites
- Client 1Connecting to the Server
- Client 2Adding Error Checking
- Client 3Processing Queries
- Client 4Working with transactors
- Summary
Embedding SQL Commands in C Programsecpg
- Embedding SQL Commands in C Programsecpg
- Prerequisites
- Client 1Connecting to the Server
- Client 2Adding Error Checking
- Client 3Processing SQL Commands
- Client 4An Interactive Query Processor
- Summary
Using PostgreSQL from an ODBC Client Application
- Using PostgreSQL from an ODBC Client Application
- ODBC Architecture Overview
- Prerequisites
- Client 1Connecting to the Server
- Client 2Adding Error Checking
- Client 3Processing Queries
- Client 4An Interactive Query Processor
- Summary
- Resources
Using PostgreSQL from a Java Client Application
- Using PostgreSQL from a Java Client Application
- JDBC Architecture Overview
- Prerequisites
- Client 1Connecting to the Server
- Client 2Adding Error Checking
- Client 3Processing Queries
- Client 4An Interactive Query Processor
- Summary
Using PostgreSQL with Perl
- Using PostgreSQL with Perl
- DBI Architecture Overview
- Prerequisites
- Client 1Connecting to the Server
- Client 2Adding Error Checking
- Client 3Processing Queries
- Client 4An Interactive Query Processor
- Summary
Using PostgreSQL with PHP
- Using PostgreSQL with PHP
- PHP Architecture Overview
- Prerequisites
- Client 1Connecting to the Server
- Client 2Adding Error Checking
- Client 3Query Processing
- Client 4An Interactive Query Processor
- Other Features
- Summary
Using PostgreSQL with Tcl and Tcl/Tk
- Using PostgreSQL with Tcl and Tcl/Tk
- Prerequisites
- Client 1Connecting to the Server
- Client 2Query Processing
- Client 3An Interactive Query Processor
- The libpgtcl Large-Object API
- Summary
Using PostgreSQL with Python
- Using PostgreSQL with Python
- Python/PostgreSQL Interface Architecture
- Prerequisites
- Client 1Connecting to the Server
- Client 2Adding Error Checking
- Client 3Query Processing
- Client 4An Interactive Command Processor
- Summary
Npgsql: The .NET Data Provider
- Npgsql: The .NET Data Provider
- Prerequisites
- Preparing Visual Studio
- Understanding the ADO.NET Class Hierarchy
- Creating an Npgsql-enabled VB Project
- Client 1Connecting to the Server
- Client 2An Interactive Query Processor
- Client 3Updating the Database with a DataSet
- Client 4A More Robust Query Processor
- Client 5Using a Typed DataSet
- Summary
Other Useful Programming Tools
- Other Useful Programming Tools
- PL/JavaWriting Stored Procedures in Java
- pgcurlWeb-enabling Your PostgreSQL Server
- pgbashWriting PostgreSQL-enabled Shell Scripts
Part III: PostgreSQL Administration
Introduction to PostgreSQL Administration
- Introduction to PostgreSQL Administration
- Security
- User Accounts
- Backup and Restore
- Server Startup and Shutdown
- Running PostgreSQL on a Windows Host
- Tuning
- Installing Updates
- Localization
- Summary
PostgreSQL Administration
- PostgreSQL Administration
- Roadmap (Wheres All My Stuff?)
- Installing PostgreSQL
- Managing Databases
- The PostgreSQL BGWRITER process
- Managing User Accounts
- Configuring Your PostgreSQL Runtime Environment
- Arranging for PostgreSQL Startup and Shutdown
- Backing Up and Copying Databases
- Point-in-time Recovery
- Summary
Internationalization and Localization
Security
- Security
- Securing the PostgreSQL Data Files
- Securing Network Access
- Securing Tables
- Securing Functions
- Summary
Replicating PostgreSQL Data with Slony
- Replicating PostgreSQL Data with Slony
- Overview
- Requirements
- Creating a Replication Cluster
- Starting the Replication Daemons
- Creating a Replication Set
- Subscribing to a Replication Set
- Changing the Cluster Topology (Re-mastering and Failover)
- Summary
Contributed Modules
Index
EAN: N/A
Pages: 261
- Chapter II Information Search on the Internet: A Causal Model
- Chapter VIII Personalization Systems and Their Deployment as Web Site Interface Design Decisions
- Chapter XIV Product Catalog and Shopping Cart Effective Design
- Chapter XVI Turning Web Surfers into Loyal Customers: Cognitive Lock-In Through Interface Design and Web Site Usability
- Chapter XVIII Web Systems Design, Litigation, and Online Consumer Behavior
