Client 2Query Processing
Executing a command with libpgtcl is easy. You invoke the pg_exec procedure and you get back a result handle. pg_exec expects two parameters:
pg_exec connection_handle command
A typical call to pg_exec might look like this:
set result_handle [pg_exec $conn "SELECT * FROM customers"]
Calling pg_exec like this captures the result handle in the variable result_handle. A result handle encapsulates many items of information into a single object. You can't get at any of this information directly; instead, you have to use the pg_result procedure.
Result Set Processing
Let's look at some of the things that you can do with a result handle:
$ tclsh

% package require Pgtcl

% set connstr "host=davinci user=korry password=cows dbname=movies"
host=davinci user=korry password=cows dbname=movies

% set conn [pg_connect -conninfo $connstr]
pgsql276
At this point, you have loaded the libpgtcl library into the Tcl interpreter and established a connection to your database. Next, you will execute a simple query using the pg_exec function:
% set result [pg_exec $conn "SELECT * FROM customers"]
pgsql276.0
When you call pg_exec, you get back a result handle. You may have noticed that the string you get back from pg_exec is similar to the string returned by pg_connect. In fact, appending a number to the connection handle forms the result handle. If you were to execute another command using the same connection handle, pg_exec would return pgsql276.1. Result handles remain valid until you clear them or close the parent connection handle. I'll show you how to clear result handles and how to close connection handles in a moment. First, let's get back to pg_result:
% pg_result $result -status
PGRES_TUPLES_OK
The pg_result -status option returns a string that tells you whether the command succeeded or failed. If a command has executed successfully, pg_result -status will return PGRES_TUPLES_OK, PGRES_COMMAND_OK, or PGRES_EMPTY_QUERY[3]. If the command fails, you will see PGRES_NONFATAL_ERROR, PGRES_FATAL_ERROR, or PGRES_BAD_RESPONSE.
[3] You may also see PGRES_COPY_IN and PGRES_COPY_OUT if you execute the COPY FROM or COPY TO commands. I won't be covering the COPY command this chapter; the details vary with implementation and seem to be rather unstable.
If your command fails, you can use the pg_result -error option to retrieve the text of the error message. Let's execute another (erroneous) command so you can see pg_result -error in action:
% set result2 [pg_exec $conn "SELECT * FROM moof"]
pgsql276.1

% pg_result $result2 -status
PGRES_FATAL_ERROR

% pg_result $result2 -error
ERROR: Relation "moof" does not exist
Of course, you could capture the error message in a variable using set error [pg_result $result2 -error].
Assuming that the command succeeded, you can determine how many rows and columns are in the result set using pg_result -numTuples and pg_result -numAttrs (respectively):
% pg_result $result -numTuples
5

% pg_result $result -numAttrs
4
If you call pg_result -numTuples (or -numAttrs) using a result handle for a failed command, the row count (or column count) will be zero.
You can retrieve the column names from a result handle using pg_result - attributes:
% pg_result $result -attributes
id customer_name phone birth_date
pg_result -attributes returns a list of column names. You can pick apart this list using lindex:
% lindex [pg_result $result -attributes] 0
id

% lindex [pg_result $result -attributes] 1
customer
A related option is pg_result -lAttributes. This option returns complete metadata for a result handle. The -lAttributes option returns a list of sublists. Each sublist contains three elements: the name of a column, the data type of a column, and the size of a column. Here is the metadata for the SELECT * FROM customers query that you have executed:
% pg_result $result -lAttributes
{id 23 4} {customer_name 1043 -1} {phone 1042 -1} {birth_date 1082 4}
This result set holds four columns so the pg_result -lAttributes returns four sublists. Notice that the data type for each column is returned in numeric form. The data type values correspond to the OID (object-id) of the corresponding entry in the pg_type system table. You can find the type names using the following query (in psql):
$ psql -d movies -q

movies=# SELECT oid, typname FROM pg_type
movies-# WHERE oid IN (23, 1043, 1042, 1082);
 oid | typname
------+---------
 23 | int4
 1042 | bpchar
 1043 | varchar
 1082 | date
(4 rows)
Let's compare the results returned by pg_result -lAttributes with the output of the d meta-command in psql:
$ psql -d movies
movies=# d customers
 Table "customers"
 Attribute | Type | Modifier
---------------+-----------------------+----------
 customer_id | integer |
 customer_name | character varying(50) |
 phone | character(8) |
 birth_date | date |
We see the same column names, but the column sizes and data types returned by pg_result don't look right. For example, the customer_name column is defined as a VARCHAR(50), but pg_result-lAttributes reports a length of -1 and a type of 1043. The problem is that the -lAttributes option returns the size of each column as stored on the server. Columns of variable size are reported as being -1 byte long. You probably won't find too many uses for -lAttributes.
One function that you will find useful is pg_result -getTuple. The -getTuple option returns a row from the result set in the form of a list. Let's retrieve the first row returned by our query:
% set tuple [pg_result $result -getTuple 0]
1 {Jones, Henry} 555-1212 1970-10-10
Notice that row numbers start at 0, not 1. With a result set containing five rows, you can request rows 0 through 4. If you try to retrieve an invalid row, you will see an error message:
% pg_result $result -getTuple 5
argument to getTuple cannot exceed number of tuples - 1
As with any other Tcl list, you can pick apart a row using the lindex operator:
% puts $tuple
1 {Jones, Henry} 555-1212 1970-10-10

% lindex $tuple 1
Jones, Henry
An empty string represents a NULL value. I happen to know that the last row in this result set contains a NULL phone number:
% set tuple [pg_result $result -getTuple 4]
7 {Grumby, Jonas} {} 1984-02-21

% lindex $tuple 2

%
Notice that lindex has returned an empty string when you asked for the phone number value (it's a little hard to see, but it's there).
In addition to -getTuple, pg_result gives you three other ways to get at the rows in a result set. First, and easiest to understand, is pg_result -tupleArray:
% pg_result $result -tupleArray 0 one_row

% parray one_row
one_row(birth_date) = 1970-10-10
one_row(customer_name) = Jones, Henry
one_row(customer_id) = 1
one_row(phone) = 555-1212
The -tupleArray option assigns a single tuple to an array variable. In this example, you asked pg_result to copy the first row (row 0) into an array variable named one_row. In Tcl, every array is an associative array, meaning that you can index into the array using any string value. A nonassociative array forces you to assign a unique number to each array element. Associative arrays are nice. You can see from this example that the -tupleArray option uses the name of each column as a key (array index). If you want to find the customer name in this array, you could write the following:
% puts $one_row(customer_name)
Jones, Henry
There is a serious gotcha waiting in the -tupleArray option. Because -tupleArray produces an associative array, the column names in your result set must be unique. Normally, this isn't an issue, but if you have two or more computed columns in your result set, you must give them unique names using the AS clause. Here is an example that shows the problem:
% set result2 [pg_exec $conn "SELECT 2*3, 5*3"]
pgsql276.2

% pg_result $result2 -tupleArray 0 missing_fields

% parray missing_fields
missing_fields(?column?) = 15
You can see the problem; unless you rename a computed column, it will be named ?column?: If you have two columns with the same name, one of them will vanish from the associative array. Let's fix this:
% set result2 [pg_exec $conn "SELECT 2*4 AS first, 5*3 AS second"]
pgsql276.3

% pg_result $result2 -tupleArray 0 all_fields

% parray all_fields
all_fields(first) = 8
all_fields(second) = 15
Much betternow you see both values.
The next pg_result option assigns all the rows in a result set to a single arrayfor example:
% pg_result $result -assign all_rows
all_rows

% parray all_rows
all_rows(0,birth_date) = 1970-10-10
all_rows(0,customer_name) = Jones, Henry
all_rows(0,customer_id) = 1
all_rows(0,phone) = 555-1212
all_rows(1,birth_date) = 1972-07-10
all_rows(1,customer_name) = Rubin, William
all_rows(1,customer_id) = 2
all_rows(1,phone) = 555-2211
all_rows(2,birth_date) = 1968-01-21
all_rows(2,customer_name) = Panky, Henry
all_rows(2,customer_id) = 3
all_rows(2,phone) = 555-1221
all_rows(3,birth_date) = 1969-03-05
all_rows(3,customer_name) = Wonderland, Alice N.
all_rows(3,customer_id) = 4
all_rows(3,phone) = 555-1122
all_rows(4,birth_date) = 1984-02-21
all_rows(4,customer_name) = Grumby, Jonas
all_rows(4,customer_id) = 7
all_rows(4,phone) =
pg_result -assign copies all rows in the result set into a two-dimensional array. After you execute the command pg_result $result -assign all_rows, the array variable $all_rows will contain 20 elements (five rows times four columns). The first array index is the row number and the second index is the column name (remember, Tcl arrays are associative; you can use any string value as an array index). If you want the phone number value from the third row, you will find it in $all_rows(2,phone):
% puts $all_rows(2,phone)
555-1221
Because the array produced by -assign is an associative array, you must ensure that each column in the result set has a unique name.
Finally, pg_result can create an associative array from your result set where the key to the array is formed by the values in the first column. I think this option is best understood by looking at an example:
% set result3
[pg_exec $conn "SELECT customer_id, phone, birth_date FROM customers"]
pgsql276.4

% pg_result $result3 -assignbyidx results
results
% parray results
results(1,birth_date) = 1970-10-10
results(1,phone) = 555-1212
results(2,birth_date) = 1972-07-10
results(2,phone) = 555-2211
results(3,birth_date) = 1968-01-21
results(3,phone) = 555-1221
results(4,birth_date) = 1969-03-05
results(4,phone) = 555-1122
results(7,birth_date) = 1984-02-05
results(7,phone) =
Like pg_result -assign, the -assignbyidx option creates a two-dimensional array. The difference between -assign and -assignbyidx is in how they create the key values for the array. -assign uses the row number as the first index and the column name as the second dimension. On the other hand, -assignbyidx removes the first column from the result set and uses the first column in each row as the first index.
This result set ($result3) contains five rows and three columns. An array created by -assign would have 15 members, but an array created by -assignbyidx will have 10 members (five rows times two columns). The -assignbyidx option has removed the first column (the customer_id column) from the array and used those values (1, 2, 3, 4, and 7) to index the first dimension in the result array.
When you use -assignbyidx, you have to pay attention to the order in which the columns appear in the result set. The first column is used to index the resulting array. You must also ensure that the values in the first column are unique, or you will lose entire rows from the result set.
Now that you know how to process the result set of a query, let's look at a sample application that will execute a single (hard-wired) query and display the results in tabular form.
Listing 16.9 shows the first few lines of client2.tcl.
Listing 16.9. client2.tclmain
 1 #!/usr/local/bin/wish
 2 #
 3 # Filename: client2.tcl
 4
 5 proc main { } {
 6
 7 wm withdraw .
 8
 9 package require Tktable
10
11 set conn [connect]
12
13 if { $conn != {} } {
14
15 set table [build_dialog $conn]
16
17 process_command $conn $table "SELECT * FROM customers"
18
19 tkwait window .top
20
21 pg_disconnect $conn
22 }
23 }
In this application, you use the Tktable extension to Tk. If you don't already have this extension, you can find it at http://tktable.sourceforge.net. Because this is an extension, you have to explicitly load (or package require) the Tktable package before you can use it (see line 9).
Next, call the connect procedure to establish a connection to the PostgreSQL server. This is the same connect procedure that you developed earlier in this chapter (it's imported from pgconnect.sql at the bottom of this application). connect returns a connection handle if successful, or returns an empty string in the event of a failure.
If you connected, create a dialog that you will use to display the results of a query. The build_dialog procedure (shown in Listing 16.10) returns the name of the table widget hosted in the dialog. Next, call the process_command procedure (shown later in Listing 16.12) to execute a simple SELECT command. process_command expects three parameters: a connection handle, the name of a table widget, and the text of a query.
After you've finished filling in the table widget, display the dialog to the user and wait for him to close that window.
Finally, play nice and disconnect from the server using pg_disconnect when you are finished.
Listing 16.10. client2.tclbuild_dialog
25 proc build_dialog { conn } {
26
27 toplevel .top
28
29 wm title .top "Customers"
30
31 set table [make_table .top]
32
33 button .top.close -text "Close Window" -command {exit}
34
35 scrollbar .top.sy -command [list $table yview]
36 scrollbar .top.sx -command [list $table xview] -orient horizontal
37
38 grid $table .top.sy -sticky news
39 grid .top.sx -sticky ew
40 grid .top.close
41
42 grid columnconfig .top 0 -weight 1
43 grid rowconfig .top 0 -weight 1
44 grid rowconfig .top 2 -weight 0
45
46 return $table
47 }
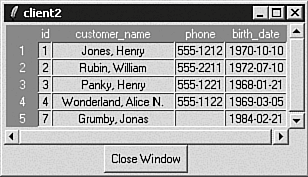
Listing 16.10 shows the build_dialog procedure. This procedure creates a toplevel window that hosts a table widget, scrollbars, and a Close Window button. Figure 16.4 shows the window layout that you are constructing.
Figure 16.4. The client2.tcl-results.
After creating a toplevel window and configuring its title bar, you call the make_table procedure (shown later in Listing 16.11). make_table creates a new table widget (whose parent is .top) and does some initial configuration work. Next you create the Close Window button and a vertical and horizontal scrollbar. Finally, arrange all the child widgets (the table widget, button, and scrollbars) using the grid layout manager.
If you look closely at the window layout in Figure 16.4 (and use your imagination), you'll see that the child widgets are arranged in a grid containing three rows and two columns. You have to use your imagination because the grid cells are not equally sized. Be sure to look at the layout of the child widgets, not the data values in the table control. The top row in the grid contains a table control in the leftmost column and a vertical scrollbar in the rightmost column. The middle row contains the horizontal scrollbar in the leftmost column and the rightmost column is empty. Finally, the bottom row contains the Close Window button in the leftmost column and, again, the rightmost column is empty.
Now, look back to lines 38 through 40 in Listing 16.10. You'll see how the grid layout manager arranges everything.
Lines 42 through 44 ensure that the table widget resizes whenever the toplevel widget is resized. The easiest way to understand these three lines of code is to comment them out, run the application, and then stretch out the window. You'll see that the vertical scrollbar gets wider and the horizontal scrollbar gets taller. A bit too "Salvador Dali" for my taste. The grid columnconfig and grid rowconfig procedures fix up everything again.
You finish by returning the name of the table widget to our caller.
Listing 16.11. client2.tclmake_table
49 proc make_table { parent } {
50
51 table $parent.table
52 -titlerows 1
53 -titlecols 1
54 -roworigin -1
55 -colorigin -1
56 -variable table_data
57 -yscrollcommand {.top.sy set}
58 -xscrollcommand {.top.sx set}
59 -colstretchmode last -rowstretchmode last
60
61 return $parent.table
62 }
This procedure (make_table) creates a new table widget and configures it so that it is ready for use.
The name of the table widget is $parent.table. You'll use the first row of the table to display column names and the first column to display row numbers: The -titlerows 1 and -titlecols 1 options tell the table widget that you want to dedicate one row and one column to hold titles.
Normally, the first row in a table is row 0 (and the first column is column 0). Change the origin of the table to -1,-1 to make it a little easier to account for the title row and column. That means that the title row is actually row -1 and the first data row is row 0 (similar trickery is performed on the column-numbering scheme).
A table widget needs a variable to hold all its datawe'll use a variable named table_data for that purpose. We won't actually do anything with this variable; we just need to provide one. (If you want to see a completely pointless widget, remove the -variable table_data line and run this applicationthe results violate the Principle Of Least Astonishment).
The next two options (-yscrollcommand and -xscrollcommand) connect the table widget to the two scrollbars (.top.sx and .top.sy) that you will be creating a little later.
The final configuration options tell the table widget how to behave if the container (.top) is resized. Setting the column stretch mode to last means that the rightmost column in the table will expand to take up any extra real estate. Similarly, setting the row stretch mode to last will stretch out the bottom row in the table. See the Tktable documentation for other resizing options.
Finish up by returning the name of the table widget to the caller. Listing 16.12 shows the process_command procedure.
Listing 16.12. client2.tclprocess_command
64 proc process_command { conn table command } {
65
66 set result_set [pg_exec $conn $command]
67
68 load_table $table $result_set
69 }
This procedure is nice and short. It executes a command (passed from the caller in the command parameter) and calls the load_table procedure to load the results of the command into a table widget.
I mentioned earlier that pg_exec executes a PostgreSQL command and returns a result set handle. pg_exec returns a result set, even if something goes wrong. In the next client application, I'll show you how to handle execution errors. For now, just assume that the command will succeed.
The procedure shown in Listing 16.13 (load_table) doesn't do much by itselfit simply calls a few helper procedures in the correct order.
Listing 16.13. client2.tclload_table
71 proc load_table { table result_set } {
72
73 size_table $table $result_set
74
75 set_column_headers $table $result_set
76
77 fill_table $table $result_set
78
79 size_columns $table $result_set
80 }
load_table is called whenever you want to copy values from a result set into a table widget. There are four steps to this process. First, you adjust the size of the table (this is the logical size, not the physical, onscreen widget size) to contain the same number of rows and columns as the result set. Next, copy the column names from the result set into the first row of the table. After that, we copy all the data values from the result set into the individual table cells. Finally, you adjust the size of each column in the table widget. You want each column to be wide enough to display the widest value.
The size_table procedure (see Listing 16.14) is responsible for adjusting the number of rows and columns in the table widget to match the size of the result set. We start by extracting the number of columns (libpgtcl calls them attributes) and the number of rows (also known as tuples) from the result set.
Listing 16.14. client2.tclsize_table
82 proc size_table { table result_set } {
83
84 set col_cnt [pg_result $result_set -numAttrs]
85 set row_cnt [pg_result $result_set -numTuples]
86
87 $table configure
88 -rows [expr $row_cnt + 1 ]
89 -cols [expr $col_cnt + 1 ]
90 }
Notice that you add an extra row and column to the table widget. The topmost row holds column names. The leftmost column holds row numbers.
The set_column_headers procedure (see Listing 16.15) performs two functions: copying column names from the result set into the title row of the given table widget and storing the width of each column name in the col_widths global array.
Listing 16.15. client2.tclset_column_headers
 92 proc set_column_headers { table result_set } {
 93
 94 global col_widths
95
 96 set col_cnt [pg_result $result_set -numAttrs]
 97 set col_names [pg_result $result_set -attributes]
 98
 99 for {set col 0} {$col < $col_cnt} {incr col} {
100 set col_name [lindex $col_names $col]
101 $table set -1,$col $col_name
102 set col_widths($col) [string length $col_name]
103 }
104 }
set_column_headers begins by retrieving the column count and column names from the given result set. When you call pg_result -attributes, you get back a list of column names.
Lines 99 through 102 loop through each column in the result set. In each iteration, you extract a column name from the list, copy the column name into the first row of the table (line 101), and store the length of the column name in col_widths.
The col_widths array is used by size_columns to set each column to its optimal width. You want to stretch each column so that it is wide enough to display the widest value in that column. Note that you can't compute the final width of each column in this procedure, only the starting width. You won't know the final width for a column until you have processed every row in the result set.
The fill_table procedure (see Listing 16.16) copies data values from the result set into the table.
Listing 16.16. client2.tclfill_table
106 proc fill_table { table result_set } {
107
108 global col_widths
109
110 set col_cnt [pg_result $result_set -numAttrs]
111 set row_cnt [pg_result $result_set -numTuples]
112
113 for {set row 0} {$row < $row_cnt} {incr row} {
114 set tuple [pg_result $result_set -getTuple $row]
115
116 $table set $row,-1 [expr $row + 1]
117
118 for {set col 0} {$col < $col_cnt} {incr col} {
119
120 set val [lindex $tuple $col]
121
122 if { $col_widths($col) < [string length $val] } {
123 set col_widths($col) [string length $val]
124 }
125 $table set $row,$col $val
126 }
127 }
128 }
First, set up two loop invariants to help improve performance: col_cnt contains the number of columns in the result set and row_cnt contains the number of rows.
 {incr row}
[4] In Tcl, each command is a word. This sidebar talks about writing quick code. Quick words? oh, nevermind.
After computing the column count and row count, iterate through the rows in the result set. To access each row, you use pg_result -getTuple. You may recall from the earlier discussion that libpgtcl gives you a number of ways to get at the data values in a result set. pg_result -getTuple returns a single row in the form of a list of values.
At line 116, you copy the row number into the first column of the table (this is a "title" column).
Next, enter a nested loop to process each column in the current row. First, extract the data value from the list returned by pg_result -getTuple (line 120). Second, update the column width (stored in $col_widths($col)) if this value is wider than any value that you have seen in this column. Remember, you want to size each column to the width of the widest value. Finally, copy the data value into the table (line 125).
size_columns (see Listing 16.17) is responsible for sizing each column in the table widget. The set_column_headers and fill_table procedures built an array of column widths ($col_widths). We use the table -width option to set the size of each column.
Listing 16.17. client2.tclsize_columns
130 proc size_columns { table result_set } {
131
132 global col_widths
133
134 set col_cnt [pg_result $result_set -numAttrs]
135
136 for {set col 0} {$col < $col_cnt} {incr col} {
137 $table width $col $col_widths($col)
138 }
139
140 $table width -1 5
141 }
The final call to table -width adjusts the width of the first columnremember, the first column displays a row counter. A width of 5 is aesthetically pleasing (at least on my screen).
Listing 16.18 shows the mainline code for client2.tcl. You load the pgconnect.tcl source file, call the main procedure, and then exit.
Listing 16.18. client2.tclmainline
143 # Mainline code follows
144 #
145 source pgconnect.tcl
146 main
147 exit
Try to run this application. It's not very exciting, is it? You really want to change the query and run it again, don't you?
At this point, you have enough information to write an interactive query processor in Tcl/Tk. In fact, you need only a few small changes to client2.tcl to process arbitrary commands.
Part I: General PostgreSQL Use
Introduction to PostgreSQL and SQL
- Introduction to PostgreSQL and SQL
- A Sample Database
- Basic Database Terminology
- Prerequisites
- Connecting to a Database
- Creating Tables
- Viewing Table Descriptions
- Adding New Records to a Table
- Installing the Sample Database
- Retrieving Data from the Sample Database
- The CASE Expression
- Aggregates
- Multi-Table Joins
- UPDATE
- DELETE
- A (Very) Short Introduction to Transaction Processing
- Creating New Tables Using CREATE TABLE...AS
- Using VIEW
- Summary
Working with Data in PostgreSQL
- Working with Data in PostgreSQL
- NULL Values
- Character Values
- Numeric Values
- Date/Time Values
- Boolean (Logical) Values
- Geometric Data Types
- Object IDs (OID)
- BLOBs
- Network Address Data Types
- Sequences
- Arrays
- Column Constraints
- Expression Evaluation and Type Conversion
- Creating Your Own Data Types
- Summary
PostgreSQL SQL Syntax and Use
- PostgreSQL SQL Syntax and Use
- PostgreSQL Naming Rules
- Creating, Destroying, and Viewing Databases
- Creating New Tables
- Adding Indexes to a Table
- Getting Information About Databases and Tables
- Transaction Processing
- Summary
Performance
- Performance
- How PostgreSQL Organizes Data
- Gathering Performance Information
- Understanding How PostgreSQL Executes a Query
- Execution Plans Generated by the Planner
- The ARC Buffer Manager
- Table Statistics
- Performance Tips
Part II: Programming with PostgreSQL
Introduction to PostgreSQL Programming
- Introduction to PostgreSQL Programming
- Server-Side Programming
- Client-Side APIs
- General Structure of Client Applications
- Choosing an Application Environment
- Summary
Extending PostgreSQL
- Extending PostgreSQL
- Extending the PostgreSQL Server with Custom Functions
- Returning Multiple Values from an Extension Function
- The PostgreSQL SRF Interface
- Returning Complete Rows from an Extension Function
- Extending the PostgreSQL Server with Custom Data Types
- Internal and External Forms
- Defining a Simple Data Type in PostgreSQL
- Defining the Data Type in C
- Defining the Input and Output Functions in C
- Defining the Input and Output Functions in PostgreSQL
- Defining the Data Type in PostgreSQL
- Indexing Custom Data Types
- Summary
PL/pgSQL
- PL/pgSQL
- Installing PL/pgSQL
- Language Structure
- Function Body
- Cursors
- Triggers
- Polymorphic Functions
- PL/pgSQL and Security
- Summary
The PostgreSQL C APIlibpq
- The PostgreSQL C APIlibpq
- Prerequisites
- Client 1Connecting to the Server
- Client 2Adding Error Checking
- Client 3Simple ProcessingPQexec() and PQprint()
- Client 4An Interactive Query Processor
- Summary
A Simpler C APIlibpgeasy
- A Simpler C APIlibpgeasy
- Prerequisites
- Client 1Connecting to the Server
- Client 2Adding Error Checking
- Client 3Processing Queries
- Client 4An Interactive Query Processor
- Summary
The New PostgreSQL C++ APIlibpqxx
- The New PostgreSQL C++ APIlibpqxx
- Prerequisites
- Client 1Connecting to the Server
- Client 2Adding Error Checking
- Client 3Processing Queries
- Client 4Working with transactors
- Summary
Embedding SQL Commands in C Programsecpg
- Embedding SQL Commands in C Programsecpg
- Prerequisites
- Client 1Connecting to the Server
- Client 2Adding Error Checking
- Client 3Processing SQL Commands
- Client 4An Interactive Query Processor
- Summary
Using PostgreSQL from an ODBC Client Application
- Using PostgreSQL from an ODBC Client Application
- ODBC Architecture Overview
- Prerequisites
- Client 1Connecting to the Server
- Client 2Adding Error Checking
- Client 3Processing Queries
- Client 4An Interactive Query Processor
- Summary
- Resources
Using PostgreSQL from a Java Client Application
- Using PostgreSQL from a Java Client Application
- JDBC Architecture Overview
- Prerequisites
- Client 1Connecting to the Server
- Client 2Adding Error Checking
- Client 3Processing Queries
- Client 4An Interactive Query Processor
- Summary
Using PostgreSQL with Perl
- Using PostgreSQL with Perl
- DBI Architecture Overview
- Prerequisites
- Client 1Connecting to the Server
- Client 2Adding Error Checking
- Client 3Processing Queries
- Client 4An Interactive Query Processor
- Summary
Using PostgreSQL with PHP
- Using PostgreSQL with PHP
- PHP Architecture Overview
- Prerequisites
- Client 1Connecting to the Server
- Client 2Adding Error Checking
- Client 3Query Processing
- Client 4An Interactive Query Processor
- Other Features
- Summary
Using PostgreSQL with Tcl and Tcl/Tk
- Using PostgreSQL with Tcl and Tcl/Tk
- Prerequisites
- Client 1Connecting to the Server
- Client 2Query Processing
- Client 3An Interactive Query Processor
- The libpgtcl Large-Object API
- Summary
Using PostgreSQL with Python
- Using PostgreSQL with Python
- Python/PostgreSQL Interface Architecture
- Prerequisites
- Client 1Connecting to the Server
- Client 2Adding Error Checking
- Client 3Query Processing
- Client 4An Interactive Command Processor
- Summary
Npgsql: The .NET Data Provider
- Npgsql: The .NET Data Provider
- Prerequisites
- Preparing Visual Studio
- Understanding the ADO.NET Class Hierarchy
- Creating an Npgsql-enabled VB Project
- Client 1Connecting to the Server
- Client 2An Interactive Query Processor
- Client 3Updating the Database with a DataSet
- Client 4A More Robust Query Processor
- Client 5Using a Typed DataSet
- Summary
Other Useful Programming Tools
- Other Useful Programming Tools
- PL/JavaWriting Stored Procedures in Java
- pgcurlWeb-enabling Your PostgreSQL Server
- pgbashWriting PostgreSQL-enabled Shell Scripts
Part III: PostgreSQL Administration
Introduction to PostgreSQL Administration
- Introduction to PostgreSQL Administration
- Security
- User Accounts
- Backup and Restore
- Server Startup and Shutdown
- Running PostgreSQL on a Windows Host
- Tuning
- Installing Updates
- Localization
- Summary
PostgreSQL Administration
- PostgreSQL Administration
- Roadmap (Wheres All My Stuff?)
- Installing PostgreSQL
- Managing Databases
- The PostgreSQL BGWRITER process
- Managing User Accounts
- Configuring Your PostgreSQL Runtime Environment
- Arranging for PostgreSQL Startup and Shutdown
- Backing Up and Copying Databases
- Point-in-time Recovery
- Summary
Internationalization and Localization
Security
- Security
- Securing the PostgreSQL Data Files
- Securing Network Access
- Securing Tables
- Securing Functions
- Summary
Replicating PostgreSQL Data with Slony
- Replicating PostgreSQL Data with Slony
- Overview
- Requirements
- Creating a Replication Cluster
- Starting the Replication Daemons
- Creating a Replication Set
- Subscribing to a Replication Set
- Changing the Cluster Topology (Re-mastering and Failover)
- Summary
Contributed Modules
Index
EAN: N/A
Pages: 261
- ERP Systems Impact on Organizations
- ERP System Acquisition: A Process Model and Results From an Austrian Survey
- Intrinsic and Contextual Data Quality: The Effect of Media and Personal Involvement
- Relevance and Micro-Relevance for the Professional as Determinants of IT-Diffusion and IT-Use in Healthcare
- Development of Interactive Web Sites to Enhance Police/Community Relations
