Using ServerDocument and ASP.NET
Many pieces must be put together here, but each one is fairly straightforward. Here is what we are going to do:
- Create an ASP.NET Web site.
- Create a simple VSTO customized expense report spreadsheet that has a cached dataset that is data bound to a list object and a cached string assigned to a named range in the Startup handler.
- Publish the expense report template to the Web site.
- Create an .aspx page that populates the data island (the cached dataset) before the document is served up.
- As an added bonus, we adapt that page and turn into a custom file type handler.
In Visual Studio, select File > New > Web Site and create a new ASP.NET site. Suppose for the sake of this example that the server is http://accounting, and the Web site is http://accounting/expenses.
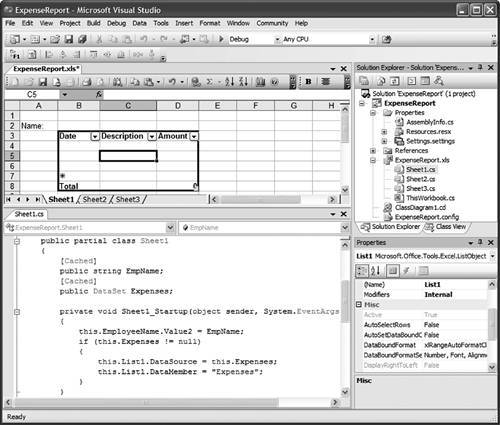
We come back to this Web site project later. For now, close it down and create a VSTO 2005 Excel spreadsheet project. Let's start by putting together a simple customization with one named range and one list object control bound to an untyped dataset. We will make the user's name and the expense dataset cached, so that the server can put the data in the data island when the document is served up. Figure 18-1 shows the spreadsheet with a named range and a list object. You can also see in Figure 18-1 the code behind Sheet1. The code defines a string called EmpName that is cached as well as a DataSet called Expenses that is cached. In the Startup handler for Sheet1, the code sets the Value2 property of the NamedRange called EmployeeName to the cached value EmpName. It also data binds the Expenses dataset to the ListObject called List1.
Figure 18-1. A simple expense report worksheet with two cached class members: EmpName and Expenses.
Choose the Build > Publish menu item and use the Publishing Wizard to build the spreadsheet and put it up on http://accounting/expenses. Doing so sets up the document so that it points to the customization on the Web server rather than the local machine. (Chapter 20, "Deployment," covers deployment scenarios in more detail.)
For the customization to run on the client machine, you need to have a security policy set to trust the server. Chapter 19, ".NET Code Security," covers the whys and wherefores of security policy issues in detail; for now, just trust us that you need a security policy. On the client machine, you can use the command-line CASPOL.EXE tool or the MSCORCFG.MSC management tool to create a machine-level policy that grants full trust to the customization DLL. Here we use CASPOL.EXE to add a new policy that trusts content from a directory on the accounting Web server:
> caspol -ag 1.2 -url http://accounting/expenses/* FullTrust

Microsoft (R) .NET Framework CasPol 2.0
Copyright (C) Microsoft Corporation. All rights reserved.

The operation you are performing will alter security policy.
Are you sure you want to perform this operation? (yes/no)
yes
Added union code group with "-url" membership condition to the
Machine level.
Success
Just to make sure that works, tell CASPOL to display the security policy:
> caspol -lg

Microsoft (R) .NET Framework CasPol 2.0
Copyright (C) Microsoft Corporation. All rights reserved.

Security is ON
Execution checking is ON
Policy change prompt is ON

Level = Machine

Code Groups:

1. All code: Nothing
 1.1. Zone - MyComputer: FullTrust
 1.1.1. StrongName -: FullTrust
 1.1.2. StrongName -: FullTrust
 1.2. Zone - Intranet: LocalIntranet
 1.2.1. All code: Same site Web
 1.2.2. All code: Same directory FileIO - 'Read, PathDiscovery'
 1.2.3. Url - http://accounting/expenses/*: FullTrust
 1.3. Zone - Internet: Internet
 1.3.1. All code: Same site Web
 1.4. Zone - Untrusted: Nothing
 1.5. Zone - Trusted: Internet
 1.5.1. All code: Same site Web
Success
We have not set up the handler on the server yet, but do a quick sanity check on the client to make sure that the document can be downloaded and the customization run on the client machine. There will not be any data in it yet; let's take care of that next.
Setting Up the Server
Use Visual Studio to open the expenses Web site created earlier, and you will see that the deployed files for this customized spreadsheet have shown up. Now all we need to do is write a server-side page that loads the blank document into memory and fills in its data island before sending it out over the wire to the client. Right-click the Web site and choose Add New Item. Add a new .aspx Web form.
We need to add a reference to Microsoft.VisualStudio.Tools.Applications. Runtime.DLL to get at the ServerDocument class. After we do that, the code is fairly straightforward right up until the point where we set the serialized state. We discuss how that works in more detail later in this chapter.
Listing 18-1. An ASPX Web Form That Edits the Data Island on the Server
<%@ Page Language="C#" AutoEventWireup="true" %>
<%@ Import Namespace="System.Configuration" %>
<%@ Import Namespace="System.Web.Configuration" %>
<%@ Import Namespace="System.Data"%>
<%@ Import Namespace="System.Data.Common"%>
<%@ Import Namespace="System.Data.OleDb"%>
<%@ Import Namespace="System.IO"%>
<%@ Import Namespace= "Microsoft.VisualStudio.Tools.Applications.Runtime"%>
An Alternative Approach: Create a Custom Handler
It seems a little odd to go to an .aspx page to download a spreadsheet or document. An alternative approach to solving the problem of customizing documents on the server is to intercept requests for particular file extensions and customize the response before it goes out to the client.
This time, instead of creating a new .aspx Web form, create a new .ashx handler (see Figure 18-2).
Figure 18-2. Creating a custom handler item.
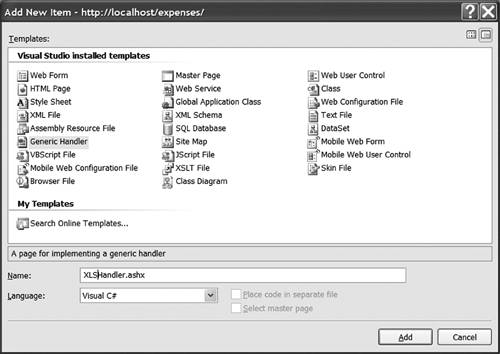
The code is essentially identical; the only difference is that because a handler is not an instance of a Web page, we do not have any of the standard page objects such as Response, Request, User, and so on. Fortunately, the context of the page request is encapsulated in a special "context" object that is passed to the handler.
Listing 18-2. Creating a Custom Handler That Edits the Data Island
<%@ WebHandler Language="C#" %>

using System;
using System.Data;
using System.Data.Common;
using System.Data.OleDb;
using System.IO;
using System.Web;
using Microsoft.VisualStudio.Tools.Applications.Runtime;

public class XLSHandler : IHttpHandler {
 const int Forbidden = 403;
 public void ProcessRequest (HttpContext context) {

 if (!context.User.Identity.IsAuthenticated)
 {
 context.Response.StatusCode = Forbidden;
 context.Response.End();
 return;
 }

 DataSet dataset = new DataSet();
 DataTable datatable = dataset.Tables.Add("Expenses");
 OleDbDataAdapter adapter = new OleDbDataAdapter();

 adapter.SelectCommand = new OleDbCommand("SELECT [Date], " +
 "Description, Cost FROM Expenses WHERE EmployeeName = "" +
 context.User.Identity.Name + """);

 string connectionString = ConfigurationManager.
 ConnectionStrings["expenses"]. ConnectionString;
 adapter.SelectCommand.Connection =
 new OleDbConnection(connectionString);
 adapter.Fill(datatable);

 FileStream file = new FileStream(
 @"c:INetPubWWWRootexpensesExpenseReport.XLS",
 FileMode.Open, FileAccess.Read);
 byte[] template;
 try
 {
 template = new byte[file.Length];
 file.Read(template, 0, (int)file.Length);
 }
 finally
 {
 file.Close();
 }

 ServerDocument sd = new ServerDocument(template, ".XLS");
 try
 {
 sd.CachedData.HostItems["ExpenseReport.Sheet1"].
 CachedData["EmpName"].SerializeDataInstance(
 context.User.Identity.Name);
 sd.CachedData.HostItems["ExpenseReport.Sheet1"].
 CachedData["Expenses"].SerializeDataInstance(dataset);
 sd.Save();

 // "template" still has the original bytes. Get the new bytes.
 template = sd.Document;
 }
 finally
 {
 sd.Close();
 }

 context.Response.ContentType = "application/vnd.ms-excel";
 context.Response.OutputStream.Write(template, 0, template.Length);
 }
 public bool IsReusable
 {
 get { return false; }
 }
}
Finally, to turn this on, add the information about the class and assembly name for the handler to your Web.config file in the application's virtual root. If you want to debug the server-side code, you can add debugging information in the configuration file, too.
Listing 18-3. A Web Configuration File to Turn on the Handler
Now when the client hits the server, the handler will intercept the request, load the requested file into memory, contact the database, create the appropriate dataset, and serialize the dataset into the data island in the expense reportall without starting Excel.
Part One. An Introduction to VSTO
An Introduction to Office Programming
- Why Office Programming?
- Office Object Models
- Properties, Methods, and Events
- The Office Primary Interop Assemblies (PIAs)
- Conclusion
Introduction to Office Solutions
- The Three Basic Patterns of Office Solutions
- Office Automation Executables
- Office Add-Ins
- Code Behind a Document
- Conclusion
Part Two. Office Programming in .NET
Programming Excel
- Ways to Customize Excel
- Programming User-Defined Functions
- Introduction to the Excel Object Model
- Conclusion
Working with Excel Events
Working with Excel Objects
- Working with Excel Objects
- Working with the Application Object
- Working with the Workbooks Collection
- Working with the Workbook Object
- Working with the Worksheets, Charts, and Sheets Collections
- Working with Document Properties
- Working with the Windows Collections
- Working with the Window Object
- Working with the Names Collection and Name Object
- Working with the Worksheet Object
- Working with the Range Object
- Special Excel Issues
- Conclusion
Programming Word
Working with Word Events
Working with Word Objects
- Working with Word Objects
- Working with the Application Object
- Working with the Dialog Object
- Working with Windows
- Working with Templates
- Working with Documents
- Working with a Document
- Working with the Range Object
- Working with Bookmarks
- Working with Tables
- Conclusion
Programming Outlook
- Ways to Customize Outlook
- Introduction to the Outlook Object Model
- Introduction to the Collaboration Data Objects
- Conclusion
Working with Outlook Events
Working with Outlook Objects
- Working with Outlook Objects
- Working with the Application Object
- Working with the Explorers and Inspectors Collections
- Working with the Explorer Object
- Working with the Inspector Object
- Working with the NameSpace Object
- Working with the MAPIFolder Object
- Working with the Items Collection
- Properties and Methods Common to Outlook Items
- Outlook Issues
- Conclusion
Introduction to InfoPath
- What Is InfoPath?
- Getting Started
- Form Security
- Programming InfoPath
- Data Source Events
- Form Events, Properties, and Methods
- Conclusion
Part Three. Office Programming in VSTO
The VSTO Programming Model
- The VSTO Programming Model
- VSTO Extensions to Word and Excel Objects
- Dynamic Controls
- Advanced Topic: Dynamic Host Items
- Advanced Topic: Inspecting the Generated Code
- VSTO Extensions to the Word and Excel Object Models
- Conclusion
Using Windows Forms in VSTO
- Using Windows Forms in VSTO
- Introduction
- Adding Windows Forms Controls to Your Document
- Writing Code Behind a Control
- The Windows Forms Control Hosting Architecture
- Properties Merged from OLEObject or OLEControl
- Adding Controls at Runtime
- Conclusion
Working with Actions Pane
Working with Smart Tags in VSTO
- Introduction to Smart Tags
- Creating Document-Level Smart Tags with VSTO
- Creating Application-Level Smart Tags
- Conclusion
VSTO Data Programming
- VSTO Data Programming
- Creating a Data-Bound Customized Spreadsheet with VSTO
- Creating a Data-Bound Customized Word Document with VSTO
- Datasets, Adapters, and Sources
- Another Technique for Creating Data-Bound Spreadsheets
- Caching Data in the Data Island
- Advanced ADO.NET Data Binding: Looking Behind the Scenes
- Binding-Related Extensions to Host Items and Host Controls
- Conclusion
Server Data Scenarios
- Populating a Document with Data on the Server
- Using ServerDocument and ASP.NET
- A Handy Client-Side ServerDocument Utility
- The ServerDocument Object Model
- Conclusion
.NET Code Security
- .NET Code Security
- Code Access Security Versus Role-Based Security
- Code Access Security in .NET
- Location, Location, Location
- Strong Names
- Publisher Certificates
- Trusting the Document
- Deploying Policy to User Machines
- Conclusion
Deployment
- Deployment
- VSTO Prerequisites
- Deploying to an Intranet Shared Directory or Web Site
- Local Machine Deployment Without a Deployment Manifest
- Editing Manifests
- Creating Setup Packages
- Advanced Topic: Deploying Network Solutions to Be Cached Locally
- Conclusion
Part Four. Advanced Office Programming
Working with XML in Excel
- Introduction to Excels XML Features
- Introduction to XML Schema Creation in Visual Studio
- An End-to-End Scenario
- Advanced XML Features in Excel
- Excel-Friendly XML Schemas
- VSTO Support for Excel Schema Mapping
- Conclusion
Working with XML in Word
- Introduction to Words XML Features
- An End-to-End Scenario: Creating a Schema and Mapping It into a Word Document
- Exporting the Mapped XML in the Document to an XML Data File
- Importing an XML Data File into the Mapped Document
- The XML Options Dialog
- VSTO Support for Word Schema Mapping
- VSTO Support for the WordML File Format
- Conclusion
Developing COM Add-Ins for Word and Excel
- Introduction to Add-Ins
- Scenarios for Using Add-Ins
- How a COM Add-In Is Registered
- Implementing IDTExtensibility2
- Writing a COM Add-In Using Visual Studio
- The Pitfalls of MsCoree.dll
- COM Interop and Regasm.exe
- Shimming: A Solution to the Problems with MsCoree.dll
- Conclusion
Creating Outlook Add-Ins with VSTO
EAN: N/A
Pages: 214
