Ways to Customize Outlook
Outlook has an object model that consists of 67 objects that combined have more than 1,700 properties and methods. The Outlook object model is about a third as big as the Excel and Word object models and tends to give you less control over Outlook than you would expect. Outlook does have a larger number of events compared to the Word and Excel object modelsmore than 300 events. However, the large number of events is mainly due to 16 events that are duplicated on 15 Outlook objects.
The main way that you will integrate your code into Outlook is via add-ins. This model was originally designed to allow the integration of COM components written in VB6, VBA, C, or C++. However, through COM interop, a managed object can masquerade as a COM object and participate in the Outlook add-in model.
Automation Executable
As mentioned in Chapter 2, "Introduction to Office Solutions," you can start Outlook from a console application or Windows application and automate it from that external program. The problem with this approach is that you cannot add your automation executable to the exclusion list of the Outlook object model security guard.
The Outlook object model security guard prevents code from accessing sensitive parts of the Outlook object model such as the address book or the send mail functionality. Its purpose is to protect Outlook from code that might spread as an e-mail worm virus. Outlook has a mechanism to trust a particular installed add-in and let it bypass the Outlook object model guard that is discussed in Chapter 11. It does not have a mechanism to trust an automation executable and let an automation executable bypass the guard.
Add-Ins
When building add-ins for Outlook, you have two choices: You can either build a COM add-in or a VSTO Outlook add-in. A VSTO Outlook add-in solves many of the problems associated with COM add-in development and is the preferred model for Outlook 2003 add-in development. You can read about this model for Outlook add-ins in Chapter 24, "Creating Outlook Add-Ins with VSTO." The only time you would want to consider building a COM add-in instead is if you need to target versions of Outlook that are older than Outlook 2003. You can read about building COM add-ins in Chapter 23, "Developing COM Add-Ins for Word and Excel."
Outlook has a COM add-ins dialog box that enables users to enable and disable add-ins. Both VSTO add-ins and COM add-ins appear in the COM Add-Ins dialog box. This dialog box is very well hidden. To access the COM Add-Ins dialog, you must follow these steps:
|
1. |
Choose Options from the Tools menu to bring up the Options dialog. |
|
2. |
Click the Other tab of the Options dialog. |
|
3. |
Click the Advanced Options button to bring up the Advanced Options dialog. |
|
4. |
Click the COM Add-Ins button to bring up the COM Add-Ins dialog. |
Figure 9-1 shows the COM Add-Ins dialog.
Figure 9-1. The COM Add-Ins dialog in Outlook.

COM add-ins can be added and removed from the dialog by using the Add and Remove buttons. VSTO add-ins cannot be added using the Add button, but can be removed using the Remove button. Each add-in has a check box that can be checked and unchecked to enable or disable the add-in while still leaving it in the list of available add-ins. Typically, you will not use this dialog to add and remove add-insonly to disable and enable available add-ins. The addition and removal of add-ins is handled by the installer of your COM add-in or VSTO add-in.
Outlook discovers the add-ins that are installed by reading the registry keys under My ComputerHKEY_CURRENT_USERSoftwareMicrosoftOfficeOutlookAddins in the registry. You can view the registry on your computer by going to the Windows Start menu and choosing Run. In the Run dialog box, type regedit for the program to run then click the OK button. You can also register add-ins for Outlook under My ComputerHKEY_LOCAL_MACHINESoftwareMicrosoftOfficeOutlookAddins. Add-ins registered under HKEY_LOCAL_MACHINE do not appear in the COM Add-Ins dialog box and cannot be enabled or disabled by users.
Smart Tags
Smart Tags are a feature that enables the display of a pop-up menu with actions for a given piece of text on the screen. Outlook supports Smart Tags in several ways.
Smart Tags When Word Is the E-mail Editor
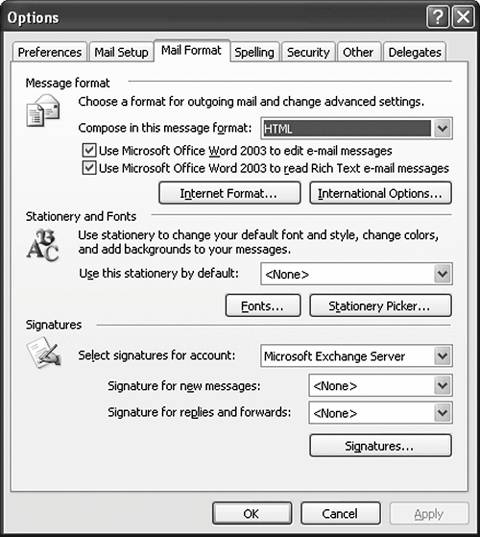
First, if Word is used as the e-mail editor in Outlook, Smart Tags appear when you edit e-mail messages. To set Word as the e-mail editor, you can use the Options command from the Tools menu to display Outlook's Options dialog. On the Mail Format page, check the Use Microsoft Office Word 2003 to edit e-mail messages, as shown in Figure 9-2.
Figure 9-2. Specifying Word as the e-mail editor.
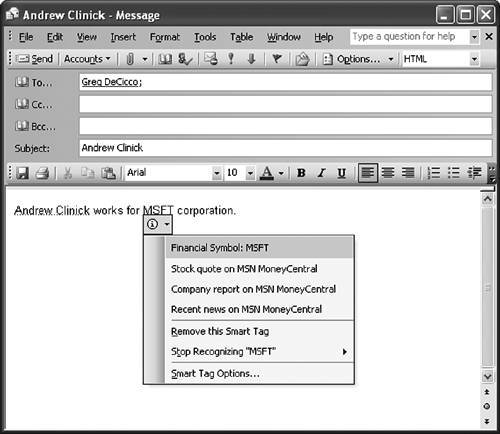
In addition to specifying Word as the e-mail editor, you must also configure Word's Smart Tag options as described in Chapter 6, "Programming Word." Then, when you create a new e-mail message, you will be able to see Smart Tags in your message, as shown in Figure 9-3.
Figure 9-3. Smart Tags in an e-mail message when Word is the e-mail editor.
Smart Tags in the Research Task Pane When Word Is the E-mail Editor
You can register Smart Tags to recognize text in the Research task pane. If Word is being used as the e-mail editor, the user can select some text in the e-mail, right-click the text, and choose Look Up to bring up the Research task pane. Results in the Research task pane may include text that is tagged by Smart Tags.
Smart Tags Embedded in HTML Format E-mail and Displayed in the Reading Pane
A third way Smart Tags are supported in Outlook is if you use Word as the e-mail editor and send e-mail in HTML format. If Word's send format is configured appropriately, Smart Tags can be embedded in the HTML formatted message. Users who read the messages that have the Smart Tag installed and have Outlook's security settings set to allow it will be able to see Smart Tags display in Outlook's reading pane. Outlook's reading pane is effectively an HTML Web browser.
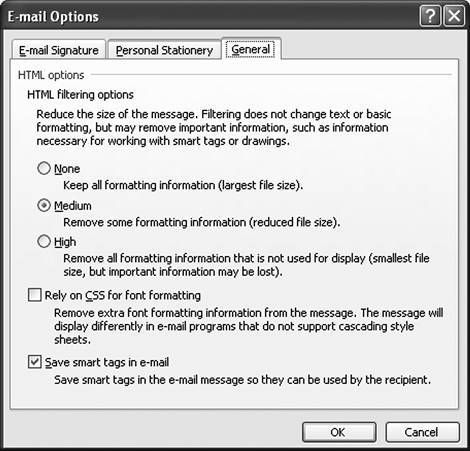
To configure this use of Smart Tags, you must first specify Word as the e-mail editor and choose the send format to be HTML, as shown in Figure 9-2. To configure Word to be able to embed Smart Tags in HTML, you must choose Options from the Tools menu of Word to bring up Word's Options dialog. In this dialog, select the General page and click the E-mail Options button. This brings up the E-mail Options dialog shown in Figure 9-4. In the General page of this dialog, you must set the HTML filtering options to None or Medium and check the Save Smart Tags in e-mail check box.
Figure 9-4. E-mail options to enable the embedding of Smart Tags in HTML e-mail messages.
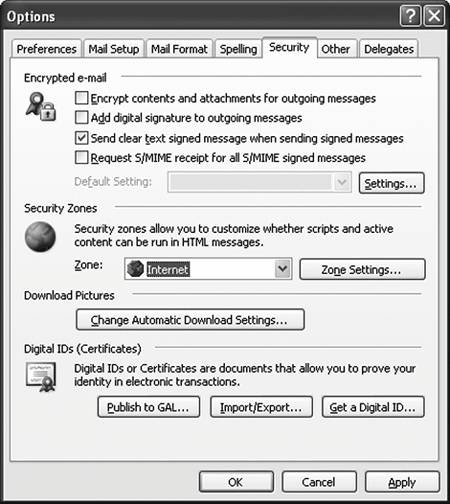
Finally, you must ensure that security settings of Outlook will allow Smart Tags to appear. In Outlook's Options dialog box, select the Security page and make sure the Zone is set to the Internet Zone, as shown in Figure 9-5.
Figure 9-5. Internet zone security required to allow Smart Tags to be displayed in e-mail messages.
With all these settings configured, you should be able to type an e-mail message, send it, and when it is received, you can see the Smart Tag appear in the reading pane, as shown in Figure 9-6. The Smart Tag looks a little different because the reading pane uses Internet Explorer's menu style rather than the Office menu style.
Figure 9-6. A Smart Tag displayed in the reading pane.
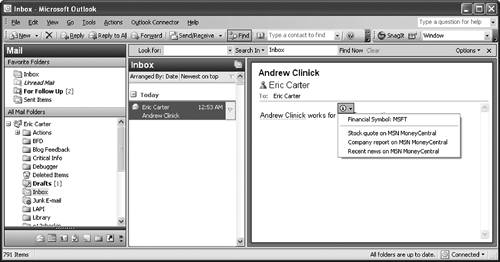
Persona Menu Smart Tags
The final way Smart Tags are supported in Outlook is via the Persona menu. This menu appears on e-mail items and other Outlook items when you click the Persona icon shown in many Outlook views. Figure 9-7 shows the Persona icon and the menu that appears when you click it. Smart Tag actions appear in the Additional Actions submenu that is shown in Figure 9-7.
Figure 9-7. The Persona menu in OutlookSmart Tag actions appear under the Additional Actions submenu.
VSTO cannot be used to provide Smart Tags for Outlook because VSTO only supports Smart Tags for code behind a document. The Outlook uses of Smart Tags are not at the document level but at the application level. Chapter 16, "Working with Smart Tags in VSTO," describes how to create an application-level Smart Tag in C# that could be used in e-mail when Word is your e-mail editor.
Custom Property Pages
An Outlook add-in can add a custom property page to the Properties dialog box for a folder or to Outlook's Options dialog. We walk through how this is done using a VSTO Outlook add-in. First, create a VSTO Outlook add-in project in VSTO by following the instructions in Chapter 24.
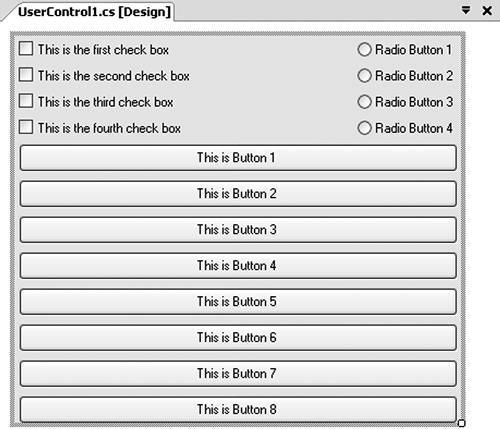
After you have created a basic VSTO Outlook add-in project, you need to add a user control project item to the project. A user control is a special kind of Windows Forms control that is useful for inserting into another window. To add a user control to your project, click the project node in the Solution Explorer, and then choose Add User Control from the Project menu. When you double-click the newly added user control project item, you will see the user control designer shown in Figure 9-8. You can resize the user control using the drag handle in the lower-right corner. Resize it to about 410 x 355 pixels, which is the size of a property page in Outlook. With the user control resized, use the controls toolbox (choose Toolbox from the View menu if it is not already showing) to add controls to your user control surface. In Figure 9-8, we have added several check boxes, radio buttons, and buttons to the user control surface.
Figure 9-8. The user control designer.
To use this user control as a custom property page, we must make some modifications to the code behind it. Right-click the user control project item in the Solution Explorer and choose View Code. We first must implement an interface required by Outlook called PropertyPage. The PropertyPage interface has two methods and a property. The Apply method is called on our PropertyPage implementation when the user clicks the Apply button in the Outlook Options or Folder Properties dialog. The GetPageInfo method gets a help filename and help context so that you can provide help for your custom property page. The Dirty property is a bool property that you can use to let Outlook know whether the user has changed any settings in your custom property page. When Dirty returns TRue, Outlook knows to enable the Apply button in the dialog so that the user can apply changes made in the custom property page.
Second, we must add a property that Outlook will call to get the caption for the property page tab. This property must be marked with a DispId attribute that Outlook uses to identify which property will return the caption for the property page tab. The name of the property does not matter as long as it returns a string; in Listing 9-1, we name the property PageCaption.
Listing 9-1 shows what your class should look like after you have made these modifications. Because user controls use the partial class feature in Visual Studio, all the code that is specific to how many buttons or controls you added should not show up in this file but in the other hidden part of the partial class. Note that the code uses the System.Runtime.InteropServices namespace for the DispID attribute on the Caption property. The code also declares a constant called captionDispID that is set to the ID Outlook expects will be associated with the Caption property.
Listing 9-1. First Version of the Modified User Control Class
using System;
using System.Windows.Forms;
using Outlook = Microsoft.Office.Interop.Outlook;
using System.Runtime.InteropServices;

namespace OutlookAddin1
{
 public partial class UserControl1 :
 UserControl, Outlook.PropertyPage
 {
 const int captionDispID = -518;
 bool isDirty = false;

 public UserControl1()
 {
 InitializeComponent();
 }

 void Outlook.PropertyPage.Apply()
 {
 MessageBox.Show("The user clicked the Apply button.");
 }

 bool Outlook.PropertyPage.Dirty
 {
 get
 {
 return isDirty;
 }
 }

 void Outlook.PropertyPage.GetPageInfo(ref string helpFile,
 ref int helpContext)
 {

 }

 [DispId(captionDispID)]
 public string PageCaption
 {
 get
 {
 return "Test Page";
 }
 }
 }
}
With the user control created, two event handlers must be added. The first event handler is for the Application object's OptionsPagesAdd event. This event is raised when Outlook is ready to add custom property pages to the Outlook Options dialog, which is shown when the user chooses Options from the Tools menu. The event handler is passed a pages parameter of type PropertyPages that has an Add method that can be used to add a user control as a custom property page.
The second event handler is for the NameSpace object's OptionsPagesAdd event. This event is raised when Outlook is ready to add custom property pages when a properties dialog box for a folder is displayed. The properties dialog box for a folder is shown when the user right-clicks a folder and chooses Properties from the pop-up menu. The event handler is passed a pages parameter of type PropertyPages that has an Add method that can be used to add a user control as a custom property page. The event handler is also passed a folder parameter of type MAPIFolder that specifies the folder for which the properties dialog box will be shown.
Listing 9-2 shows an implementation of a VSTO ThisApplication class that handles these two events. In the event handlers for the Application object's OptionsPagesAdd event and the NameSpace object's OptionsPagesAdd event, an instance of the user control in Listing 9-1 is created and passed as the first parameter to the PropertyPages.Add method. The second property is passed an empty string because the caption for the custom property page is retrieved by Outlook calling the PageCaption property on the user control that has been attributed with a DispID known to Outlook.
Listing 9-2. A VSTO Outlook Add-In That Handles the OptionsPagesAdd Event on Application and Namespace
using System;
using System.Windows.Forms;
using Microsoft.VisualStudio.Tools.Applications.Runtime;
using Outlook = Microsoft.Office.Interop.Outlook;

namespace OutlookAddin1
{
 public partial class ThisApplication
 { Outlook.NameSpace nameSpace;

 private void ThisApplication_Startup(object sender, EventArgs e)
 {
 this.OptionsPageAdd += new
 Outlook.ApplicationEvents_11_OptionsPagesAddEventHandler(
 ThisApplication_OptionsPagesAdd);

 nameSpace = this.Session;
 nameSpace.OptionsPagesAdd += new
 Outlook.NameSpaceEvents_OptionsPagesAddEventHandler(
 NameSpace_OptionsPagesAdd);
 }

 private void ThisApplication_Shutdown(object sender, EventArgs e)
 {
 }

 void ThisApplication_OptionsPagesAdd(Outlook.PropertyPages pages)
 {
 pages.Add(new UserControl1(), "");
 }

 void NameSpace_OptionsPagesAdd(Outlook.PropertyPages pages,
 Outlook.MAPIFolder folder)
 {
 pages.Add(new UserControl1(), "");
 }

 #region VSTO Designer generated code
 private void InternalStartup()
 {
 this.Startup += new EventHandler(ThisApplication_Startup);
 this.Shutdown += new EventHandler(ThisApplication_Shutdown);
 }
 #endregion
 }
}
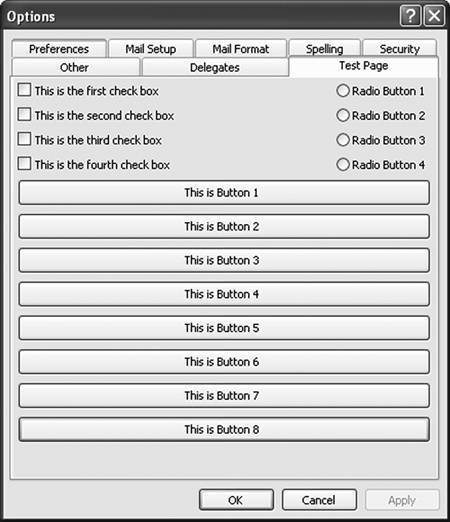
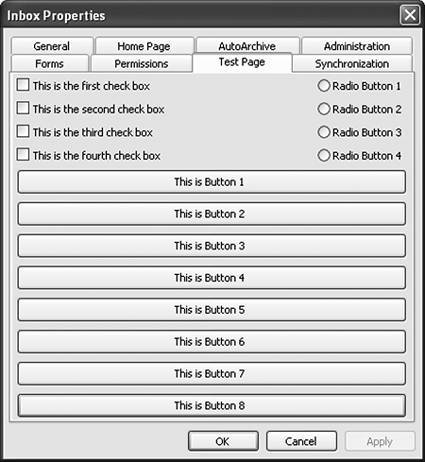
If you compile and run this VSTO add-in, you will get the result shown in Figure 9-9 when you show Outlook's Options dialog and click the Test Page tab.
Figure 9-9. A custom property page added to Outlook's Options dialog.
If you right-click a folder and choose Properties, you can also see that the custom property page is added to the folder's Properties dialog, as shown in Figure 9-10.
Figure 9-10. A custom property page added to a folder's Properties dialog.
If you play with these dialogs a bit, you will notice that the Apply button never gets enabled when you change the check boxes or radio buttons in the custom property page. Also note that the Apply method that was implemented as part of implementing the PropertyPage interface is never called. To fix this, the implementation of the user control is modified as shown in Listing 9-3 so that when a check box or radio button is changed, it changes the value of the class variable isDirty to TRue. In addition, the code notifies Outlook that the property page state has changed by connecting to Outlook's PropertyPageSite object. The code declares a propertyPageSite class member variable and sets it by calling the InitializePropertyPageSite method in the Load event handler. The Load event handler must use reflection to get the PropertyPageSite object.
With the PropertyPageSite connected, the code defines a method called SetIsDirty that changes the state of the isDirty variable and then calls Outlook's Property-PageSite.OnStatusChange method. This notifies Outlook that it needs to call into the PropertyPage interface to get the new state of the custom property page. A complete implementation would detect any changes made to the property page that could change the dirty state and potentially detect when a change is undone and clear the dirty state back to false.
Finally, the code raises the CheckedChanged event of the first check box on the custom property page. When the changed state changes, the code calls SetIsDirty to set the dirty state to true and notifies Outlook that the state has changed.
Listing 9-3. Second Version of a User Control Class That Handles Dirty State Properly
using System;
using System.Windows.Forms;
using Outlook = Microsoft.Office.Interop.Outlook;
using System.Runtime.InteropServices;

namespace OutlookAddin1
{
 public partial class UserControl1 : UserControl,
 Outlook.PropertyPage
 {
 const int captionDispID = -518;
 bool isDirty = false;
 private Outlook.PropertyPageSite propertyPageSite = null;

 public UserControl1()
 {
 InitializeComponent();

 this.Load += new EventHandler(UserControl1_Load);
 this.checkBox1.CheckedChanged += new
 System.EventHandler(this.OnCheckBox1Changed);
 }

 void Outlook.PropertyPage.Apply()
 {
 MessageBox.Show("The user clicked the Apply button.");
 }

 bool Outlook.PropertyPage.Dirty
 {
 get
 {
 return isDirty;
 }
 }

 void Outlook.PropertyPage.GetPageInfo(ref string helpFile,
 ref int helpContext) { }

 [DispId(captionDispID)]
 public string Caption
 {
 get
 {
 return "Test Page";
 }
 }

 private void SetIsDirty(bool value)
 {
 isDirty = value;
 propertyPageSite.OnStatusChange();
 }

 private void OnCheckBox1Changed(object sender, EventArgs e)
 {
 SetIsDirty(true);
 }

 void UserControl1_Load(object sender, EventArgs e)
 {
 InitializePropertyPageSite();
 }

 void InitializePropertyPageSite()
 {
 string windowsFormsStrongName =
 typeof(System.Windows.Forms.Form).Assembly.FullName;

 Type oleObjectType = Type.GetType(
 System.Reflection.Assembly.CreateQualifiedName(
 windowsFormsStrongName,
 "System.Windows.Forms.UnsafeNativeMethods")).
 GetNestedType("IOleObject");

 System.Reflection.MethodInfo getClientSiteMethodInfo =
 oleObjectType.GetMethod("GetClientSite");

 propertyPageSite = (Outlook.PropertyPageSite)
 getClientSiteMethodInfo.Invoke(this, null);
 }
 }
}
Now when you run the add-in and change the checked state of the first check box in the custom property page, the dirty state is changed and Outlook's PropertyPage-Site is notified. The result is that the Apply button is enabled. Clicking the Apply button invokes the test dialog in Listing 9-3's implementation of the Apply method.
Part One. An Introduction to VSTO
An Introduction to Office Programming
- Why Office Programming?
- Office Object Models
- Properties, Methods, and Events
- The Office Primary Interop Assemblies (PIAs)
- Conclusion
Introduction to Office Solutions
- The Three Basic Patterns of Office Solutions
- Office Automation Executables
- Office Add-Ins
- Code Behind a Document
- Conclusion
Part Two. Office Programming in .NET
Programming Excel
- Ways to Customize Excel
- Programming User-Defined Functions
- Introduction to the Excel Object Model
- Conclusion
Working with Excel Events
Working with Excel Objects
- Working with Excel Objects
- Working with the Application Object
- Working with the Workbooks Collection
- Working with the Workbook Object
- Working with the Worksheets, Charts, and Sheets Collections
- Working with Document Properties
- Working with the Windows Collections
- Working with the Window Object
- Working with the Names Collection and Name Object
- Working with the Worksheet Object
- Working with the Range Object
- Special Excel Issues
- Conclusion
Programming Word
Working with Word Events
Working with Word Objects
- Working with Word Objects
- Working with the Application Object
- Working with the Dialog Object
- Working with Windows
- Working with Templates
- Working with Documents
- Working with a Document
- Working with the Range Object
- Working with Bookmarks
- Working with Tables
- Conclusion
Programming Outlook
- Ways to Customize Outlook
- Introduction to the Outlook Object Model
- Introduction to the Collaboration Data Objects
- Conclusion
Working with Outlook Events
Working with Outlook Objects
- Working with Outlook Objects
- Working with the Application Object
- Working with the Explorers and Inspectors Collections
- Working with the Explorer Object
- Working with the Inspector Object
- Working with the NameSpace Object
- Working with the MAPIFolder Object
- Working with the Items Collection
- Properties and Methods Common to Outlook Items
- Outlook Issues
- Conclusion
Introduction to InfoPath
- What Is InfoPath?
- Getting Started
- Form Security
- Programming InfoPath
- Data Source Events
- Form Events, Properties, and Methods
- Conclusion
Part Three. Office Programming in VSTO
The VSTO Programming Model
- The VSTO Programming Model
- VSTO Extensions to Word and Excel Objects
- Dynamic Controls
- Advanced Topic: Dynamic Host Items
- Advanced Topic: Inspecting the Generated Code
- VSTO Extensions to the Word and Excel Object Models
- Conclusion
Using Windows Forms in VSTO
- Using Windows Forms in VSTO
- Introduction
- Adding Windows Forms Controls to Your Document
- Writing Code Behind a Control
- The Windows Forms Control Hosting Architecture
- Properties Merged from OLEObject or OLEControl
- Adding Controls at Runtime
- Conclusion
Working with Actions Pane
Working with Smart Tags in VSTO
- Introduction to Smart Tags
- Creating Document-Level Smart Tags with VSTO
- Creating Application-Level Smart Tags
- Conclusion
VSTO Data Programming
- VSTO Data Programming
- Creating a Data-Bound Customized Spreadsheet with VSTO
- Creating a Data-Bound Customized Word Document with VSTO
- Datasets, Adapters, and Sources
- Another Technique for Creating Data-Bound Spreadsheets
- Caching Data in the Data Island
- Advanced ADO.NET Data Binding: Looking Behind the Scenes
- Binding-Related Extensions to Host Items and Host Controls
- Conclusion
Server Data Scenarios
- Populating a Document with Data on the Server
- Using ServerDocument and ASP.NET
- A Handy Client-Side ServerDocument Utility
- The ServerDocument Object Model
- Conclusion
.NET Code Security
- .NET Code Security
- Code Access Security Versus Role-Based Security
- Code Access Security in .NET
- Location, Location, Location
- Strong Names
- Publisher Certificates
- Trusting the Document
- Deploying Policy to User Machines
- Conclusion
Deployment
- Deployment
- VSTO Prerequisites
- Deploying to an Intranet Shared Directory or Web Site
- Local Machine Deployment Without a Deployment Manifest
- Editing Manifests
- Creating Setup Packages
- Advanced Topic: Deploying Network Solutions to Be Cached Locally
- Conclusion
Part Four. Advanced Office Programming
Working with XML in Excel
- Introduction to Excels XML Features
- Introduction to XML Schema Creation in Visual Studio
- An End-to-End Scenario
- Advanced XML Features in Excel
- Excel-Friendly XML Schemas
- VSTO Support for Excel Schema Mapping
- Conclusion
Working with XML in Word
- Introduction to Words XML Features
- An End-to-End Scenario: Creating a Schema and Mapping It into a Word Document
- Exporting the Mapped XML in the Document to an XML Data File
- Importing an XML Data File into the Mapped Document
- The XML Options Dialog
- VSTO Support for Word Schema Mapping
- VSTO Support for the WordML File Format
- Conclusion
Developing COM Add-Ins for Word and Excel
- Introduction to Add-Ins
- Scenarios for Using Add-Ins
- How a COM Add-In Is Registered
- Implementing IDTExtensibility2
- Writing a COM Add-In Using Visual Studio
- The Pitfalls of MsCoree.dll
- COM Interop and Regasm.exe
- Shimming: A Solution to the Problems with MsCoree.dll
- Conclusion
Creating Outlook Add-Ins with VSTO
EAN: N/A
Pages: 214
