Introduction to Smart Tags
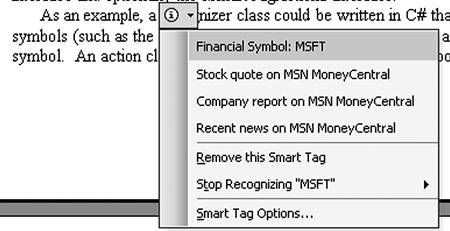
The Smart Tags feature of Word and Excel enables you to display a pop-up menu with actions for a given piece of text in a document or spreadsheet. For example, a Smart Tag could recognize stock symbols (such as the MSFT stock symbol) and display a set of actions that can be taken for that symbol. When Word finds a piece of text that a Smart Tag has recognized, it displays a red dotted underline under the recognized text. If the user hovers over the text, a pop-up menu icon appears next to the cell, as shown in Figure 16-1. If the user clicks the pop-up menu icon, a menu of actions displays for the recognized piece of text, as shown in Figure 16-2. When an action is selected, Word calls back into the Smart Tag to execute the action.
Figure 16-1. Some recognized text in Word.

Figure 16-2. Dropping down the Smart Tag menu in Word.
When Excel recognizes a Smart Tag, it displays a little triangle in the lower-right corner of the associated cell. If the user hovers over the cell, a pop-up menu icon appears next to the cell that the user can click to drop down a menu of actions for the recognized piece of text. Figure 16-3 shows an example menu. When an action is selected, Excel calls back into the Smart Tag to execute the action.
Figure 16-3. Dropping down the Smart Tag menu in Excel.
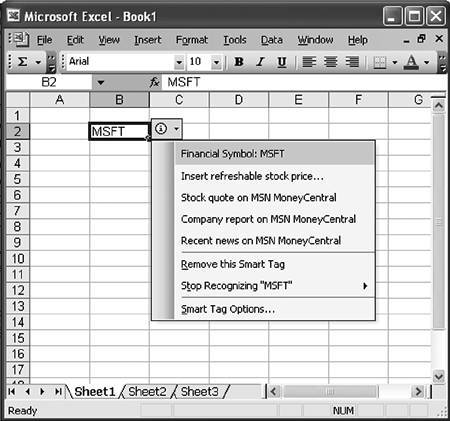
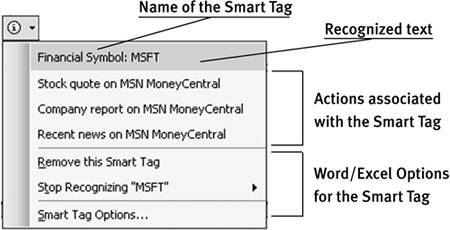
Figure 16-4 shows some additional detail about the drop-down menu that appears for recognized text. At the top of the drop-down menu, the name of the Smart Tag displays along with the text that was recognized. The next section of the menu shows actions that are available for the given Smart Tag. This particular Smart Tag, called Financial Symbol, has four actions associated with it. The bottom section of the menu provides Word- or Excel-specific options for the Smart Tag.
Figure 16-4. The Smart Tag menu.
Configuring Smart Tags in Word and Excel
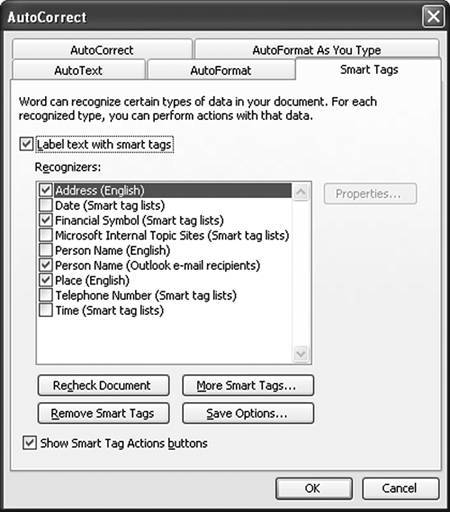
Smart Tags in Word are managed from the Smart Tags page of the AutoCorrect Options dialog shown in Figure 16-5. The Smart Tags page can be displayed by choosing AutoCorrect Options from the Tools menu. Here the user can turn on and off individual Smart Tags as well as control other options relating to how Smart Tags display in the document.
Figure 16-5. Word's Smart Tags page in the AutoCorrect dialog.
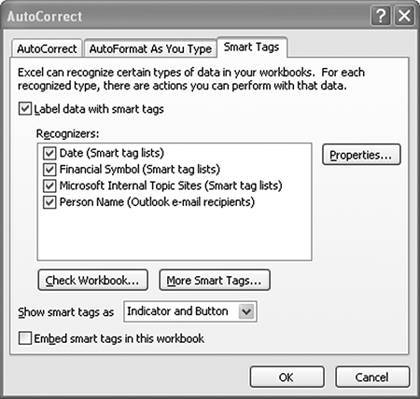
Smart Tags in Excel are managed from the Smart Tags page of the AutoCorrect dialog, as shown in Figure 16-6. The Smart Tags page can be displayed by choosing AutoCorrect Options from the Tools menu. Here the user can turn on and off individual recognizers as well as control other options relating to how Smart Tags display in the workbook.
Figure 16-6. Excel's Smart Tags page in the AutoCorrect dialog.
The Persistent Tagging Generated by Smart Tags
To understand how Smart Tags work in Office, it is helpful to have a conceptual model in your mind. Otherwise, some of the behavior you will see when working with Smart Tags will be confusing.
A Smart Tag has a recognition engine that is passed text in the document or workbook. If the Smart Tag recognizes a segment of text, it can tell Word or Excel to tag the text as being recognized. This tagging is stored and saved in the document by Word or Excel. When text is tagged, it remains tagged until the user removes the tag by choosing Remove This Smart Tag from the Smart Tag menu. So even if a Smart Tag has stopped recognizing a particular term or is no longer active, the tagging in the document can remain.
Text that has been tagged by a Smart Tag has its tagged state saved into the document. You can see this tagging when you save into WordML format. A document with the stock symbol MSFT has been recognized in a Word document by a Smart Tag with Smart Tag type name customsmarttag. This tag also can optionally store custom properties in the document when it recognizes a termin this example, the Smart Tag stores the properties LongStockName and the current StockValue. You can see all this in the WordML markup:
MSFT
Part One. An Introduction to VSTO
An Introduction to Office Programming
- Why Office Programming?
- Office Object Models
- Properties, Methods, and Events
- The Office Primary Interop Assemblies (PIAs)
- Conclusion
Introduction to Office Solutions
- The Three Basic Patterns of Office Solutions
- Office Automation Executables
- Office Add-Ins
- Code Behind a Document
- Conclusion
Part Two. Office Programming in .NET
Programming Excel
- Ways to Customize Excel
- Programming User-Defined Functions
- Introduction to the Excel Object Model
- Conclusion
Working with Excel Events
Working with Excel Objects
- Working with Excel Objects
- Working with the Application Object
- Working with the Workbooks Collection
- Working with the Workbook Object
- Working with the Worksheets, Charts, and Sheets Collections
- Working with Document Properties
- Working with the Windows Collections
- Working with the Window Object
- Working with the Names Collection and Name Object
- Working with the Worksheet Object
- Working with the Range Object
- Special Excel Issues
- Conclusion
Programming Word
Working with Word Events
Working with Word Objects
- Working with Word Objects
- Working with the Application Object
- Working with the Dialog Object
- Working with Windows
- Working with Templates
- Working with Documents
- Working with a Document
- Working with the Range Object
- Working with Bookmarks
- Working with Tables
- Conclusion
Programming Outlook
- Ways to Customize Outlook
- Introduction to the Outlook Object Model
- Introduction to the Collaboration Data Objects
- Conclusion
Working with Outlook Events
Working with Outlook Objects
- Working with Outlook Objects
- Working with the Application Object
- Working with the Explorers and Inspectors Collections
- Working with the Explorer Object
- Working with the Inspector Object
- Working with the NameSpace Object
- Working with the MAPIFolder Object
- Working with the Items Collection
- Properties and Methods Common to Outlook Items
- Outlook Issues
- Conclusion
Introduction to InfoPath
- What Is InfoPath?
- Getting Started
- Form Security
- Programming InfoPath
- Data Source Events
- Form Events, Properties, and Methods
- Conclusion
Part Three. Office Programming in VSTO
The VSTO Programming Model
- The VSTO Programming Model
- VSTO Extensions to Word and Excel Objects
- Dynamic Controls
- Advanced Topic: Dynamic Host Items
- Advanced Topic: Inspecting the Generated Code
- VSTO Extensions to the Word and Excel Object Models
- Conclusion
Using Windows Forms in VSTO
- Using Windows Forms in VSTO
- Introduction
- Adding Windows Forms Controls to Your Document
- Writing Code Behind a Control
- The Windows Forms Control Hosting Architecture
- Properties Merged from OLEObject or OLEControl
- Adding Controls at Runtime
- Conclusion
Working with Actions Pane
Working with Smart Tags in VSTO
- Introduction to Smart Tags
- Creating Document-Level Smart Tags with VSTO
- Creating Application-Level Smart Tags
- Conclusion
VSTO Data Programming
- VSTO Data Programming
- Creating a Data-Bound Customized Spreadsheet with VSTO
- Creating a Data-Bound Customized Word Document with VSTO
- Datasets, Adapters, and Sources
- Another Technique for Creating Data-Bound Spreadsheets
- Caching Data in the Data Island
- Advanced ADO.NET Data Binding: Looking Behind the Scenes
- Binding-Related Extensions to Host Items and Host Controls
- Conclusion
Server Data Scenarios
- Populating a Document with Data on the Server
- Using ServerDocument and ASP.NET
- A Handy Client-Side ServerDocument Utility
- The ServerDocument Object Model
- Conclusion
.NET Code Security
- .NET Code Security
- Code Access Security Versus Role-Based Security
- Code Access Security in .NET
- Location, Location, Location
- Strong Names
- Publisher Certificates
- Trusting the Document
- Deploying Policy to User Machines
- Conclusion
Deployment
- Deployment
- VSTO Prerequisites
- Deploying to an Intranet Shared Directory or Web Site
- Local Machine Deployment Without a Deployment Manifest
- Editing Manifests
- Creating Setup Packages
- Advanced Topic: Deploying Network Solutions to Be Cached Locally
- Conclusion
Part Four. Advanced Office Programming
Working with XML in Excel
- Introduction to Excels XML Features
- Introduction to XML Schema Creation in Visual Studio
- An End-to-End Scenario
- Advanced XML Features in Excel
- Excel-Friendly XML Schemas
- VSTO Support for Excel Schema Mapping
- Conclusion
Working with XML in Word
- Introduction to Words XML Features
- An End-to-End Scenario: Creating a Schema and Mapping It into a Word Document
- Exporting the Mapped XML in the Document to an XML Data File
- Importing an XML Data File into the Mapped Document
- The XML Options Dialog
- VSTO Support for Word Schema Mapping
- VSTO Support for the WordML File Format
- Conclusion
Developing COM Add-Ins for Word and Excel
- Introduction to Add-Ins
- Scenarios for Using Add-Ins
- How a COM Add-In Is Registered
- Implementing IDTExtensibility2
- Writing a COM Add-In Using Visual Studio
- The Pitfalls of MsCoree.dll
- COM Interop and Regasm.exe
- Shimming: A Solution to the Problems with MsCoree.dll
- Conclusion
Creating Outlook Add-Ins with VSTO
EAN: N/A
Pages: 214
