Another Technique for Creating Data-Bound Spreadsheets
Unlike our previous example, in this case we do not define ahead of time where the back-end data store is located; you have to write a few lines of code to obtain the data.
Create a new Excel project and choose the Data > Microsoft Office Excel Data > XML > XML Source to display the XML Source pane. As you can see, no XML schemas are mapped into this document, so click the XML Maps button and add the schema file shown in Listing 17-3.
Listing 17-3. A Schema for a Two-Table Dataset
This is a dataset schema that defines an Order as consisting of a single Customer and any number of Books, where each book has a Title, ISBN, and Price. In a database, this would be organized as two related tables, as you will see.
The structure of the XML schema then appears in the XML Source pane, and you can drag and drop elements of the schema onto the spreadsheet. Try dragging the Customer node onto a cell. The single datum creates a named range host control. If you then drag over the Book node, you get a List object. Also, Visual Studio has again created a dataset source file. However, Visual Studio knows nothing about what the source of the data will be, so it does not generate any adapters.
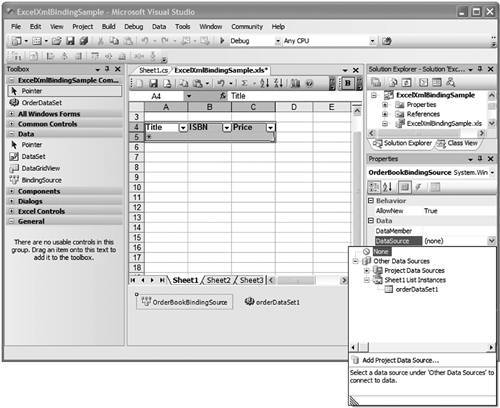
Next, let's add a binding source. From the Toolbox, find the binding source component in the Data category. Drag it onto the spreadsheet. A binding source component appears in the component tray. Rename the binding source to OrderBookBindingSource using the properties window. Then click on the list object you created by dragging the Book node onto the worksheet. In the properties window, set the DataSource of the list object to the OrderBookBindingSource you created.
If you compile and run the customization, not much will happen; the data binding source is just a "dummy"there is no actual data in there. Also, there is no instance of the dataset on the components tray, so there is no chance that there will ever be data associated with this binding source as things stand now.
Figure 17-13. The XML Source pane.
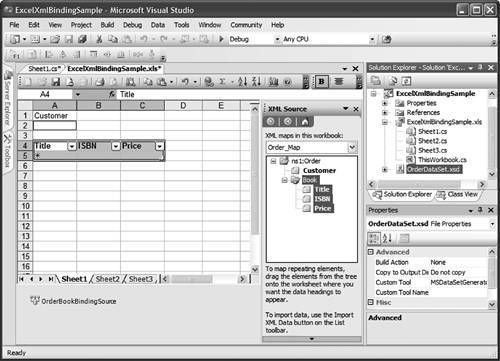
Notice that the project system has automatically added the schema to the project; it will generate a typed dataset for this schema and add it to the project as well. But that class is just source code; the project system does not know yet what it is going to look like when compiled. Well then, let's compile it. Build the project, but do not run it.
Now if you pop open the toolbox, you will see a new set of tools under the name of the project. There should be an OrderDataSet item. Drag it over onto the spreadsheet's component tray and drop it; doing so adds an instance of the typed dataset to the customized worksheet class.
|
Alternatively, you can add this typed dataset to your project before compiling if you open up the ToolBox tab on the left side of the designer and drag and drop the dataset component onto the design surface. When you drag and drop a dataset component, Visual Studio shows you a combo box that enables you to pick from all available typed datasets referenced by or in your project. This combo box shows you the new dataset even if you have not compiled your project. |
We have gotten most of the parts we need: The binding source is hooked up to the list object, but the binding source does not yet know that the dataset we have just dropped onto the component tray is important.
Click the book binding source in the component tray and take a look at its Property pane. Start by clicking the DataSource drop-down, and navigate the tree view to select Other Data Sources > Sheet1 List Instances > OrderDataSet1. Then click the DataMember property drop-down and select the Book table.
Figure 17-14. Setting the DataSource property of the binding source.
|
Do not forget to set the DataMember property when binding to a table. Without it, the binding data source will attempt to extract the columns for the table from the dataset itself, not from the Book table. This will then fail at runtime. |
We have gotten almost everything we need; the only thing left is to put some data in the typed dataset instance we have added. Typically, we would fill the dataset by creating an adapter to talk to some external database; for this example, we just fill the typed dataset manually, using the code in Listing 17-4. (You could also fill it by loading XML out of a file or downloading XML from a Web service.)
Listing 17-4. Filling a Typed Dataset from "Scratch"
private void Sheet1_Startup(object sender, System.EventArgs e)
{
 // An order has a customer column
 this.orderDataSet1.Order.AddOrderRow("Vlad the Impaler");
 // A book has a title, ISBN and price, and is associated with
 // a particular order.
 this.orderDataSet1.Book.AddBookRow("Blood For Dracula",
 "0-123-45678-9", 34.95, this.orderDataSet1.Order[0]);
 this.orderDataSet1.Book.AddBookRow("Fang Attack!",
 "9-876-54321-0", 14.44, this.orderDataSet1.Order[0]);
}
Now build and execute the customized spreadsheet. You'll see that when the Startup event runs and creates the new row in the book table, the data binding layer automatically updates the list object.
Figure 17-15. The List object is bound to the data table.
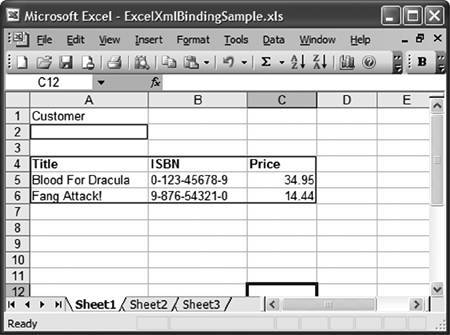
Furthermore, data binding to list objects goes both ways; updating the data in the host control propagates the changes back to the data table.
Complex and Simple Data Binding
What you have just seen is an example of "complex" data binding, so named not because it is particularly difficult but rather because many data are bound at once to a relatively complicated host control. Controls must be specially written to support complex data binding. By contrast, "simple" data binding binds a single datum to a single property of a host control.
Note that nothing happened to the Customer cell when we ran the code. Back in the designer, click the single-celled range you mapped to the Customer property earlier and take a look at its Properties pane. If you click the Advanced DataBinding property in the Properties pane, the dialog shown in Figure 17-16 displays.
Figure 17-16. Creating a simple data binding.
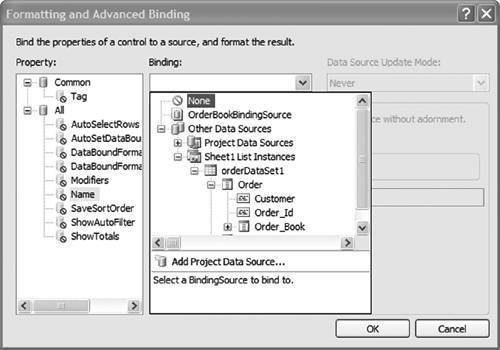
Select the property you want to bindValueand in the Binding drop-down, you can select Other Data Sources > Sheet1 List Instances > OrderDataSet1 > Order > Customer. Now we have binding information that associates the Value property on the host control with the Customer field in the dataset. When we run the code, the value from the dataset is automatically copied into the host control, and when the dataset is changed, the binding manager keeps the host control up-to-date. Note in this example that we have not created a master-details relationship between the customer and the ordersthe list object will show all orders created by all customers. For an example of creating a master-details relationship, see Chapter 21.
However, it does not work the other way; unlike our earlier list object example, changing the value in the cell does not automatically propagate that change back to the dataset. Why not?
In the Data Source Update Mode drop-down in the upper-left corner of the dialog we just looked at, there are three choices: Never, OnValidation, and OnPropertyChanged. The last choice certainly seems like a sensible choice; when a property on the control changes, update the data source to keep it in sync.
Unfortunately, that does not work with Excel host controls. Why? Because you can create a binding to any old property of a host control, but we cannot change the fact that the aggregated Range objects do not source any "some property just changed" event that the binding manager can listen to. Windows Forms Controls do source such an event, but Word and Excel host controls do not.
This means that we need to tell the binding manager explicitly that the data source needs to be updated, instead of relying on the control informing its binding manager for you. Fortunately, this is simply done. Double-click the mapped range in the designer to automatically create a Change event handler, and then fill it in with the line of code which forces the binding to update the source:
private void OrderCustomerCell_Change(Excel.Range Target)
{
 this.OrderCustomerCell.DataBindings["Value"].WriteValue();
}
Now all changes made to the dataset will be propagated into the mapped range, and vice versa.
Data Binding in Word Documents
Word also supports creating XML mapped documents. However, unlike the Excel designer, the Word designer does not automatically create typed datasets from mapped schemas. If you want to create a typed dataset from a schema mapped into Word, you have to add it to the project system yourself. Just add the schema XSD file to the project, and then ensure that in its Properties pane the Custom Tool property is set to MSDataSetGenerator; the build system will then create the typed dataset for you.
Because simple data binding in Word is essentially the same as in Excel, and Excel supports complex data binding in the list object host control, this chapter does not talk much more about data binding in Word.
Part One. An Introduction to VSTO
An Introduction to Office Programming
- Why Office Programming?
- Office Object Models
- Properties, Methods, and Events
- The Office Primary Interop Assemblies (PIAs)
- Conclusion
Introduction to Office Solutions
- The Three Basic Patterns of Office Solutions
- Office Automation Executables
- Office Add-Ins
- Code Behind a Document
- Conclusion
Part Two. Office Programming in .NET
Programming Excel
- Ways to Customize Excel
- Programming User-Defined Functions
- Introduction to the Excel Object Model
- Conclusion
Working with Excel Events
Working with Excel Objects
- Working with Excel Objects
- Working with the Application Object
- Working with the Workbooks Collection
- Working with the Workbook Object
- Working with the Worksheets, Charts, and Sheets Collections
- Working with Document Properties
- Working with the Windows Collections
- Working with the Window Object
- Working with the Names Collection and Name Object
- Working with the Worksheet Object
- Working with the Range Object
- Special Excel Issues
- Conclusion
Programming Word
Working with Word Events
Working with Word Objects
- Working with Word Objects
- Working with the Application Object
- Working with the Dialog Object
- Working with Windows
- Working with Templates
- Working with Documents
- Working with a Document
- Working with the Range Object
- Working with Bookmarks
- Working with Tables
- Conclusion
Programming Outlook
- Ways to Customize Outlook
- Introduction to the Outlook Object Model
- Introduction to the Collaboration Data Objects
- Conclusion
Working with Outlook Events
Working with Outlook Objects
- Working with Outlook Objects
- Working with the Application Object
- Working with the Explorers and Inspectors Collections
- Working with the Explorer Object
- Working with the Inspector Object
- Working with the NameSpace Object
- Working with the MAPIFolder Object
- Working with the Items Collection
- Properties and Methods Common to Outlook Items
- Outlook Issues
- Conclusion
Introduction to InfoPath
- What Is InfoPath?
- Getting Started
- Form Security
- Programming InfoPath
- Data Source Events
- Form Events, Properties, and Methods
- Conclusion
Part Three. Office Programming in VSTO
The VSTO Programming Model
- The VSTO Programming Model
- VSTO Extensions to Word and Excel Objects
- Dynamic Controls
- Advanced Topic: Dynamic Host Items
- Advanced Topic: Inspecting the Generated Code
- VSTO Extensions to the Word and Excel Object Models
- Conclusion
Using Windows Forms in VSTO
- Using Windows Forms in VSTO
- Introduction
- Adding Windows Forms Controls to Your Document
- Writing Code Behind a Control
- The Windows Forms Control Hosting Architecture
- Properties Merged from OLEObject or OLEControl
- Adding Controls at Runtime
- Conclusion
Working with Actions Pane
Working with Smart Tags in VSTO
- Introduction to Smart Tags
- Creating Document-Level Smart Tags with VSTO
- Creating Application-Level Smart Tags
- Conclusion
VSTO Data Programming
- VSTO Data Programming
- Creating a Data-Bound Customized Spreadsheet with VSTO
- Creating a Data-Bound Customized Word Document with VSTO
- Datasets, Adapters, and Sources
- Another Technique for Creating Data-Bound Spreadsheets
- Caching Data in the Data Island
- Advanced ADO.NET Data Binding: Looking Behind the Scenes
- Binding-Related Extensions to Host Items and Host Controls
- Conclusion
Server Data Scenarios
- Populating a Document with Data on the Server
- Using ServerDocument and ASP.NET
- A Handy Client-Side ServerDocument Utility
- The ServerDocument Object Model
- Conclusion
.NET Code Security
- .NET Code Security
- Code Access Security Versus Role-Based Security
- Code Access Security in .NET
- Location, Location, Location
- Strong Names
- Publisher Certificates
- Trusting the Document
- Deploying Policy to User Machines
- Conclusion
Deployment
- Deployment
- VSTO Prerequisites
- Deploying to an Intranet Shared Directory or Web Site
- Local Machine Deployment Without a Deployment Manifest
- Editing Manifests
- Creating Setup Packages
- Advanced Topic: Deploying Network Solutions to Be Cached Locally
- Conclusion
Part Four. Advanced Office Programming
Working with XML in Excel
- Introduction to Excels XML Features
- Introduction to XML Schema Creation in Visual Studio
- An End-to-End Scenario
- Advanced XML Features in Excel
- Excel-Friendly XML Schemas
- VSTO Support for Excel Schema Mapping
- Conclusion
Working with XML in Word
- Introduction to Words XML Features
- An End-to-End Scenario: Creating a Schema and Mapping It into a Word Document
- Exporting the Mapped XML in the Document to an XML Data File
- Importing an XML Data File into the Mapped Document
- The XML Options Dialog
- VSTO Support for Word Schema Mapping
- VSTO Support for the WordML File Format
- Conclusion
Developing COM Add-Ins for Word and Excel
- Introduction to Add-Ins
- Scenarios for Using Add-Ins
- How a COM Add-In Is Registered
- Implementing IDTExtensibility2
- Writing a COM Add-In Using Visual Studio
- The Pitfalls of MsCoree.dll
- COM Interop and Regasm.exe
- Shimming: A Solution to the Problems with MsCoree.dll
- Conclusion
Creating Outlook Add-Ins with VSTO
EAN: N/A
Pages: 214
