Programming Research Services
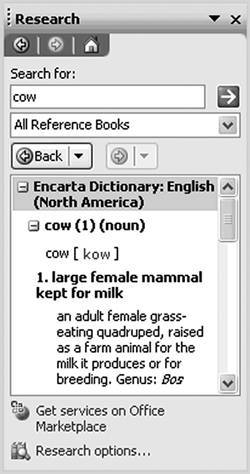
This section examines how to build research services for Word and other Office applications. Word has a task pane called the Research task pane that enables you to enter a search term and search various sources for that search term. Figure 6-6 shows the Research task pane.
Figure 6-6. The Research task pane.
Office enables developers to write a special Web service called a research service that implements two Web methods defined by Office: Registration and Query. Both Web methods take a string and return a string. A research service can be registered with Office and used in Office's Research task pane. For example, you might write a research service that searches for the search term in a corporate database.
Although the signatures of the two Web methods you must declare are simple, the actual implementation of these methods is somewhat complex because Word has four separate XML schemas that must be used for the request passed to Registration, the response returned by Registration, the request passed to Query, and the response returned by Query.
The simplest way to build research services is by using the Research Service Development Extras Toolkit for Office that is available for download at http://www.microsoft.com/downloads/details.aspx?FamilyID=8b0a4427-9cfd-493e-82a7-16f8d88ebdc7. This toolkit provides helper classes to assist in parsing the requests and forming responses. Note that this example uses Visual Studio 2003 because the Research Service Development Toolkit was not available for Visual Studio 2005 at the time of this writing.
Getting Started with Research Services
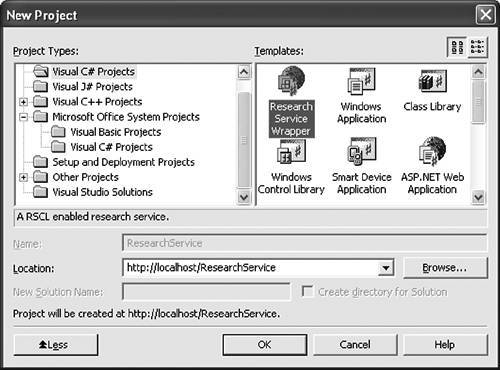
After you have downloaded and installed the Research Service Development Extras Toolkit, launch Visual Studio 2003 and choose New Project from the File menu. Select Visual C# Projects in the Project Types window and click the Research Service Wrapper in the Templates window, as shown in Figure 6-7.
Figure 6-7. Selecting the Research Service Wrapper project.
When you click OK, a wizard appears that in Step 1 prompts you for the information needed to create your research service, as shown in Figure 6-8. The first step of the wizard prompts you for provider information and an ID for the provider. You can think of a provider as being like a Web site that potentially provides multiple services. For example, the ACME corporation might provide a number of different research services. You can click the New Guid button to automatically generate a unique ID for the provider.
Figure 6-8. Step 1 of the ASP.NET Research Services Wizard.

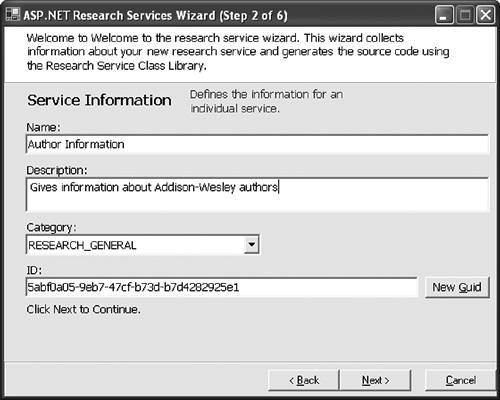
Figure 6-9 shows Step 2 of the wizard. Here you specify the name of the service, a description of the service, and you assign the service a category from a list of categories that are predefined by Office. You also must have a unique ID for your service.
Figure 6-9. Step 2 of the ASP.NET Research Services Wizard.
Step 3 of the wizard prompts you as to whether you require licensing for your research service. We respond No to this step for this example. Step 4 lets you specify an OleDB data provider, a SqlDB data provider, or no data provider. We choose no data provider. Finally, when you click the Finish button in Step 5, the research service project is created for you.
A Simple Research Service
The wizard has created a project for our Author Information research service. Within the project is a file called ResearchService.asmx.cs. Edit this file to produce the result shown in Listing 6-1. If the user searches for the strings "Eric Carter" or "Eric Lippert," the service will send back information listing all the authors of this book.
Listing 6-1. The ResearchService.asmx.cs File
using System;
using Microsoft.Samples.Office.ResearchService;
using Microsoft.Samples.Office.ResearchService.Registration;
using Microsoft.Samples.Office.ResearchService.Query;

namespace ResearchService
{
 public class ResearchService : ResearchWebService
 {
 public override RegistrationResponse Registration(
 RegistrationRequest request)
 {
 return new RegistrationResponse();
 }

 public override QueryResponse Query(QueryRequest request)
 {
 QueryResponse response = new QueryResponse();
 if (request.QueryText == "Eric Carter" ||
 request.QueryText == "Eric Lippert")
 {
 DocumentResponseWriter responseWriter;

 responseWriter = new DocumentResponseWriter();
 responseWriter.WriteItem("Eric Carter", "One of the authors of this
book, a Lead Developer at Microsoft Corporation.");
 responseWriter.WriteItem("Eric Lippert", "One of the authors of this
book, a Developer at Microsoft Corporation.");

 response.WriteResponse(responseWriter);
 }
 return response;
 }
 }
}
Registering the Research Service with Word
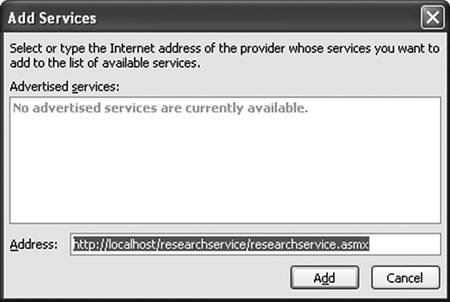
After building the project, the next step is to register it with Word. First, launch Word. Then, bring up Word's Research task pane by choosing Task Pane from the View menu. Drop down the available task panes from the pop-up menu at the top of the task pane and choose Research. At the very bottom of the Research task pane is some text that says Research options. Click that text to get the dialog shown in Figure 6-13. Then click the Add Services button. The dialog shown in Figure 6-10 appears. In this dialog, type the address to the Web service .asmx file. Then click the Add button.
Figure 6-13. Research Options dialog.
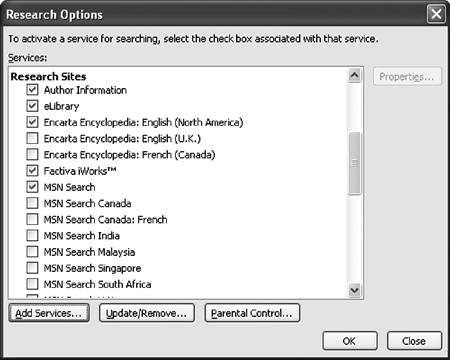
Figure 6-10. Word's Add Services dialog.
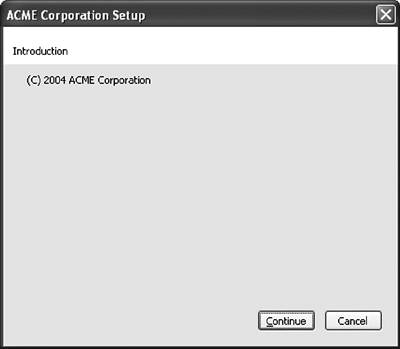
When you click the Add button, Word displays a dialog announcing the provider of the research service, as shown in Figure 6-11.
Figure 6-11. Word's Provider dialog.
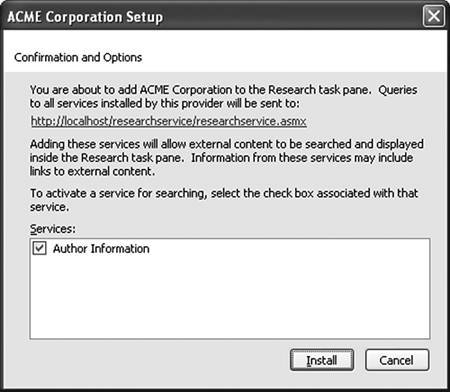
Clicking Continue brings up a dialog showing details about the research service shown in Figure 6-12. Click Install to install the research service.
Figure 6-12. Research Service confirmation dialog.
Clicking Install returns to the Research Options dialog shown in Figure 6-13, which now has our Author Information research site installed in the Research Sites category. Click OK to continue.
Using the Research Service
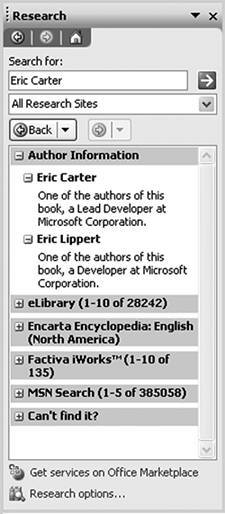
Now, you can type the text Eric Carter in the Research task pane and drop down the list of sites to search to select All Research Sites. Click the green arrow button to search. The research service is contacted, and the response displays in the task pane, as shown in Figure 6-14. An alternative way to search for text is to type it in the document, select it, and then click it while holding down the Alt key.
Figure 6-14. The Research task pane shows results from the new Author Information research service.
More Research Service Resources
This has been a brief introduction to how to get started creating research service in C# using Visual Studio. You can do many more things with research services, including returning richer results with hyperlinks and images. For more information about creating research services, search http://msdn.microsoft.com for the phrase "research services."
Part One. An Introduction to VSTO
An Introduction to Office Programming
- Why Office Programming?
- Office Object Models
- Properties, Methods, and Events
- The Office Primary Interop Assemblies (PIAs)
- Conclusion
Introduction to Office Solutions
- The Three Basic Patterns of Office Solutions
- Office Automation Executables
- Office Add-Ins
- Code Behind a Document
- Conclusion
Part Two. Office Programming in .NET
Programming Excel
- Ways to Customize Excel
- Programming User-Defined Functions
- Introduction to the Excel Object Model
- Conclusion
Working with Excel Events
Working with Excel Objects
- Working with Excel Objects
- Working with the Application Object
- Working with the Workbooks Collection
- Working with the Workbook Object
- Working with the Worksheets, Charts, and Sheets Collections
- Working with Document Properties
- Working with the Windows Collections
- Working with the Window Object
- Working with the Names Collection and Name Object
- Working with the Worksheet Object
- Working with the Range Object
- Special Excel Issues
- Conclusion
Programming Word
- Ways to Customize Word
- Programming Research Services
- Introduction to the Word Object Model
- Conclusion
Working with Word Events
Working with Word Objects
- Working with Word Objects
- Working with the Application Object
- Working with the Dialog Object
- Working with Windows
- Working with Templates
- Working with Documents
- Working with a Document
- Working with the Range Object
- Working with Bookmarks
- Working with Tables
- Conclusion
Programming Outlook
- Ways to Customize Outlook
- Introduction to the Outlook Object Model
- Introduction to the Collaboration Data Objects
- Conclusion
Working with Outlook Events
Working with Outlook Objects
- Working with Outlook Objects
- Working with the Application Object
- Working with the Explorers and Inspectors Collections
- Working with the Explorer Object
- Working with the Inspector Object
- Working with the NameSpace Object
- Working with the MAPIFolder Object
- Working with the Items Collection
- Properties and Methods Common to Outlook Items
- Outlook Issues
- Conclusion
Introduction to InfoPath
- What Is InfoPath?
- Getting Started
- Form Security
- Programming InfoPath
- Data Source Events
- Form Events, Properties, and Methods
- Conclusion
Part Three. Office Programming in VSTO
The VSTO Programming Model
- The VSTO Programming Model
- VSTO Extensions to Word and Excel Objects
- Dynamic Controls
- Advanced Topic: Dynamic Host Items
- Advanced Topic: Inspecting the Generated Code
- VSTO Extensions to the Word and Excel Object Models
- Conclusion
Using Windows Forms in VSTO
- Using Windows Forms in VSTO
- Introduction
- Adding Windows Forms Controls to Your Document
- Writing Code Behind a Control
- The Windows Forms Control Hosting Architecture
- Properties Merged from OLEObject or OLEControl
- Adding Controls at Runtime
- Conclusion
Working with Actions Pane
Working with Smart Tags in VSTO
- Introduction to Smart Tags
- Creating Document-Level Smart Tags with VSTO
- Creating Application-Level Smart Tags
- Conclusion
VSTO Data Programming
- VSTO Data Programming
- Creating a Data-Bound Customized Spreadsheet with VSTO
- Creating a Data-Bound Customized Word Document with VSTO
- Datasets, Adapters, and Sources
- Another Technique for Creating Data-Bound Spreadsheets
- Caching Data in the Data Island
- Advanced ADO.NET Data Binding: Looking Behind the Scenes
- Binding-Related Extensions to Host Items and Host Controls
- Conclusion
Server Data Scenarios
- Populating a Document with Data on the Server
- Using ServerDocument and ASP.NET
- A Handy Client-Side ServerDocument Utility
- The ServerDocument Object Model
- Conclusion
.NET Code Security
- .NET Code Security
- Code Access Security Versus Role-Based Security
- Code Access Security in .NET
- Location, Location, Location
- Strong Names
- Publisher Certificates
- Trusting the Document
- Deploying Policy to User Machines
- Conclusion
Deployment
- Deployment
- VSTO Prerequisites
- Deploying to an Intranet Shared Directory or Web Site
- Local Machine Deployment Without a Deployment Manifest
- Editing Manifests
- Creating Setup Packages
- Advanced Topic: Deploying Network Solutions to Be Cached Locally
- Conclusion
Part Four. Advanced Office Programming
Working with XML in Excel
- Introduction to Excels XML Features
- Introduction to XML Schema Creation in Visual Studio
- An End-to-End Scenario
- Advanced XML Features in Excel
- Excel-Friendly XML Schemas
- VSTO Support for Excel Schema Mapping
- Conclusion
Working with XML in Word
- Introduction to Words XML Features
- An End-to-End Scenario: Creating a Schema and Mapping It into a Word Document
- Exporting the Mapped XML in the Document to an XML Data File
- Importing an XML Data File into the Mapped Document
- The XML Options Dialog
- VSTO Support for Word Schema Mapping
- VSTO Support for the WordML File Format
- Conclusion
Developing COM Add-Ins for Word and Excel
- Introduction to Add-Ins
- Scenarios for Using Add-Ins
- How a COM Add-In Is Registered
- Implementing IDTExtensibility2
- Writing a COM Add-In Using Visual Studio
- The Pitfalls of MsCoree.dll
- COM Interop and Regasm.exe
- Shimming: A Solution to the Problems with MsCoree.dll
- Conclusion
Creating Outlook Add-Ins with VSTO
EAN: N/A
Pages: 214
