Hierarchies and Character Animation
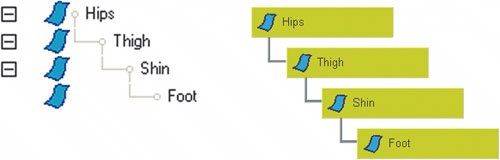
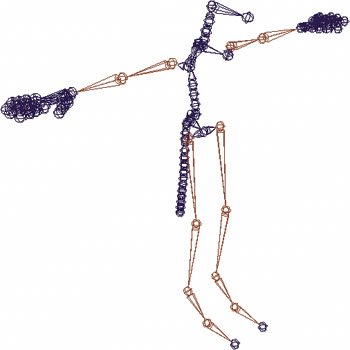
Most 3D packages organize information about your character into a hierarchy. Essentially, the hierarchy tells the computer that the foot bone's connected to the shin bone, the shin bone's connected to the thigh bone, and so on. The hierarchy looks a bit like a tree, with each connection forming a branch. It's very similar to the nested directories found on your computer. Once you've chosen a means of animating your character, you can make a decision about how to set up the hierarchy.
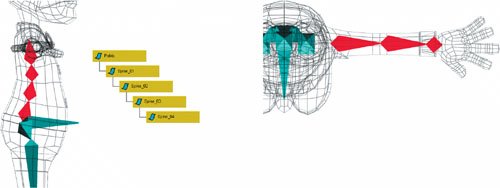
A hierarchy tells the computer in what order the character's parts should be assembled.

A hierarchy can be represented as a tree or a graph.
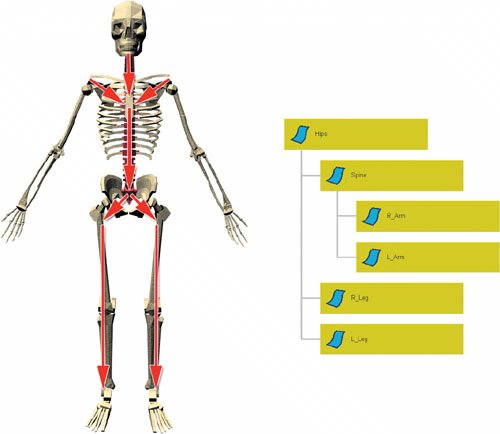
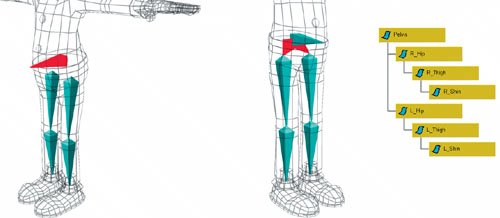
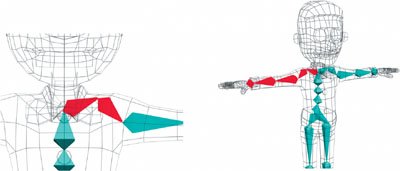
The root of a character's body is almost always the hips or pelvis. The pelvis is close to the center of gravity of the human body, which makes it a good candidate. More importantly, it is the center of weight distribution for the entire body. The pelvis supports the spine and the entire upper body, passing this weight down through the legs to the ground. Finally, almost all motions in a character start with the hipsyet another reason to have them as the root of your character's hierarchy.
The weight of the upper body is distributed through the pelvis, where it passes through the legs to the ground. The hierarchy of a character should be centered on the hips.
Skeletons
Most single-skin characters are deformed using a skeleton made up of bones and joints. As with the human skeleton, the rigid bones are connected by joints. In most 3D packages, bones are helper objects that don't render. They sit inside the skin of a character and act as a guide for the deformation utility that actually deforms the mesh of the character.
There are differences, however, between real bones and the virtual bones in a 3D application. Virtual bones exist simply to help the skeleton deform a mesh. They may not have to match a real skeleton exactly. The few dozen bones in the spine, for example, can usually be represented by a handful of virtual bones. There may also be places in a virtual skeleton where additional bones are required to help deform the mesh properly.
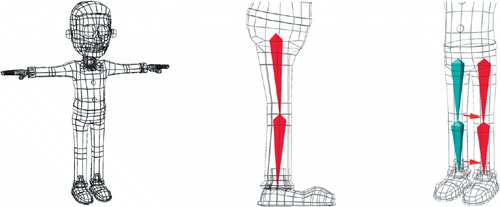
A skeleton made of bones fits into the character's mesh.
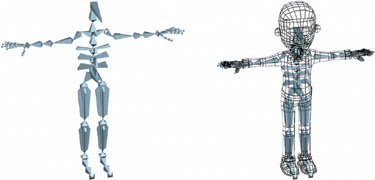
When the skeleton is animated, the character's mesh deforms to match.
To build a skeleton, you'll place the bones within the mesh and then assemble them into a hierarchy that can be animated. Once a skeleton is assembled, there are two strategies for manipulating and animating a skeleton: forward kinematics and inverse kinematics.
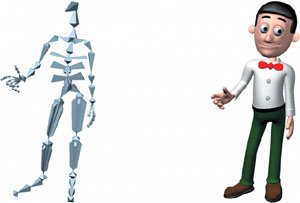
Software packages display bones and skeletons in a variety of ways, but many use simple tetrahedral shapes that do not render.
Forward Kinematics
Forward kinematics (FK) is the default method for manipulating hierarchies or skeletons. It is rotation based, which means that you position the joints by rotating them around each other. This is essentially the way human joints actually work, and it provides a good simulation of reality.
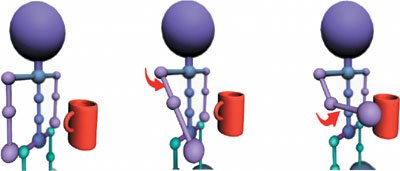
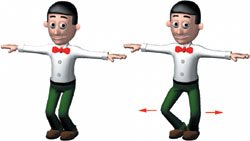
If, for example, you want to place a character's hand on a coffee cup, you first rotate the shoulder, then the elbow, then the wrist and fingers, working your way from the top of the hierarchy on down. Each rotation brings the hand closer to the cup.
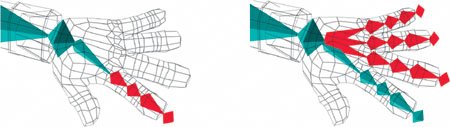
Since forward kinematics is rotation based, you can't simply pick up the hand and place it on the cup. This would merely move the hand to the cup, leaving the wrist behind.
To move the hand to the cup using forward kinematics, first rotate the shoulder, then the elbow, and so on until the hand reaches the cup.
Inverse Kinematics
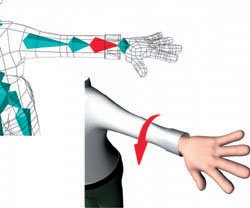
Inverse kinematics (IK) works the opposite way; it's translation based instead of rotation based. Inverse kinematics is easy to use: you place the character's hand on the coffee cup, and the rest of the arm automatically follows. This simple action is more complex than you might think, because the software must solve the rotations for all of the joints in the arm so that the bones remain connected to each other and look natural.
To make things more complicated, there can be many ways of orienting a character's arm so that the hand rests on the cup. The computer doesn't know how the joints of the body are supposed to moveif it's just as easy to bend the elbow backward or sideways to make the arm meet the cup, that's fine with the computer. This problem can be resolved to some degree by using parameters such as rotation limits, but IK can still be unpredictable, particularly when used on limbs with a large range of motion, like arms.
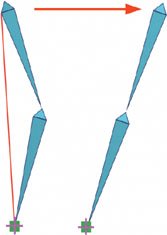
To move the hand to the cup using inverse kinematics, simply grab the hand and move it to the cup.
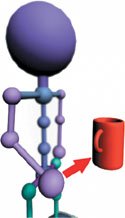
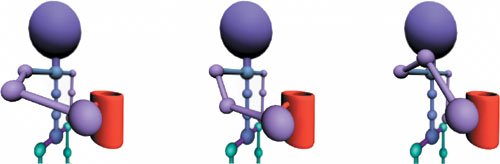
The one problem with inverse kinematics is that there can be more than one solution to the problem. Here, the arm can take several positions and the hand will still reach the cup.
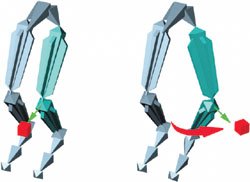
The Parts of an IK Chain
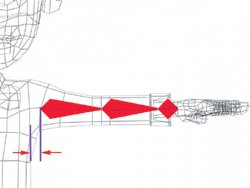
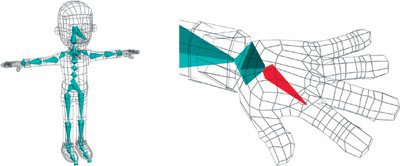
An IK chain consists of a group of joints whose rotations are manipulated by an object called an effector. The first joint in an IK chain is known as the root of the chain. It's also the root of the hierarchy, but may not be the root of the entire skeleton. This joint may also contain data that helps position the chain, depending on the software. Moving the root of the IK chain moves everything below it in the hierarchy.
The tip of the last joint of the chain is called the effector. This element controls the position of the end of the IK chain. The software will always try to position the chain so that it runs between the root and the effector.
The parts of an IK chain include the root, joint, bone, and effector.
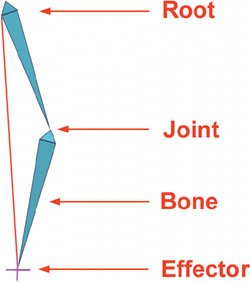
Bones (connected by joints) lie between the root and the effector and act as articulated points in the chain. An arm would have one jointthe elbowwhile a spine may have many joints.
Manipulating a Chain
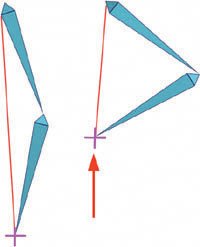
You manipulate the IK chain using the effector. As you move the effector, the joints of the chain rotate accordingly. This makes posing and animating a character easy, because you need to consider the position of only a single effector, rather than the rotation of many joints.
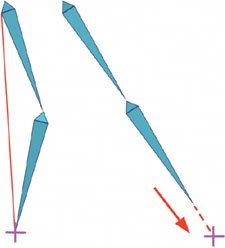
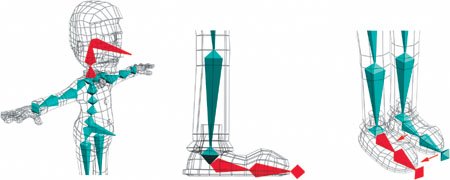
What happens when you pull the effector beyond the limits of the joints? Most software keeps the joints at a fixed length, so the fully extended chain simply aims itself at the effector. Some software, however, can allow the joints to stretch, expanding the length of the entire chain to meet the effector. This sort of effect can be used for cartoony squashing and stretching motions.
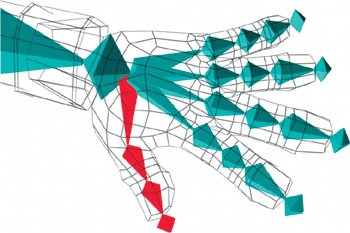
At the other end of the chain, translating the root typically moves the entire chain. If the IK effector is outside of this hierarchy, the end of the chain will stay locked to the world. The effector can also be connected to another object via hierarchies, or to a constraint to make the joints follow another object. If a character is riding a bike, for example, effectors at the hands can keep the arms locked to the bike's handlebars.
Joint Limits
To prevent joints from bending the wrong way, you may need to inform the software exactly what the limits are for a specific joint. Most packages allow for these limits to be configured on a joint-by-joint and axis-by-axis basis. Some packages have different types of joints and let you specify a joint as either hinged (two-dimensional) or ball and socket (three-dimensional).
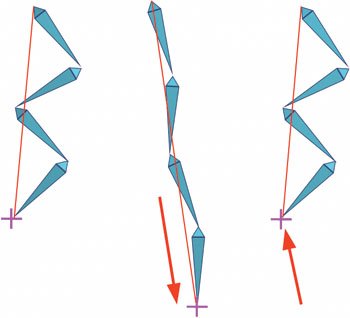
Translating the effector bends the IK chain.
When the effector is moved beyond the limits of the chain, the chain simply aims itself at the effector.
Moving the topmost bone of the chain moves the entire chain.
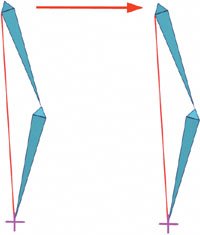
If the effector is outside of the hierarchy, however, as in this figure, the end of the chain stays in place.
Rest Positions and Goals
Many packages have incorporated the idea of a default joint position, also known as a rest or goal position, for a series of skeleton joints. Setting a default position forces the chain to return to the default shape when the effector is moved to its default position. The default position is usually the one in which the joints were originally created, but some packages allow for it to be redefined at any time.
This feature helps animation considerably because it makes the behavior of the skeleton quite predictable. It is also exceptionally good for chains with many joints, like an animal's tail.
A rest position tries to keep the IK chain in the same shape when the effector is moved.
Controlling IK Chain Direction
You'll also need to consider the overall direction of the chain itself. The knees are a good example: a character's knees can point either straight ahead or out to the sides. Both of these solutions are acceptable, but manipulating that angle requires some extra control. Depending on the software, several methods can be used to specify how the joint should bend. The angle is often a separate attribute that can be modified or animated. Another method is to create a constraint in the form of a helper object. Under this method, the knee would point at this helper object, and you would animate the object to control the angle of the knee.
Mixing Forward and Inverse Kinematics
While IK is almost always used for legs, it's not always the best option for other parts of the body. Since forward kinematics is based on rotations, its default motion causes the joints to move along rotational arcs, which looks more natural because it is the way real skeletons work. This is much more desirable than IK's default motion, which is a straight line. Of course, there are many times when you will need IK to lock down the hands, but when the hands are free, FK can be much easier to animate.
In order to meet these differing needs, most advanced packages offer some method of switching between FK and IK, often by letting you change the influence of the IK effector. When it's at 100 percent, IK is fully engaged; change that influence to zero and FK is fully engaged.
An IK solution for the legs can have the knees point forward or out to the sides.
You can make animation easier by having the knee point to a helper object.
Chapter One. Basics of Character Design
- Chapter One. Basics of Character Design
- Approaching Design as an Artist
- Design Styles
- Designing a Character
- Finalizing Your Design
Chapter Two. Modeling Characters
Chapter Three. Rigging Characters
- Chapter Three. Rigging Characters
- Hierarchies and Character Animation
- Facial Rigging
- Mesh Deformation
- Refining Rigs
- Conclusion
Chapter Four. Basics of Animation
- Chapter Four. Basics of Animation
- Understanding Motion
- Animation Interfaces
- The Language of Movement
- Secondary Action
- Conclusion
Chapter Five. Creating Strong Poses
- Chapter Five. Creating Strong Poses
- Posing the Body Naturally
- Creating Appealing Poses
- Animating with Poses
- Conclusion
Chapter Six. Walking and Locomotion
- Chapter Six. Walking and Locomotion
- The Mechanics of Walking
- Animating Walks
- Beyond Walking
- Adding Personality to a Walk
- Transitions
- Conclusion
Chapter Seven. Facial and Dialogue Animation
Chapter Eight. Animal Motion
Chapter Nine. Acting
- Chapter Nine. Acting
- Acting Vs. Animating
- Acting and Story
- Acting Technique
- Acting and the Body
- Other Techniques
- Conclusion
Chapter Ten. Directing and Filmmaking
EAN: 2147483647
Pages: 84
