Mesh Deformation
Once you've built the skeleton and fitted it to a mesh, you can use it to deform the skin of your character. You can do this using a technique called mesh deformation, also known as "skinning" or "binding," which uses the position of the bones to determine the shape of the mesh. As you move the bones of the skeleton, the skin of the character deforms to match.
The goal of any mesh deformation utility is to move vertices. Each vertex in the character's mesh is assigned to follow one or many bones. When a bone moves, the vertices follow and maintain their relative distance to the bone. The vertices of the thigh need to follow the thighbone, for example, while both the upper and lower leg will affect the vertices around the knee. When more than one bone affects a vertex, their influence must be weighted.
A weighted deformation allows more than one bone to affect a given vertex. The method of accomplishing this depends on the software you use, but the underlying theory is the same for all packages. Each bone affects each vertex, using a weight from 0 to 1. When the weight is at 0, the vertex is unaffected by the bone. When the weight is at 1, the bone completely controls the motion of the vertex, and the vertex is said to be fully affected. Weights in the middle of the range allow multiple bones to affect a vertex.
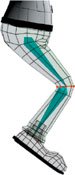
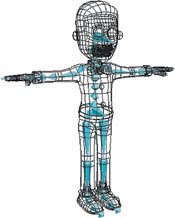
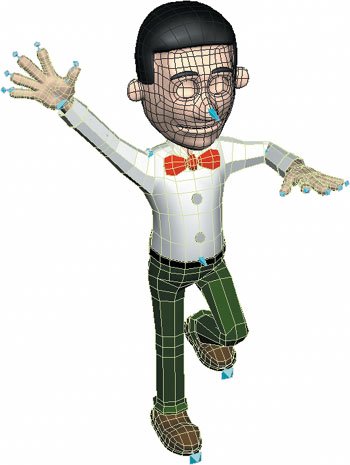
In a mesh deformation system, the vertices follow the motion of the bones.
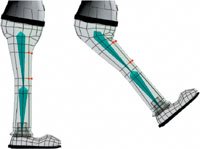
Vertices near the joints are weighted so they're affected by both bones.
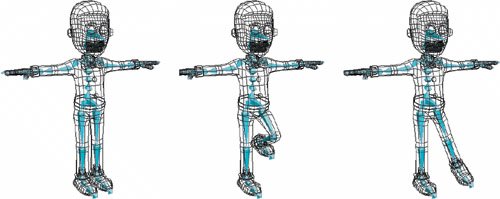
You can set up weighting using a combination of methods, which include envelopes, painted weights, and numerical assignment. Each of these methods accomplishes the same goal: assigning weights to vertices so that they will follow the bones.
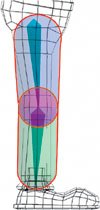
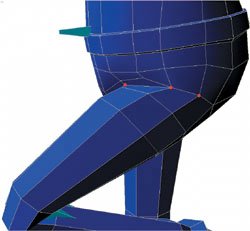
An envelope surrounds a bone and affects all the vertices within the envelope. When envelopes overlap at the joints, the vertices are weighted accordingly.
Envelopes
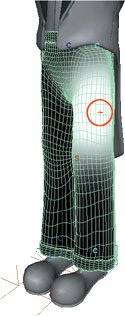
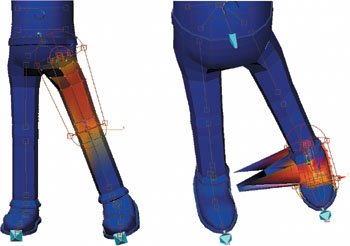
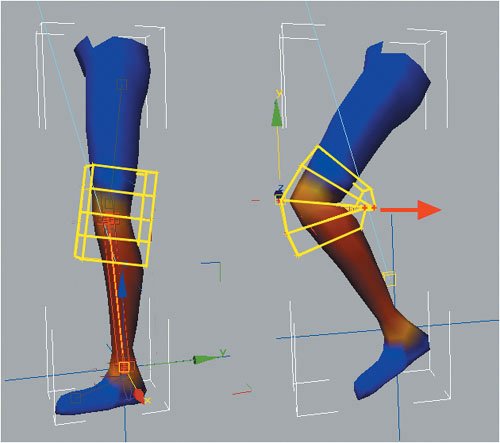
Envelopes are probably the most common way to set up weighting. An envelope is essentially a range of influence that surrounds the bone. This range of influence is typically displayed as a capsule shape that you can move and resize to match the character's mesh. When envelopes overlap, the vertices in the overlapping areas are weighted accordingly. Envelopes can also have what is known as a falloff range, which reduces the strength of the envelope to zero over a user-specified distance. Use of a falloff range helps create smooth transitions between bones.
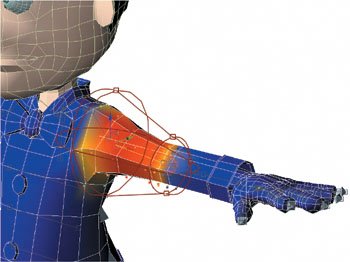
Many packages provide visual feedback to help with adjusting the envelope. In this case, the red vertices are fully affected, while the yellow ones are weighted.
Painted Weights
Some packages, such as Maya, allow you to use 3D painting tools to generate weight maps. This gives you more control in tricky areas because weights can more closely fit the shape of the character than a capsule-shaped envelope can. When combined with a pressure-sensitive tablet, it can be a very effective way to skin a character.
Painted weights allow you to use a brush to assign vertex weights interactively.
Numerical Assignment
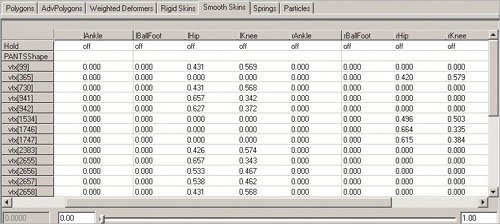
Most advanced packages have some sort of interface that allows you to type in the weights for each vertex. This gives you tons of control, but you'd usually use it only to tweak trouble spots, because typing in weight values for every vertex in a character would be a long, tedious process.
Numerical assignment involves assigning the weights numerically a vertex at a time.
Other Deformation Tools
In addition to mesh deformation, a number of other tools can help deform a mesh. These tools can aid in skeletal or facial animation.
Clusters
Clusters are another way to animate the shape of your character. In its simplest sense, a cluster is a collection of vertices, giving you the ability to control many vertices with just one cluster. More complex systems allow you to weight vertices between one or several clusters, which can produce very subtle deformation effects on the skin of a character.
Clusters are useful in several situations: a cluster linked to a skeleton can be used as a skeletal deformation system, and you can also use clusters to simulate effects such as muscle bulging. Some people use clusters to control parts of the face in facial animation
You can also use clusters to fix trouble spots in a character; for example, you can animate a cluster to resculpt a stubborn joint on a frame-by-frame basis.
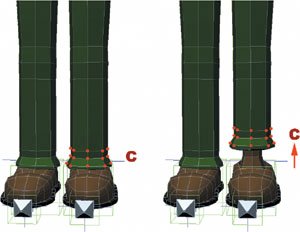
You can use a cluster to move a specific set of vertices.
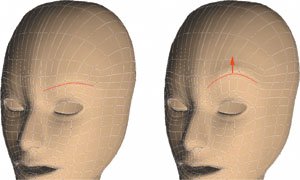
Wires
While clusters use sets of points to affect a surface, wires go a step further and use simple curves to affect the surface. This gives you much broader control and is used a lot in facial animation to animate the eyebrows, or even the mouth.
Lattices
Lattices are grids of points that you can use to affect the shape of a character's skin. Most commonly, they're used to affect soft areas of the bodyto add jiggle to a belly, for example. Some packages use lattices to simulate muscle bulging and control the deformation around joints.
Wires are splines that can deform geometry.
Lattices can be used to deform skin.
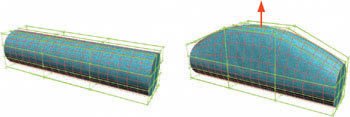
Some packages use lattices to affect deformations around joints.
Refining Rigs |
Chapter One. Basics of Character Design
- Chapter One. Basics of Character Design
- Approaching Design as an Artist
- Design Styles
- Designing a Character
- Finalizing Your Design
Chapter Two. Modeling Characters
Chapter Three. Rigging Characters
- Chapter Three. Rigging Characters
- Hierarchies and Character Animation
- Facial Rigging
- Mesh Deformation
- Refining Rigs
- Conclusion
Chapter Four. Basics of Animation
- Chapter Four. Basics of Animation
- Understanding Motion
- Animation Interfaces
- The Language of Movement
- Secondary Action
- Conclusion
Chapter Five. Creating Strong Poses
- Chapter Five. Creating Strong Poses
- Posing the Body Naturally
- Creating Appealing Poses
- Animating with Poses
- Conclusion
Chapter Six. Walking and Locomotion
- Chapter Six. Walking and Locomotion
- The Mechanics of Walking
- Animating Walks
- Beyond Walking
- Adding Personality to a Walk
- Transitions
- Conclusion
Chapter Seven. Facial and Dialogue Animation
Chapter Eight. Animal Motion
Chapter Nine. Acting
- Chapter Nine. Acting
- Acting Vs. Animating
- Acting and Story
- Acting Technique
- Acting and the Body
- Other Techniques
- Conclusion
Chapter Ten. Directing and Filmmaking
EAN: 2147483647
Pages: 84
