Creating Characters
Producing a Film
Once you have your story written and storyboarded, it's time to actually produce the film. Making an animated film can be a solitary endeavor, or it can be a group effort. Regardless of the size of the team, however, it is not an easy task. You need to be organized and dedicated to completing the film. Whether you're making a student film or a feature, the steps required are pretty much the same.
Developing a Budget
All films have a budget of some sort. In a commercial film, this budget would involve time and money. For a personal film, it could just be a free summer, a computer, and a heck of a lot of time. In either event, you need to develop a rough budget. With any project, there are three conflicting goals:
- Make the best-quality film.
- Make it at the lowest possible price.
- Make it as quickly as possible.
When confronted with these choices, you'll usually need to pick two. The trick is to balance all three so you get a film that works but also comes in on time and within budget. Doing so may require clever design, scheduling, and budgetingor freebies from a friend at the post house. However you get it done, try to make quality your number-one goal, because when people see a film they judge it by its quality, not by how much it cost or how quickly it was produced.
Sadly, nobody has infinite resources, and all animated films have a budget. Animation is a very creative pursuit, and placing time and limits on the creative process is never easy. That's why they invented things like producers to do the dirty work of creating a budget. Remember, a budget can be monetary, but it can also take other forms; you'll need to consider deadlines and air dates, as well as the number of people available to work on the project.
A budget is simply a fixed amount of time, money, or quality, and it can be good for your work. If you have an infinite amount of time to get something done, chances are good that it will never get done. Limits force you to make decisions, invent novel solutions, and, most importantly, get the project finished.
Story and Budget
Writers can very easily create stories that are rich, complex, and detailed; all they have to do is write more words. Ink is cheap. Film is expensive, and in film, some ideas simply cost more to produce than others. In live action, a simple film with a handful of characters is a lot cheaper to produce than a big action blockbuster. The same goes for animation. The more characters, sets, and props a movie uses, the more time and money each minute of screen time is going to require.
Think about movies you have seen recently and how many different locations they had to use. Typically, the more locations there are, the more expensive the film. Animation is very similar. More locations mean more sets and more expense. Even the choice of shots affects the budget: a long shot chosen over a close shot can make a difference because you have to build more for the long shot.
Many writers and story people hate to be told that an idea is just too expensive to produce. But if you try to produce something that's too expensive for the given budget, then corners must invariably be cut and the project is bound to suffer in terms of quality. It is much better to work from ideas that are achievable from the start.
Design and Budget
One way to address a budget is to design characters and props that meet the budget. If you design highly realistic characters, the audience will expect highly realistic animation. If you don't have the budget for this, quality will suffer. If your budgets are tight, it makes much more sense to design simpler characters. That way, the audience's expectations will not be so high.
Design affects budget. The simple character will be cheaper to animate than the more complex character.
Reuse and Budgeting
One way to lower budgets is to reuse characters, props, and backgrounds. This may not be possible for a single film, but it is very important for such things as a television series. Once a character is built, it can be used over and over. The only additional investment is animation time. The same goes for sets and props. Many series limit the number of sets, forcing writers to make do with the inventory at hand.
Setting Deadlines
Time, or rather the lack of it, is always a factor when making a film. Part of any budget is the time allotted to complete the project. Most commercial projects have very strict deadlines, and even student films are due at the end of the semester. The only project that might have no deadline is the personal film. Without a deadline, however, many personal films tend to sit around for years before they get finished. It's best to think of a deadline as the finish line of a racefinishing the race gives you a sense of accomplishment.
A good budget has reasonable deadlines. As is often the case when money is involved, however, many budgets tend to cut corners. Shaving a week or a month off the schedule may save a production money, but it is also sure to dig into the quality of the finished project.
Deciding exactly how much time to budget for a project requires years of experience. Most novices (and many experts, for that matter) tend to underestimate the amount of time required. It almost always takes longer than you think. If in doubt, always add a fudge factordouble or triple your original estimate.
You can use many rules of thumb when budgeting a project. One may be the number of seconds an animator can produce in a week. Of course, this number will vary depending on the project. An animator on a feature film may produce only 3 to 10 seconds per week, but it is very high-quality animation. Games are another story: for the short cinematic sequences in games, 3 to 10 seconds a day, and for gameplay, at least 3 moves a day are reasonable goals. An animator on an animated TV series, on the other hand, may have to produce as much as 20 to 60 seconds per week, but at a lower quality. As you can see, these numbers vary widely depending on the material.
In addition to animator time, dozens of other factors need to be considered. How much time is needed to write the script? Record the dialogue? Create the storyboards? Get approval from the network? Other factors may be technical, such as how much time it takes to render the project. If it takes three days to render all the frames and the project is due tomorrow, you're dead meat. All these factors, plus many others, must be worked into a coherent schedule.
Developing a Schedule
You'll need to consider many factors in creating a schedule. The best way to look at these factors is to put everything into a grid of some sort. Many producers use scheduling programs or custom spreadsheets to work it all out. Putting together a good schedule is a lot like putting together an assembly line: after one part of the process is complete, the next department picks up the work and adds to it. For example, you can't animate a character until it is built, so modeling, rigging, and layout must happen before animation.
Some tasks can overlap. In a feature film environment, many studios develop and model the characters concurrently with the script and storyboard creation. This allows the animators to start work much sooner after the storyboard is locked. Rendering is another task that can be overlapped. After a shot is finished, it can be rendered while the other shots are animated.
A simple schedule overlaps tasks for efficiency.
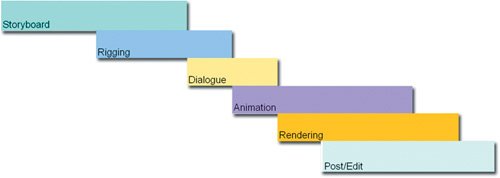
The best schedule interleaves all of the required tasks seamlessly, so that the film is completed cleanly and efficiently, with no waiting around. Of course, all sorts of issues that threaten to undermine the schedule are sure to pop up during production, but with a well-planned schedule, these can be accounted for much more easily. It's also good to add in a bit of a cushion for those times when everything goes wrong. If the project is due in 10 weeks, you might create an 8-week schedule just to be sure that when tasks slip, you'll still hit the final deadline.
Assembling a Crew
Animation is a lot of work, and most films require a crew of people. For small projects, this crew can be a handful of people; for feature films, the crew can number in the hundreds.
Regardless of the number of actual people involved, there are quite a few job descriptions associated with filmmaking, and you'll need to be familiar with each of them. If you're working alone, you may find that you'll be doing most or all of these jobs yourself. If, however, you're working as part of a larger team, you may be doing only one of these jobsor in the case of a smaller production, you may find that you're managing a handful of tasks. Regardless of where you find yourself, the following list should be helpful.
Producers. These come in a number of flavors. At the top of the heap is the executive producer, who does the business development and funds the project. Executive producers typically deal with clients. A bit lower on the totem pole may be a supervising producer who manages the day-to-day tasks and may delegate responsibility to even more producers. These may include line producers, creative producers, animation producers, and perhaps a few others. Generally, all producers are involved in managing the production in one way or another.
Director. The main creative force on the project. The director supervises just about everything, including story, dialogue recording, modeling, animation, and postproduction. Some studios break up the directing job: they may have a voice director who does nothing but direct the voice talent, an animation director, an art director, a creative director, and so on.
Writer/storyboard artist. The people who create and visualize the story. Writers tend to work with words; storyboard artists tend to work with pictures. Both have the same goal: coming up with a clever and coherent story.
Voice talent. The voices of the characters. A good voice actor has a very nimble and versatile voice and excellent acting skills.
Modeling. A sculptor, essentially, who works on a computer and creates all the characters and props. Some modelers have been known to dabble in clay and may scan in their physical sculptures. A good modeler knows how to build characters that animate well.
Textures/lighting. A painter who works on the computer. The texture artist is responsible for creating textures and writing shaders that are applied to the characters and props. The texture person may also manage lighting.
Technical director. An artist with a strong technical bent. Technical directors know a lot about the software and can usually do some programming. They do all sorts of tasks, from rigging characters to laying out scenes, doing camera work, writing shaders, and managing renders to writing custom software and plug-ins.
Animator. The person who brings the characters to life. A good animator has an excellent sense of acting and timing, as well as a strong knowledge of anatomy and motion.
Systems and support. The people who keep the computers running. This team can also include people dubbed "render wranglers," who manage rendering and final output on large projects, making sure each and every frame finds its way through the system.
Audio. People who record dialogue, as well as edit and mix the final soundtrack.
Composer. If there is original music, someone has to write it, and that's the composer. A good composer writes music that sets a mood but doesn't overpower the film.
Administrative. Of course, there are plenty of spots for administrative people such a production assistants, payroll, and so on.
It's always important to get good people for your projectspeople who are not just talented artists, but who show up on time and hit the deadline with time to spare. Additionally, everyone has to get along; people with a professional work ethic make things go much more smoothly.
Of course, the best people are always busy (and usually expensive), so you may have to make some trade-offs when looking for people. In the case of a student film, you may have very little money to offer, but you can do trades and offer to help out on other students' projects in return for help on your film.
Developing the Story
As we have seen, the first task in making an animated film is developing the story. Most of the time, you pitch and sell the idea to get the money and time to create the film. Once you have the idea sold, a development and refinement process probably takes place before the film actually gets made. This means refining the raw idea into a film that can actually be made. Many productions spend almost as much time developing the story as they do in actual production.
In some cases, the story development and animation processes run concurrently. The main characters can be designed before the storyboard is complete, and modeling can also begin before the story is locked.
Designing the Production
As the story develops, the look of the characters and of the production should also develop. Sometimes this is a back-and-forth process in which the design decisions affect the story and vice versa. As the design is solidified, the modeling and texturing artists can start creating the assets for the production.
Design is one of the most critical tasks of a film. If an animation looks cool or interesting, your audience will notice it, and great design not only appeals to your audience, but also inspires the artists on your crew. (I know of a lot of productions that got extra attention from the crew just because the designs looked so cool.) Conversely, a bad design makes the production into "just another job" for the crew.
Modeling and Rigging
Character building and rigging must happen early in the production. You are likely to know who the major characters are even before the story is finalizedin many productions, the characters are built while the script is being written. In fact, you may need to create rough models of the characters to sell the project in the first place.
As the script and storyboard are finalized, you will have a much clearer idea of the modeling requirements. This enables you to model the secondary characters and props as the dialogue is recorded and the Leica reel is cut.
Recording Dialogue
Once the script and storyboard are finished, it's time to record dialoguebut before you do this, you need to cast your characters.
Casting your voice talent is one of the most critical tasks you face in making a film. If you can get excellent voice talent who give great performances, you will have great raw material for animators to use in creating an inspired acting performance.
The voice determines, to a large degree, how the audience perceives a character, and you should make every attempt to get it right. You may have to audition a number of actors in order to find the right voice.
Casting Voices
Selecting voices for a film is like assembling players for a band. The individual voices must complement one another, yet they must also all work together toward a common goal. Try to come up with a good mix of voices and textures. If two voices sound similar, it can get very confusing for the audience.
Casting is difficult for the director, but it can be even more stressful for actors. Most of them will be rejected, and only a few will get jobs. Respect this when holding a casting session. With actors who don't make the cut, be nice and be sure to pass along a compliment or two as you let them down.
What does this character sound like? Casting a low voice will make him scary; casting a high voice might make him funny.
You should always go into a casting session with an open mind. Often, you won't know the voice until you hear it. If you have a preconceived notion of how you want your character to sound, it biases you against what could be a better solution. Actors are creative people, and they can bring a lot to the process. Give them a bit of rope and let them try to "discover" the voice. After they nail it, let your directing skills kick in and fine-tune the performance.
When auditioning, listen to just the actor's voice, because that's all the audience will hear. It doesn't matter what the actor looks like; the sound is all that matters. A number of women perform voices for young boy characters, for example, but obviously could never play them on screen. You're not casting the person, just the person's voice. Many directors look away from the person who is auditioning so that the actor's gestures or appearance don't bias them.
If your budget is minimal, as in a personal film, you may have to rely on friends or even perform the voices yourself. This doesn't have to be a problem; you can get good performances from nonprofessionals. Aardman Animation has done some excellent films, such as Creature Comforts, among others, that use interviews with ordinary people as the dialogue track. People always sound more relaxed and natural when they're not trying to act and when they're talking about something personal.
Recording Dialogue
After you cast the actors, you can book a voice session to record your tracks. This is one of the most critical parts of the production process, because a lousy voice track cannot be saved with great animation. Typically, a voice session is also one of the most fun parts of the process. You hear the lines for the first time, which is exciting, and you also hear the jokes for the first time, which can be hilarious.
In a professional environment, the actors sit together in a booth, and a recording engineer operates the equipment. The director conducts the process, while various other people (producers, clients, etc.) usually gather and offer their sage advicewhich the director may or may not take.
In a budget environment, try to get a decent recording in whatever way possible. This usually means getting good microphones and a quiet room. If you can, get a separate microphone for each actor.
Dialogue can be recorded one line at a time, or many lines can be recorded together, as in a radio play. You'll often have actors voice multiple characters, and in this case, you need to record lines individually. Recording lines one at a time makes editing much easier and allows you to easily introduce your own timing in the final material.
If your dialogue is quick, with characters stepping on each other's lines, you may need to record many lines in a single take. This can become tricky later, because it's much harder to edit this type of dialogue.
Directing Dialogue
The director needs to get the most out of each actor. This means communicating with the actors and letting them know what you expect. Before you record a scene, discuss it with the actors so they have an idea of how you see the action taking place. You also need to keep the actors fresh and spontaneous, so try to communicate your ideas quickly and concisely.
When recording, it's a good idea to get the actors into a creative flow, so they stay in character. Be sure to get stands for the scripts, so the actors can keep their hands free. Too many interruptions cause them to slip out of character, which prolongs the process and makes the acting stale. Try to keep things moving along when everyone is in character. The first few reads of a script are usually the best.
Most directors like to do multiple takes so that they have a variety of material to choose from. The best way to do this and still keep the actors fresh is to have the actors record the same line (or lines) three times in a row, usually known as A, B, and C takes (which can also stretch into many more if needed). By saying the lines multiple times, actors can vary the reads each time and stay within character. As you record, mark down the take you like. If you're not sure, ask the engineer for a playback.
If an actor is not reading a line the way you want, the first temptation is to just read the line yourself to give the actor a hint. This is not a good idea, because actors need to find the lines themselves. If they simply parrot the director, the line is certain to fall flat. Try to get your point across in different ways by telling the actor the line needs to be louder, softer, subtler, angrier, nicer, more condescending, etc. If you can't get the reading you want, you may need to come back to it at the end of the session, so the actor has a fresh take.
Ad-Lib
Some of the best voice actors are also very good comedians and improvisational actors. During the recording process, they may diverge from the script and throw in a few ad-lib lines. These can add a lot of spice and spontaneity to your film. On some productions, we've known our actors well enough to know that we can leave parts of the script open and allow them to fill in the blanks. You may also find that lines that looked great on paper don't sound as great when read. In this case, you may need to do a quick rewrite of the script in the recording studio or ask the actors to improvise something better.
Ad-libs and script changes, however, can be a real problem with clients and network executives. Most of these people have approval over the script, so any deviation from the script may need to go through another approval process. Be sure to record the original lines as well as the ad-libs so that you have a backup if the changes are rejected.
Cutting a Leica Reel
Once you have your storyboard and your dialogue, it's a good idea to cut a Leica reel, also known as an animatic. The Leica reel contains still images timed to the dialogue and music. The finished Leica reel looks like a slide show that plays like a rough version of your film. It tells you the length of each individual shot and locks down the timing of dialogue.
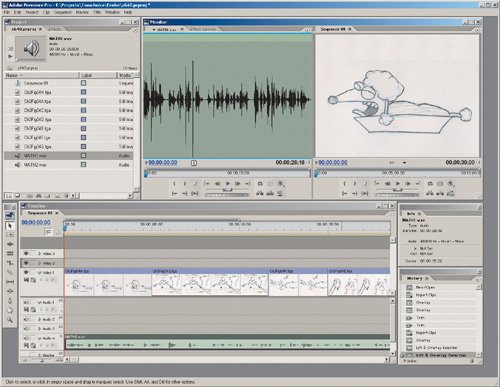
A video editing package like Avid, Final Cut, or Adobe Premiere is a good choice for creating Leica reels. The procedure is relatively straightforward, and the principles apply to other editing packages as well.
First, you should get digital versions of your storyboard panels. If you created them in 3D, the files already exist. If the storyboard is hand-drawn, the drawings need to be scanned. (For large storyboards, a scanner with a sheet feeder helps considerably.) If you have dialogue, you also need to import the audio into your computer. After you have these on your disk, you need to import all the storyboard picture files into your video editor.
Now it's simply a matter of clicking and dragging the individual pictures to the video timeline and adjusting their lengths so that the film plays the way you want. By dragging the edges of the image on the timeline, you can add time to or subtract time from each panel. If you have dialogue, it should be dragged to the timeline as well. Dialogue, however, is a fixed lengththe only way to make it shorter is to cut words or sentences. As you work through the dialogue, you are also selecting the final takes from the recording session. You may need to jot down the exact takes for later so the audio engineer can match the tracks from the master tape.
After you've worked your way through all the dialogue and storyboard panels, render your Leica reel and watch it. If you need to, go back and make timing changes. You may also want to cut extraneous shots to tighten up the film, or add needed shots at this point. The finished Leica reel gives you a good idea of exactly how long your film will be, as well as exactly how long each shot in the film will be.
A Leica reel can be created in a nonlinear video editor.
Creating the Layout
After you've finished your Leica reel, the timing and shot selection for the film are also locked down. It's finally time to start animation production in earnest. The production team is likely to be building and rigging the primary characters and props long before the Leica reel is complete, though some productions hold off on secondary modeling because scenes can get cut during the animatic process. It makes no sense to build props for scenes that will never be animated.
Before the animators can begin animating, they need to have scene files that contain all the elements associated with the scene. These include any characters, props, backgrounds, and audio, among other things. This task is typically called layout. Technical directors usually perform the task, but animators have also been known to help lay out shots for animation.
Each layout varies depending on the requirements of the scene. If the animation involves a live-action composite, it may be as simple as placing the character in the shot and loading up the background plate. In a more complex shot, the artist doing layout may need to light the scene, rig characters, place props, and so on. The final layout should be a scene file that is ready to be animated.
Animating the Film
After the scenes have been laid out, you're finally ready to actually animate your film. That's what most of this book has been about, and animation is one of the truly fun parts of making a film.
When animating your film, the temptation is to animate every shot in sequential order, from beginning to end. This, however, is usually not the best way to proceed. The beginning of the film is very important to the rest of the film, so don't animate it until you are comfortable with your characters. This takes a while. The first shot you animate should probably be an easy one somewhere in the middle of the film. That way, you can get a feel for the characters before animating the critical shots. This also ensures that the end of your movie will look more fully resolved, because it will have been animated at the end of production, when everyone has become comfortable with the story, characters, and other elements.
Keeping Track of Things
After production begins laying out shots, you need to track each shot through the production process. This usually involves a bit of paperwork to ensure that everyone involved in production is kept up to date on the progress of the film.
A tracking sheet is a piece of paper or Web page on a computer that keeps track of each and every shot as it flows through the production. Different studios call these documents by different nameslead sheets, production tracking, and so on. Despite the differing terminology, they all keep track of basically the same information.
Tracking sheets are usually set up as tables. Each horizontal row contains the information for one shot. The vertical columns contain information for each step of the process. Typical columns might include modeling, texturing, rigging, layout, animation, and rendering. There may also be spaces for information such as the name of the animator, the number of revisions, and so on.
As each step is finished for each shot, the appropriate boxes are marked so that the director and producers can instantly see the progress of the film.
Rendering and Output
Once your animation is complete, you need to render it and output it to film or video. Film always looks great, particularly on the big screen. Unfortunately, you can't just hand people a 35mm print and tell them to go watch your film. Video is certainly a more practical medium, though it lacks the quality of film. You can also distribute your animation digitally on CD-ROM, on DVD, or over the Internet.
Output to Video
Video is the most common output for computer animation. Video output cards are very reasonably priced, making it by far the cheapest way to get your film into a format that people can see. You can simply print your video to a standard home video recorder, but this does not by any means give you the best-quality picture. Digital decks that use the DV tape format along with an IEEE1394 interface produce excellent-quality images.
Most post houses can also output your digital frames directly to higher-end formats like DigiBeta, D1, and HDTV. You can simply back up your frames to an archival medium such as CD-ROM or DLT tape and have the post house do the conversion and output for you.
Output to Film
Film is a great medium for output. Videotape formats seem to change with the seasons, but 35mm film has been constant for almost a century. Many major studios even go so far as to record their digitally created cartoons to film for archive, even though it is not needed for broadcast.
If you want to output to film, you open up a whole new can of worms. Film requires images of a much higher resolution than video. The typical film recorder requires an image that's at least 2048 lines wide, as opposed to video's 640 lines, taking up 10 times the storage space of video. This can blow your storage requirements through the roof. Film recorders can also be expensive to rent. Some companies, however, have set up service bureaus that can output film from your data on a per-frame basis.
To get your images to film, the typical process is to back up all the frames on an archival medium that the service bureau can read. DLT tape is the most popular format, because you can get more than 40GB on a tape. After the tape is in the proper format, you basically hand it to the bureau, and they give you back a negative of your filmand, of course, a bill.
Another way of getting film output is to print your animation to videotape, such as DigiBeta, and go to a service that prints video to film. This looks decent, but not nearly as good as a direct-to-film transfer. Some people are now using HDTV as the intermediate format. I've heard that this can work very well, particularly because HDTV can support 24fps.
Adding Sound Effects
Now that your film has been animated and rendered, you still need to do some postproduction to add sound effects and sync up the dialogue.
Creating good sound effects is an art in itself, and if you have the budget, a good sound engineer is worth the money. If you don't have that sort of budget, you can find plenty of sound effects CDs on the market with a wide variety of sounds, from realistic to cartoony.
There are also many times when you need sound effects that aren't in any collections. If this is the case, you need to create them from scratch. This involves setting up a microphone and recording the sounds you need. If you want the sound of breaking glass, for example, get a hammer and smash some pop bottles. (Wear safety glasses, of course!) You can be very creative in the types of objects you use to create your sound effects. Toys like slide whistles, kazoos, and jaw harps make great sounds. Also, atypical effects can make a scene much funnier. If a character runs into a wall, the sound of a bowling strike may be funnier than a simple thud.
One sound effect that is often overlooked is the ambient sound of the room. If you're in the city, the room may have faint echoes of traffic in the distance. Country dwellers may have birds or crickets as their background. This type of effect is barely audible but adds a subtle sense of space to the film.
How do you add sound effects? Well, a good recording studio with an engineer is the best way to do this. You are paying not only for the use of the studio's equipment, but for the engineer's time and expert ear. If you can't afford this, most video editing packages allow you to add a track of sound effects over the dialogue and sync it to video. More sophisticated multitrack sound editing software packages are geared specifically for the task of mixing sound for film. These packages allow you to mix dozens of digital tracks in real time as well as to add effects. The sound can then be mixed to a simple stereo or mono track and synced to your film in Premiere, or at a postproduction facility.
Distribution
After your film is complete, how do you get people to look at it? Well, if the film was a work-for-hire project for a studio or commercial client, that matter is pretty much out of your hands. The owner of the film handles the distribution.
If you have a student or personal film, distribution is very important. In the past, many people have sent films to film festivals. There are a number of major festivals, including Annecy in France, the LA Animation Celebration, and Hiroshima in Japan, as well as many, many more. Siggraph is a great festival for 3D animation.
One currently popular method of distribution is the Internet. Simply put up a Web site with a link to your film. Pass on the link to some of your friends. If they like it, they'll pass it on to their friends, and so on. Some films have really taken off through this word-of-mouth method. For more exposure, you might also consider a number of film sites on the Internet that take a cut of future proceeds in exchange for hosting your film.
Chapter One. Basics of Character Design
- Chapter One. Basics of Character Design
- Approaching Design as an Artist
- Design Styles
- Designing a Character
- Finalizing Your Design
Chapter Two. Modeling Characters
Chapter Three. Rigging Characters
- Chapter Three. Rigging Characters
- Hierarchies and Character Animation
- Facial Rigging
- Mesh Deformation
- Refining Rigs
- Conclusion
Chapter Four. Basics of Animation
- Chapter Four. Basics of Animation
- Understanding Motion
- Animation Interfaces
- The Language of Movement
- Secondary Action
- Conclusion
Chapter Five. Creating Strong Poses
- Chapter Five. Creating Strong Poses
- Posing the Body Naturally
- Creating Appealing Poses
- Animating with Poses
- Conclusion
Chapter Six. Walking and Locomotion
- Chapter Six. Walking and Locomotion
- The Mechanics of Walking
- Animating Walks
- Beyond Walking
- Adding Personality to a Walk
- Transitions
- Conclusion
Chapter Seven. Facial and Dialogue Animation
Chapter Eight. Animal Motion
Chapter Nine. Acting
- Chapter Nine. Acting
- Acting Vs. Animating
- Acting and Story
- Acting Technique
- Acting and the Body
- Other Techniques
- Conclusion
Chapter Ten. Directing and Filmmaking
EAN: 2147483647
Pages: 84
