Finalizing Your Design
The ultimate goal of the design process is to create an image or sculpture that can be used as a reference to model the character in a 3D application. 3D modeling can be a very technical pursuit, so the art you create must be technically precise. Think of technical drawings used in industry and architecture; this is essentially what you will be creating. To model a character, you will need at least two orthographic views: side and front. These can be created using drawings, sculptures, or photographs.
Drawing Your Characters
The simplest way to finalize your character designs is to sketch them on paper. A pencil is a wonderful thing, because it allows you to very quickly block out the size and shape of your character. If you know how to write your name, you can most likely draw a character.
If you spend much time modeling characters on the computer, you'll develop a visual sense that will translate to paper as well. The act of modeling characters seems to improve your drawing, while drawing characters improves your modeling. Another way to improve both skills is through a life drawing class, which is the single best way to understand the aesthetics of the human form.
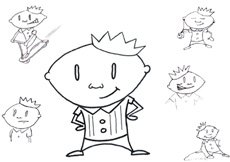
People who draw often "cheat" the third dimension. This little guy looks fine on a flat sheet of paper, but he might not transfer well to 3D.

The Problem with 2D
The one problem with drawings is that they are 2D representations of a 3D world. Many artists "cheat" the third dimension when drawing, and while this works within the drawing, translating that to 3D can be difficult. When creating drawings for modeling, you need to make sure they don't cheat and are accurate to 3D.
Finalizing Your Drawings
The final drawings that prepare your character for modeling need to be very accurate technical drawings that work in 3D. Creating accurate front and side views of a character is not as easy as it sounds. Each view must line up precisely with the other drawings once they're scanned into the computer.
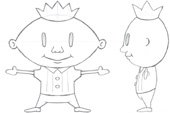
The drawings also need to have very specific poses. At a minimum, you'll want a front and side view, but top and back views can also be helpful for some characters. Draw your characters with the arms outstretched in the front view, to assist in modeling and rigging the arms. If your character is symmetrical, be sure to make the drawing symmetrical. One way to ensure that your character is symmetrical is to draw only half the character on paper, scan it, and then flip it in Photoshop to create the other half.
These are nice drawings, but they do very little to help the modeler realize the character.
This is much better. The character has front and side views, the arms are extended, and the front view is symmetrical.
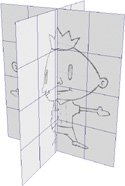
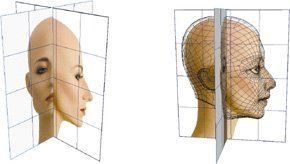
These images can be mapped onto planes in a 3D application and used as a reference for modeling the character.
Sculpting Your Characters
Another way to design characters is to sculpt them in clay. A 3D clay sculpture is much closer to the final character than any 2D drawing can get. Clay, however, is messier, more difficult to model accurately, and certainly a great deal more time-consuming than sketching.
Like drawing, sculpting is an art. Plenty of books and classes are available to teach the finer points of sculpture. If you understand 3D modeling, you should take to sculpture quite easily, and you'll probably find the interactivity of clay far superior to that of any computer-driven interface.
Once you've created an acceptable sculpture, there are two methods for getting it into the computer for modeling. The first method is simply to take a photograph of the sculpture. The second is to digitize the actual surface of the model, using a 3D scanner or digitizer. The method you choose will depend on your needs and also your budget. Laser scanning is very accurate and makes modeling easier, but the process can get expensive because it's usually done by an outside service. Digital cameras make photographing a subject very easy, and good reference photos are typically enough to create an accurate model.
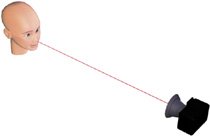
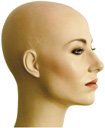
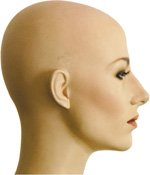
The camera needs to be placed so it is shooting perpendicular to the subject.
This shot is not perpendicular, and the result is a less than perfect profile.
This shot is dead-on and will make modeling the profile much easier.
Photographing Sculpture
You can photograph a sculpture for reference, but you can also photograph just about anything else: if you want to model a likeness of real person or an animal, for example, you can photograph them instead of sculpting or drawing them. Regardless of the subject, the process is pretty much the same. Like making a technical drawing, taking an accurate photograph that can be used for 3D modeling requires a bit of care.
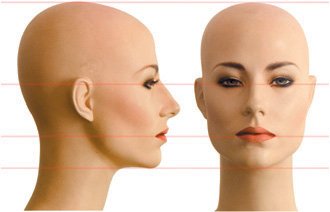
When photographing a 3D object for modeling, you will always need to get accurate front and side views. The photographs you create will need to mimic the front and side orthographic views in your 3D program. To accomplish this, position the camera so that it is level with and pointing straight at the object being photographed. If the camera is too high or low or off to one side, the object will be distorted, making it difficult to model. When photographing a head, for example, it's usually best to center the camera on the subject's nose. You also need to maintain a uniform distance between the lens and the subject for each view. The best way to do this is to put the camera on a tripod and back the subject up against a wall to create a fixed distance between the two.
This front view was shot with a wide 28mm lens, which distorts the perspective, causing a slight fisheye effect.
Another important parameter is the focal length of the lens. A long lens flattens your subject, mimicking an orthographic view and providing a more accurate modeling reference. To better understand this, think of a fisheye lens, which is the opposite of a long lens. A fisheye intentionally distorts the subject, making modeling harder. If your camera has a variable zoom, zoom all the way in and move the camera back to frame your subject.
Moving the camera back and zooming the lens to 100mm flattens the perspective, making the image more accurate and more like the orthographic viewpoints used in modeling.

Preparing Photographs for Modeling
Preparing a set of photographs for modeling follows much the same process as getting a set of drawings ready. The photographs are transferred or scanned into a computer. Even the most careful photo session will create images that are slightly different in size, so an image-editing application such as Photoshop is useful for scaling and arranging the photos.
These photos were aligned in Photoshop. A few guidelines can help align the images.
Once the images are aligned, they can be mapped to reference planes. With the planes as a reference, the modeling will be accurate to the design.
Chapter One. Basics of Character Design
- Chapter One. Basics of Character Design
- Approaching Design as an Artist
- Design Styles
- Designing a Character
- Finalizing Your Design
Chapter Two. Modeling Characters
Chapter Three. Rigging Characters
- Chapter Three. Rigging Characters
- Hierarchies and Character Animation
- Facial Rigging
- Mesh Deformation
- Refining Rigs
- Conclusion
Chapter Four. Basics of Animation
- Chapter Four. Basics of Animation
- Understanding Motion
- Animation Interfaces
- The Language of Movement
- Secondary Action
- Conclusion
Chapter Five. Creating Strong Poses
- Chapter Five. Creating Strong Poses
- Posing the Body Naturally
- Creating Appealing Poses
- Animating with Poses
- Conclusion
Chapter Six. Walking and Locomotion
- Chapter Six. Walking and Locomotion
- The Mechanics of Walking
- Animating Walks
- Beyond Walking
- Adding Personality to a Walk
- Transitions
- Conclusion
Chapter Seven. Facial and Dialogue Animation
Chapter Eight. Animal Motion
Chapter Nine. Acting
- Chapter Nine. Acting
- Acting Vs. Animating
- Acting and Story
- Acting Technique
- Acting and the Body
- Other Techniques
- Conclusion
Chapter Ten. Directing and Filmmaking
EAN: 2147483647
Pages: 84
