How a COM Add-In Is Registered
A COM add-in from the standpoint of the Office application is a COM component registered in a particular place in the registry that implements the IDTExtensibility2 interface defined by Office and Visual Studio. From your standpoint as a C# developer, you are writing a C# class that you will compile into an assembly (DLL). Through .NET's' COM interop support, your C# class can be made to look like a COM component to the Office application. You will have to register your add-in just like any COM component to get the Office application to load it.
The registry settings and interface implementation described in this section are created for you automatically when you create an add-in project in Visual Studio. However, it is still important to understand the anatomy of an add-in should you have to troubleshoot add-in issues.
Registry Location of a COM Add-In: HKEY_CURRENT_USER or HKEY_LOCAL_MACHINE
Office determines which COM add-ins to load for a particular application by checking two places in the registryeither under HKEY_CURRENT_USER or under HKEY_LOCAL_MACHINE. To view the registry, choose Run from the Start menu of Windows and type regedit.exe and click the OK button.
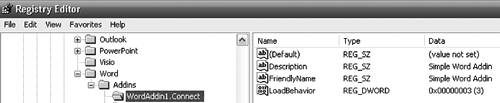
The first place a COM add-in can be registered is in the registry under HKEY_CURRENT_USERSoftwareMicrosoftOffice\%appname%Addins. This is where COM add-ins installed on a per-user basis are found, as shown in Figure 23-1. COM add-ins should typically be installed on a per-user basis so that the add-in user settings will move with the user should the user log on to a different machine.
Figure 23-1. A registry entry for a COM add-in.
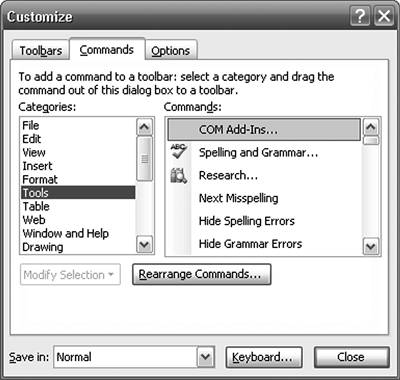
Any COM add-ins registered in the registry under HKEY_CURRENT_USER will show up in the COM add-ins dialog for the relevant Office application. Finding the COM add-ins dialog in each Office application can be quite a challenge. In all Office applications, the dialog is not available from a menu in the default install. To add a button to show the COM add-in dialog, you need to customize the toolbars in the Office application by right-clicking the command bar and selecting Customize. Doing so causes the Customize dialog to appear (see Figure 23-2). Click the Commands tab and select Tools from the Categories list. Then scroll through the list of available commands and find the COM Add-Ins command. Drag this command onto an existing toolbar.
Figure 23-2. Locating the COM Add-Ins command in the Customize dialog box.
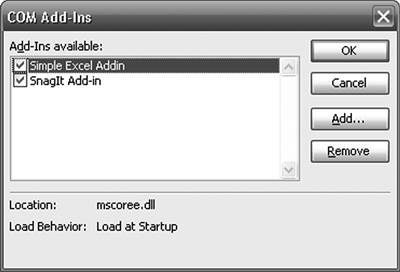
When you click the COM Add-Ins button that you have added to a toolbar, the COM Add-Ins dialog displays, as shown in Figure 23-3. This dialog shows you all the COM add-ins registered in the registry under HKEY_CURRENT_USER for the Office application you are using.
Figure 23-3. The COM Add-Ins dialog.
The second place a COM add-in can be registered is under HKEY_LOCAL_MACHINESoftwareMicrosoftOffice\%appname%Addins. COM add-ins registered on a per-machine basis are available for all users but also are effectively hidden from the user within the Office application. If a COM add-in is registered under HKEY_LOCAL_MACHINE, it will never show up in the COM Add-Ins dialog. It is recommended that you register your COM add-in under HKEY_LOCAL_USER so that your COM add-in is visible to end users.
Registry Entries Required for a COM Add-In
Each COM add-in registered in the registry whether under HKEY_CURRENT_USER or HKEY_LOCAL_MACHINE must be registered in the following way. First, there must be a key representing the COM add-in under the Addins key. This key is named with the ProgID of the COM add-in. A ProgID is an identifier for the COM add-in that is generated by Visual Studio. This identifier is used by COM to figure out how to create your COM add-in. The default ProgID for a Visual Studio COM add-in project is the name of the add-in project combined with the name of the class (Connect) generated in Visual Studio that implements IDTExtensibility2. So if you create a COM add-in project in Visual Studio called MyAddin2 for an Office application such as Outlook, the main key that Visual Studio creates in the registry for the COM add-in would be this:
HKEY_CURRENT_USERSoftwareMicrosoftOfficeOutlookAddinsMyAddin2.Connect
Under the key for your COM add-in, several values are required. FriendlyName is a string value that contains the name of the COM add-in that will appear to the user in the COM Add-Ins dialog. Description is a string value that contains a more in depth description of the COM add-in. This description does not appear anywhere in the Office UI or COM Add-Ins dialog, but it is helpful when users or administrators are investigating by using regedit.exe what add-ins are installed on a machine and what they do. LoadBehavior is a DWORD value that describes the load behavior for the COM add-in. The values that LoadBehavior can be set to are a bitwise or of the values in Table 23-1. Typically, this should be set to the value of 3 to load and connect the COM add-in at startup. If the LoadBehavior is set to 2, the COM add-in is loaded but its IDTExtensibility.OnConnection method is never called, which effectively amounts to the COM add-in being disabled.
|
Value |
Description |
|---|---|
|
0 |
Disconnected. The COM add-in is not loaded. |
|
1 |
Connected. The COM add-in is loaded. |
|
2 |
Load at startup. The COM add-in will be loaded and connected when the host application starts. |
|
8 |
Load on demand. The COM add-in will be loaded and connected when the host application requires it, (for example, when a user clicks a button that uses functionality in the COM add-in). |
|
16 |
Connect first time. The COM add-in will be loaded and connected the first time the user runs the host application after registering the COM add-in. |
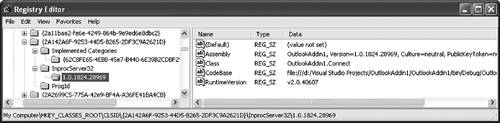
In addition to these keys, several entries under HKEY_CLASSES_ROOTCLSID are made for the COM add-in, as shown in Figure 23-4. A unique ClassID (a GUID, which is a unique identifier that looks like {FEC2B9E7-9366-4AD2-AD05-4CF0167AC9C6} ) is created by Visual Studio. This ClassID is added as a key under the HKEY_CLASSES_ROOTCLSID path. This ClassID is registered so it corresponds to the ProgID for the COM add-in (MyAddin2.Connect in our example). The keys and values created under the ClassID key are described in more detail later in this chapter.
Figure 23-4. The registry entries for a COM add-in under the HKEY_CLASSES_ROOTCLSID path.
Part One. An Introduction to VSTO
An Introduction to Office Programming
- Why Office Programming?
- Office Object Models
- Properties, Methods, and Events
- The Office Primary Interop Assemblies (PIAs)
- Conclusion
Introduction to Office Solutions
- The Three Basic Patterns of Office Solutions
- Office Automation Executables
- Office Add-Ins
- Code Behind a Document
- Conclusion
Part Two. Office Programming in .NET
Programming Excel
- Ways to Customize Excel
- Programming User-Defined Functions
- Introduction to the Excel Object Model
- Conclusion
Working with Excel Events
Working with Excel Objects
- Working with Excel Objects
- Working with the Application Object
- Working with the Workbooks Collection
- Working with the Workbook Object
- Working with the Worksheets, Charts, and Sheets Collections
- Working with Document Properties
- Working with the Windows Collections
- Working with the Window Object
- Working with the Names Collection and Name Object
- Working with the Worksheet Object
- Working with the Range Object
- Special Excel Issues
- Conclusion
Programming Word
Working with Word Events
Working with Word Objects
- Working with Word Objects
- Working with the Application Object
- Working with the Dialog Object
- Working with Windows
- Working with Templates
- Working with Documents
- Working with a Document
- Working with the Range Object
- Working with Bookmarks
- Working with Tables
- Conclusion
Programming Outlook
- Ways to Customize Outlook
- Introduction to the Outlook Object Model
- Introduction to the Collaboration Data Objects
- Conclusion
Working with Outlook Events
Working with Outlook Objects
- Working with Outlook Objects
- Working with the Application Object
- Working with the Explorers and Inspectors Collections
- Working with the Explorer Object
- Working with the Inspector Object
- Working with the NameSpace Object
- Working with the MAPIFolder Object
- Working with the Items Collection
- Properties and Methods Common to Outlook Items
- Outlook Issues
- Conclusion
Introduction to InfoPath
- What Is InfoPath?
- Getting Started
- Form Security
- Programming InfoPath
- Data Source Events
- Form Events, Properties, and Methods
- Conclusion
Part Three. Office Programming in VSTO
The VSTO Programming Model
- The VSTO Programming Model
- VSTO Extensions to Word and Excel Objects
- Dynamic Controls
- Advanced Topic: Dynamic Host Items
- Advanced Topic: Inspecting the Generated Code
- VSTO Extensions to the Word and Excel Object Models
- Conclusion
Using Windows Forms in VSTO
- Using Windows Forms in VSTO
- Introduction
- Adding Windows Forms Controls to Your Document
- Writing Code Behind a Control
- The Windows Forms Control Hosting Architecture
- Properties Merged from OLEObject or OLEControl
- Adding Controls at Runtime
- Conclusion
Working with Actions Pane
Working with Smart Tags in VSTO
- Introduction to Smart Tags
- Creating Document-Level Smart Tags with VSTO
- Creating Application-Level Smart Tags
- Conclusion
VSTO Data Programming
- VSTO Data Programming
- Creating a Data-Bound Customized Spreadsheet with VSTO
- Creating a Data-Bound Customized Word Document with VSTO
- Datasets, Adapters, and Sources
- Another Technique for Creating Data-Bound Spreadsheets
- Caching Data in the Data Island
- Advanced ADO.NET Data Binding: Looking Behind the Scenes
- Binding-Related Extensions to Host Items and Host Controls
- Conclusion
Server Data Scenarios
- Populating a Document with Data on the Server
- Using ServerDocument and ASP.NET
- A Handy Client-Side ServerDocument Utility
- The ServerDocument Object Model
- Conclusion
.NET Code Security
- .NET Code Security
- Code Access Security Versus Role-Based Security
- Code Access Security in .NET
- Location, Location, Location
- Strong Names
- Publisher Certificates
- Trusting the Document
- Deploying Policy to User Machines
- Conclusion
Deployment
- Deployment
- VSTO Prerequisites
- Deploying to an Intranet Shared Directory or Web Site
- Local Machine Deployment Without a Deployment Manifest
- Editing Manifests
- Creating Setup Packages
- Advanced Topic: Deploying Network Solutions to Be Cached Locally
- Conclusion
Part Four. Advanced Office Programming
Working with XML in Excel
- Introduction to Excels XML Features
- Introduction to XML Schema Creation in Visual Studio
- An End-to-End Scenario
- Advanced XML Features in Excel
- Excel-Friendly XML Schemas
- VSTO Support for Excel Schema Mapping
- Conclusion
Working with XML in Word
- Introduction to Words XML Features
- An End-to-End Scenario: Creating a Schema and Mapping It into a Word Document
- Exporting the Mapped XML in the Document to an XML Data File
- Importing an XML Data File into the Mapped Document
- The XML Options Dialog
- VSTO Support for Word Schema Mapping
- VSTO Support for the WordML File Format
- Conclusion
Developing COM Add-Ins for Word and Excel
- Introduction to Add-Ins
- Scenarios for Using Add-Ins
- How a COM Add-In Is Registered
- Implementing IDTExtensibility2
- Writing a COM Add-In Using Visual Studio
- The Pitfalls of MsCoree.dll
- COM Interop and Regasm.exe
- Shimming: A Solution to the Problems with MsCoree.dll
- Conclusion
Creating Outlook Add-Ins with VSTO
EAN: N/A
Pages: 214
