Getting Started
Before you can use VSTO to put code behind InfoPath forms, you must ensure that the following things are installed on your development machine:
- Visual Studio 2005
- InfoPath 2003 Service Pack 1 or later
- The Microsoft Office InfoPath 2003 Toolkit for Visual Studio 2005
The toolkit must be installed last because it has an explicit dependency on both Visual Studio and InfoPath.
InfoPath Service Pack 1 contains the primary interop assemblies (PIAs) for InfoPath so that managed code can automate the InfoPath object model. Service Pack 1 also added the OnSave event, improved support for some offline scenarios, and digital signature support. You will read more about the details later in this chapter.
Creating a New Project
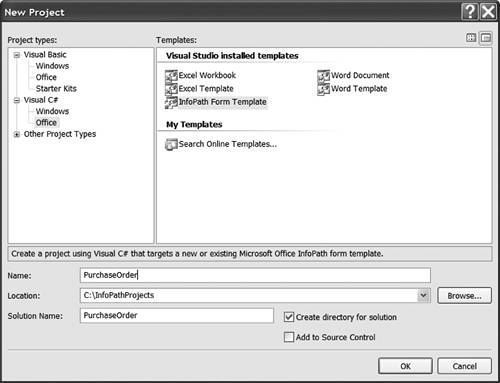
After you have the toolkit installed, open Visual Studio and choose New Project from the File Menu. Open up the Visual C# node in the tree view, choose Office, and then choose the InfoPath Form Template project as shown in Figure 12-1.
Figure 12-1. Creating an InfoPath project in Visual Studio.
|
The location is the location on the development machine, not the final location from which the published form will be accessed by your users. |
After you click OK, the Project Wizard asks whether you want to create a new form or open a form that you have already created with InfoPath as shown in Figure 12-2.
Figure 12-2. Creating the project based on a blank or existing form.
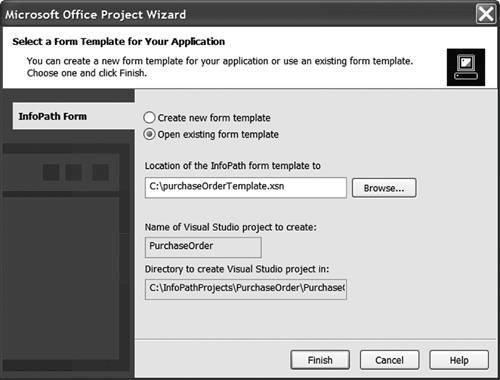
To create a new, blank form, keep the default selection of Create new form template and click Finish. To create a new form template based on an XML data file, XML schema, database connection, or Web service, create the form template in InfoPath first without using Visual Studio, and then open it as an existing form template. After you have a form template created in InfoPath, you can select the Open existing form template option and browse to the form template (.xsn) or form template definition (.xsf) file.
|
JScript (.js) or VBScript (.vbs) files associated with an existing form template will also be imported but the script itself will be nonfunctional. Other scripts, such as scripts used for custom task pane extensibility for example, are not affected. If you select a form template that already has managed code, the associated code is not included in the import; rather, you should open the Visual Studio project associated with the form template. |
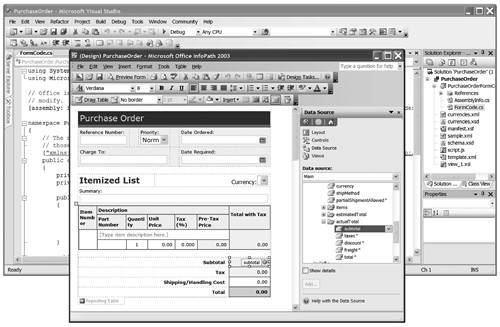
After you have created your project, you can use Visual Studio as your code editor at the same time as you design the form using the InfoPath designer window, as shown in Figure 12-3. While developing for InfoPath, you will frequently switch between the InfoPath designer window and the Visual Studio window. In addition, when you press F5 in your project, InfoPath starts up another InfoPath window called a "preview" window to preview what your form would look like at runtime. This makes for three top-level windows you might be juggling at any given time. When you close the InfoPath preview window, Visual Studio stops debugging the project. If you accidentally close the InfoPath designer window, you can reopen it by choosing Open InfoPath from Visual Studio's Project menu.
Figure 12-3. Visual Studio window and the InfoPath designer window run as two separate windows.
Take a look at the Solution Explorer window on the right side of Visual Studio. Behind the scenes, a form template consists of many files working together. By default, when working with just InfoPath, the XML template, XML schemas, XSL views, and so on are hidden unless you choose Extract Form Files from the File menu and then explore that folder in Windows Explorer. When designing the code behind a form in Visual Studio, you can see and edit all files in the InfoPath project directly. However, the InfoPath designer "locks" all the forms files. If you want to manually edit the files in Visual Studio, first close the InfoPath designer window to unlock the files.
Visual Studio adds the following new commands to facilitate the development of code behind an InfoPath form:
- Open InfoPath (opens the InfoPath designer window)
- Publish Form (the equivalent of choosing Publish from InfoPath's File menu)
- Preview > Default (previews the form you are designing in an InfoPath windowthe equivalent of creating a new form from the template you have designed)
- Preview > With Data File (previews the form you are designing with a custom XML file passed in as the initial data the form is editing)
- Preview > With User Role (previews the form with a custom role defined using InfoPath's User Roles command in the InfoPath Tools menu)
These commands are available in the Visual Studio Project menu, the Tools menu, and in the context menu that displays when you right-click the InfoPath Project node in the Visual Studio Solution Explorer window.
The InfoPath Project Properties dialog, also accessible from the project's right-click menu, has two settings that prove useful when previewing your form as shown in Figure 12-4.
Figure 12-4. Setting InfoPath-specific project properties.
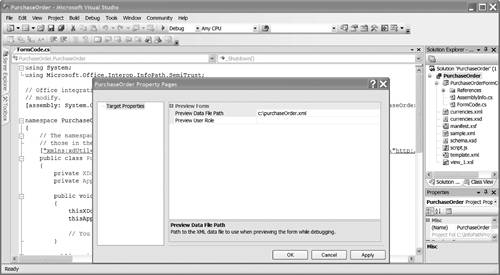
The first text box, called Preview Data File Path, takes a path to a custom XML file. Without a custom XML file, InfoPath previews with the default XML file used when filling out a new form. A custom XML file is useful for simulating what a user would experience if an existing form, saved from a previous editing session, were reopened. You can also use the Preview > With Data File command to achieve the same result.
The second text box, called Preview User Role, sets a "preview role." You can create forms that have different views depending on the "role" of the user filling out the form; an administrator might have a different view than an accountant. These roles are defined using InfoPath's User Roles command in the InfoPath Tools menu. You can also use the Preview > With User Role command to achieve the same result.
Part One. An Introduction to VSTO
An Introduction to Office Programming
- Why Office Programming?
- Office Object Models
- Properties, Methods, and Events
- The Office Primary Interop Assemblies (PIAs)
- Conclusion
Introduction to Office Solutions
- The Three Basic Patterns of Office Solutions
- Office Automation Executables
- Office Add-Ins
- Code Behind a Document
- Conclusion
Part Two. Office Programming in .NET
Programming Excel
- Ways to Customize Excel
- Programming User-Defined Functions
- Introduction to the Excel Object Model
- Conclusion
Working with Excel Events
Working with Excel Objects
- Working with Excel Objects
- Working with the Application Object
- Working with the Workbooks Collection
- Working with the Workbook Object
- Working with the Worksheets, Charts, and Sheets Collections
- Working with Document Properties
- Working with the Windows Collections
- Working with the Window Object
- Working with the Names Collection and Name Object
- Working with the Worksheet Object
- Working with the Range Object
- Special Excel Issues
- Conclusion
Programming Word
Working with Word Events
Working with Word Objects
- Working with Word Objects
- Working with the Application Object
- Working with the Dialog Object
- Working with Windows
- Working with Templates
- Working with Documents
- Working with a Document
- Working with the Range Object
- Working with Bookmarks
- Working with Tables
- Conclusion
Programming Outlook
- Ways to Customize Outlook
- Introduction to the Outlook Object Model
- Introduction to the Collaboration Data Objects
- Conclusion
Working with Outlook Events
Working with Outlook Objects
- Working with Outlook Objects
- Working with the Application Object
- Working with the Explorers and Inspectors Collections
- Working with the Explorer Object
- Working with the Inspector Object
- Working with the NameSpace Object
- Working with the MAPIFolder Object
- Working with the Items Collection
- Properties and Methods Common to Outlook Items
- Outlook Issues
- Conclusion
Introduction to InfoPath
- What Is InfoPath?
- Getting Started
- Form Security
- Programming InfoPath
- Data Source Events
- Form Events, Properties, and Methods
- Conclusion
Part Three. Office Programming in VSTO
The VSTO Programming Model
- The VSTO Programming Model
- VSTO Extensions to Word and Excel Objects
- Dynamic Controls
- Advanced Topic: Dynamic Host Items
- Advanced Topic: Inspecting the Generated Code
- VSTO Extensions to the Word and Excel Object Models
- Conclusion
Using Windows Forms in VSTO
- Using Windows Forms in VSTO
- Introduction
- Adding Windows Forms Controls to Your Document
- Writing Code Behind a Control
- The Windows Forms Control Hosting Architecture
- Properties Merged from OLEObject or OLEControl
- Adding Controls at Runtime
- Conclusion
Working with Actions Pane
Working with Smart Tags in VSTO
- Introduction to Smart Tags
- Creating Document-Level Smart Tags with VSTO
- Creating Application-Level Smart Tags
- Conclusion
VSTO Data Programming
- VSTO Data Programming
- Creating a Data-Bound Customized Spreadsheet with VSTO
- Creating a Data-Bound Customized Word Document with VSTO
- Datasets, Adapters, and Sources
- Another Technique for Creating Data-Bound Spreadsheets
- Caching Data in the Data Island
- Advanced ADO.NET Data Binding: Looking Behind the Scenes
- Binding-Related Extensions to Host Items and Host Controls
- Conclusion
Server Data Scenarios
- Populating a Document with Data on the Server
- Using ServerDocument and ASP.NET
- A Handy Client-Side ServerDocument Utility
- The ServerDocument Object Model
- Conclusion
.NET Code Security
- .NET Code Security
- Code Access Security Versus Role-Based Security
- Code Access Security in .NET
- Location, Location, Location
- Strong Names
- Publisher Certificates
- Trusting the Document
- Deploying Policy to User Machines
- Conclusion
Deployment
- Deployment
- VSTO Prerequisites
- Deploying to an Intranet Shared Directory or Web Site
- Local Machine Deployment Without a Deployment Manifest
- Editing Manifests
- Creating Setup Packages
- Advanced Topic: Deploying Network Solutions to Be Cached Locally
- Conclusion
Part Four. Advanced Office Programming
Working with XML in Excel
- Introduction to Excels XML Features
- Introduction to XML Schema Creation in Visual Studio
- An End-to-End Scenario
- Advanced XML Features in Excel
- Excel-Friendly XML Schemas
- VSTO Support for Excel Schema Mapping
- Conclusion
Working with XML in Word
- Introduction to Words XML Features
- An End-to-End Scenario: Creating a Schema and Mapping It into a Word Document
- Exporting the Mapped XML in the Document to an XML Data File
- Importing an XML Data File into the Mapped Document
- The XML Options Dialog
- VSTO Support for Word Schema Mapping
- VSTO Support for the WordML File Format
- Conclusion
Developing COM Add-Ins for Word and Excel
- Introduction to Add-Ins
- Scenarios for Using Add-Ins
- How a COM Add-In Is Registered
- Implementing IDTExtensibility2
- Writing a COM Add-In Using Visual Studio
- The Pitfalls of MsCoree.dll
- COM Interop and Regasm.exe
- Shimming: A Solution to the Problems with MsCoree.dll
- Conclusion
Creating Outlook Add-Ins with VSTO
EAN: N/A
Pages: 214
