Creating a Data-Bound Customized Spreadsheet with VSTO
Creating a no-frills data-bound customized document using the VSTO designer requires no coding but a whole lot of mouse clicking. What we are going to do is first tell Visual Studio about a data sourcein this case, the Northwind sample database that comes with Officeand then drag and drop some data-bound controls onto the spreadsheet.
Defining a Data Source
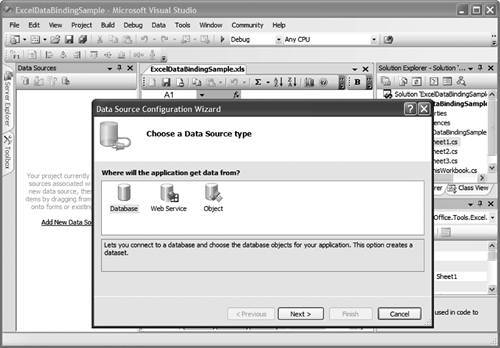
Let's start up Visual Studio and create a new Excel project. From Visual Studio's Data menu, choose Show Data Sources to display the Data Sources pane. Click Add New Data Source to start the Data Source Wizard.
Figure 17-1. Starting up the Data Source Wizard.
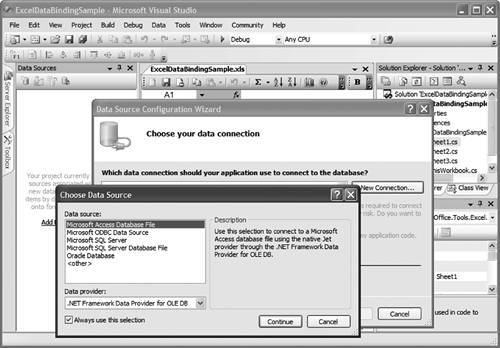
Choose Database and click Next. Click New Connection. A second wizard will appear.
Figure 17-2. Starting up the Data Source Wizard.
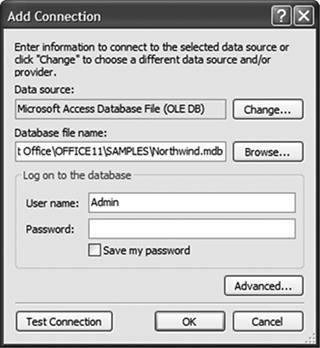
Choose Microsoft Access Database File and click Continue to go on to the Connection dialog. The Northwind database file is typically in the Program FilesMicrosoft OfficeOffice11Samples directory. Click Browse and find the Northwind database. No security is enforced on this database file, so the default username Admin and a blank password are fine.
Figure 17-3. Creating the database connection.
Click OK to close the Connection Wizard and continue with the Data Source Wizard.
|
In a real-world application with a secured database, it would be a very bad idea to have a blank administrator password. See the section "Data Sources and Security Best Practices" later in this chapter for more information. |
Figure 17-4. Viewing the connection string.
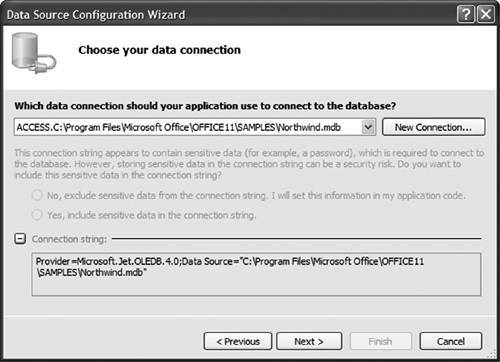
When you click Next, Visual Studio notes that you are creating a connection to a local database file that is not part of the current project. If you want this project to have its own copy of the database rather than modifying the original, you can do so and Visual Studio will automatically update the connection to point to the new location. In this first example, we do not have any reason to make a copy of the database, so click No.
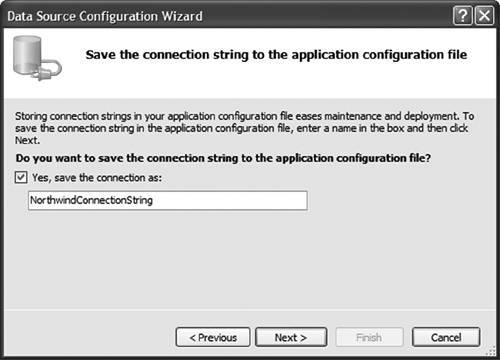
As you can see, all the information about the database connection that you have just created is saved in a connection string. For both convenience and security, it is a good idea to save that connection string in a configuration file rather than hard-coding it into your program. Again, see the section below on security best practices for more details.
Figure 17-5. Save the connection string in the application configuration file.
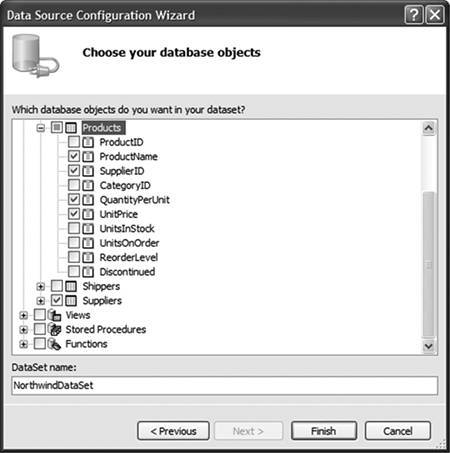
The database to which we are connecting might have an enormous number of queries, tables, and columns within those tables and so on. To manage some of this complexity, Visual Studio enables you to choose which portions of the database will display in Visual Studio. Let's select the entire Suppliers table and the ProductName, SupplierId, QuantityPerUnit and UnitPrice columns from the Products table.
Figure 17-6. Choose your tables.
Finally, click Finish to exit the Data Source Wizard.
Creating Data-Bound Controls the Easy Way
The Data Sources window now contains an entry for the NorthwindDataSet. (Why dataset rather than database? We explain what exactly we mean by dataset later on in this chapter.) Expand the nodes in the tree view.
Figure 17-7. The Data Sources pane contains the dataset tree view.
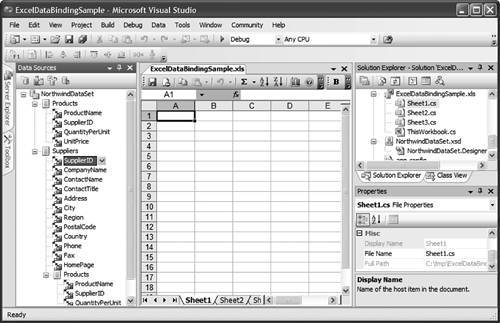
Notice a few interesting things here. First, Visual Studio has discovered from the database that the Products table has a relationship with the Suppliers table; the Products table appears both as a table in its own right, and as a child node of the Suppliers table. This will allow us to more easily create master-detail views.
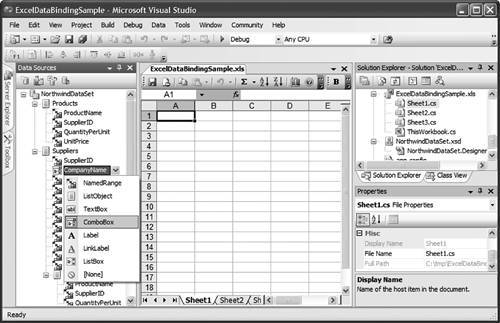
Second, notice that the icons for the columns have "named range" icons, indicating that if you drag and drop the icon onto the worksheet, you will get a data-bound named range to this column. The default for a column is a named range, and the default for an entire table is a list object, but you can choose other controls by clicking the item and selecting a drop-down. Suppose we want to have a combo box bound to the CompanyName, for instance. You can choose ComboBox from the drop-down as the control to use for CompanyName, as shown in Figure 17-8.
Figure 17-8. Choosing the control type.
Drag the CompanyName as a combo box, the ContactName as a named range, and the entire Products table onto the worksheet. Use the Products table that is the child of the Suppliers table in the tree view and we will get a nice master-detail view.
Drag the CompanyName as a combo box, the ContactName as a Bookmark, and the entire Products table as a data grid. Use the Products table that is the child of the Suppliers table in the tree view and we will get a nice master-detail view.
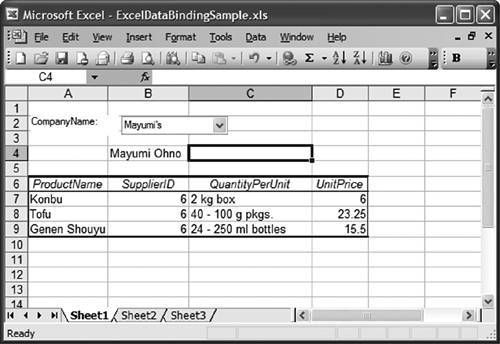
A whole lot of stuff has magically appeared in the component tray below the Excel designer: a dataset, two binding sources, and two table adapters. We get into the details of what these components are for later in this chapter. For now, compile and run the application. Without writing a single line of code, we have gotten a data-bound master-detail view on an Excel spreadsheet. As you select different items from the combo box, the named range and list object automatically update themselves.
Figure 17-9. Creating the data-bound view.
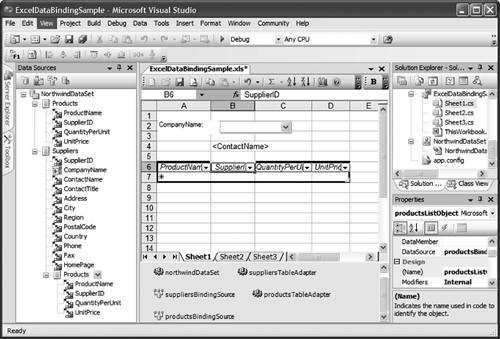
Figure 17-10. A data-bound master-detail spreadsheet.
Part One. An Introduction to VSTO
An Introduction to Office Programming
- Why Office Programming?
- Office Object Models
- Properties, Methods, and Events
- The Office Primary Interop Assemblies (PIAs)
- Conclusion
Introduction to Office Solutions
- The Three Basic Patterns of Office Solutions
- Office Automation Executables
- Office Add-Ins
- Code Behind a Document
- Conclusion
Part Two. Office Programming in .NET
Programming Excel
- Ways to Customize Excel
- Programming User-Defined Functions
- Introduction to the Excel Object Model
- Conclusion
Working with Excel Events
Working with Excel Objects
- Working with Excel Objects
- Working with the Application Object
- Working with the Workbooks Collection
- Working with the Workbook Object
- Working with the Worksheets, Charts, and Sheets Collections
- Working with Document Properties
- Working with the Windows Collections
- Working with the Window Object
- Working with the Names Collection and Name Object
- Working with the Worksheet Object
- Working with the Range Object
- Special Excel Issues
- Conclusion
Programming Word
Working with Word Events
Working with Word Objects
- Working with Word Objects
- Working with the Application Object
- Working with the Dialog Object
- Working with Windows
- Working with Templates
- Working with Documents
- Working with a Document
- Working with the Range Object
- Working with Bookmarks
- Working with Tables
- Conclusion
Programming Outlook
- Ways to Customize Outlook
- Introduction to the Outlook Object Model
- Introduction to the Collaboration Data Objects
- Conclusion
Working with Outlook Events
Working with Outlook Objects
- Working with Outlook Objects
- Working with the Application Object
- Working with the Explorers and Inspectors Collections
- Working with the Explorer Object
- Working with the Inspector Object
- Working with the NameSpace Object
- Working with the MAPIFolder Object
- Working with the Items Collection
- Properties and Methods Common to Outlook Items
- Outlook Issues
- Conclusion
Introduction to InfoPath
- What Is InfoPath?
- Getting Started
- Form Security
- Programming InfoPath
- Data Source Events
- Form Events, Properties, and Methods
- Conclusion
Part Three. Office Programming in VSTO
The VSTO Programming Model
- The VSTO Programming Model
- VSTO Extensions to Word and Excel Objects
- Dynamic Controls
- Advanced Topic: Dynamic Host Items
- Advanced Topic: Inspecting the Generated Code
- VSTO Extensions to the Word and Excel Object Models
- Conclusion
Using Windows Forms in VSTO
- Using Windows Forms in VSTO
- Introduction
- Adding Windows Forms Controls to Your Document
- Writing Code Behind a Control
- The Windows Forms Control Hosting Architecture
- Properties Merged from OLEObject or OLEControl
- Adding Controls at Runtime
- Conclusion
Working with Actions Pane
Working with Smart Tags in VSTO
- Introduction to Smart Tags
- Creating Document-Level Smart Tags with VSTO
- Creating Application-Level Smart Tags
- Conclusion
VSTO Data Programming
- VSTO Data Programming
- Creating a Data-Bound Customized Spreadsheet with VSTO
- Creating a Data-Bound Customized Word Document with VSTO
- Datasets, Adapters, and Sources
- Another Technique for Creating Data-Bound Spreadsheets
- Caching Data in the Data Island
- Advanced ADO.NET Data Binding: Looking Behind the Scenes
- Binding-Related Extensions to Host Items and Host Controls
- Conclusion
Server Data Scenarios
- Populating a Document with Data on the Server
- Using ServerDocument and ASP.NET
- A Handy Client-Side ServerDocument Utility
- The ServerDocument Object Model
- Conclusion
.NET Code Security
- .NET Code Security
- Code Access Security Versus Role-Based Security
- Code Access Security in .NET
- Location, Location, Location
- Strong Names
- Publisher Certificates
- Trusting the Document
- Deploying Policy to User Machines
- Conclusion
Deployment
- Deployment
- VSTO Prerequisites
- Deploying to an Intranet Shared Directory or Web Site
- Local Machine Deployment Without a Deployment Manifest
- Editing Manifests
- Creating Setup Packages
- Advanced Topic: Deploying Network Solutions to Be Cached Locally
- Conclusion
Part Four. Advanced Office Programming
Working with XML in Excel
- Introduction to Excels XML Features
- Introduction to XML Schema Creation in Visual Studio
- An End-to-End Scenario
- Advanced XML Features in Excel
- Excel-Friendly XML Schemas
- VSTO Support for Excel Schema Mapping
- Conclusion
Working with XML in Word
- Introduction to Words XML Features
- An End-to-End Scenario: Creating a Schema and Mapping It into a Word Document
- Exporting the Mapped XML in the Document to an XML Data File
- Importing an XML Data File into the Mapped Document
- The XML Options Dialog
- VSTO Support for Word Schema Mapping
- VSTO Support for the WordML File Format
- Conclusion
Developing COM Add-Ins for Word and Excel
- Introduction to Add-Ins
- Scenarios for Using Add-Ins
- How a COM Add-In Is Registered
- Implementing IDTExtensibility2
- Writing a COM Add-In Using Visual Studio
- The Pitfalls of MsCoree.dll
- COM Interop and Regasm.exe
- Shimming: A Solution to the Problems with MsCoree.dll
- Conclusion
Creating Outlook Add-Ins with VSTO
EAN: N/A
Pages: 214
- Chapter II Information Search on the Internet: A Causal Model
- Chapter V Consumer Complaint Behavior in the Online Environment
- Chapter VII Objective and Perceived Complexity and Their Impacts on Internet Communication
- Chapter X Converting Browsers to Buyers: Key Considerations in Designing Business-to-Consumer Web Sites
- Chapter XVIII Web Systems Design, Litigation, and Online Consumer Behavior
