An End-to-End Scenario: Creating a Schema and Mapping It into a Word Document
An End to End Scenario Creating a Schema and Mapping It into a Word Document
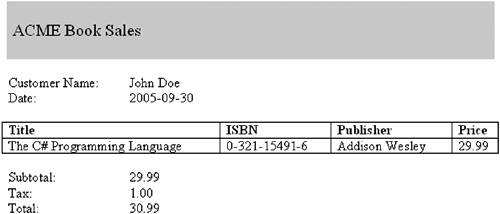
This section examines an end-to-end scenario that puts together the schema creation capabilities of Visual Studio and the schema mapping capabilities of Word. When you take a schema and apply it in Word using the XML Structure task pane, you enable the exporting and importing of XML data in the document. We are going to create a Word document that can be used to record a customer's book order. The document will support the import and export of XML that conforms to our book order schema. The document will look like Figure 22-8.
Figure 22-8. A Word document for processing a book order.
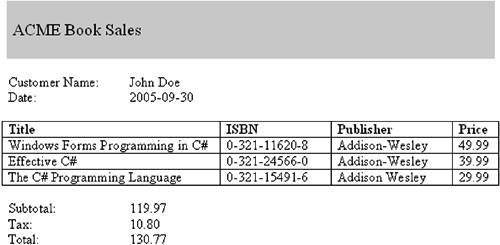
Listing 22-1 shows the XML that this document will be able to import and export.
Listing 22-1. XML File Generated from Book Order Document
 John Doe
 2005-09-30
 Windows Forms Programming in C#
 0-321-11620-8
 Addison-Wesley
 49.99

 Effective C#
 0-321-24566-0
 Addison-Wesley
 39.99

 The C# Programming Language
 0-321-15491-6
 Addison Wesley
 29.99

 119.97
 10.80
 130.77
Creating the Schema Using Visual Studio
To create our schema using Visual Studio, follow these steps.
|
1. |
Start Visual Studio 2005. |
|
2. |
Create a new XSD file by choosing File from the New menu of the File menu or by pressing Ctrl+N. |
|
3. |
Choose XML Schema from the list of Visual Studio installed templates, as shown in Figure 22-4. Then click the Open button. |
|
4. |
The Schema design view appears as shown in Figure 22-5. Drag an element object off of the toolbox onto the design surface. |
|
5. |
Type Order and press the Enter key. |
|
6. |
In the * row, type CustomerName and press the Enter key. |
|
7. |
In the * row, type Date and press the Tab key, and then type date for the data type and press Enter. |
|
8. |
In the * row, type Subtotal and press the Tab key, and then type float for the data type and press Enter. |
|
9. |
In the * row, type Tax and press the Tab key, and then type float for the data type and press Enter. |
|
10. |
In the * row, type Total and press the Tab key, and then type float for the data type and press Enter. |
|
11. |
Now, right-click the Order element box and choose New element from the Add menu. |
|
12. |
Type Book and press the Enter key. |
|
13. |
In the * row of the newly created Book element, type Title and press Enter. |
|
14. |
In the * row of the newly created Book element, type ISBN and press Enter. |
|
15. |
In the * row of the newly created Book element, type Publisher and press Enter. |
|
16. |
In the * row of the newly created Book element, type Price and press the Tab key, and then type float for the data type and press Enter. |
|
17. |
We now want to specify that multiple books can be included in an order. Click the Book row in the Order element box and show the Properties window by choosing Properties Window from the View menu. For the property maxOccurs, type unbounded. For the property minOccurs, type 1. |
|
18. |
We also need to change the targetNamespace for the XML schema. Visual Studio defaults the namespace to be http://tempuri.org/XMLSchema.xsd. This needs to be changed to some other namespace name because if you create multiple schemas with this namespace and try to attach them to Word, Word will display an error because it expects the namespace from each attached schema to be unique. We will change it to http://dotnet4office.com/bookorder.xsd. To do this, show the Properties window if it is not already visible by choosing Properties Window from the View window. In the properties for the schema, you will see a row that says targetNamespace. Change the targetNamespace from http://tempuri.org/XMLSchema.xsd to http://dotnet4office.com/bookorder.xsd. |
|
19. |
Now save the schema using the Save As command from the File menu. In the Save File As dialog, drop down the Save as type combo box and pick XML Schema Files (*.xsd). For the filename, type BookOrder.xsd and save it to a convenient place such as the desktop. |
Figure 22-9 shows the final schema as displayed by Visual Studio.
Figure 22-9. The book order schema in Visual Studio.
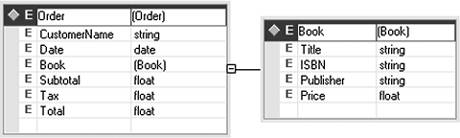
Listing 22-2 shows the generated XSD file. Note that the sequence of Book elements in an Order element is a sequence with a minimum (minOccurs) of one Book elements and a maximum (maxOccurs) of unbounded Book elements. This will allow our schema to represent one or more Books in an Order. Also, having a sequence where maxOccurs is greater than one or unbounded will allow Word to know that it can represent the Books in an Order using a Word table.
Listing 22-2. Book Order XSD Schema File
[View full width]
elementFormDefault="qualified" xmlns="http://dotnet4office.com/bookorder.xsd" xmlns:mstns="http://dotnet4office.com/bookorder.xsd" xmlns:xs="http://www.w3.org/2001/XMLSchema">
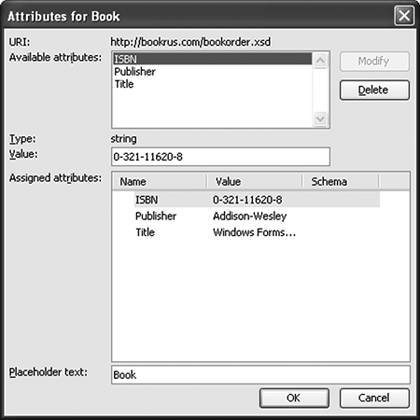
An additional point to notice about our schema file is that it is element-centricwe use XML elements and do not use XML attributes at all in our schema. Although Word supports the mapping of XML attributes, it does so in a way that makes it difficult for the end user to edit the attributes. The user must show the XML tags in the document, right-click an XML tag, and use the Attributes dialog shown in Figure 22-10 to edit attributes. In this example, we have mapped a book order schema where Title, ISBN, and Publisher are attributes rather than elements. These attributes will not show directly in the document, so it is usually best to avoid having attributes in schemas you are going to use with Word and instead use only elements.
Figure 22-10. Word's attribute editing dialog.
Adding a Schema to the Word Document
Now that we have created a schema, let's add it to a Word document. Launch Word and create a new empty document. Bring up the Word XML Structure task pane as described in the first section of this chapter. You should now see the XML Structure task pane with no schema as yet associated with the document in the task pane. To add an XML schema to the document, click the Templates and Add-Ins hyperlink in the XML Structure task pane. Then, as shown in the first part of this chapter, click the Add Schema button shown in Figure 22-3 to add your book order schema to the document. Give your schema the friendly name or alias of BookOrder in the Schema Settings dialog shown in Figure 22-4. Then close the Templates and Add-Ins dialog by clicking the OK button. The XML Structure task pane should now look like Figure 22-7.
The XML Options Dialog and Mixed Content
Before we start to construct the document shown in Figure 22-8, we need to briefly consider one additional dialogthe XML Options dialog. In the XML Structure task pane, there is a hyperlink at the bottom of the pane with the text XML Options. Click this hyperlink to bring up the XML Options dialog. Alternatively, you can click the XML Options button in the Templates and Add-Ins dialog. Figure 22-11 shows the XML Options dialog.
Figure 22-11. The XML Options dialogIgnore mixed content should be checked.
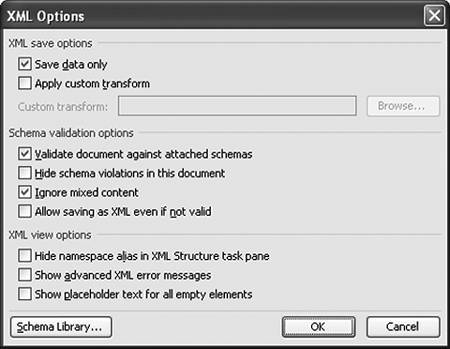
For the purpose of this end-to-end scenario, we need to make sure that the check box next to Ignore mixed content is checked. By checking this check box, it will allow us to intersperse text that is not part of our customer order schema with text that is. Mixed content allows us to have a structure similar to that shown in Listing 22-3, where arbitrary text (in bold) is mixed with the tagged XML data text.
Listing 22-3. Book Order XML with Mixed Content in Bold
 Customer Name: John Doe
 Date: 2005-09-30

 Books that were ordered:
 Windows Forms Programming in C#
 0-321-11620-8
 Addison-Wesley
 49.99

 Effective C#
 0-321-24566-0
 Addison-Wesley
 39.99

 The C# Programming Language
 0-321-15491-6
 Addison Wesley
 29.99


Subtotal: 119.97
 Tax: 10.80
 Total: 130.77
Creating a Document with Mapped XML Structure
To begin, let's construct a document with some text in it but no schema mapping. Create a document that looks like the one shown in Figure 22-12. Create a place to put a customer name, date, subtotal, tax, and total. Create a single table with four columns and two rows where we will put a book with a title, ISBN, publisher, and price.
Figure 22-12. A Word document with no schema mapping.
Now we can begin mapping our schema by inserting tags into the document. The experience of mapping schema into a Word document is quite different from mapping a schema into an Excel document. If you have ever edited an HTML page in a text editor, you will find that mapping a schema into a Word document feels somewhat similar to the way HTML tags are used to mark up text in an HTML page.
Make the XML Structure task pane visible and verify that the Show XML tags in the document check box is checked in the task pane. This will allow you to see the XML tags that Word is inserting into the document. Click anywhere in the Word document. Then in the bottom half of the XML structure task pane you will see an element list that is identified with the text "Choose an element to apply to your current selection." In that list is only one element, Order. Order is the root element of our schema, so it must be mapped first. Click Order in the element list. The dialog shown in Figure 22-13 will appear. For this example, we will choose Apply to Entire Document. It is possible to map multiple schemas into one document, but it is not possible to export valid XML from such a document. VSTO also does not support the mapping of multiple schemas into one document, so we will avoid constructing such a document.
Figure 22-13. The Apply to Entire Document dialog.

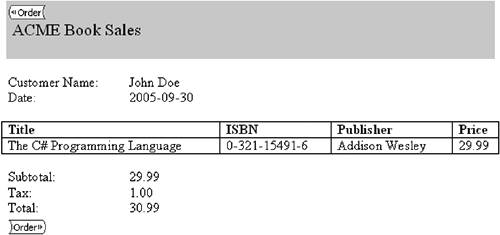
After you click the Apply to Entire Document button, the Word document now looks like Figure 22-14. You can see that an Order tag has been applied to the entire document. This will give you an idea of where we are goingwe are effectively going to make the Word document look something like Listing 22-3.
Figure 22-14. The Word document with an Order tag applied to the entire document.
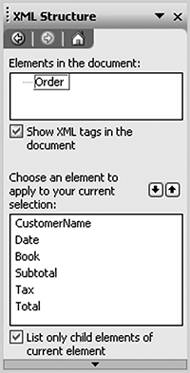
The Order element has six child elements: CustomerName, Date, Book (which is a repeating element), Subtotal, Tax, and Total. Let's map these elements now. Select the text John Doe in the document. From the XML Structure pane, click CustomerName in the element list, as shown in Figure 22-15. If CustomerName does not appear in the element list along with the other child elements of Order, toggle the List only child elements of the current element check box until it appears.
Figure 22-15. The element list shows child elements of Order.
Select the text 2005-09-30 and click the Date element in the element list. Select the text 29.99 and click the Subtotal element in the element list. Select the text 1.00 and click the Tax element in the element list. Select the text 30.99 and click the Total element in the element list. If you make a mistake and tag some text with the wrong element tag, right-click the element tag and choose the Remove tag menu option.
Figure 22-16 shows the document with the entire schema mapped except for the Book subelements. Note the pink squiggly line along the side of the document. This is Word's schema validation feature telling us that the mapped document has not yet been constructed in a way that conforms to the book order schema. This is because we have not yet mapped the Book subelements. You can right-click the squiggly line to get the exact error that is occurring that will prevent Word from exporting valid XML from this mapping.
Figure 22-16. Mappings for all elements of the book order schema except for Book subelements.
We are going to map our repeating Book element into a table. If we map a Book element into a row of the table, Word will be smart about this and when additional rows are added to the table Word will automatically tag the newly inserted row as a new Book element with all related tags.
First, select the entire row with the book "The C# Programming Language" in it by clicking in the start of the row and dragging across the row. It is important that you do not select beyond the edge of the rowthat you only select the current row, as shown in Figure 22-17.
Figure 22-17. Selecting the entire row but not beyond the entire row.

With the entire row selected, click the Book element in the element list. Figure 22-18 shows the resulting tagged row.
Figure 22-18. Tagging an entire row as a Book element.

Now we need to tag the column values to mark them with the child elements of the Book element. The Book element has four child elements: Title, ISBN, Publisher, and Price. Once again, if the elements do not appear in the element list, toggle the List only child elements of the current element check box to make the elements appear. Select the text The C# Programming Language and click the Title element in the element list. Select the text 0-321-15491-6 and click the ISBN element in the element list. Select the text Addison Wesley and click the Publisher element in the element list. Finally, select the text 29.99 and click the Price element in the element list. Figure 22-19 shows the resulting tagged row.
Figure 22-19. Completed tagging for a row in a table that represents a Book element.

Now let's verify that we have set up the table in a way that Word will automatically tag new rows as Book elements. Click somewhere in the table. From the Table menu, choose Insert and then Rows Below. As shown in Figure 22-20, Word automatically adds tags to the new row.
Figure 22-20. Word automatically tags new rows in the table with the Book element tags.
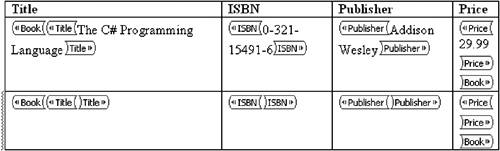
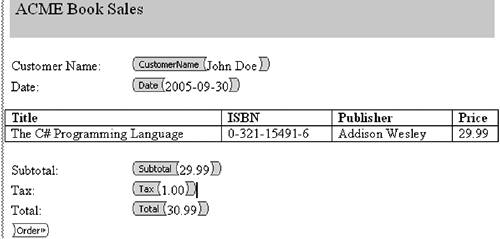
Now, fill out the remainder of the table to make it look like Figure 22-8. After you have filled out the table, you can hide the XML tags by unchecking the Show XML tags in the document check box in the XML structure pane or by pressing the keyboard accelerator Ctrl+Shift+X. Typically, when you deploy a document such as this to end users, you will not want to have the XML tags showing in the document. The only complication this causes is when a tag is emptyit is very hard for the user of your document to type text in the right place. To solve this issue, use the XML Options dialog box and check the Show placeholder text for all empty elements option. Figure 22-21 shows the final document with XML tags showing.
Figure 22-21. The final Word document with tags showing.

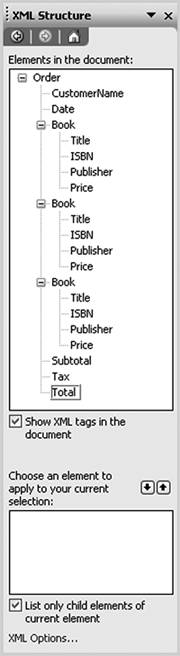
Also, note that the XML structure task pane shows the elements that have been mapped into the document in a tree view, as shown in Figure 22-22. You can right-click the elements in this tree view and a menu appears that allows you to unmap a particular element or edit attributes associated with a particular element.
Figure 22-22. Elements mapped in the document are shown in the document tree view.
Part One. An Introduction to VSTO
An Introduction to Office Programming
- Why Office Programming?
- Office Object Models
- Properties, Methods, and Events
- The Office Primary Interop Assemblies (PIAs)
- Conclusion
Introduction to Office Solutions
- The Three Basic Patterns of Office Solutions
- Office Automation Executables
- Office Add-Ins
- Code Behind a Document
- Conclusion
Part Two. Office Programming in .NET
Programming Excel
- Ways to Customize Excel
- Programming User-Defined Functions
- Introduction to the Excel Object Model
- Conclusion
Working with Excel Events
Working with Excel Objects
- Working with Excel Objects
- Working with the Application Object
- Working with the Workbooks Collection
- Working with the Workbook Object
- Working with the Worksheets, Charts, and Sheets Collections
- Working with Document Properties
- Working with the Windows Collections
- Working with the Window Object
- Working with the Names Collection and Name Object
- Working with the Worksheet Object
- Working with the Range Object
- Special Excel Issues
- Conclusion
Programming Word
Working with Word Events
Working with Word Objects
- Working with Word Objects
- Working with the Application Object
- Working with the Dialog Object
- Working with Windows
- Working with Templates
- Working with Documents
- Working with a Document
- Working with the Range Object
- Working with Bookmarks
- Working with Tables
- Conclusion
Programming Outlook
- Ways to Customize Outlook
- Introduction to the Outlook Object Model
- Introduction to the Collaboration Data Objects
- Conclusion
Working with Outlook Events
Working with Outlook Objects
- Working with Outlook Objects
- Working with the Application Object
- Working with the Explorers and Inspectors Collections
- Working with the Explorer Object
- Working with the Inspector Object
- Working with the NameSpace Object
- Working with the MAPIFolder Object
- Working with the Items Collection
- Properties and Methods Common to Outlook Items
- Outlook Issues
- Conclusion
Introduction to InfoPath
- What Is InfoPath?
- Getting Started
- Form Security
- Programming InfoPath
- Data Source Events
- Form Events, Properties, and Methods
- Conclusion
Part Three. Office Programming in VSTO
The VSTO Programming Model
- The VSTO Programming Model
- VSTO Extensions to Word and Excel Objects
- Dynamic Controls
- Advanced Topic: Dynamic Host Items
- Advanced Topic: Inspecting the Generated Code
- VSTO Extensions to the Word and Excel Object Models
- Conclusion
Using Windows Forms in VSTO
- Using Windows Forms in VSTO
- Introduction
- Adding Windows Forms Controls to Your Document
- Writing Code Behind a Control
- The Windows Forms Control Hosting Architecture
- Properties Merged from OLEObject or OLEControl
- Adding Controls at Runtime
- Conclusion
Working with Actions Pane
Working with Smart Tags in VSTO
- Introduction to Smart Tags
- Creating Document-Level Smart Tags with VSTO
- Creating Application-Level Smart Tags
- Conclusion
VSTO Data Programming
- VSTO Data Programming
- Creating a Data-Bound Customized Spreadsheet with VSTO
- Creating a Data-Bound Customized Word Document with VSTO
- Datasets, Adapters, and Sources
- Another Technique for Creating Data-Bound Spreadsheets
- Caching Data in the Data Island
- Advanced ADO.NET Data Binding: Looking Behind the Scenes
- Binding-Related Extensions to Host Items and Host Controls
- Conclusion
Server Data Scenarios
- Populating a Document with Data on the Server
- Using ServerDocument and ASP.NET
- A Handy Client-Side ServerDocument Utility
- The ServerDocument Object Model
- Conclusion
.NET Code Security
- .NET Code Security
- Code Access Security Versus Role-Based Security
- Code Access Security in .NET
- Location, Location, Location
- Strong Names
- Publisher Certificates
- Trusting the Document
- Deploying Policy to User Machines
- Conclusion
Deployment
- Deployment
- VSTO Prerequisites
- Deploying to an Intranet Shared Directory or Web Site
- Local Machine Deployment Without a Deployment Manifest
- Editing Manifests
- Creating Setup Packages
- Advanced Topic: Deploying Network Solutions to Be Cached Locally
- Conclusion
Part Four. Advanced Office Programming
Working with XML in Excel
- Introduction to Excels XML Features
- Introduction to XML Schema Creation in Visual Studio
- An End-to-End Scenario
- Advanced XML Features in Excel
- Excel-Friendly XML Schemas
- VSTO Support for Excel Schema Mapping
- Conclusion
Working with XML in Word
- Introduction to Words XML Features
- An End-to-End Scenario: Creating a Schema and Mapping It into a Word Document
- Exporting the Mapped XML in the Document to an XML Data File
- Importing an XML Data File into the Mapped Document
- The XML Options Dialog
- VSTO Support for Word Schema Mapping
- VSTO Support for the WordML File Format
- Conclusion
Developing COM Add-Ins for Word and Excel
- Introduction to Add-Ins
- Scenarios for Using Add-Ins
- How a COM Add-In Is Registered
- Implementing IDTExtensibility2
- Writing a COM Add-In Using Visual Studio
- The Pitfalls of MsCoree.dll
- COM Interop and Regasm.exe
- Shimming: A Solution to the Problems with MsCoree.dll
- Conclusion
Creating Outlook Add-Ins with VSTO
EAN: N/A
Pages: 214
