Programming User-Defined Functions
Excel enables the creation of user-defined functions that can be used in Excel formulas. A developer must create a special kind of DLL called an XLL. Excel also allows you to write custom functions in VBA that can be used in Excel formulas. Unfortunately, Excel does not support or recommend writing an XLL that uses managed code.
Building a Managed Automation Add-In That Provides User-Defined Functions
Fortunately, there is an easier way to create a user-defined function that does not require you to create an XLL. Excel 2003 supports a customization technology called an automation add-in that can easily be created in C# or Visual Basic.
First, launch Visual Studio and create a new C# class library project. Name the project AutomationAddin. In your Class1.cs file created for you in the new project, enter the code shown in Listing 3-1. This code defines a class called MyFunctions that implements a function called MultiplyNTimes. We will use this function as a custom formula. Our class also implements RegisterFunction and UnregisterFunction, which are attributed with the ComRegisterFunction attribute and ComUnregisterFunction attribute respectively. The RegisterFunction will be called when the assembly is registered for COM interop. The UnregisterFunction will be called when the assembly is unregistered for COM interop. These functions put a necessary key in the registry that allow Excel to know that this class can be used as an automation add-in.
Listing 3-1. A C# Class Called MyFunctions That Exposes a User-Defined Function MultiplyNTimes
using System;
using System.Runtime.InteropServices;
using Microsoft.Win32;

namespace AutomationAddin
{
 [ClassInterface(ClassInterfaceType.AutoDual)]
 public class MyFunctions
 {
 public MyFunctions()
 {
 }

 public double MultiplyNTimes(double number1,
 double number2, double timesToMultiply)
 {
 double result = number1;
 for (double i = 0; i < timesToMultiply; i++)
 {
 result = result * number2;
 }
 return result;
 }

 [ComRegisterFunctionAttribute]
 public static void RegisterFunction(Type type)
 {
 Registry.ClassesRoot.CreateSubKey(
 GetSubKeyName(type));
 }

 [ComUnregisterFunctionAttribute]
 public static void UnregisterFunction(Type type)
 {
 Registry.ClassesRoot.DeleteSubKey(
 GetSubKeyName(type),false);
 }

 private static string GetSubKeyName(Type type)
 {
 System.Text.StringBuilder s =
 new System.Text.StringBuilder();
 s.Append(@"CLSID{");
 s.Append(type.GUID.ToString().ToUpper());
 s.Append(@"}Programmable");
 return s.ToString();
 }
 }
}
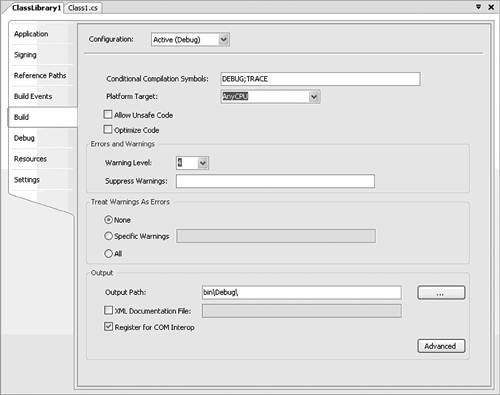
With this code written, you need to modify the project so that it will automatically register this class for COM interop when it is built. First, show the properties for the project by double-clicking the Properties node under the project node in Solution Explorer. In the properties designer that appears, click the Build tab and check the check box that says Register for COM Interop, as shown in Figure 3-7. Then choose Build Solution from the Build menu to build the class library project. Your actions will result in your class library project being built as well as registered in the registry as an automation add-in. Excel will now be able to see your C# class and use it.
Figure 3-7. Setting Build options to register for COM interop.
Using Your Managed Automation Add-In in Excel
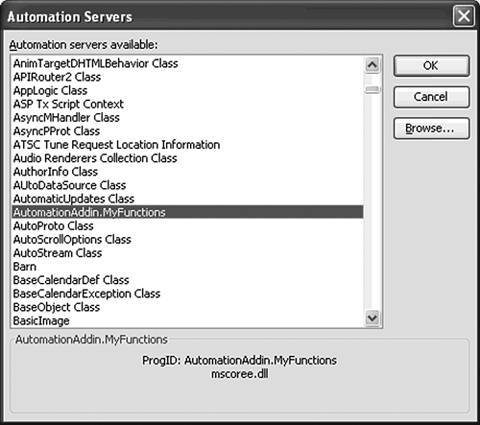
Launch Excel and choose Add-Ins from the Tools menu to display the Add-Ins dialog. In the Add-Ins dialog, click the Automation button. You can find the class you created by looking for AutomationAddin.MyFunctions in the list of automation servers, as shown in Figure 3-8.
Figure 3-8. Selecting AutomationAddin.MyFunctions from the Automation Servers dialog.
By clicking OK in this dialog, you have added the AutomationAddin.MyFunctions class to the list of installed automation add-ins, as shown in Figure 3-9.
Figure 3-9. AutomationAddin.MyFunctions is now installed.
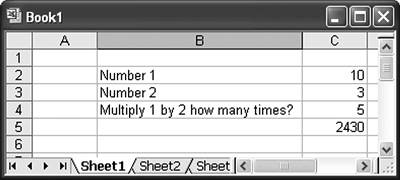
Now, try to use the function MultiplyNTimes in an Excel formula. First create a simple spreadsheet that has a number, a second number to multiply the first by, and a third number for how many times you want to multiply the first number by the second number. Figure 3-10 shows the spreadsheet.
Figure 3-10. A simple spreadsheet to test the custom formula in.

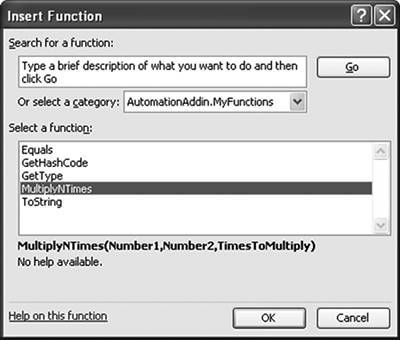
Click an empty cell in the workbook below the numbers, and then click the Insert Function button (the button with the "fx" label) in the formula bar. From the dialog of available formulas, drop down the "Or select a category" drop-down box and choose AutomationAddin.MyFunctions. Then click the MultiplyNTimes function, as shown in Figure 3-11.
Figure 3-11. Picking MultiplyNTimes from the Insert Function dialog box.
When you click the OK button, Excel pops up a dialog to help select function arguments from cells in the spreadsheet, as shown in Figure 3-12.
Figure 3-12. Setting the function arguments.
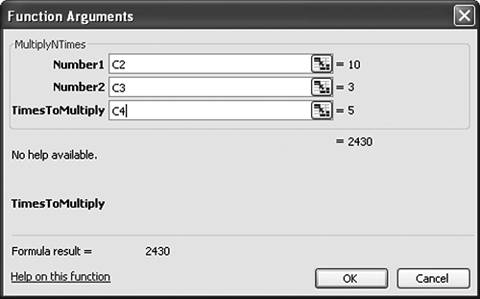
After you have selected function arguments from the appropriate cells, click OK to create the final spreadsheet, as shown in Figure 3-13, with the custom formula in cell C5.
Figure 3-13. The final spreadsheet.
Some Additional User-Defined Functions
You might experiment with other functions that could be used in an Excel formula. For example, Listing 3-2 shows several other functions you could add to your MyFunctions class. To use Listing 3-2, you must add a reference to the Excel 11.0 Object Library and also add the code using Excel = Microsoft.Off-ice.Interop.Excel to the top of your class file. Note in particular that when you declare a parameter as an object, Excel passes you a Range object. Also note how optional parameters are supported by the AddNumbers function. When a parameter is omitted, System.Type.Missing is passed as the value of the parameter.
Listing 3-2. Additional User-Defined Function That Could Be Added to the MyFunctions Class
public string GetStars(double number)
{
 System.Text.StringBuilder s =
 new System.Text.StringBuilder();
 s.Append('*', number);
 return s.ToString();
}

public double AddNumbers(double number1,
 [Optional] object number2, [Optional] object number3)
{
 double result = number1;

 if (number2 != System.Type.Missing)
 {
 Excel.Range r2 = number2 as Excel.Range;
 double d2 = Convert.ToDouble(r2.Value2);
 result += d2;
 }

 if (number3 != System.Type.Missing)
 {
 Excel.Range r3 = number3 as Excel.Range;
 double d3 = Convert.ToDouble(r3.Value2);
 result += d3;
 }

 return result;
}

public double CalculateArea(object range)
{
 Excel.Range r = range as Excel.Range;
 return Convert.ToDouble(r.Width) +
 Convert.ToDouble(r.Height);
}

public double NumberOfCells(object range)
{
 Excel.Range r = range as Excel.Range;
 return r.Cells.Count;
}

public string ToUpperCase(string input)
{
 return input.ToUpper();
}
Debugging User-defined Functions in a Managed Automation Add-Ins
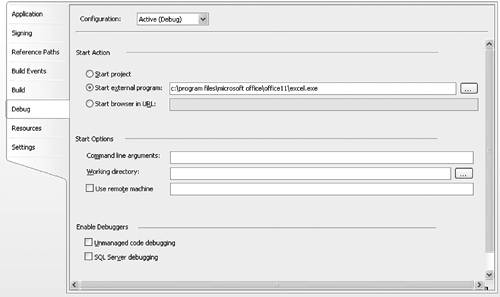
You can debug a C# class library project that is acting as an automation add-in by setting Excel to be the program your class library project starts when you debug. Show the properties for the project by double-clicking the Properties node under the project node in Solution Explorer. In the properties designer that appears, click the Debug tab, and in the Start external program text box, type the full path to Excel.exe, as shown in Figure 3-14. Now, set a breakpoint on one of your user functions, press F5, and use the function in the spreadsheet. The debugger will stop in the implementation of your user function where the breakpoint was set.
Figure 3-14. Setting Debug options to start Excel.
Deploying Managed Automation Add-Ins
To deploy an automation add-in, right-click your solution in Solution Explorer and choose New Project from the Add menu. From the Add New Project dialog, choose Setup Project from Other Project TypesSetup and Deployment in the Project Types tree.
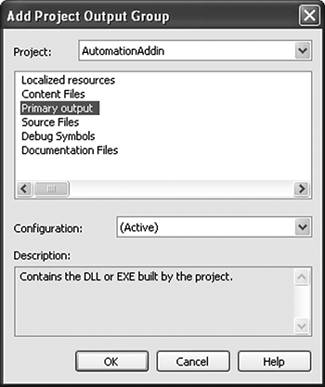
Right-click the added setup project in Solution Explorer and choose Project Output from the Add menu. From the Add Project Output Group dialog box, choose the AutomationAddin project and select Primary Output, as shown in Figure 3-15.
Figure 3-15. Adding the Primary output of the Automation Addin project to the setup project.
Because we told the project to register our managed object for COM interop, the setup project should already be set up correctly to register the managed object for COM interop at install time, too. To verify this, click the Primary output from AutomationAddin node in the setup project. In the Properties window for the primary output (our C# DLL), make sure that Register is set to vsdrpCOM.
Part One. An Introduction to VSTO
An Introduction to Office Programming
- Why Office Programming?
- Office Object Models
- Properties, Methods, and Events
- The Office Primary Interop Assemblies (PIAs)
- Conclusion
Introduction to Office Solutions
- The Three Basic Patterns of Office Solutions
- Office Automation Executables
- Office Add-Ins
- Code Behind a Document
- Conclusion
Part Two. Office Programming in .NET
Programming Excel
- Ways to Customize Excel
- Programming User-Defined Functions
- Introduction to the Excel Object Model
- Conclusion
Working with Excel Events
Working with Excel Objects
- Working with Excel Objects
- Working with the Application Object
- Working with the Workbooks Collection
- Working with the Workbook Object
- Working with the Worksheets, Charts, and Sheets Collections
- Working with Document Properties
- Working with the Windows Collections
- Working with the Window Object
- Working with the Names Collection and Name Object
- Working with the Worksheet Object
- Working with the Range Object
- Special Excel Issues
- Conclusion
Programming Word
Working with Word Events
Working with Word Objects
- Working with Word Objects
- Working with the Application Object
- Working with the Dialog Object
- Working with Windows
- Working with Templates
- Working with Documents
- Working with a Document
- Working with the Range Object
- Working with Bookmarks
- Working with Tables
- Conclusion
Programming Outlook
- Ways to Customize Outlook
- Introduction to the Outlook Object Model
- Introduction to the Collaboration Data Objects
- Conclusion
Working with Outlook Events
Working with Outlook Objects
- Working with Outlook Objects
- Working with the Application Object
- Working with the Explorers and Inspectors Collections
- Working with the Explorer Object
- Working with the Inspector Object
- Working with the NameSpace Object
- Working with the MAPIFolder Object
- Working with the Items Collection
- Properties and Methods Common to Outlook Items
- Outlook Issues
- Conclusion
Introduction to InfoPath
- What Is InfoPath?
- Getting Started
- Form Security
- Programming InfoPath
- Data Source Events
- Form Events, Properties, and Methods
- Conclusion
Part Three. Office Programming in VSTO
The VSTO Programming Model
- The VSTO Programming Model
- VSTO Extensions to Word and Excel Objects
- Dynamic Controls
- Advanced Topic: Dynamic Host Items
- Advanced Topic: Inspecting the Generated Code
- VSTO Extensions to the Word and Excel Object Models
- Conclusion
Using Windows Forms in VSTO
- Using Windows Forms in VSTO
- Introduction
- Adding Windows Forms Controls to Your Document
- Writing Code Behind a Control
- The Windows Forms Control Hosting Architecture
- Properties Merged from OLEObject or OLEControl
- Adding Controls at Runtime
- Conclusion
Working with Actions Pane
Working with Smart Tags in VSTO
- Introduction to Smart Tags
- Creating Document-Level Smart Tags with VSTO
- Creating Application-Level Smart Tags
- Conclusion
VSTO Data Programming
- VSTO Data Programming
- Creating a Data-Bound Customized Spreadsheet with VSTO
- Creating a Data-Bound Customized Word Document with VSTO
- Datasets, Adapters, and Sources
- Another Technique for Creating Data-Bound Spreadsheets
- Caching Data in the Data Island
- Advanced ADO.NET Data Binding: Looking Behind the Scenes
- Binding-Related Extensions to Host Items and Host Controls
- Conclusion
Server Data Scenarios
- Populating a Document with Data on the Server
- Using ServerDocument and ASP.NET
- A Handy Client-Side ServerDocument Utility
- The ServerDocument Object Model
- Conclusion
.NET Code Security
- .NET Code Security
- Code Access Security Versus Role-Based Security
- Code Access Security in .NET
- Location, Location, Location
- Strong Names
- Publisher Certificates
- Trusting the Document
- Deploying Policy to User Machines
- Conclusion
Deployment
- Deployment
- VSTO Prerequisites
- Deploying to an Intranet Shared Directory or Web Site
- Local Machine Deployment Without a Deployment Manifest
- Editing Manifests
- Creating Setup Packages
- Advanced Topic: Deploying Network Solutions to Be Cached Locally
- Conclusion
Part Four. Advanced Office Programming
Working with XML in Excel
- Introduction to Excels XML Features
- Introduction to XML Schema Creation in Visual Studio
- An End-to-End Scenario
- Advanced XML Features in Excel
- Excel-Friendly XML Schemas
- VSTO Support for Excel Schema Mapping
- Conclusion
Working with XML in Word
- Introduction to Words XML Features
- An End-to-End Scenario: Creating a Schema and Mapping It into a Word Document
- Exporting the Mapped XML in the Document to an XML Data File
- Importing an XML Data File into the Mapped Document
- The XML Options Dialog
- VSTO Support for Word Schema Mapping
- VSTO Support for the WordML File Format
- Conclusion
Developing COM Add-Ins for Word and Excel
- Introduction to Add-Ins
- Scenarios for Using Add-Ins
- How a COM Add-In Is Registered
- Implementing IDTExtensibility2
- Writing a COM Add-In Using Visual Studio
- The Pitfalls of MsCoree.dll
- COM Interop and Regasm.exe
- Shimming: A Solution to the Problems with MsCoree.dll
- Conclusion
Creating Outlook Add-Ins with VSTO
EAN: N/A
Pages: 214
- Linking the IT Balanced Scorecard to the Business Objectives at a Major Canadian Financial Group
- Measuring and Managing E-Business Initiatives Through the Balanced Scorecard
- A View on Knowledge Management: Utilizing a Balanced Scorecard Methodology for Analyzing Knowledge Metrics
- The Evolution of IT Governance at NB Power
- Governance Structures for IT in the Health Care Industry
