Using ExamGear Special Edition
ExamGear is designed to be user friendly and very intuitive, eliminating the need for you to learn some confusing piece of software just to practice answering questions. Because the software has a smooth learning curve, your time is maximized because you start practicing almost immediately.
General Description of How the Software Works
ExamGear has three modes of operation: Study Mode, Practice Exam, and Adaptive Exam (see Figure A.2). All three sections have the same easy-to-use interface. Using Study Mode, you can hone your knowledge as well as your test-taking abilities through the use of the Show Answers option. While you are taking the test, you can expose the answers along with a brief description of why the given answers are right or wrong. This gives you the ability to better understand the material presented.
Figure A.2. The opening screen offers three testing modes.

The Practice Exam section has many of the same options as Study Mode, but you cannot reveal the answers. This way, you have a more traditional testing environment with which to practice.
The Adaptive Exam questions continuously monitor your expertise in each tested topic area. If you reach a point at which you either pass or fail, the software ends the examination. As in the Practice Exam, you cannot reveal the answers.
Menu Options
The ExamGear Special Edition interface has an easy-to-use menu that provides the following options:
|
Menu |
Command |
Description |
|---|---|---|
|
File |
|
Prints the current screen. |
|
Print Setup |
Allows you to select the printer. |
|
|
Exit |
Exits the program. |
|
|
Help |
Contents |
Opens ExamGear Special Edition's help file. |
|
About |
Displays information about ExamGear Special Edition, including serial number, registered owner, and so on. |
File
The File menu allows you to exit the program and configure print options.
Help
As it suggests, this menu option gives you access to ExamGear's help system. It also provides important information like your serial number, software version, and so on.
Starting a Study Mode Session
Study Mode enables you to control the test in ways that actual certification exams do not allow:
- You can set your own time limits.
- You can concentrate on selected skill areas (modules).
- You can reveal answers or have each response graded immediately with feedback.
- You can restrict the questions you see again to those missed or those answered correctly a given number of times.
- You can control the order in which questions are presentedrandom order or in order by skill area (module).
- To begin testing in Study Mode, click the Study Mode button from the main Interface screen. You are presented with the Study Mode configuration page (see Figure A.3).
Figure A.3. The Study Mode configuration page.
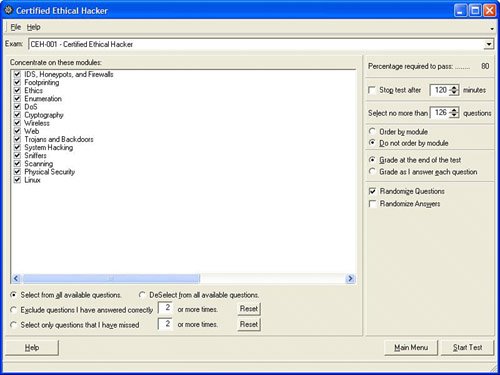
At the top of the Study Mode configuration screen, you see the Exam drop-down list. This list shows the activated exam that you have purchased with your ExamGear Special Edition product, as well as any other exams you may have downloaded or any Preview exams that were shipped with your version of ExamGear. Select the exam with which you want to practice from the drop-down list.
Below the Exam drop-down list, you see the questions that are available for the selected exam. Each exam has at least one question set. You can select the individual question set or any combination of the question sets if there is more than one available for the selected exam.
Below the Question Set list is a list of skill areas or modules on which you can concentrate. These skill areas or modules reflect the units of exam objectives defined by vendor for the exam. Within each skill area you will find several exam objectives. You can select a single skill area or module to focus on, or you can select any combination of the available skill areas/modules to customize the exam to your individual needs.
In addition to specifying which question sets and skill areas you want to test yourself on, you can also define which questions are included in the test based on your previous progress working with the test. ExamGear Special Edition automatically tracks your progress with the available questions. When configuring the Study Mode options, you can opt to view all the questions available within the question sets and skill areas you have selected, or you can limit the questions presented. Choose from the following options:
- Select from All Available Questions. This option causes ExamGear Special Edition to present all available questions from the selected question sets and skill areas.
- Exclude Questions I Have Answered Correctly X or More Times. ExamGear offers you the option to exclude questions that you have previously answered correctly. You can specify how many times you want to answer a question correctly before ExamGear considers you to have mastered it (the default is two times).
- Select Only Questions That I Have Missed X or More Times. This option configures ExamGear Special Edition to drill you only on questions that you have missed repeatedly. You may specify how many times you must miss a question before ExamGear determines that you have not mastered it (the default is two times).
At any time, you can reset ExamGear Special Edition's tracking information by clicking the Reset button for the feature you want to clear.
At the top-right side of the Study Mode configuration sheet, you can see your access level to the question sets for the selected exam. Access levels are either Full or Preview. For a detailed explanation of each of these access levels, see the section "Obtaining Updates" in this appendix.
Under your access level, you see the score required to pass the selected exam. Below the required score, you can select whether the test will be timed and how much time will be allowed to complete the exam. Select the Stop Test After 90 Minutes check box to set a time limit for the exam. Enter the number of minutes you want to allow for the test (the default is 90 minutes). Deselecting this check box allows you to take an exam with no time limit.
You can also configure the number of questions included in the exam. The default number of questions changes with the specific exam you have selected. Enter the number of questions you want to include in the exam in the Select No More than X Questions option.
You can configure the order in which ExamGear Special Edition presents the exam questions. Select from the following options:
- Display Questions in Random Order. This option is the default option. When selected, it causes ExamGear Special Edition to present the questions in random order throughout the exam.
- Order by Skill Area. This option causes ExamGear to group the questions presented in the exam by skill area. All questions for each selected skill area are presented in succession. The test progresses from one selected skill area to the next, until all the questions from each selected skill area have been presented.
ExamGear offers two options for scoring your exams. Select one of the following options:
- Grade at the End of the Test. This option configures ExamGear Special Edition to score your test after you have been presented with all the selected exam questions. You can reveal correct answers to a question, but if you do, that question is not scored.
- Grade as I Answer Each Question. This option configures ExamGear to grade each question as you answer it, providing you with instant feedback as you take the test. All questions are scored unless you click the Show Answer button before completing the question.
You can return to the ExamGear Special Edition main startup screen from the Study Mode configuration screen by clicking the Main Menu button. If you need assistance configuring the Study Mode exam options, click the Help button for configuration instructions.
When you have finished configuring all the exam options, click the Start Test button to begin the exam.
Starting Practice Exams and Adaptive Exams
This section describes the Practice and Adaptive Exams, defines the differences between these exam options and the Study Mode option, and provides instructions for starting them.
Differences Between the Practice and Adaptive Exams and Study Modes
Question screens in the Practice and Adaptive Exams are identical to those found in Study Mode, except that the Show Answer, Grade Answer, and Item Review buttons are not available while you are in the process of taking a practice or adaptive exam. The Practice Exam provides you with a report screen at the end of the exam. The Adaptive Exam gives you a brief message indicating whether you've passed or failed the exam.
When taking a practice exam, the Item Review screen is not available until you have answered all the questions. This is consistent with the behavior of most vendors' current certification exams. In Study Mode, Item Review is available at any time.
When the exam timer expires, or if you click the End Exam button, the Examination Score Report screen comes up.
Starting an Exam
From the ExamGear Special Edition main menu screen, select the type of exam you want to run. Click the Practice Exam or Adaptive Exam button to begin the corresponding exam type.
What Is an Adaptive Exam?
To make the certification testing process more efficient and valid and therefore make the certification itself more valuable, some vendors in the industry are using a testing technique called adaptive testing. In an adaptive exam, the exam "adapts" to your abilities by varying the difficulty level of the questions presented to you.
The first question in an adaptive exam is typically an easy one. If you answer it correctly, you are presented with a slightly more difficult question. If you answer that question correctly, the next question you see is even more difficult. If you answer the question incorrectly, however, the exam "adapts" to your skill level by presenting you with another question of equal or lesser difficulty on the same subject. If you answer that question correctly, the test begins to increase the difficulty level again. You must correctly answer several questions at a predetermined difficulty level to pass the exam. After you have done this successfully, the exam is ended and scored. If you do not reach the required level of difficulty within a predetermined time (typically 30 minutes) the exam is ended and scored.
Why Do Vendors Use Adaptive Exams?
Many vendors who offer technical certifications have adopted the adaptive testing technique. They have found that it is an effective way to measure a candidate's mastery of the test material in as little time as necessary. This reduces the scheduling demands on the test taker and allows the testing center to offer more tests per test station than they could with longer, more traditional exams. In addition, test security is greater, and this increases the validity of the exam process.
Studying for Adaptive Exams
Studying for adaptive exams is no different from studying for traditional exams. You should make sure that you have thoroughly covered all the material for each of the test objectives specified by the certification exam vendor. As with any other exam, when you take an adaptive exam, either you know the material or you don't. If you are well prepared, you will be able to pass the exam. ExamGear Special Edition allows you to familiarize yourself with the adaptive exam testing technique. This will help eliminate any anxiety you might experience from this testing technique and allow you to focus on learning the actual exam material.
ExamGear's Adaptive Exam
The method used to score the Adaptive Exam requires a large pool of questions. For this reason, you cannot use this exam in Preview mode. The Adaptive Exam is presented in much the same way as the Practice Exam. When you click the Start Test button, you begin answering questions. The Adaptive Exam does not allow item review, and it does not allow you to mark questions to skip and answer later. You must answer each question when it is presented.
Assumptions
This section describes the assumptions made when designing the behavior of the ExamGear Special Edition adaptive exam.
- You fail the test if you fail any module, earn a failing overall score, or reach a threshold at which it is statistically impossible for you to pass the exam.
- You can fail or pass a test without cycling through all the questions.
- The overall score for the adaptive exam is Pass or Fail. However, to evaluate user responses dynamically, percentage scores are recorded for modules and the overall score.
Algorithm Assumptions
This section describes the assumptions used in designing the ExamGear Special Edition Adaptive Exam scoring algorithm.
Module Scores
You fail a module (and the exam) if any module score falls below 66%.
Overall Scores
To pass the exam, you must pass all modules and achieve an overall score of 86% or higher.
You fail if the overall score percentage is less than or equal to 85% or if any module score is less than 66%.
Inconclusive Scores
If your overall score is between 67 and 85%, it is considered to be inconclusive. Additional questions will be asked until you pass or fail or until it becomes statistically impossible to pass without asking more than the maximum number of questions allowed.
Question Types and How to Answer Them
Because certification exams from different vendors vary, you will face many types of questions on any given exam. ExamGear Special Edition presents you with different question types to allow you to become familiar with the various ways an actual exam may test your knowledge. Microsoft's 70-300 exam, in particular, offers a unique exam format and utilizes question types other than multiple choice. This version of ExamGear includes casesextensive problem descriptions running several pages in length, followed by a number of questions specific to that case. Some vendors refer to these case/question collections as testlets. This version of ExamGear Special Edition also includes regular questions that are not attached to a case study. We include these question types to make taking the actual exam easier because you will already be familiar with the steps required to answer each question type. This section describes each of the question types presented by ExamGear and provides instructions for answering each type.
Multiple Choice
Most of the questions you see on a certification exam are multiple choice (see Figure A.4). This question type asks you to select an answer from the list provided. Sometimes you must select only one answer, often indicated by answers preceded by option buttons (round selection buttons). At other times, multiple correct answers are possible, indicated by check boxes preceding the possible answer combinations.
Figure A.4. A typical multiple-choice question.
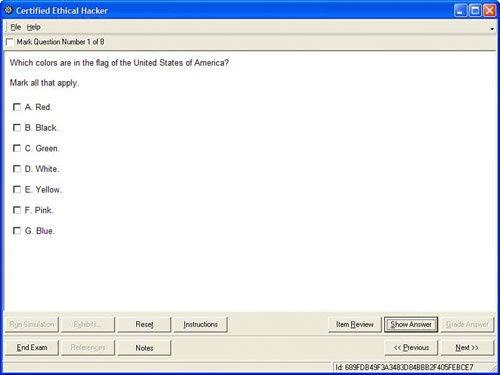
You can use three methods to select an answer:
- Click the option button or check box next to the answer. If more than one correct answer to a question is possible, the answers will have check boxes next to them. If only one correct answer to a question is possible, each answer will have an option button next to it. ExamGear Special Edition prompts you with the number of answers you must select.
- Press the alphabetic key that corresponds to the answer.
You can use any one of three methods to clear an option button:
- Click another option button.
- Click the text of another answer.
- Press the alphabetic key that corresponds to another answer.
You can use any one of three methods to clear a check box:
- Click the check box next to the selected answer.
- Click the text of the selected answer.
- Press the alphabetic key that corresponds to the selected answer.
To clear all answers, click the Reset button.
Remember that some of the questions have multiple answers that are correct. Do not let this throw you off. The multiple correct questions do not have one answer that is more correct than another. In the single correct format, only one answer is correct. ExamGear Special Edition prompts you with the number of answers you must select.
Drag and Drop
One form of drag and drop question is called a Drop and Connect question. These questions present you with a number of objects and connectors. The question prompts you to create relationships between the objects by using the connectors. The gray squares on the left side of the question window are the objects you can select. The connectors are listed on the right side of the question window in the Connectors box. An example is shown in Figure A.5.
Figure A.5. A typical Drop and Connect question.
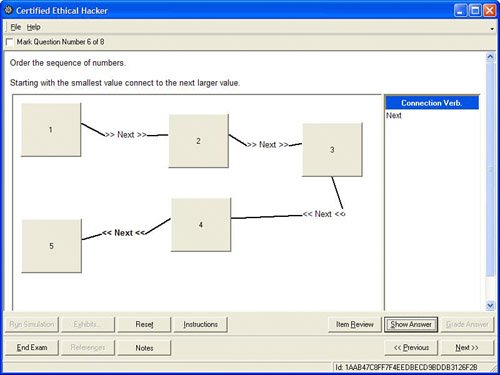
To select an object, click it with the mouse. When an object is selected, it changes color from a gray box to a white box. To drag an object, select it by clicking it with the left mouse button and holding the left mouse button down. You can move (or drag) the object to another area on the screen by moving the mouse while holding the left mouse button down.
To create a relationship between two objects, take the following actions:
- Select an object and drag it to an available area on the screen.
- Select another object and drag it to a location near where you dragged the first object.
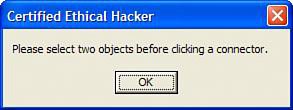
- Select the connector that you want to place between the two objects. The relationship should now appear complete. Note that to create a relationship, you must have two objects selected. If you try to select a connector without first selecting two objects, you are presented with an error message like that illustrated in Figure A.6.
Figure A.6. The error message.
Initially, the direction of the relationship established by the connector is from the first object selected to the second object selected. To change the direction of the connector, right-click the connector and choose Reverse Connection.
You can use either of two methods to remove the connector:
- Right-click the text of the connector that you want to remove, and then choose Delete.
- Select the text of the connector that you want to remove, and then press the Delete key.
To remove from the screen all the relationships you have created, click the Reset button.
Keep in mind that connectors can be used multiple times. If you move connected objects, it will not change the relationship between the objects; to remove the relationship between objects, you must remove the connector that joins them. When ExamGear Special Edition scores a drag-and-drop question, only objects with connectors to other objects are scored.
Another form of drag and drop question is called the Select and Place question. Instead of creating a diagram as you do with the Drop and Connect question, you are asked a question about a diagram. You then drag and drop labels onto the diagram in order to correctly answer the question.
Ordered-List Questions
In the ordered-list question type (see Figure A.7), you are presented with a number of items and are asked to perform two tasks:
- Build an answer list from items on the list of choices.
- Put the items in a particular order.
Figure A.7. A typical ordered-list question.
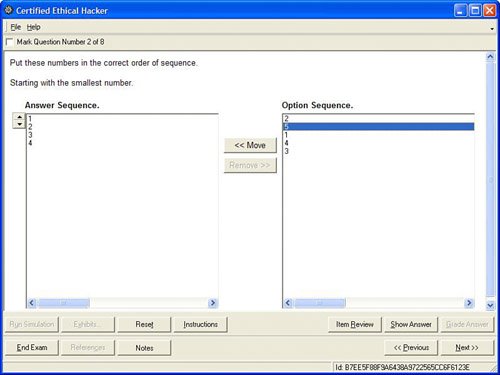
You can use any one of the following three methods to add an item to the answer list:
- Drag the item from the list of choices on the right side of the screen to the answer list on the left side of the screen.
- From the available items on the right side of the screen, double-click the item you want to add.
- From the available items on the right side of the screen, select the item you want to add; then click the Move button.
To remove an item from the answer list, you can use any one of the following four methods:
- Drag the item you want to remove from the answer list on the left side of the screen back to the list of choices on the right side of the screen.
- On the left side of the screen, double-click the item you want to remove from the answer list.
- On the left side of the screen, select the item you want to remove from the answer list, and then click the Remove button.
- On the left side of the screen, select the item you want to remove from the answer list, and then press the Delete key.
To remove all items from the answer list, click the Reset button.
If you need to change the order of the items in the answer list, you can do so using either of the following two methods:
- Drag each item to the appropriate location in the answer list.
- In the answer list, select the item that you want to move, and then click the up or down arrow button to move the item.
Keep in mind that items in the list can be selected twice. You may find that an ordered-list question will ask you to list in the correct order the steps required to perform a certain task. Certain steps may need to be performed more than once during the process. Don't think that after you have selected a list item, it is no longer available. If you need to select a list item more than once, you can simply select that item at each appropriate place as you construct your list.
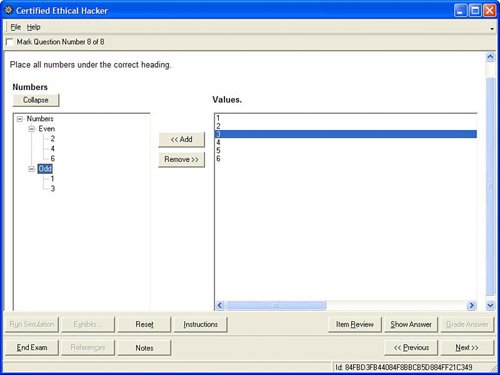
Ordered-Tree Questions
The ordered-tree question type (see Figure A.8) presents you with a number of items and prompts you to create a tree structure from those items. The tree structure includes two or three levels of nodes.
Figure A.8. A typical ordered-tree question.
An item in the list of choices can be added only to the appropriate node level. If you attempt to add one of the list choices to an inappropriate node level, you are presented with the error message shown in Figure A.9
Figure A.9. The Invalid Destination Node error message.

Like the ordered-list question, realize that any item in the list can be selected twice. If you need to select a list item more than once, you can simply select that item for the appropriate node as you construct your tree.
Also realize that not every tree question actually requires order to the lists under each node. Think of them as simply tree questions rather than ordered-tree questions. Such questions are just asking you to categorize hierarchically. Order is not an issue.
You can use either of the following two methods to add an item to the tree:
- Drag the item from the list of choices on the right side of the screen to the appropriate node of the tree on the left side of the screen.
- Select the appropriate node of the tree on the left side of the screen. Select the appropriate item from the list of choices on the right side of the screen. Click the Add button.
You can use either of the following two methods to remove an item from the tree:
- Drag an item from the tree to the list of choices.
- Select the item and click the Remove button.
To remove from the tree structure all the items you have added, click the Reset button.
Simulations
Simulation questions (see Figure A.10) require you to actually perform a task.
Figure A.10. A typical simulation question.
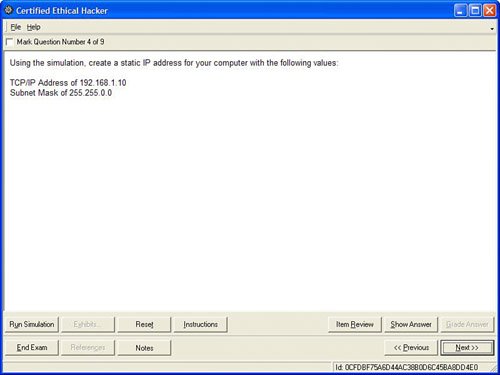
The main screen describes a situation and prompts you to provide a solution. When you are ready to proceed, you click the Run Simulation button in the lower-left corner. A screen or window appears on which you perform the solution. This window simulates the actual software that you would use to perform the required task in the real world. When a task requires several steps to complete, the simulator displays all the necessary screens to allow you to complete the task. When you have provided your answer by completing all the steps necessary to perform the required task, you can click the OK button to proceed to the next question.
You can return to any simulation to modify your answer. Your actions in the simulation are recorded, and the simulation appears exactly as you left it.
Simulation questions can be reset to their original state by clicking the Reset button.
Hot Spot Questions
Hot spot questions (see Figure A.11) ask you to correctly identify an item by clicking an area of the graphic or diagram displayed. To respond to the question, position the mouse cursor over a graphic. Then press the right mouse button to indicate your selection. To select another area on the graphic, you do not need to deselect the first one. Just click another region in the image.
Figure A.11. A typical hot spot question.

Standard ExamGear Special Edition Options
Regardless of question type, a consistent set of clickable buttons enables you to navigate and interact with questions. The following list describes the function of each of the buttons you may see. Depending on the question type, some of the buttons will be grayed out and will be inaccessible. Buttons that are appropriate to the question type are active.
- Run Simulation. This button is enabled if the question supports a simulation. Clicking this button begins the simulation process.
- Exhibits. This button is enabled if exhibits are provided to support the question. An exhibit is an image, video, sound, or text file that provides supplemental information needed to answer the question. If a question has more than one exhibit, a dialog box appears, listing exhibits by name. If only one exhibit exists, the file is opened immediately when you click the Exhibits button.
- Reset. This button clears any selections you have made and returns the question window to the state in which it appeared when it was first displayed.
- Instructions. This button displays instructions for interacting with the current question type.
- Item Review. This button leaves the question window and opens the Item Review screen. For a detailed explanation of the Item Review screen, see the "Item Review" section later in this appendix.
- Show Answer. This option displays the correct answer with an explanation of why it is correct. If you choose this option, the current question will not be scored.
- Grade Answer. If Grade at the End of the Test is selected as a configuration option, this button is disabled. It is enabled when Grade as I Answer Each Question is selected as a configuration option. Clicking this button grades the current question immediately. An explanation of the correct answer is provided, just as if the Show Answer button were pressed. The question is graded, however.
- End Exam. This button ends the exam and displays the Examination Score Report screen.
- << Previous. This button displays the previous question on the exam.
- Next >>. This button displays the next question on the exam.
- << Previous Marked. This button is displayed if you have opted to review questions that you have marked using the Item Review screen. This button displays the previous marked question. Marking questions is discussed in more detail later in this appendix.
- Next Marked >>. This button is displayed if you have opted to review questions that you have marked using the Item Review screen. This button displays the next marked question. Marking questions is discussed in more detail later in this appendix.
- << Previous Incomplete. This button is displayed if you have opted to review questions that you have not answered using the Item Review screen. This button displays the previous unanswered question.
- Next Incomplete>>. This button is displayed if you have opted to review questions, using the Item Review screen, that you have not answered. This button displays the next unanswered question.
Mark Question and Time Remaining
ExamGear provides you with two methods to aid in dealing with the time limit of the testing process. If you find that you need to skip a question or if you want to check the time remaining to complete the test, use one of the options discussed in the following sections.
Mark Question
Check this box to mark a question so that you can return to it later using the Item Review feature. The adaptive exam does not allow questions to be marked because it does not support item review.
Time Remaining
If the test is timed, the Time Remaining indicator is enabled. It counts down minutes remaining to complete the test. The adaptive exam does not offer this feature because it is not timed.
Item Review
The Item Review screen allows you to jump to any question. ExamGear Special Edition considers an incomplete question to be any unanswered question or any multiple-choice question for which the total number of required responses has not been selected. For example, if the question prompts for three answers and you selected only A and C, ExamGear considers the question to be incomplete.
The Item Review screen enables you to review the exam questions in different ways. You can enter one of two browse sequences (series of similar records): Browse Marked Questions or Browse Incomplete Questions. You can also create a custom grouping of the exam questions for review based on a number of criteria.
When using Item Review, if Show Answer was selected for a question while you were taking the exam, the question is grayed out in item review. The question can be answered again if you use the Reset button to reset the question status.
The Item Review screen contains two tabs. The Questions tab lists questions and question information in columns. The Current Score tab provides your exam score information, presented as a percentage for each module and as a bar graph for your overall score.
The Item Review Questions Tab
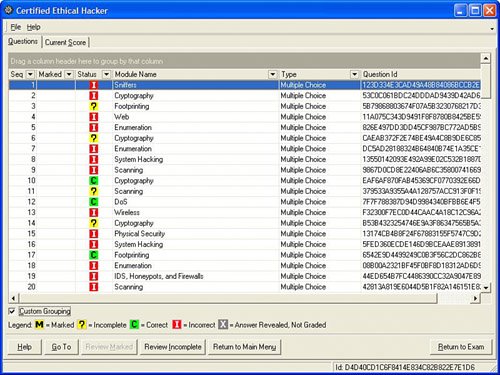
The Questions tab on the Item Review screen (see Figure A.12) presents the exam questions and question information in a table. You can select any row you want by clicking in the grid. The Go To button is enabled whenever a row is selected. Clicking the Go To button displays the question on the selected row. You can also display a question by double-clicking that row.
Figure A.12. The Questions tab on the Item Review screen.
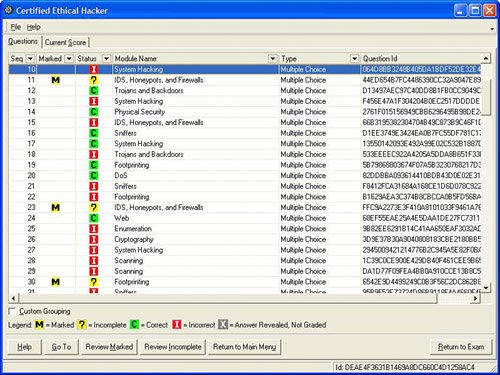
Columns
The Questions tab contains the following six columns of information:
- Seq. Indicates the sequence number of the question as it was displayed in the exam.
- Question Number. Displays the question's identification number for easy reference.
- Marked. Indicates a question that you have marked using the Mark Question check box.
- Status. The status can be M for Marked, ? for Incomplete, C for Correct, I for Incorrect, or X for Answer Shown.
- Module Name. The module associated with each question.
- Type. The question type, which can be Multiple Choice, Drag and Drop, Simulation, Hot Spot, Ordered List, or Ordered Tree.
To resize a column, place the mouse pointer over the vertical line between column headings. When the mouse pointer changes to a set of right and left arrows, you can drag the column border to the left or right to make the column more or less wide. Simply click with the left mouse button and hold that button down while you move the column border in the desired direction.
The Item Review screen enables you to sort the questions on any of the column headings. Initially, the list of questions is sorted in descending order on the sequence number column. To sort on a different column heading, click that heading. You will see an arrow appear on the column heading indicating the direction of the sort (ascending or descending). To change the direction of the sort, click the column heading again.
The Item Review screen also allows you to create a custom grouping. This feature enables you to sort the questions based on any combination of criteria you prefer. For instance, you might want to review the question items sorted first by whether they were marked, then by the module name, then by sequence number. The Custom Grouping feature allows you to do this. Start by checking the Custom Grouping check box (see Figure A.13). When you do so, the entire questions table shifts down a bit onscreen, and a message appears at the top of the table that reads Drag a column header here to group by that column.
Figure A.13. The Custom Grouping check box allows you to create your own question sort order.
Simply click the column heading you want with the left mouse button, hold that button down, and move the mouse into the area directly above the questions table (the custom grouping area). Release the left mouse button to drop the column heading into the custom grouping area. To accomplish the custom grouping previously described, first check the Custom Grouping check box. Then drag the Marked column heading into the custom grouping area above the question table. Next, drag the Module Name column heading into the custom grouping area. You will see the two column headings joined together by a line that indicates the order of the custom grouping. Finally, drag the Seq column heading into the custom grouping area. This heading will be joined to the Module Name heading by another line indicating the direction of the custom grouping.
Notice that each column heading in the custom grouping area has an arrow indicating the direction in which items are sorted under that column heading. You can reverse the direction of the sort on an individual column-heading basis using these arrows. Click the column heading in the custom grouping area to change the direction of the sort for that column heading only. For example, using the custom grouping created previously, you can display the question list sorted first in descending order by whether the question was marked, in descending order by module name, and then in ascending order by sequence number.
The custom grouping feature of the Item Review screen gives you enormous flexibility in how you choose to review the exam questions. To remove a custom grouping and return the Item Review display to its default setting (sorted in descending order by sequence number), simply uncheck the Custom Grouping check box.
The Current Score Tab
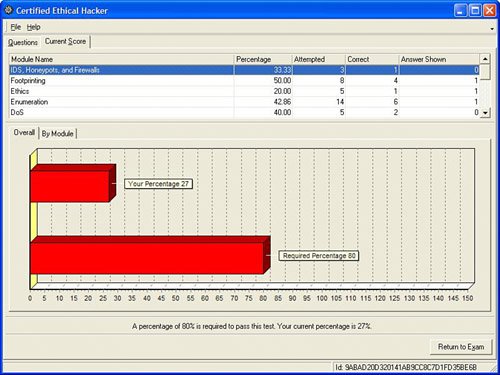
The Current Score tab of the Item Review screen (see Figure A.14) provides a real-time snapshot of your score. The top half of the screen is an expandable grid. When the grid is collapsed, scores are displayed for each module. Modules can be expanded to show percentage scores for objectives and subobjectives. Information about your exam progress is presented in the following columns:
- Module Name. This column shows the module name for each objective group.
- Percentage. This column shows the percentage of questions for each objective group that you answered correctly.
- Attempted. This column lists the number of questions you answered either completely or partially for each objective group.
- Correct. This column lists the actual number of questions you answered correctly for each objective group.
- Answer Shown. This column lists the number of questions for each objective group that you chose to display the answer to using the Show Answer button.
Figure A.14. The Current Score tab on the item review screen.
The columns in the scoring table are resized and sorted in the same way as those in the questions table on the Item Review Questions tab. Refer to the earlier section "The Item Review Questions Tab" for more details.
A graphical overview of the score is presented below the grid. The graph depicts two red bars: The top bar represents your current exam score, and the bottom bar represents the required passing score. To the right of the bars in the graph is a legend that lists the required score and your score. Below the bar graph is a statement that describes the required passing score and your current score.
In addition, the information can be presented on an overall basis or by exam module. The Overall tab shows the overall score. The By Module tab shows the score by module.
Clicking the End Exam button terminates the exam and passes control to the Examination Score Report screen.
The Return to Exam button returns to the exam at the question from which the Item Review button was clicked.
Review Marked Items
The Item Review screen allows you to enter a browse sequence for marked questions. When you click the Review Marked button, questions that you have previously marked using the Mark Question check box are presented for your review. While browsing the marked questions, you will see the following changes to the buttons available:
- The caption of the Next button becomes Next Marked.
- The caption of the Previous button becomes Previous Marked.
Review Incomplete
The Item Review screen allows you to enter a browse sequence for incomplete questions. When you click the Review Incomplete button, the questions you did not answer or did not completely answer are displayed for your review While browsing the incomplete questions, you will see the following changes to the buttons:
- The caption of the Next button becomes Next Incomplete.
- The caption of the Previous button becomes Previous Incomplete.
Examination Score Report Screen
The Examination Score Report screen (see Figure A.15) appears when the Study Mode, Practice Exam, or Adaptive Exam endsas the result of timer expiration, completion of all questions, or your decision to terminate early.
Figure A.15. The Examination Score Report screen.
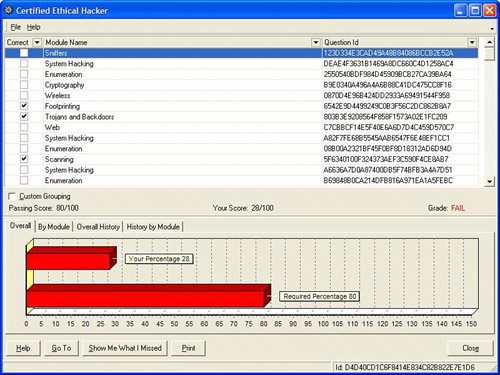
This screen provides you with a graphical display of your test score, along with a tabular breakdown of scores by module. The graphical display at the top of the screen compares your overall score with the score required to pass the exam. Buttons below the graphical display allow you to open the Show Me What I Missed browse sequence, print the screen, or return to the main menu.
Show Me What I Missed Browse Sequence
The Show Me What I Missed browse sequence is invoked by clicking the Show Me What I Missed button from the Examination Score Report or from the configuration screen of an adaptive exam.
Note that the window caption is modified to indicate that you are in the Show Me What I Missed browse sequence mode. Question IDs and position within the browse sequence appear at the top of the screen, in place of the Mark Question and Time Remaining indicators. Main window contents vary, depending on the question type. The following list describes the buttons available within the Show Me What I Missed browse sequence and the functions they perform:
- Return to Score Report. Returns control to the Examination Score Report screen. In the case of an adaptive exam, this button's caption is Exit, and control returns to the adaptive exam configuration screen.
- Run Simulation. Opens a simulation in Grade mode, causing the simulation to open displaying your response and the correct answer. If the current question does not offer a simulation, this button is disabled.
- Exhibits. Opens the Exhibits window. This button is enabled if one or more exhibits are available for the question.
- Instructions. Shows how to answer the current question type.
- Print. Prints the current screen.
- Previous or Next. Displays missed questions.
Types of Updates
Several types of updates may be available for download, including various free updates and additional items available for purchase.
Free Program Updates
Free program updates include changes to the ExamGear Special Edition executables and runtime libraries (DLLs). When any of these items are downloaded, ExamGear automatically installs the upgrades. ExamGear Special Edition will be reopened after the installation is complete.
Free Database Updates
Free database updates include updates to the exam or exams that you have registered. Exam updates are contained in compressed, encrypted files and include exam databases, simulations, and exhibits. ExamGear Special Edition automatically decompresses these files to their proper location and updates the ExamGear software to record version changes and import new question sets.
Contacting Que Certification |
Part I: Exam Preparation
The Business Aspects of Penetration Testing
- The Business Aspects of Penetration Testing
- Study Strategies
- Security Fundamentals
- Security Testing
- Hacker and Cracker Descriptions
- Ethical Hackers
- Test PlansKeeping It Legal
- Ethics and Legality
- Summary
- Key Terms
- Apply Your Knowledge
The Technical Foundations of Hacking
- The Technical Foundations of Hacking
- Study Strategies
- The Attackers Process
- The Ethical Hackers Process
- Security and the Stack
- Summary
- Key Terms
- Apply Your Knowledge
Footprinting and Scanning
- Footprinting and Scanning
- Study Strategies
- Determining Assessment Scope
- The Seven-Step Information Gathering Process
- Summary
- Key Terms
- Apply Your Knowledge
Enumeration and System Hacking
- Enumeration and System Hacking
- Study Strategies
- The Architecture of Windows Computers
- Enumeration
- Windows Hacking
- Summary
- Key Terms
- Apply Your Knowledge
Linux and Automated Security Assessment Tools
- Linux and Automated Security Assessment Tools
- Study Strategies
- Linux
- Automated Assessment Tools
- Picking the Right Platform
- Summary
- Key Terms
- Apply Your Knowledge
Trojans and Backdoors
- Trojans and Backdoors
- Study Strategies
- An Overview of TrojansThe History of Trojans
- Covert Communications
- Trojan and Backdoor Countermeasures
- Summary
- Key Terms
- Apply Your Knowledge
Sniffers, Session Hijacking, and Denial of Service
- Sniffers, Session Hijacking, and Denial of Service
- Study Strategies
- Sniffers
- Session Hijacking
- Denial of Service
- Summary
- Key Terms
- Apply Your Knowledge
Web Server Hacking, Web Applications, and Database Attacks
- Web Server Hacking, Web Applications, and Database Attacks
- Study Strategies
- Web Server Hacking
- Web Application Hacking
- Database Overview
- Summary
- Key Terms
- Apply Your Knowledge
Wireless Technologies, Security, and Attacks
- Wireless Technologies, Security, and Attacks
- Study Strategies
- Wireless TechnologiesA Brief History
- Wireless LANs
- Wireless Hacking Tools
- Securing Wireless Networks
- Summary
- Key Terms
- Apply Your Knowledge
IDS, Firewalls, and Honeypots
- IDS, Firewalls, and Honeypots
- Study Strategies
- Intrusion Detection Systems
- Firewalls
- Honeypots
- Summary
- Key Terms
- Apply Your Knowledge
Buffer Overflows, Viruses, and Worms
- Buffer Overflows, Viruses, and Worms
- Study Strategies
- Buffer Overflows
- Viruses and Worms
- Summary
- Key Terms
- Apply Your Knowledge
Cryptographic Attacks and Defenses
- Cryptographic Attacks and Defenses
- Study Strategies
- Functions of Cryptography
- History of Cryptography
- Algorithms
- Hashing
- Digital Signatures
- Steganography
- Digital Certificates
- Public Key Infrastructure
- Protocols, Standards, and Applications
- Encryption Cracking and Tools
- Summary
- Key Terms
- Apply Your Knowledge
Physical Security and Social Engineering
- Physical Security and Social Engineering
- Study Strategies
- Physical Security
- Social Engineering
- Summary
- Key Terms
- Apply Your Knowledge
Part II: Final Review
- Fast Facts
- Ethics and Legality
- Footprinting
- Scanning
- Enumeration
- System Hacking
- Trojans and Backdoors
- Sniffers
- Denial of Service
- Social Engineering
- Session Hijacking
- Hacking Web Servers
- Web Application Vulnerabilities
- Web-Based Password Cracking Techniques
- SQL Injection
- Hacking Wireless Networks
- Virus and Worms
- Physical Security
- Linux Hacking
- Evading Firewalls, IDS, and Honeypots
- Buffer Overflows
- Cryptography
- Penetration Testing
- Certified Ethical Hacker
- Practice Exam Questions
- Answers to Practice Exam Questions
- Glossary
Part III: Appendixes
Appendix A. Using the ExamGear Special Edition Software
- Appendix A. Using the ExamGear Special Edition Software
- Exam Simulation
- Study Tools
- How ExamGear Special Edition Works
- Installing ExamGear Special Edition
- Using ExamGear Special Edition
- Contacting Que Certification
- License
- Software and Documentation
- License Term and Charges
- Title
- Updates
- Limited Warranty and Disclaimer
- Limitation of Liability
- Miscellaneous
- U.S. Government Restricted Rights
EAN: 2147483647
Pages: 247
