Objective 7. Print a Presentation

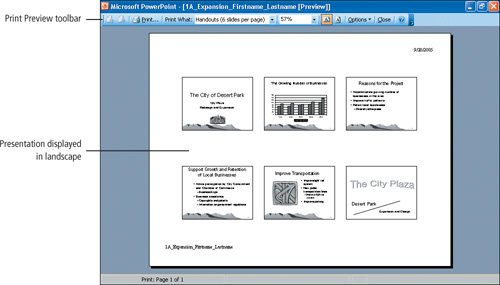
You can print your presentation as individual slides so that one slide fills the entire sheet of paper, as slide handouts, or as notes pages. Recall that slide handouts include several slides printed on one sheet of paper. You can print 1, 2, 3, 4, 6, or 9 slides per page and then distribute the printed handouts to your audience. The size of the slides on the printout varies, depending on the number of slides that you choose to print per page.


[Page 1174]

Activity 1.21. Previewing and Printing Handouts and Slides

Clicking the Print button on the Standard toolbar prints one copy of each slide in the presentationfilling the entire page with the slide. Printing a presentation in this manner uses a large amount of ink or toner, depending on the type of printer to which your system is connected. The majority of the projects in this textbook require that you print handouts, not slides, which conserves paper and printer supplies. To change the print options, use the Print dialog box.

1.

Display the File menu, and then click Print. Take a moment to study the table in Figure 1.33, which describes what you can do in each section of the Print dialog box.

Figure 1.33. The Print Dialog Box

Section

Here you can:

Printer

Change the current printer. Information regarding the printer location and the port that the printer is using is included here.

Print range

Choose the slides that you want to print.

Copies

Specify the number of copies that you want to print.

Print what:

Specify the type of output. You can print slides, handouts, notes pages, or outline view (only the text of the slides, in outline format).

Handouts

Specify the number of slides per page and the order in which the slides are arranged on the page.


2.

In the lower left portion of the dialog box, click the Print what arrow, and then from the displayed list, click Handouts.

3.

Under Handouts, click the Slides per page arrow, and on the displayed list, click 6 to print all six slides in the presentation on one page. Notice that the Preview box to the right indicates six slides.

4.

In the same dialog box section, click the Vertical option button.

The preview changes its order of how the slides will be printedslides 13 in the first column and then slides 46 in the second column.

5.

At the bottom of the dialog box, click the Color/grayscale arrow. Click Grayscale. If necessary, click to select the Frame slides check box so that a thin border surrounds each slide on the printout, thus giving the printout a finished and professional look.

Selecting Grayscale optimizes the look of color slides that are printed on a black and white printer, whereas printing in Pure Black and White hides shadows and patterns applied to text and graphics.

6.

Under Print range, verify that the All option button is selected so that all of the slides in the presentation are included in the handouts printout. Under Copies, in the Number of copies box, verify that 1 displays so that only one copy of the handouts is printed. Compare your dialog box to Figure 1.34.


[Page 1175]

Figure 1.34.


7.

In the lower left corner of the Print dialog box, click Preview.

The Print Preview window opens, displaying your presentation as it will look when printed using the print options that you selected. In this window, you can change the print options and then print your presentation.

Another Way: To Display the Presentation in the Print Preview Window

You can display the Print Preview window at any time by clicking the Print Preview button on the Standard toolbar.

8.

On the Print Preview toolbar, click Landscape .

The presentation displays and will print on paper set up in landscape orientation11 inches wide by 8 ½ inches tall.

9.

On the Print Preview toolbar, click Options , point to Printing Order and then click Horizontal. Slides 1, 2, and 3 display in the top row and slides 4, 5, and 6 display in the bottom row. Compare your Print Preview window to Figure 1.35.


[Page 1176]

Figure 1.35.


10.

On the Print Preview toolbar, click Portrait .

The presentation displays and will print on paper set up in portrait orientation8 ½ inches wide by 11 inches tall.

11.

On the Print Preview toolbar, click Print to return to the print dialog box, and then click OK.

All six slides in the presentation are printed on one page, and the printout includes a header with the current date on the right and a footer with the file name on the left.

12.

On the Print Preview toolbar, click Close .

The Print Preview window closes and your presentation is displayed in Normal View.

Activity 1.22. Printing Notes Pages

In this activity, you will print Notes Pages for the slides that contain speakers notes.
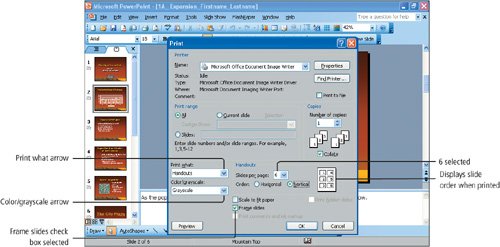
1.

Display the File menu, and then click Print.

2.

In the lower left corner of the Print dialog box, click the Print what arrow, and then from the displayed list, click Notes Pages.

3.

Under Print range, click the Slides option button and notice that the insertion point is blinking in the Slides box.


[Page 1177]
In this manner, you can choose to print only specific slides by entering the slide numbers that you want to print.

4.

In the Slides box, type 2,6

NotePrinting Several Sequential Slides

You can print several sequential slides by using a hyphen between slide numbers. For example, typing 35 in the Slides box results in printouts that include slides 3, 4, and 5.

5.

Under Print what, click the Color/grayscale arrow, and then from the displayed list click Grayscale. Compare your dialog box to Figure 1.36.

Figure 1.36.
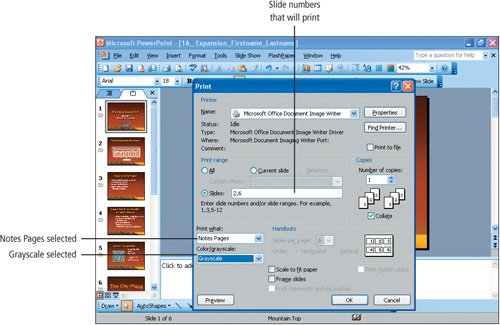

6.

In the lower right corner of the Print dialog box, click OK to print the two notes pages.

7.

Check your Chapter Assignment Sheet or Course Syllabus, or consult your instructor, to determine if you are to submit your assignments on paper or electronically using your colleges course information management system. To submit electronically, go to Step 8, and then follow the instructions provided by your instructor.

8.

Save the presentation.


[Page 1178]

Windows XP

Outlook 2003

Internet Explorer

Computer Concepts

Word 2003

Chapter One. Creating Documents with Microsoft Word 2003

Chapter Two. Formatting and Organizing Text

Chapter Three. Using Graphics and Tables

Chapter Four. Using Special Document Formats, Columns, and Mail Merge

Excel 2003

Chapter One. Creating a Worksheet and Charting Data

Chapter Two. Designing Effective Worksheets

Chapter Three. Using Functions and Data Tables

Access 2003

Chapter One. Getting Started with Access Databases and Tables

Chapter Two. Sort, Filter, and Query a Database

Chapter Three. Forms and Reports

Powerpoint 2003

Chapter One. Getting Started with PowerPoint 2003

Chapter Two. Creating a Presentation

Chapter Three. Formatting a Presentation

Integrated Projects

Chapter One. Using Access Data with Other Office Applications

Chapter Two. Using Tables in Word and Excel

Chapter Three. Using Excel as a Data Source in a Mail Merge

Chapter Four. Linking Data in Office Documents

Chapter Five. Creating Presentation Content from Office Documents


Go! With Microsoft Office 2003 Brief
GO! with Microsoft Office 2003 Brief (2nd Edition)
ISBN: 0131878646
EAN: 2147483647
Year: 2004
Pages: 448

Flylib.com © 2008-2020.
If you may any questions please contact us: flylib@qtcs.net