Recall that each table in a relational database contains all of the records about a single topic. Tables can be joined by including the primary key field from one table as a foreign key field in a second table. This common field is used to create a relationship, which enables you to include data from more than one table in a query.
For example, in the Club Fundraiser database, the Club Members table includes all of the information about the club members, such as name, address, and phone number. The Pledges table includes the donor name, pledge amount, and date the pledge is collected. When a club member receives a pledge, only the Student# field is included with the pledge to identify who received the donation. It is not necessary to include any other club member information in the Pledges table, because the club member information is contained in the Club Members table.
To produce a list of the club member names and how much they have received in donations, a query is used to combine the name from the Club Members table with the pledge amount from the Pledges table. In this manner, data from more than one table can be used to create useful information.
In this activity, you will use both tables in the Club Fundraiser database to create a query that lists the names of the students who have received pledges that have not been collected yet.
1. | With your 2A_Club_Fundraiser database open, and Queries selected on the Objects bar, double-click Create query in Design view.
|
| |
2. | Add both the Club Members and Pledges field lists, and then expand the table area and the field lists to display all of the field names. If necessary, Maximize  the Select Query window. Compare your screen with Figure 2.36. the Select Query window. Compare your screen with Figure 2.36.
Figure 2.36.
(This item is displayed on page 1006 in the print version)
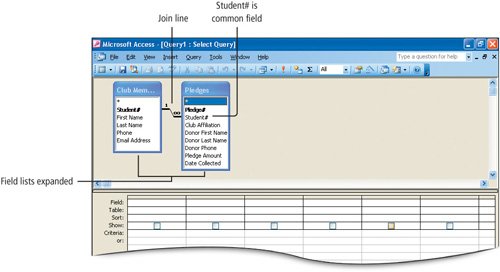
The join line indicates the one-to-many relationshipone club member can have many pledges. Student# is the common field in the two tables. Notice that Student# is bold in the Club Members table where it is the primary key field, but it is not bold in the Pledges table where it is the foreign key field.
|
|
[Page 1006] |
3. | From the Club Members field list, add First Name and Last Name to the design grid. On the Sort row, under Last Name, click to select Ascending to sort the records in alphabetic order by last name.
|
4. | From the Pledges field list, add Donor First Name, Donor Last Name, Donor Phone, Pledge Amount, and Date Collected to the design grid.
The second row in the design grid is labeled Table and indicates the table of origin for each field in the design grid. When using multiple tables in a query, this information is helpful, especially when some tables may include the same field names, such as address, but different data, such as a students address or a faculty members address.
|
| |
5. | On the Criteria row, under Date Collected type Is Null and then compare your screen with Figure 2.37.
Figure 2.37.
(This item is displayed on page 1007 in the print version)
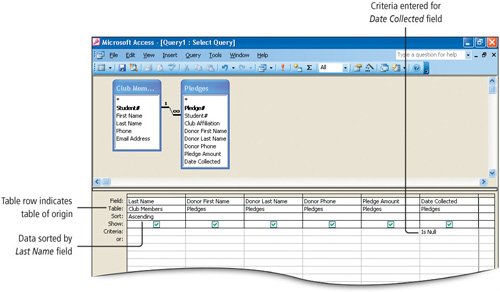
Recall that Is Null looks for records that have no data entered for this field, indicating that the pledge has not yet been collected. All of the criteria techniques you have practiced can be applied to queries that include two or more tables.
|
|
[Page 1007] |
6. | Run  the query. the query.
Eight pledges have not yet been collectedthe Date Collected field is empty. Notice that the student First Name and Last Name is included in the query results even though the common fieldStudent#was not included in the query design. Because Student# is included in both tables, and a one-to-many relationship has been created between the tables, you can display data from both tables in one query.
You can see that Emily Allen needs to contact Victoria DAmato to collect the money pledged by DAmato.
|
| |
7. | Return to the Design view  . From the Club Members field list, point to Email Address, drag it to the design grid on top of Donor First Name and release the mouse button. Compare your screen with Figure 2.38. . From the Club Members field list, point to Email Address, drag it to the design grid on top of Donor First Name and release the mouse button. Compare your screen with Figure 2.38.
Figure 2.38.
(This item is displayed on page 1008 in the print version)

When you release the mouse button, Email Address is inserted as the third field in the design grid; Donor First Name and the remaining fields move to the right. In this manner, you can add fields to your query design.
|
|
[Page 1008] |
8. | Click the Save button  . In the Save As dialog box, and using your own name, type 2A Pledges Due Firstname Lastname and then click OK. . In the Save As dialog box, and using your own name, type 2A Pledges Due Firstname Lastname and then click OK.
|
9. | Run the query. Then select all the columns, display the Format menu, click Column Width, and then click Best Fit.
|
10. | From the File menu, display the Page Setup dialog box, click the Page tab, and then under Orientation, click Landscape. Click OK.
|
11. | On the Query Datasheet toolbar, click the Print Preview button  . On the Print Preview toolbar, click the Zoom arrow and click 75%. Scroll as necessary to adjust the position of the preview and compare your screen with Figure 2.39. . On the Print Preview toolbar, click the Zoom arrow and click 75%. Scroll as necessary to adjust the position of the preview and compare your screen with Figure 2.39.
Figure 2.39.

|
|
[Page 1009] |
12. | If you have been instructed to submit your file electronically, skip this step. Otherwise, click the Print button  . .
|
13. | Close  the Print Preview window. Close the Print Preview window. Close  your 2A Pledges Due query, and click Yes when prompted to save the changes to the query layout. your 2A Pledges Due query, and click Yes when prompted to save the changes to the query layout.
Recall that the layout changes pertain to the Datasheet view of the query, which was changed when you adjusted the column widths.
|
If a relationship has not been established between tables prior to creating a query, you can create a join in the Query Design window for the purpose of that query. Drag the primary key field to the matching foreign key field in the second field list and a join line will display. To create a join, both fields must have the same data type and field size. If both fields also have the same field name, a join line will display automatically, whether or not a relationship has been created between the tables.
