Bullets and numbering are used in a PowerPoint presentation to emphasize important points on a slide. A design template includes bullets for up to five outline levels, and these outline levels determine the shape, size, color, and indentation of the bullet character. You can modify the bullets for an entire presentation by changing the bullet character, color, or size on the slide master, or you can modify bullets on an individual slide.
In this activity, you will change the bullet character, the color of the bullet, and the bullet size for the entire presentation by modifying the Slide Master.
1. | From your student files, Open  the file p03B_Volunteers and display Slide 2. Save the file as 3B_Volunteers_Firstname_Lastname and then Close the file p03B_Volunteers and display Slide 2. Save the file as 3B_Volunteers_Firstname_Lastname and then Close  the Outline/Slides pane. the Outline/Slides pane.
|
2. | Press and hold down  and then point to the Normal View button and then point to the Normal View button  , noticing that the ScreenTip Slide Master View displays. Click to display the slide master. , noticing that the ScreenTip Slide Master View displays. Click to display the slide master.
If the title master displays, drag the scroll box in the vertical scroll bar up so that the slide master displays.
|
3. | In the bulleted list placeholder, click in the first lineClick to edit Master text styles. On the menu bar, click the Format menu, and then click Bullets and Numbering.
The Bullets and Numbering dialog box displays six default bullets and two additional bullet boxesNone and Custom. You can use None to remove the bullets from a selection. The Custom box is selected, indicating that the selected bullet is not one of the default bullets, but was instead chosen from one of the symbol fonts.
|
4. | In the second row, click the first bulletthe shadowed square. Currently, the Size box indicates that the bullet is 60% of the size of the text. To enlarge the bullet, click the up spin arrow in the Size box three times to increase the size to 75% of text. Alternatively, select the number in the Size box and type 75.
Alert!: Is Your Dialog Box Different?
If the shadowed square does not display in the dialog box, then the bullet has been replaced by another user. To display the shadowed square, click the first bullet in the second row. Then, in the lower left corner of the dialog box, click Reset. The default shadowed square bullet will display.
|
|
[Page 1298] |
5. | Below the Size box, click the Color arrow to display the eight colors in the design templates color scheme. Click the seventh squarered. compare your dialog box to Figure 3.22, and then click OK. The slide master reflects the changes to the bullet.
Figure 3.22.

|
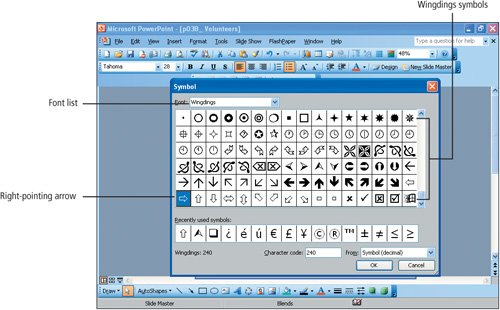
6. | Click the Second level bullet line. On the Format menu, click Bullets and Numbering. In the lower right corner of the Bullets and Numbering dialog box, click the Customize button.
The Symbol dialog box displays characters from the Wingdings font that may be used as bullet characters.
|
| |
7. | Scroll to the bottom of the list of symbols, and in the last row, click the first bullet charactera right-pointing arrowas shown in Figure 3.23. Click OK to return to the Bullets and Numbering dialog box.
[Page 1299]
Figure 3.23.
|
8. | Click the Color arrow and then click More Colors. In the last row of the honeycomb, click the last colordark red. Click OK, and then click OK again to apply your changes to the slide master.
|
9. | Click Normal View to close the slide master and return to the presentation. Display Slide 4 to view the changes to the first and second level bullets.
|
10. | Display Slide 5, and then click the bulleted list placeholder. Point to the outer edge of the placeholder so that a four-headed arrow displays, and then click so that the boundary box surrounding the placeholder changes to a pattern of dots.
Recall that when a placeholder is surrounded by a dotted pattern, formatting changes are applied to all of the text in the placeholder. Rather than making a global change on the slide master, you will modify the bullet color on this individual slide. Changes made to individual slides override the formatting on the slide master.
|
11. | On the menu bar, click the Format menu, and then click Bullets and Numbering. Click the Color arrow, and in the color scheme palette, click the sixth colorgold. Click OK to change the bullet color for the text in the selected placeholder.
|
12. | Save  the file. the file.
|
In this activity, you will use the Slide Master View to apply a picture bullet to the second level bullet.
1. | Display Slide 4 and then click Slide Master View + . Click in the Second level bullet point text.
|
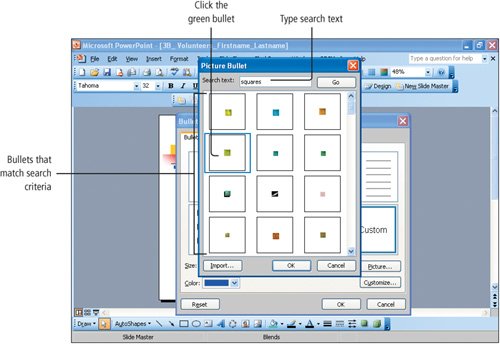
2. | From the Format menu, click Bullets and Numbering, and then in the lower right corner, click the Picture button.
The Picture Bullet dialog box displays a variety of images that can be used as bullets. Use the vertical scroll bar to view the bullets. You can search for bullets that match a keyword or you can scroll through the bullets and choose one that you wish to use.
|
3. | Click in the Search text box, type squares and then click Go.
The dialog box displays only square bullets.
|
4. | Click the green bullet shown in Figure 3.24, then click OK.
Figure 3.24.
The picture bullet is applied to the second level bullet.
|
| |
5. | Click Normal View to close the slide master, and then display Slide 4.
[Page 1301]Notice the picture bullet that displays in the slide. Later in this chapter, you will change the color scheme so that the green bullet coordinates with the presentation.
|
6. | Save the file.
|
Occasionally you may need to remove the bullet character from a line or paragraph of text. For example, your presentation may include a slide that contains a quote that you would like to display as a paragraph without a bullet. In this instance, the bullet character can be turned off. The Bullets button on the Formatting toolbar is a toggle button. Recall that a toggle button is like a light switch. You can click the button once to turn it on, and then you can click it again to turn it off. In this activity, you will turn off the bullet character in the last slide and then adjust the alignment for the text in the placeholder.
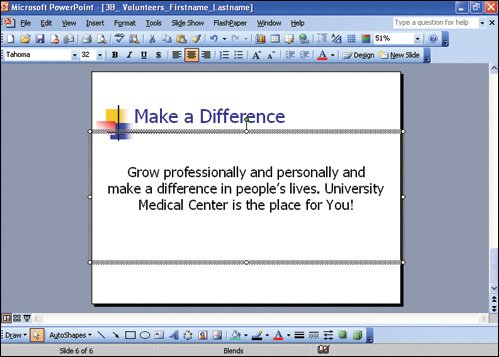
1. | Display Slide 6. Click anywhere in the bulleted paragraph. On the Formatting toolbar, click Bullets  to remove the bullet. to remove the bullet.
|
2. | On the Formatting toolbar, click Center  to center the lines. to center the lines.
|
3. | Notice that the word You! is the only word on the last line, leaving the slide with a poor design. To size the placeholder and adjust the text flow, point to the center left sizing handle so that a left-and-right-pointing arrow displays. Press and hold down the left mouse button and drag to size the placeholder so that its left edge aligns with the left edge of the slide. Release the left mouse button.
The placeholder is resized and the text fits on three lines.
|
| |
4. | Notice that the text is centered within the placeholder but it is not centered on the slide. To correct the alignment, point to the center right sizing handle so that a left-and-right-pointing arrow displays. Press and hold down the left mouse button, and then drag to the right edge of the slide. Release the left mouse button.
The placeholder extends from the right edge to the left edge of the slide and the text is correctly centered on the slide. Compare your slide to Figure 3.25.
Figure 3.25.
(This item is displayed on page 1302 in the print version)
|
5. | Save the file.
|
Slide text commonly contains bulleted items, but you can also create numbered items by applying numbers, roman numerals, uppercase, or lowercase alphabetic characters. When you move, delete, or add items to a numbered list, PowerPoint automatically reorders the numbers in the list.
1. | Display Slide 5, and then click anywhere in the bulleted list placeholder. Move the pointer over the outer edge of the placeholder so that a four-headed arrow displays. Click the left mouse button so that the edge of the placeholder displays a pattern of dots, indicating that the placeholder and all of the text within it are selected.
|
2. | On the Formatting toolbar, click Numbering  to replace the bullets with a numbered list. to replace the bullets with a numbered list.
NoteCreating Numbered Lists
You can automatically create a numbered list in a PowerPoint placeholder by typing a number followed by a closing parenthesis or period, and then pressing  . Type the text and then press . Type the text and then press  . The next number in the sequence is inserted. . The next number in the sequence is inserted.
|
|
[Page 1303] |
3. | Click the number 4 so that the line is selected. Press  and notice that the list renumbers. and notice that the list renumbers.
|
4. | Move the pointer over the outer edge of the placeholder so that a four-headed arrow displays. Click the left mouse button so that the edge of the placeholder displays a pattern of dots, indicating that all of the text within the placeholder is selected.
|
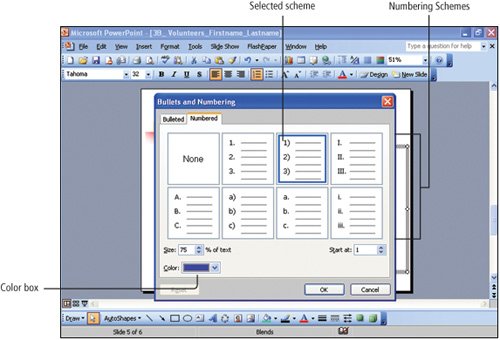
5. | On the menu bar, click the Format menu, and then click Bullets and Numbering. If necessary, click the Numbered tab. Notice the various numbering schemes that are available in PowerPoint. In the first row, click the third optionnumbers followed by closing parentheses. Click the Color arrow, and then click the last colorblue. Compare your dialog box to Figure 3.26. Click OK to apply the new numbering scheme.
Figure 3.26.
|
6. | Click anywhere on the slide to deselect the placeholder. Save the file.
|
