1. | If necessary, Open  your file 1A_Expansion_Firstname_Lastname. Be sure that the Outline/Slides pane is closed. your file 1A_Expansion_Firstname_Lastname. Be sure that the Outline/Slides pane is closed.
Recall that you can close the Outline/Slides tabs by clicking the Close button to the right of the Slides tab.
|
2. | In the vertical scroll bar at the far right edge of the window, point to the scroll box. Press and hold down the left mouse button so that a ScreenTip displays indicating the number and title of the current slide. Drag up or down as necessary to display Slide 6.
|
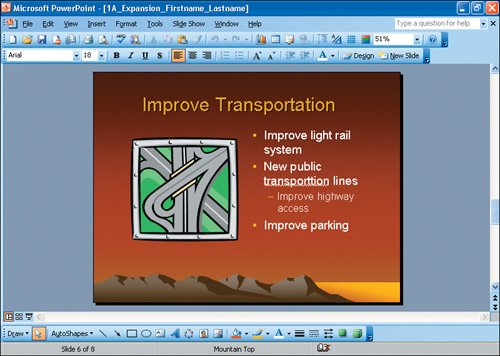
3. | With Slide 6 displayed in the Slide pane, click to position your insertion point at the end of the last bulleted item on the slideafter the word access. Press  . .
A new bullet, displayed in black, is created.
|
4. | Type Improve parking
Notice that as you begin to type, the bullet turns to the color of the other bullets on the slide.
|
5. | Click anywhere in the third bulleted lineImprove highway access.
On the Formatting toolbar, click Increase Indent  to apply a lower level bullet. Compare your slide to Figure 1.22. to apply a lower level bullet. Compare your slide to Figure 1.22.
Figure 1.22.
|
6. | Save  the file. the file.
|
1. | Display Slide 7 either by clicking the Next Slide button  or by dragging the vertical scroll box to display Slide 7. or by dragging the vertical scroll box to display Slide 7.
This slide contains a title and a placeholder for bulleted text. A placeholder reserves a portion of a slide and serves as a container for text, graphics, and other slide elements. Recall that this slide was created by promoting a bullet from the previous slide. Promoting a bullet at the highest level results in the creation of a new slide with the bulleted text as the title of the slide.
|
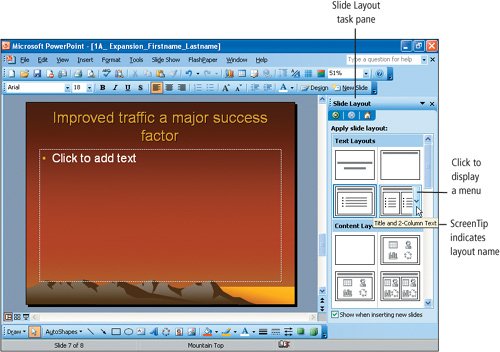
2. | To change the layout of this slide, on the menu bar, click Format, and then click Slide Layout.
The Slide Layout task pane displays all of the predefined layouts available in PowerPoint, as shown in Figure 1.23. The slide layouts are grouped into four categories: Text Layouts, Content Layouts, Text and Content Layouts, and Other Layouts.
Figure 1.23.
|
|
[Page 1161] |
3. | Take a moment to move the task panes scroll bar up and down to see the four layout categories and view the layouts. Point to, but do not click, some of the layouts and notice that a ScreenTip displays indicating the name of the layout.
When you point to a slide layout, the right side of the layout displays a bar with an arrow. See Figure 1.23. Clicking the arrow displays a small menu from which you can apply the layout to selected slides or insert a new slide with the layout applied.
|
4. | Scroll to the top to view the four choices under Text Layouts, and then click the last layoutTitle and 2-Column Text.
The slide layout is changed so that there are two side-by-side placeholders on the slide.
|
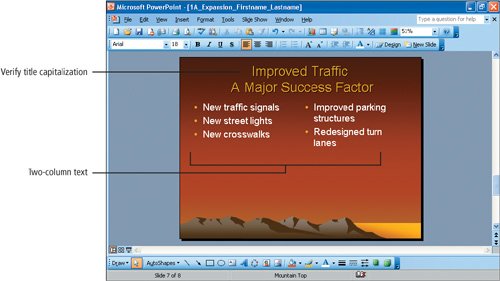
5. | Click in the left placeholder, type New traffic signals and then press .
|
6. | In the new bulleted line that is created, type New street lights and then press . Type New crosswalks
If you inadvertently added an additional bullet by pressing at the end of the bulleted list, press  to delete the extra bullet. to delete the extra bullet.
|
7. | Click in the right placeholder, and then type Improved parking structures
|
8. | Press , and then type Redesigned turn lanes
|
9. | At the top of the Slide Layout task pane, click the Close button  to close the Slide Layout task pane. to close the Slide Layout task pane.
|
10. | Look at the title of this slide and notice that the word factor is on the second line of the title by itself.
As a general design rule, you should try to have at least two words on each line of a slide title to create a balanced look.
|
11. | To balance the title, move your pointer into the title placeholder and click after the word traffic. Press .
The words Improved traffic are on the first line of the slide title and the words a major success factor are on the second line of the slide title.
|
12. | Look again at the title of this slide and notice that only the first word of the titleImprovedis capitalized.
As a rule, the first letter of each word in a title should be capitalized.
|
|
[Page 1162] |
13. | Correct the text in the title by clicking in the title placeholder and typing as necessary so that the capitalization matches Figure 1.24. Then, click in a blank area to deselect the placeholder, and compare your slide to Figure 1.24.
Figure 1.24.
|
14. | Save your presentation file.
|
As you create a presentation, PowerPoint continually checks spelling by comparing the words in your presentation to the PowerPoint dictionary. A word that is incorrectly spelled or that is not in the dictionary is indicated by a red wavy underline. Spelling errors can be corrected in either the Outline/Slides pane or the Slide pane.
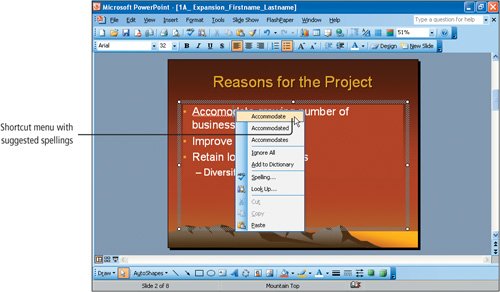
1. | Display Slide 2 by dragging the scroll box in the vertical scroll bar up until the appropriate ScreenTip displays. Notice the red wavy underline in the first bullet of this slide.
Alert!: Enabling Spelling Checker
If the red wavy underline does not display under the incorrectly spelled word, the Check spelling as you type feature may not be enabled on your system. To enable this feature, click the Tools menu, and then click Options. Click the Spelling and Style tab, and click to place a check mark in the Check spelling as you type check box.
|
|
[Page 1163] |
2. | Pause the mouse the pointer over the incorrectly spelled word, and then right-click (press the right mouse button) to display the shortcut menu. See Figure 1.25.
Figure 1.25.
|
3. | In the displayed shortcut menu, click Accommodatethe correct spelling of the word.
|
4. | On the vertical scroll bar, click the Next Slide button to display Slide 3. Locate the misspelled word in the title, move the pointer over it, and then right-click. From the displayed shortcut menu, click Businesses to correct the spelling.
|
5. | Using the same method that you used to correct the spelling errors on Slides 2 and 3, scroll through the presentation and correct spelling on the remaining slides (transportation on Slide 6 and any other spelling errors you might have made).
|
6. | Save the changes you have made to your presentation.
|
The Spelling button on the Standard toolbar activates a spelling check of your entire presentation. The spelling checker selects each incorrectly spelled word and displays a dialog box with suggested spellings and the options to ignore the word, change the word, or add the word to the dictionary.
When a presentation is displayed in Normal View with the panes displayed, the Notes pane displays below the Slide pane. The Notes pane is used to type speakers notes that can be printed below a picture of each slide. You can refer to these printouts while making a presentation, thus reminding you of the important points that you wish to make while running an electronic slide show.
1. | Drag the scroll box to display Slide 3. In the lower left corner of your PowerPoint window, click the Normal View button  to restore the Outline/Slides pane and the Notes pane. to restore the Outline/Slides pane and the Notes pane.
|
2. | Look at the PowerPoint window and notice the amount of space that is currently dedicated to each of the three panesthe Outline/Slides pane, the Slide pane, and the Notes pane. Locate the horizontal bar and vertical bar that separate the three panes. See Figure 1.26.
Figure 1.26.
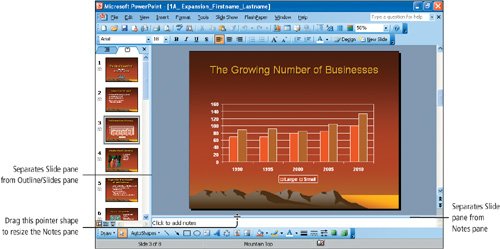
These narrow bars are used to adjust the size of the panes. If you decide to type speaker notes, you will want to make the Notes pane larger.
|
3. | Point to the small bar that separates the Slide pane from the Notes pane. The pointer displays as an equal sign with an upward-pointing and a downward-pointing arrow, as shown in Figure 1.26.
|
|
[Page 1165] |
4. | Press and hold down the left mouse button until a pattern of dots displays in the bar, indicating that you can resize the pane. While still holding down the left mouse button, drag the pointer up approximately one inch and then release the left mouse button to resize the pane.
|
5. | With Slide 3 displayed, click in the Notes pane and type As the population expands, the number of large and small businesses will continue to grow. Compare your screen to Figure 1.27.
Figure 1.27.

|
6. | Display Slide 7 in the Slide pane, and then click in the Notes pane. Type Remember that increased traffic is a major concern for the City. Stress how these changes will improve the traffic flow, not create new problems.
|
7. | Move to the last slide in the presentationSlide 8. Type the following text in the Notes pane: Stress the importance of the expansion of the City Plaza. Many citizens are working together to create this new space for the benefit of all.
|
8. | You have finished typing the notes for this presentation. Save the presentation.
|
