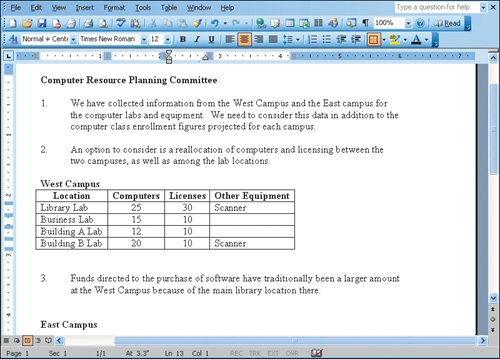
Objective 2. Enter Data and Format a Table in Word

Activity 2.2. Entering Data

The intersection of a column and a row is a cell. Use the key to move to each cell, from left to right, as you enter data. Pressing in the last cell of a row moves the insertion point to the next row. Pressing in a cell creates a new paragraph and blank line in the cell.

The first row of the table will have headings to label each of the columns.

1.

In the first row of the table, position the insertion point in the first cell. Type Location as the heading for this column, and then press .

2.

Type Computers and then press .

3.

Type Licenses and then press .

4.

Type Other Equipment and then press .


[Page 1360]

5.

Use the following list to complete the table and enter the information. In each row, type the information for each lab in the appropriately labeled columns.

Library Lab 25 computers, 30 software licenses, scanner

Business Lab 15 computers, 10 software licenses

Building A Lab 12 computers, 10 software licenses

Building B Lab 20 computers, 10 software licenses, scanner

Compare your screen with Figure 2.3.

Figure 2.3.


Alert!: Did You Press in the Last Cell?

If you press in the last cell of the last row, you will create a new blank row. The insertion point will be in the first cell of the row. To delete the row, on the Standard toolbar, click Table, point to Delete, and then click Rows.

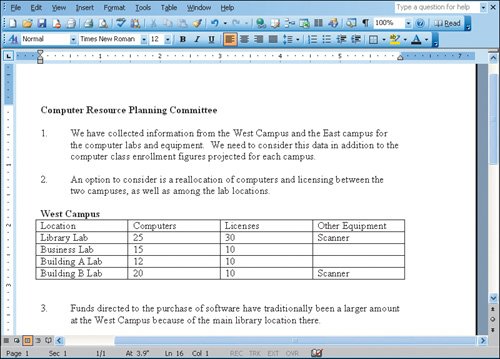
Activity 2.3. Formatting a Table

Formatting the table will make the information easier to read. You can apply formatting to a table by first selecting text, rows, columns, or the entire table. Next, choose the formats you want to apply to that selection.

1.

Move the mouse pointer to the left of the first row in the table. It will change to a right-pointing arrow. Click to select the first row. On the Formatting toolbar, click Bold, and then click Center.


[Page 1361]

2.

Click and drag over the cells in the second and third columns to select them. On the Formatting toolbar, click Center.

3.

Click anywhere in the table. On the Table menu, point to AutoFit, and then click AutoFit to Contents.

The bold headings now stand out, center alignment is applied, and the column sizes are adjusted. Compare your screen with Figure 2.4.

Figure 2.4.


4.

Save your file.


[Page 1361 (continued)]

Windows XP

Outlook 2003

Internet Explorer

Computer Concepts

Word 2003

Chapter One. Creating Documents with Microsoft Word 2003

Chapter Two. Formatting and Organizing Text

Chapter Three. Using Graphics and Tables

Chapter Four. Using Special Document Formats, Columns, and Mail Merge

Excel 2003

Chapter One. Creating a Worksheet and Charting Data

Chapter Two. Designing Effective Worksheets

Chapter Three. Using Functions and Data Tables

Access 2003

Chapter One. Getting Started with Access Databases and Tables

Chapter Two. Sort, Filter, and Query a Database

Chapter Three. Forms and Reports

Powerpoint 2003

Chapter One. Getting Started with PowerPoint 2003

Chapter Two. Creating a Presentation

Chapter Three. Formatting a Presentation

Integrated Projects

Chapter One. Using Access Data with Other Office Applications

Chapter Two. Using Tables in Word and Excel

Chapter Three. Using Excel as a Data Source in a Mail Merge

Chapter Four. Linking Data in Office Documents

Chapter Five. Creating Presentation Content from Office Documents


Go! With Microsoft Office 2003 Brief
GO! with Microsoft Office 2003 Brief (2nd Edition)
ISBN: 0131878646
EAN: 2147483647
Year: 2004
Pages: 448

Flylib.com © 2008-2020.
If you may any questions please contact us: flylib@qtcs.net