When it comes to answering questions, queries offer more flexibility than filters because you can limit the fields that are included in the results, use more than one table, include calculated values, and save the query for future use.
In the following activity, you will create a simple select query and practice adding fields to the Select Query window.
1. | With your 2A_Club Fundraiser database open, on the Objects bar, click Queries.
|
|
[Page 978] |
2. | To the right of the Objects bar, double-click the command Create query in Design view, and then compare your screen with Figure 2.7.
Figure 2.7.
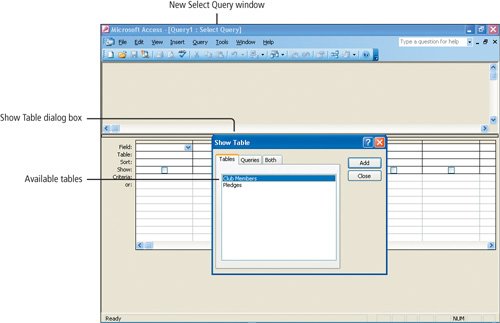
A new Select Query window opens and the Show Table dialog box displays. The Show Table dialog box lists all of the tables in the database. If this dialog box does not display, on the Query Design toolbar, click the Show Table button. In this chapter, you will create queries in Design view.
|
| |
3. | In the Show Table dialog box, click Pledges, click the Add button, and then Close the Show Table dialog box. Alternatively, you can double-click Pledges and then click Close. Compare your screen with Figure 2.8.
Figure 2.8.
(This item is displayed on page 979 in the print version)
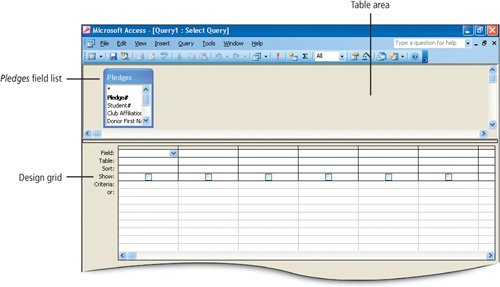
A field list for the Pledges table displays in the upper pane of the Select Query window. Pledge# is bold because it is the primary key field in this table. The Select Query window has two parts: the table area (upper pane) displays the field lists that are used in the query, and the design grid (lower pane) displays the design of the query.
[Page 979]Alert!: Does the Field List Display More Than Once?
If you add the field list more than once, right-click on the extra field list and then from the shortcut menu click Remove Table. This removes the second field list from the query design.
|
| |
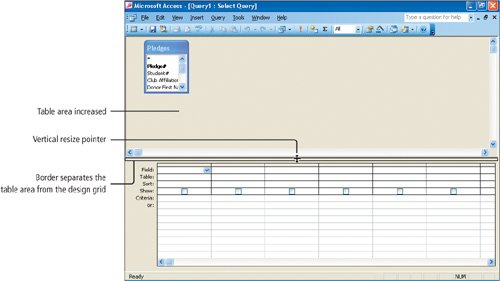
4. | If necessary, Maximize  the Select Query window. Point to the border that separates the table area and design grid until the vertical resize pointer the Select Query window. Point to the border that separates the table area and design grid until the vertical resize pointer  displays, and then drag downward to increase the size of the table area. Compare your screen with Figure 2.9. displays, and then drag downward to increase the size of the table area. Compare your screen with Figure 2.9.
[Page 980]
Figure 2.9.
|
5. | In the table area, use the  pointer to extend the lower edge of the Pledges field list to display all the field names. pointer to extend the lower edge of the Pledges field list to display all the field names.
Maximizing the window, along with resizing the panes and field lists, helps you see all of the available fields while you design your query.
|
6. | In the Pledges field list, double-click Student#, and then look at the design grid.
The Student# field displays in the design grid in the Field row. By designing a query, you can limit the fields that display in the resultunlike a filter, which always includes all of the fields in the table.
|
| |
7. | In the Pledges field list, point to Club Affiliation, drag it downward into the design gridto the Field row in the next available column, and then compare your screen with Figure 2.10.
Figure 2.10.
(This item is displayed on page 981 in the print version)

This is another way to add field names to the design grid. As you drag the field, a small rectangular shape attaches to the mouse pointer. When you release the mouse button, the field name displays in the Field row.
|
|
[Page 981] |
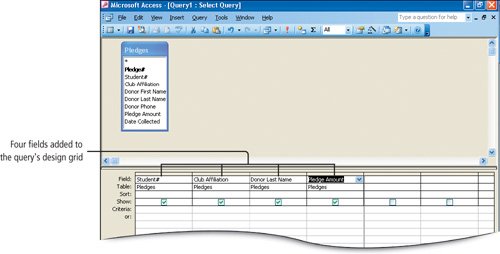
8. | In the Field row of the design grid, click in the third column, and then click the list arrow that displays. From the displayed list, click Donor Last Name to add this field to the design grid, which is another way to add a field to the design of the query.
|
9. | Using one of the methods you just practiced, add the Pledge Amount to the design grid. Compare your screen with Figure 2.11.
Figure 2.11.
|
After you create a query, you run it to see the results. When you run a query, Access looks at the records in the table (or tables) you have included in the query, finds the records that match the specified conditions (if any), and displays those records in a datasheet view. Only the fields that have been included in the query design are displayed in the results. The query is always run against current data, and therefore presents the most up-to-date data.
1. | On the Query Design toolbar, click the Run button  . Alternatively, click the View button to display the results of a query. Compare your screen with Figure 2.12. . Alternatively, click the View button to display the results of a query. Compare your screen with Figure 2.12.
Figure 2.12.
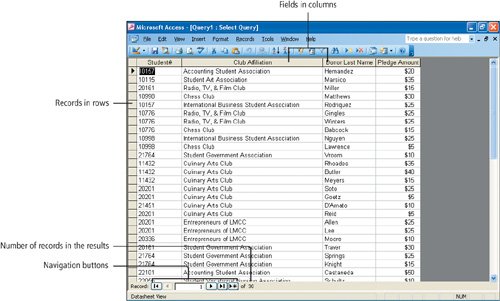
The results of the query display in Datasheet view. The four fields display in columns, the records display in rows, and navigation buttons display at the bottom of the window, in the same manner as in a table. Because no limitations or restrictions were placed on the data, the query results include all 30 records that are in the tablebut display only the fields you designated in your query design.
|
2. | At the far right end of the menu bar, click the Close Window button  . .
Because you have not previously named or saved this query, a message displays asking if you want to save the changes to the design of query Query1. The default name of a query created in this manner is Query followed by a number, such as Query1.
|
|
[Page 983] |
3. | Click Yes.
The Save As dialog box displays. Queries are frequently saved for future use.
|
4. | In the Save As dialog box, in the Query Name box, using your own name type 2A Query1 Firstname Lastname and click OK, or press  . Compare your screen with Figure 2.13. . Compare your screen with Figure 2.13.
Figure 2.13.
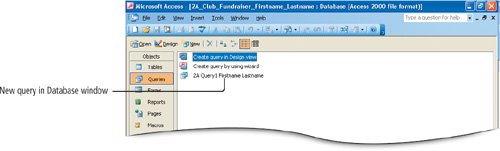
The query is saved and closed. The new query name displays in the Database window on the Queries list. When you save a query, only the design of the query is saved. Each time you open the query, Access runs it again and displays the results based on the data stored in the underlying table(s). Thus, the results of a query always reflect the latest information in the underlying tables.
|
