Objective 2. Create a Formula in Excel

Activity 1.2. Creating a Formula for Calculation in Excel

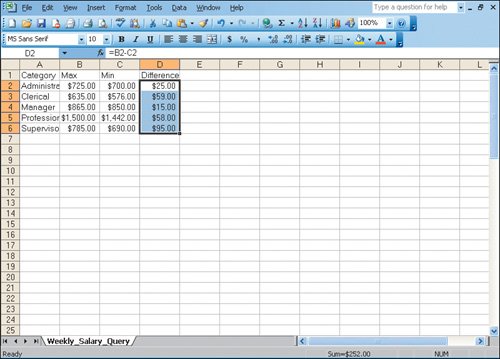
Excel has many automatic functions for calculating, such as SUM. Sometimes you will need to perform a mathematical calculation without using one of these functions.

1.

Start Excel. From the folder that contains your project files, Open the Excel file Meeting_Data_Firstname_Lastname that you saved from the previous export activity.

Excel refers to columns by letters and rows by numbers. The intersection of a row and a columna cellis always named using the column letter first and then the row number, for example, A2. Clicking in a cell location enables you to enter or edit information in that cell.

2.

Click in cell B1, and then type Max to change the column heading. Press to complete the entry and move to cell C1. Click in cell C1, and then type Min to change the column heading. Press . Click in cell D1, and then type Difference as a new column heading. Press to complete the last cell entry.

You want Excel to calculate the difference between the Max and Min salary values. Excel formulas always begin with an = sign and use the cell reference (such as A2), not the actual value appearing in a cell.

3.

In cell D2, type the formula =B2-C2 Press . Cell D2 displays the calculated value.

You want to use the same calculation for the other items. The Auto Fill tool in Excel lets you duplicate the formula for the rest of the rows, using your difference calculation. The cell references will change relative to the new cell location for the formula, using the cells in the new row.

The Fill handle is a box at the lower right corner of a selected cell.

When the mouse pointer is on the Fill handle, it changes to a .

4.

In cell D2, click and drag the fill handle at the lower right corner of the cell to cell D6, and then release the mouse button.

This copies the formula to the other selected cells in the Difference column and changes the cell references for each rows calculation. The calculated value is displayed in each cell. Compare your screen with Figure 1.2.


[Page 1348]


Figure 1.2.


5.

Save your file and leave it open for the next activity.


[Page 1348 (continued)]

Windows XP

Outlook 2003

Internet Explorer

Computer Concepts

Word 2003

Chapter One. Creating Documents with Microsoft Word 2003

Chapter Two. Formatting and Organizing Text

Chapter Three. Using Graphics and Tables

Chapter Four. Using Special Document Formats, Columns, and Mail Merge

Excel 2003

Chapter One. Creating a Worksheet and Charting Data

Chapter Two. Designing Effective Worksheets

Chapter Three. Using Functions and Data Tables

Access 2003

Chapter One. Getting Started with Access Databases and Tables

Chapter Two. Sort, Filter, and Query a Database

Chapter Three. Forms and Reports

Powerpoint 2003

Chapter One. Getting Started with PowerPoint 2003

Chapter Two. Creating a Presentation

Chapter Three. Formatting a Presentation

Integrated Projects

Chapter One. Using Access Data with Other Office Applications

Chapter Two. Using Tables in Word and Excel

Chapter Three. Using Excel as a Data Source in a Mail Merge

Chapter Four. Linking Data in Office Documents

Chapter Five. Creating Presentation Content from Office Documents


Go! With Microsoft Office 2003 Brief
GO! with Microsoft Office 2003 Brief (2nd Edition)
ISBN: 0131878646
EAN: 2147483647
Year: 2004
Pages: 448

Flylib.com © 2008-2020.
If you may any questions please contact us: flylib@qtcs.net