Objective 2. Modify Slides

In the following activities, you will modify slides by finding and replacing text and by using the Undo and Redo commands.

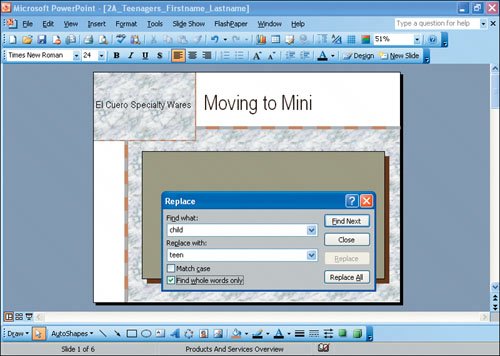
Activity 2.5. Finding and Replacing Text

Throughout this presentation, the word child is used to describe the new product line. The word teen more accurately describes the product. You could scroll through the presentation and change each occurrence of child to teen. PowerPoint provides an easier method for you to change all of the occurrences of a word to another word by using the Replace command.

1.

Display Slide 1. On the menu bar, click the Edit menu, and then click Replace.

2.

In the displayed Replace dialog box, in the Find what box, type child to instruct PowerPoint to search for all occurrences of the word child.

3.

Press to move the insertion point to the Replace with box, and then type teen


[Page 1220]

4.

In the lower left corner of the dialog box, if necessary, clear the Match case check box.

The Match case option instructs PowerPoint to match the capitalization in the Find what and Replace with boxes. In this instance, you are instructing PowerPoint to replace all occurrences of child with teen, regardless of the capitalization.

5.

Click to place a check mark in the Find whole words only check box.

When the Find whole words only option is checked, PowerPoint finds the word child. It will not find a word in which the word child is contained, such as children. Compare your dialog box with Figure 2.10.

Figure 2.10.


6.

In the lower right corner of the Replace dialog box, click the Replace All button.

PowerPoint searches the presentation and indicates that two replacements were made.

7.

Click OK to close the box indicating the number of replacements. Click Close to close the Replace dialog box.


[Page 1221]

8.

Save the presentation.

More Knowledge: Replacing Text

To replace some, but not all, occurrences of a word, use the Find Next button in the Replace dialog box to instruct PowerPoint to stop at each occurrence of the Find what text. Then click Replace if you want to replace the selected occurrence, or click Find Next to skip to the next occurrence without replacing.


Activity 2.6. Using the Undo and Redo Commands

A useful feature in PowerPoint is the ability to undo a change that you have made. PowerPoint remembers each change so that you can undo these commands if you have changed your mind or performed an action by mistake. You can change your mind again and reverse an undo by using the Redo command.

1.

Display Slide 6. In the first bullet point, select the word February, and then type January to replace the selected word.

2.

On the Standard toolbar, click the Undo button .

February displays in the slide.

3.

On the Standard toolbar, click the Redo button .

January displays in the slide.

4.

On the menu bar, click the View menu, and then click Header and Footer. Click the Notes and Handouts tab. If necessary, click to select the Date and time check box and then click to select Update automatically. Clear the Header and Page number check boxes. If necessary, click to select the Footer check box, and then in the Footer box type 2A_Teenagers_Firstname_Lastname In the upper right corner of the dialog box, click Apply to All.

5.

Save the file. Check your Chapter Assignment Sheet or Course Syllabus, or consult your instructor, to determine if you are to submit your assignments on paper or electronically using your colleges course information management system. To submit electronically, go to Step 7, and then follow the instructions provided by your instructor. To print your project, continue with Step 6.


[Page 1222]

6.

Display the File menu, and then click Print. Click the Print what arrow, and then click Handouts. Under Handouts, click the Slides per page arrow, and then click 6. Next to Order, click the Horizontal option button. Click the Color/grayscale arrow, and then click Grayscale. Make sure that the Frame slides check box is selected. In the lower left corner, click Preview to see how your slides will print. Then, on the Print Preview toolbar, click Print, and then click OK. One sheet will print, with the current date in the upper right corner and the footer in the lower left corner.

7.

Close the file and close PowerPoint.

More Knowledge: Using the Undo and Redo Buttons

The list arrows to the right of the Undo and Redo buttons display a list of the undo and redo actions available. Use caution, however, because if you undo an action in the list, you will undo all actions above that item in the list too!


End

You have completed Project 2A


[Page 1223]

Windows XP

Outlook 2003

Internet Explorer

Computer Concepts

Word 2003

Chapter One. Creating Documents with Microsoft Word 2003

Chapter Two. Formatting and Organizing Text

Chapter Three. Using Graphics and Tables

Chapter Four. Using Special Document Formats, Columns, and Mail Merge

Excel 2003

Chapter One. Creating a Worksheet and Charting Data

Chapter Two. Designing Effective Worksheets

Chapter Three. Using Functions and Data Tables

Access 2003

Chapter One. Getting Started with Access Databases and Tables

Chapter Two. Sort, Filter, and Query a Database

Chapter Three. Forms and Reports

Powerpoint 2003

Chapter One. Getting Started with PowerPoint 2003

Chapter Two. Creating a Presentation

Chapter Three. Formatting a Presentation

Integrated Projects

Chapter One. Using Access Data with Other Office Applications

Chapter Two. Using Tables in Word and Excel

Chapter Three. Using Excel as a Data Source in a Mail Merge

Chapter Four. Linking Data in Office Documents

Chapter Five. Creating Presentation Content from Office Documents


Go! With Microsoft Office 2003 Brief
GO! with Microsoft Office 2003 Brief (2nd Edition)
ISBN: 0131878646
EAN: 2147483647
Year: 2004
Pages: 448

Flylib.com © 2008-2020.
If you may any questions please contact us: flylib@qtcs.net