The Blends design template color schemes include background colors such as white, black, and blue. There are many other background options, called fill effects, that can be applied to the background of slidesincluding textures, patterns, gradient fills, and pictures.
There are three types of gradient fills that can be applied to a slide backgroundone color, two color, and preset. In this activity, you will experiment with each of these gradients and then apply a preset gradient background to the title slide.
1. | If necessary, Open  the file 3B_Volunteers_Firstname_Lastname. the file 3B_Volunteers_Firstname_Lastname.
|
2. | Display Slide 1. On the menu bar, click the Format menu, and then click Background. In the Background dialog box, under Background fill, click the downward-pointing Background fill arrow, as shown in Figure 3.29. Click Fill Effects, and if necessary, click the Gradient tab.
Figure 3.29.
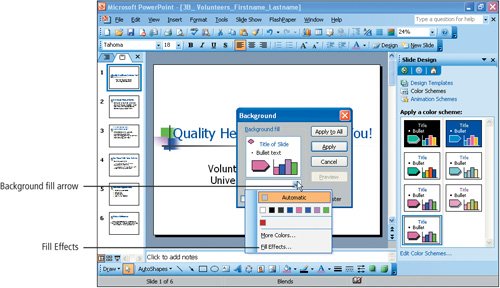
Under Colors, notice that you can choose a One color gradient, in which a single color fades into a lighter or darker shade or you can choose a Two color gradient, in which one color fades into another color. You can also choose a Preset, which contains color combinations chosen by Microsoft.
|
|
[Page 1308] |
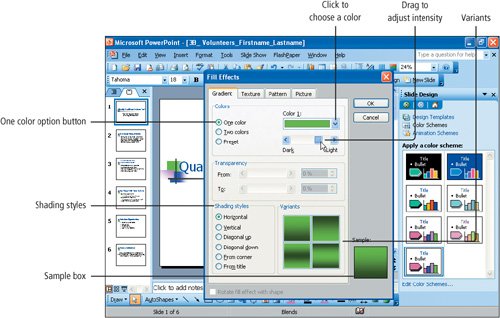
3. | Under Colors, click the One color option button and then click the Color 1 arrow. Click the last color in the color palettegreen.
In the lower right corner of the dialog box, notice the Sample that displays.
|
4. | Below the color box, a Dark/Light scale displays. By dragging the scroll box in this scale, you can adjust the intensity of the color that you have chosen. Point to the scroll box and drag it to the right toward the light end of the scale, as shown in Figure 3.30.
Figure 3.30.
|
5. | The Shading styles and Variants sections of the dialog box allow you to change the direction in which the gradient is applied. Under Shading styles, click Diagonal down. Under Variants, click the first box in the upper left corner. Click OK, and then click Preview to view the effect of the gradient fill on the title slide.
The Background dialog box displays in the center of the slide, making it difficult to see the effect that the gradient fill has on the slide.
|
6. | Point to the title bar of the Background dialog box, and then drag the box to the right so that it overlaps the task pane. Release the mouse button to view the fill effect.
|
| |
7. | In the Background dialog box, click the Background fill arrow, and then click Fill Effects. Click the Two colors option button, and then click the Color 1 arrow to display the color palette. You can choose a color from the color palette or you can click More Colors to choose a custom color. In the color scheme palette, click the second colorblack. Click the Color 2 arrow and then in the color palette, click the fourth colordark blue.
[Page 1309]
|
8. | Under Shading styles, click From title. Under Variants, click the second variant. Click OK, and then click Preview.
Notice that this gradient fill is very dark, providing no contrast for the title. To correct the lack of contrast, choose a lighter background.
|
9. | In the Background dialog box, click the Background fill arrow, and then click Fill Effects again. Click Preset and then click the Preset colors arrow to display the list of preset color designs. Scroll through the list and click on several of the designs to view the Preset color schemes. Click Daybreak.
|
10. | Under Shading styles, click Diagonal down. Under Variants, in the first row click the second variant. Click OK to return to the Background dialog box, and then click Preview.
The Daybreak gradient fill provides ample contrast to display the title effectively.
|
11. | Click Apply to apply the gradient fill to the title slide only.
|
12. | Save  the file. the file.
|
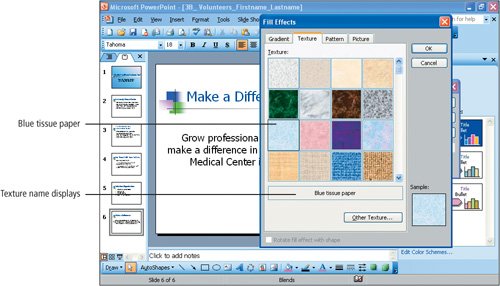
In this activity, you will apply a textured background to Slide 6.
Slides often contain elements in addition to text. For example, tables, charts, pictures, and shapes are used to enhance and emphasize text. Sometimes these elements conflict with background graphics that are a part of the applied design template. In the Blends design template, three squares display to the left of the title that are a part of the design template. In this activity, you will turn these elements off on Slide 1.
When you omit background graphics that are on the master, you must omit all of the graphics. You cannot choose the graphics that you wish to omit.