Objective 2. Use a Form to Add and Delete Records
Adding and deleting records using a form helps to prevent data entry errors, because the person performing the data entry is looking at only one record at a time. Recall that your database is useful only if the information is accuratejust like your personal address book is useful only if it contains accurate addresses and phone numbers.
Activity 3.2. Adding Records to a Table Using a Form
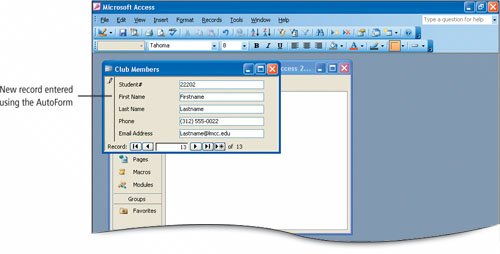
Forms are based on, bound to, a table where the records are stored. That is, when a record is entered in a form, the new record is added to the corresponding table. The reverse is also truewhen a record is added to a table, the new record can be viewed in the corresponding form. In this activity, you will add a new record to the Club Members table using the AutoForm that you just created.
Alert!: Does a Blank Form Display?
If you press ![]() or
or ![]() after typing the Email Address, the record you entered is saved and a new blank form displays. If this happens, click the Previous Record button to view the record you just entered.
after typing the Email Address, the record you entered is saved and a new blank form displays. If this happens, click the Previous Record button to view the record you just entered.
Activity 3.3. Deleting Records from a Table Using a Form
You can delete records from a database table using a form. In this activity, you will delete a record in the Club Members tablethe record for Alphonse Moore.
1. | With the Club Members form open, click in the Last Name field, and then on the Form View toolbar, click the Find button |
2. | Notice that the Look In box indicates the Last Name field, then in the Find What box, type Moore Click Find Next and then compare your screen with Figure 3.4 to confirm that the record for Alphonse Moore displays. Figure 3.4.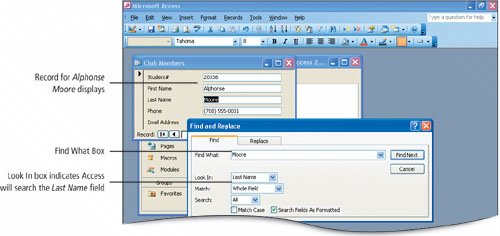
|
3. | Close |
4. | On the Form View toolbar, click the Delete Record button |
5. | Click Yes to delete the record and reduce the number of records in the table to 12. On the title bar of the Club Members form, click the Close button |
6. | Double-click the Club Members table to open it in Datasheet view. Alternatively, select the table name and click the Open button on the Database window toolbar. |
7. | Examine the table and verify that the record for Alphonse Moore no longer displays. Compare your screen with Figure 3.5 and confirm that the new record you added with your name for Student# 22202 is included. Figure 3.5.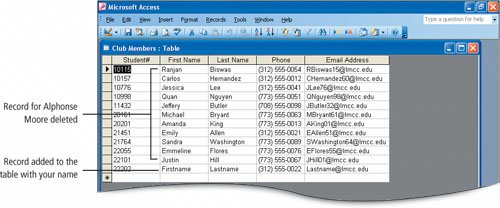
Recall that this form is based on the Club Members table. Your actions of adding and deleting records using the Club Members form updates the records stored in the Club Members table. |
8. | On the title bar of the table, click the Close button |
Activity 3.4. Printing a Form
Like other Access objects, forms can be printed. If you click the Print button, all of the records will print in the form layout that you selected.
1. | On the Objects bar, click Forms, and notice that the Club Members form you just created is listed. Double-click the Club Members form to open it in Form view, and then click the Maximize |
2. | On the Print Preview toolbar, click the Close button |
3. | Under Grid Settings, change the Number of Columns to 2 and the Column Spacing to 0.15" Compare your screen with Figure 3.6, and then click OK. Figure 3.6.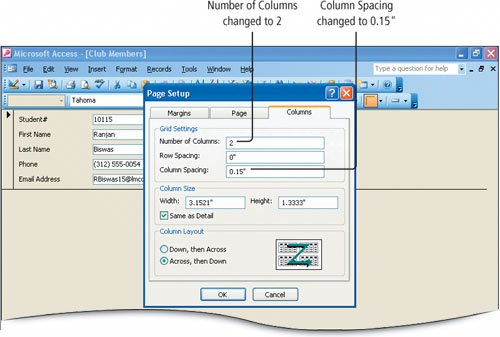
Use two columns to maximize the number of records that display on a page. The space between the columns is adjusted slightly to ensure that the entire width of the two columns will print. |
4. | Click the Print Preview button Figure 3.7.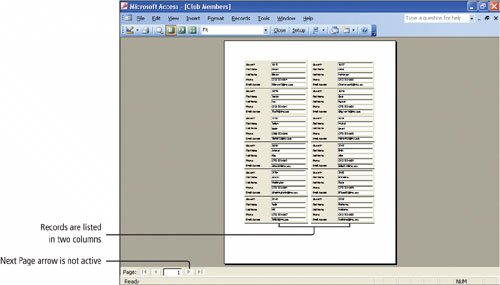
Alert!: Does a Warning Box Display? Depending on your printer, a warning box may display to advise you that the columns will be too wide and some data may be lost. If this displays, click OK and continue with the print process. The adjustment to the column spacing property should be sufficient to enable all of the data to print. |
5. | On the Print Preview toolbar, click the Print button |
|
Windows XP
Outlook 2003
Internet Explorer
Computer Concepts
Word 2003 Chapter One. Creating Documents with Microsoft Word 2003
Chapter Two. Formatting and Organizing Text
Chapter Three. Using Graphics and Tables
Chapter Four. Using Special Document Formats, Columns, and Mail Merge
Excel 2003 Chapter One. Creating a Worksheet and Charting Data
Chapter Two. Designing Effective Worksheets
Chapter Three. Using Functions and Data Tables
Access 2003 Chapter One. Getting Started with Access Databases and Tables
Chapter Two. Sort, Filter, and Query a Database
Chapter Three. Forms and Reports
Powerpoint 2003 Chapter One. Getting Started with PowerPoint 2003
Chapter Two. Creating a Presentation
Chapter Three. Formatting a Presentation
Integrated Projects Chapter One. Using Access Data with Other Office Applications
Chapter Two. Using Tables in Word and Excel
Chapter Three. Using Excel as a Data Source in a Mail Merge
Chapter Four. Linking Data in Office Documents
Chapter Five. Creating Presentation Content from Office Documents GO! with Microsoft Office 2003 Brief (2nd Edition) ISBN: 0131878646
EAN: 2147483647 Year: 2004
Pages: 448
Flylib.com © 2008-2020. If you may any questions please contact us: flylib@qtcs.net 
|