Objective 1. Start and Exit PowerPoint
The purpose of any presentation is to influence your audience. Whether you are presenting a new product to coworkers, making a speech at a conference, or expressing your opinion to your city council, you want to make a good impression and give your audience a reason to agree with your point of view. How your audience reacts to your message depends on the information you present and how you present yourself. In the following activities, you will start PowerPoint, become familiar with the PowerPoint window, open an existing PowerPoint presentation, close a file, and exit PowerPoint.
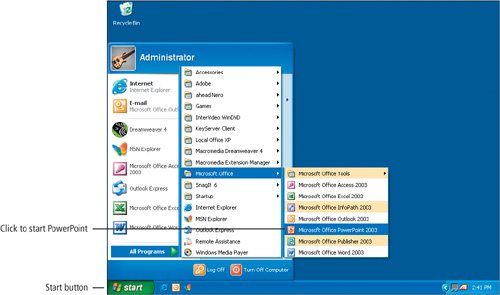
Activity 1.1. Starting PowerPoint and Opening a Presentation
You can open an existing presentation file by clicking Open from the File menu, by clicking the Open button on the Standard toolbar, or by clicking Open or More on the Getting Started task pane.


Activity 1.2. Identifying Parts of the PowerPoint Window
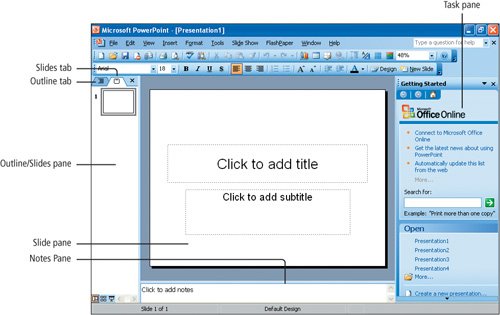
1. | Figures 1.7a and 1.7b identify the parts of the PowerPoint window. Take a moment to familiarize yourself with the parts of the window shown, and notice that the status bar displays near the bottom of the PowerPoint window. Figure 1.7a.
Figure 1.7b.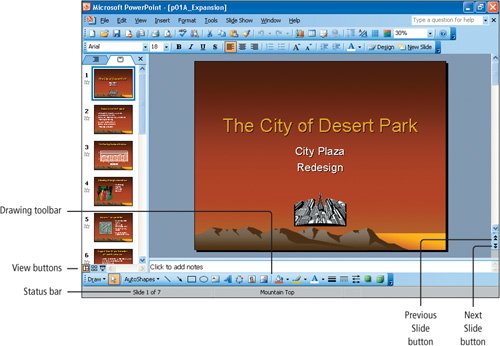
Alert!: Does Your Screen Differ? At the left side of your window in the Outline/Slides pane, your window may display the slide miniatures shown in Figure 1.7, or if the Outline tab is selected, the window displays the presentation outline. |
2. | On the right edge of your screen, at the top of the vertical scroll bar, point to the scroll box, and then press and hold down the left mouse button. |
3. | Drag the scroll box down slightly until the ScreenTip Slide: 2 of 7 Reasons for the Project displays, and then release the left mouse button. |
4. | At the bottom of the vertical scroll bar, locate the double, upward-pointing and downward-pointing arrows. Refer to Figure 1.7b, and then without clicking, point to them to display their ScreenTipsPrevious Slide and Next Slide. |
5. | Click the Next Slide button |
6. | Near the lower left corner of the window, locate the View buttons, as shown in Figure 1.7b. With your mouse, point to each of the three View buttons to display their ScreenTips indicating the three different ways to view your presentationNormal View, Slide Sorter View, and Slide Show from current slide (Shift+F5). |
Activity 1.3. Accessing the Menu Commands
1. | On the menu bar, click File. Figure 1.8.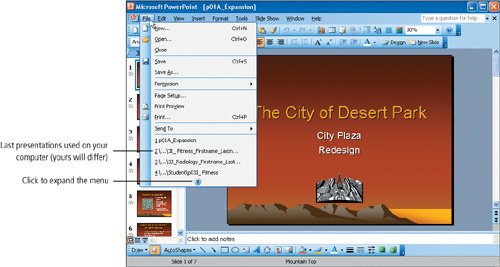
Figure 1.9.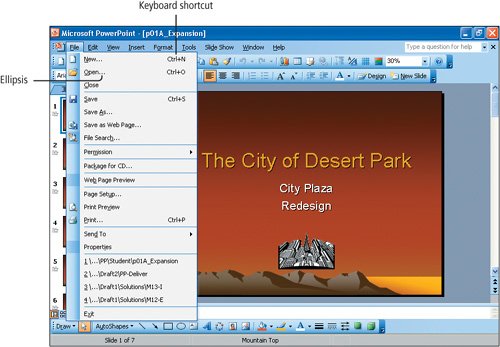
NoteDisplaying the Full Menu Many individuals prefer the automatic full menu display. To set a system to always display full menus, display the Tools menu, click Customize, and then click the Options tab. Under Personalized Menus and Toolbars, select the Always show full menus check box. | ||||||||||||||||||
2. | Be sure that the full menu is displayed, as shown in Figure 1.9, and notice that there is a keyboard shortcut to the right of some commands; for example, Ctrl+N for the New command. | ||||||||||||||||||
3. | On the displayed File menu, to the left of some command names, notice that there is an image of the button that represents this command on a toolbar. | ||||||||||||||||||
4. | On the displayed File menu, pause the mouse pointer over Print, but do not click. | ||||||||||||||||||
5. | Look at the full File menu on your screen and notice the various symbols and characters that are standard across all Microsoft products. Take a moment to study the table in Figure 1.10 for a description of these elements.
| ||||||||||||||||||
6. | With the File menu still displayed, move your pointer into the menu bar and point to Insert. | ||||||||||||||||||
7. | Move your mouse pointer anywhere into the slide pane area of your screen, and then click once to close the menu without accessing a command. |
 (triangle)
 (check mark)
Activity 1.4. Identifying and Displaying Toolbars and ScreenTips
Toolbars are the rows of buttons that display below the menu bar. The buttons on the toolbar provide a one-click method to perform commonly used commands and tasks. The three toolbars that you will use most often in PowerPoint are the Standard toolbar, the Formatting toolbar, and the Drawing toolbar.
Depending on how your system is set, you might see the Standard and Formatting toolbars each occupying separate rows as in Figure 1.11. Or, you might see shortened Standard and Formatting toolbars docked side by side below the menu bar. When the Standard and Formatting toolbars share one row, you can click Toolbar Options to view additional buttons, as shown in Figure 1.12. The instruction in this textbook assumes that your toolbars occupy separate rows.
Figure 1.11.
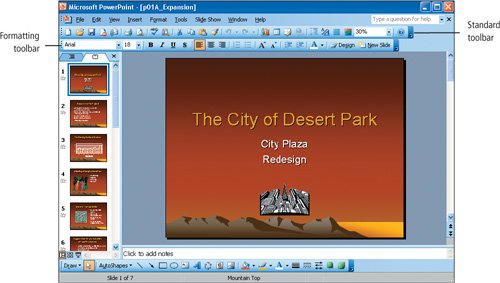
Figure 1.12.
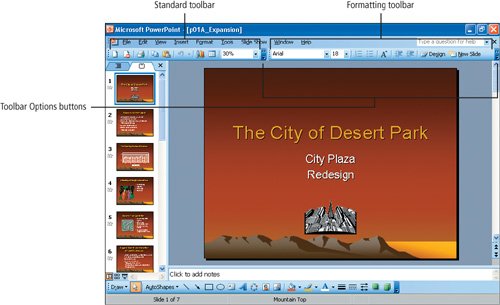
1. | Look at your screen to determine how the toolbars are displayed. If they are not displayed on two rows, as shown in Figure 1.11, click the Toolbar Options button |
2. | On the Standard toolbar, point to, but do not click, any button. |
3. | On the Formatting toolbar, point to, but do not click, any button. The ScreenTip displays. More Knowledge: Displaying a Toolbar Right-click any toolbar to select another toolbar. If a toolbar is missing entirely, point to an existing toolbar or to the menu bar and click the right mouse button (also known as right-clicking). On the shortcut menu that displays, point to the name of the toolbar you wish to display and click the left mouse button. Alternatively, display the View menu, point to Toolbars, and then click the name of the toolbar you wish to display. |
Activity 1.5. Closing and Displaying the Task Pane
When you open the PowerPoint program, the task pane displays on the right side of your window. A task pane is a window within a Microsoft Office application that provides commonly used commands. Its location allows you to use these commands while still working on your files. In PowerPoint, the task pane allows you to complete many tasks, including opening and creating files, adding graphic images, and changing the design of your slides. When you open your presentation, the task pane closes. In this activity, you will redisplay and then close the task pane.
1. | On the menu bar, click View, and then click Task Pane. Figure 1.13.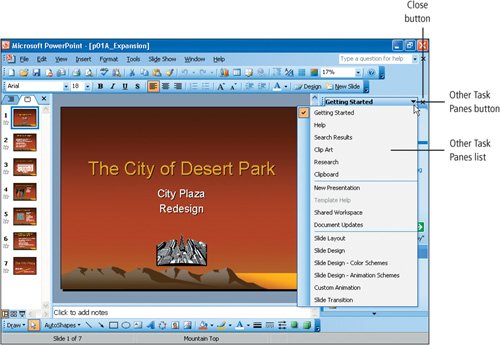
|
2. | Click Other Task Panes |
3. | At the top of the task pane, click Close |
Activity 1.6. Creating a New Folder and Saving a File
In the same way that you use file folders to organize your paper documents, Windows uses a hierarchy of electronic folders to keep your electronic files organized. Using Windows hierarchy of folders, you can group your files in a logical manner. Currently, the file p01A_Expansion is displayed in your PowerPoint window. To change the name of the file or its directory or drive location, or to create a new folder in which to store your files, use the Save As command on the File menu.
1. | Check with your instructor or lab coordinator to see where you will be storing your documents, for example, on your own disk or USB flash drive, or on a network drive, and be sure that storage location is available. Then, on the menu bar, click File, and then click Save As. |
2. | In the Save As dialog box, at the right edge of the Save in box, click the Save in arrow to view a list of the drives available to you. |
3. | Navigate to the drive on which you will be storing your folders and presentationsfor example, 3 ½ Floppy (A:), a USB flash drive that you have connected, or the drive designated by your instructor or lab coordinator. |
4. | To the right of the Save in box, notice the row of buttons. Click the Create New Folder button Figure 1.14.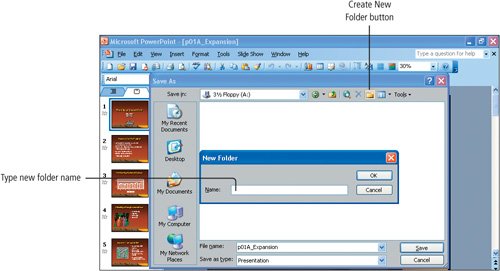
|
5. | In the Name box, type PowerPoint Chapter 1 to create a new folder on your disk, and then click OK. |
6. | In the lower portion of the Save As dialog box, locate the File name box. |
7. | Click to position your insertion point in the File name box and type as necessary to save the file with the name 1A_Expansion_Firstname_Lastname See Figure 1.15. Figure 1.15.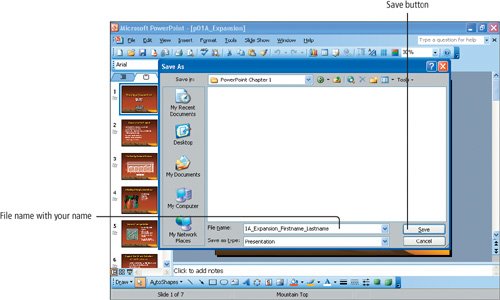
Throughout this textbook, you will be instructed to save your files using the file name followed by your first and last name. Check with your instructor to see if there is some other file naming arrangement for your course. |
8. | In the lower right corner, click the Save button or press |
Activity 1.7. Closing a File and Exiting PowerPoint
When you are finished working on a presentation, you should save and close it. Closing a file means that you are removing it from your systems random access memory (RAM). You should save a file before closing it, but if you forget to save, PowerPoint will remind you. You can exit the PowerPoint program by clicking Exit from the File menu or by closing all open presentations and then clicking the Close button at the extreme right edge of the title bar.
1. | With your file 1A_Expansion_Firstname_Lastname still displayed, move your pointer to the menu bar and click File. Click Close. Another Way: To Close a File You can also close a file by clicking the Close Window button. |
2. | On the menu bar, click File, and then click Exit to close PowerPoint. |
|
Windows XP
Outlook 2003
Internet Explorer
Computer Concepts
Word 2003 Chapter One. Creating Documents with Microsoft Word 2003
Chapter Two. Formatting and Organizing Text
Chapter Three. Using Graphics and Tables
Chapter Four. Using Special Document Formats, Columns, and Mail Merge
Excel 2003 Chapter One. Creating a Worksheet and Charting Data
Chapter Two. Designing Effective Worksheets
Chapter Three. Using Functions and Data Tables
Access 2003 Chapter One. Getting Started with Access Databases and Tables
Chapter Two. Sort, Filter, and Query a Database
Chapter Three. Forms and Reports
Powerpoint 2003 Chapter One. Getting Started with PowerPoint 2003
Chapter Two. Creating a Presentation
Chapter Three. Formatting a Presentation
Integrated Projects Chapter One. Using Access Data with Other Office Applications
Chapter Two. Using Tables in Word and Excel
Chapter Three. Using Excel as a Data Source in a Mail Merge
Chapter Four. Linking Data in Office Documents
Chapter Five. Creating Presentation Content from Office Documents GO! with Microsoft Office 2003 Brief (2nd Edition) ISBN: 0131878646
EAN: 2147483647 Year: 2004
Pages: 448
Flylib.com © 2008-2020. If you may any questions please contact us: flylib@qtcs.net 
|