After you have set up different tables for each subject in your database, you must provide a way to bring that data together to create meaningful information. To do this, first you must define relationships. A relationship is an association that is established between two tables using common fieldsfields that contain the same data in more than one table. After you have established the relationship, you can create queries, forms, and reports to display information from several tables at once.
To identify which student received each pledge, you must connect the data in the 1B Pledges table with the data in the 1B Club Members table. The common field between these two tables is Student#. It is the field that appears in both tables.
In the 1B Club Members table, Student# is the primary key fieldensuring that a single student can appear in the table only one time. In the 1B Pledges table, each record includes the student number of the student who collected the pledge. Because a single student can obtain many different pledges, a students number could appear many times in the 1B Pledges table. The relationship between each student and the pledges he or she obtains is known as a one-to-many relationshipone student can obtain many pledgesand is the most common type of relationship in Access.
To create a relationship, the two connected fields must have the same data type and the same field size, but they need not have the exact same field name.
| |
1. | Be sure both tables are closed. On the Database toolbar, click the Relationships button  , and then compare your screen with Figure 1.38. , and then compare your screen with Figure 1.38.
Figure 1.38.
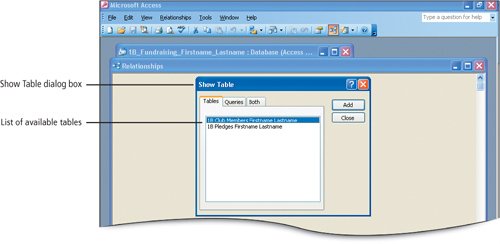
The Relationships window opens and the Show Table dialog box displays. Here you identify the tables between which you want to create a relationship. Although this database currently has only two tables, larger databases can have many tables.
[Page 909]NoteIf the Show Table Dialog Box Does Not Display
If the Show Table dialog box does not display, click the Show Table button  on the Relationship toolbar. on the Relationship toolbar.
|
2. | In the Show Table dialog box, with your 1B Club Members table selected, click Add.
A table field lista list of fields in a tablefor the 1B Club Members table is added to the Relationships window.
|
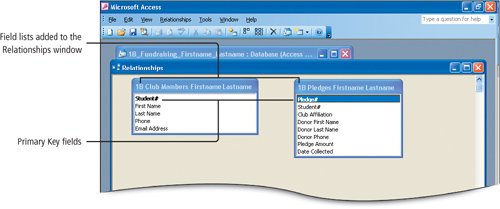
3. | In the Show Table dialog box, double-click your 1B Pledges table.
The 1B Pledges field list is added to the Relationships window. Double-clicking adds the field list into the Relationships window without clicking the Add button.
Alert!: Are There More Than Two Tables in the Relationships Window?
Removing Extra Table Field Lists
If you add one of the tables more than once, you must remove it from the Relationships Window. Right-click the duplicate table and then from the shortcut menu, click Hide Table, or from the Edit menu click Delete.
|
4. | Close the Show Table dialog box. In the 1B Pledges field list, position your mouse pointer over the lower edge of the list to display the Vertical Resize pointer  , and then drag downward to display the entire field list. , and then drag downward to display the entire field list.
Because you can now view the entire list, the scroll bar on the right is removed. Expanding the field list enables you to see all of the available fields.
|
5. | In the 1B Pledges field list, position your mouse pointer over the right edge of the list to display the Horizontal Resize pointer  , and then drag right to display the entire name in the title bar. Point to the title bar of the field list you just resized and drag it to the right side of the window. , and then drag right to display the entire name in the title bar. Point to the title bar of the field list you just resized and drag it to the right side of the window.
|
| |
6. | In the 1B Club Members field list, position your mouse pointer over the right edge of the list to display the Horizontal Resize pointer , and then drag right to expand the list to display the entire name in the title bar. Position the expanded field lists as shown in Figure 1.39.
Figure 1.39.
(This item is displayed on page 910 in the print version)
|
|
[Page 910] |
7. | In the field list for your 1B Pledges table, click Date Collected. With Pledge# deselected, notice that the Pledge# field displays in bold, and that in your 1B Club Members field list, the Student# field name displays in bold. Notice also that Student# is a field name in both tables.
Bold indicates the field designated as the primary key in each tablethat is, the field that uniquely identifies the record in each table.
|
| |
8. | In your 1B Club Members field list, click Student#, drag to the right to the 1B Pledges field list until your mouse pointer is on top of Student# as shown in Figure 1.40, and then release the mouse button.
Figure 1.40.
(This item is displayed on page 911 in the print version)
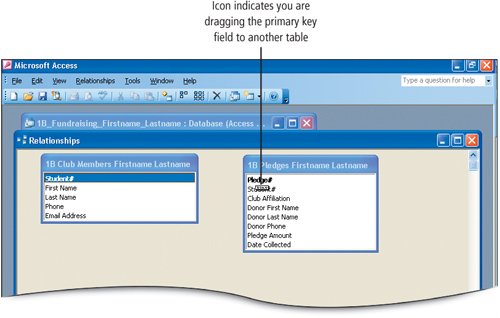
The Edit Relationships dialog box displays. As you drag, a small graphic displays to indicate that you are dragging the Student# primary key from the 1B Club Members table to the Student# in the 1B Pledges table. Each record in the 1B Club Members table can be related to many records in the 1B Pledges table. The Student# is referred to as the foreign key field in the many table. The foreign key is the field that is included in the related table so it can be joined with the primary key in another table.
[Page 911]NoteUsing AutoNumber Fields in a Relationship
To join an AutoNumber field in one table to a foreign key field in a second table, the foreign key data type must be set to Number and the field size property must be set to long integerwhich includes whole numbers from -2,147,483,648 through 2,147,483,647.
|
| |
9. | In the displayed Edit Relationships dialog box, click to select the Enforce Referential Integrity check box, and then compare your screen with Figure 1.41.
Figure 1.41.
(This item is displayed on page 912 in the print version)
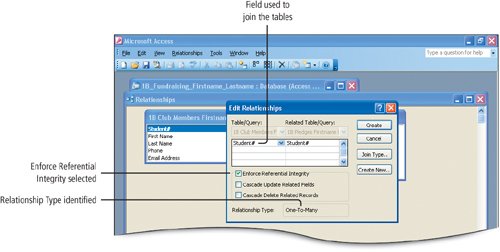
The 1B Club Members table is listed on the left and the related table1B Pledgesis listed on the right. The type of relationshipOne-To-Manyis correctly identified in the Relationship Type box because Student# is the primary key field in the 1B Club Members table, but is not the primary key field in the 1B Pledges table.
Enforcing referential integrity ensures that a pledge cannot be added to the 1B Pledges table for someone who is not included in the 1B Club Members table. In this manner, you ensure that you do not have pledges listed in the 1B Pledges table with no corresponding club member in the 1B Club Members table who is responsible for collecting the money. Similarly, you will not be able to delete someone from the 1B Club Members table if there is a pledge for that member in the 1B Pledges table.
|
|
[Page 912] |
10. | In the Edit Relationships dialog box, click Create, and then compare your screen with Figure 1.42.
Figure 1.42.
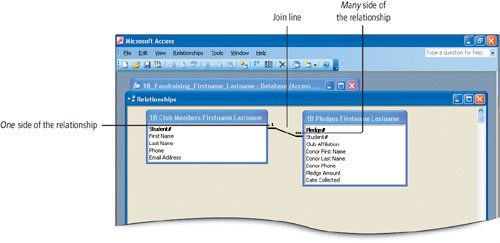
A join linethe line joining two tablesdisplays between the two tables. On the line, 1 indicates the one side of the relationship, and the infinity symbol ( ) indicates the One club member can collect many pledges. These symbols display when referential integrity has been enforced. ) indicates the One club member can collect many pledges. These symbols display when referential integrity has been enforced.
|
Table relationships provide a map of how your database is organized, and you can print this information as a report. In this activity, you will print your relationships report.
1. | With the Relationships window open, on the menu bar, click File, and then click Print Relationships. Compare your screen with Figure 1.43.
Figure 1.43.
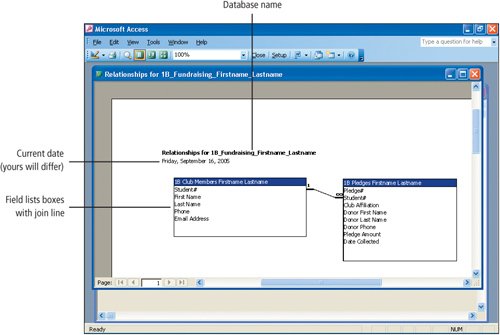
A report of the relationships you just created displays.
|
2. | Check your Chapter Assignment Sheet or Course Syllabus, or consult your instructor, to determine whether you are to submit the printed pages that are the results of this project. To print, on the toolbar, click the Print button  . .
|
3. | On the report title bar, click the Close button  , and then click Yes when prompted to save the report. , and then click Yes when prompted to save the report.
|
4. | In the displayed Save As dialog box, click OK to accept the default report name.
The report is saved and will display as an available report on the list of Reports objects.
|
| |
5. | In the Relationships window title bar, click the Close button . If a message box displays asking if you want to save the layout of the relationships, click Yes.
[Page 914]This action saves the way the field lists display in the Relationships window.
|
There are other relationships that can be created using the same process in the Relationships window. The type of relationship is determined by the placement of the primary key field. A one-to-one relationship exists between two tables when a record in one table is related to a single record in a second table. In this case, both tables use the same field as the primary key. This is most often used when data is placed in a separate table because access to the information is restricted. You can also create multiple one-to-many relationships between tables in a database simply by adding more tables to the Relationships window and creating a join line between the tables based on their common field. A primary key field from one table can be joined to the same field in more than one table.
