Hack 89. Publish Your Geodata to the Web with GeoServer


If the OGC web standards meet your needs, GeoServer is a great way to get started.
At the beginning of this chapter, we introduced the OpenGIS Consortium's vision for accessible GIS with their Geography Markup Language, Web Feature Service, and Web Map Service standards. If you decide that WFS, WMS, and GML fit your needs, GeoServer is a great place to start.
GeoServer is a Java-servlet-based toolkit that aspires to be the Apache of the geospatial web, designed to make it easy for new users to install and publish their existing geodata. GeoServer is GPL and is available from Sourceforge at http://geoserver.sf.net/. The project's main supporter is a nonprofit called The Open Planning Project, which believes that more accessible data about our environment will help to give citizens a greater say about the planning decisions that affect their lives.
GeoServer is a J2EE application built as a thin layer on top of the excellent GeoTools Java GIS toolkit. This allows it to support a wide variety of data formats, as GeoTools strives to make adding new data formats as easy as possible. In this hack, we'll get a GeoServer instance up and running.
8.4.1. Setting up GeoServer
You will need Java installed on your computer. GeoServer requires at least Version 1.4, which can be downloaded from Sun's web site or from http://blackdown.org/ for many Linux distributions. You will also need a Java Servlet Container. There are a variety of open source and commercial Servlet Container implementations; two good ones are Tomcat (by Apache's Jakarta project, freely available to all) and Resin (by Caucho, a commercial company, free for development purposes and hobbyists, and very fast). Both are easy to set up and have built-in web servers, so Apache need not also be installed. To use GeoServer's web-based administration tool, Tomcat 5 is required, as it supports Version 2.0 of the Servlet specification.
You can get the latest version of GeoServer from the download area at http://geoserver.sf.net/. At the time of writing, this is Version 1.2.0. The quickest way to get started is to grab the WAR file: the latest version is always geoserver.war. This can be dropped right into the Servlet Container's webapps directory, without requiring more Java expertise. To build it from scratch requires the ant build tool.
8.4.2. Starting up GeoServer
The .war contains all the code, libraries, and configuration files to run GeoServer. Both Tomcat and Resin have a directory named webapps/ where the .war file should be placed. If the container is already running, it may need to be restarted, but as soon as it is, the .war will expand and GeoServer will load up. The best way to check to see if GeoServer is working is to issue a GetCapabilities request through any web browser. If the container is running on your local machine on the default port, the capabilities request will look like this:
http://localhost:8080/geoserver/wfs?request=GetCapabilities
This should return a WFS Capabilities.xsd document with sample values. You should also see a couple of FeatureTypes, samples in the default GeoServer installation. These can be queried with GetFeature and DescribeFeatureType requests. GeoServer also has an integrated Web Map Server; its Capabilities document is queried in a similar way:
http://localhost:8080/geoserver/wms?request=GetCapabilities
8.4.2.1 Configuring GeoServer
Now that GeoServer is up and running, it is time to configure it with your own information and data. GeoServer has a web-based user interface to make this as easy as possible. It is accessed at:
http://localhost:8080/geoserver/
This will show a welcome page, with links to the Capabilities page. It also has a link to the TestWfsPost servlet, which is quite useful for playing with the XML-post portions of the Web Feature Service. WFS requests can be written directly into the text box and issued to GeoServer. A few other pages can also be accessed, such as contact information and basic statistics. But to actually configure GeoServer, you must log in. Attempting to do any administrative-type action or hitting the log in button will take you to the page to log in. To log in, the default username is "admin" and the password is "geoserver."
The admin page shows various stats and allows the releasing of locks. The relevant page for now is Config, shown in Figure 8-2.
Figure 8-2. GeoServer administration
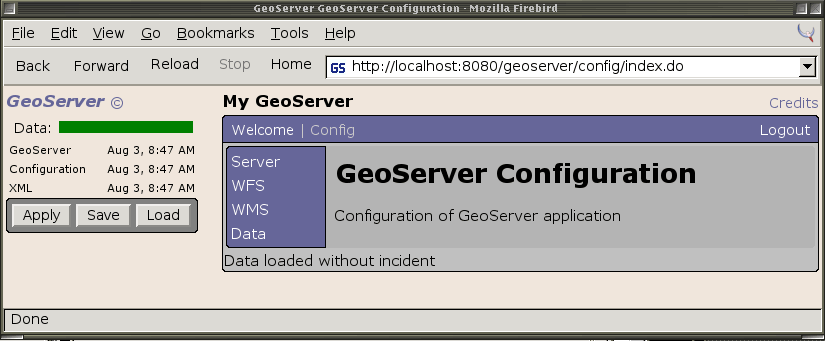
GeoServer configuration is divided into four basic sections: Server, which contains global application settings and contact information; WFS and WMS, which configure their specific settings; and Data, where different data formats are loaded and configured to serve as layers (in WMS) and FeatureTypes (in WFS).
8.4.2.2 Setting global settings and contact information
The first thing to configure is the global settings and contact information in Server, shown in Figure 8-3. Maximum Features allows you to specify a limit on the number of Features that can be returned. GeoServer can now return 15 MB of geographic data operating on a Java Virtual Machine (JVM) with a maximum of 10 or less MB of memory. It has also been tested to handle over 10,000 simultaneous GetCapabilities requests. But the Maximum Features value is still useful for extremely large data sets that clients do not necessarily want to receive all at once.
Figure 8-3. GeoServer configuration
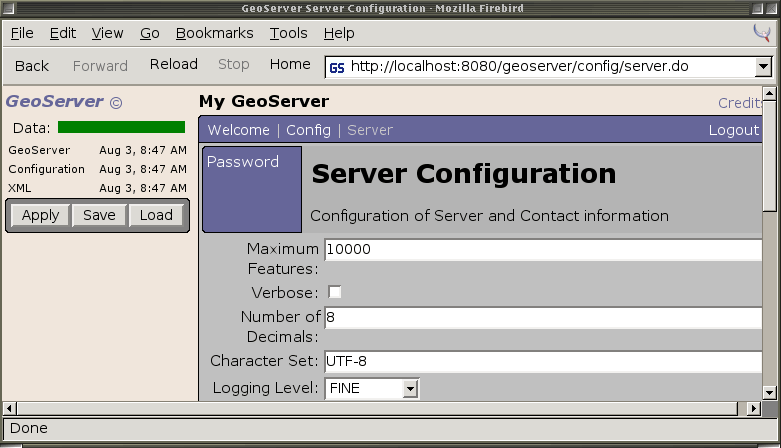
The Verbose field can be set to indicate whether the returned XML documents should have pretty printing, that is, nice indents and spacing for human readability. This can be useful when getting started, but when actually in production, most clients will likely be computer programs that do not care at all about pretty printing; indeed the spaces and carriage returns will just slow down processing slightly. Note that most browsers now will put XML into human-readable form on their own, so you will likely still be able to easily read GeoServer's output if you set Verbose to false.
Other fields can limit the number of decimals returned in GetFeature responses, which can help cut down bandwidth (but also accuracy). The Character Set can be changed to specific encodings, but UTF-8 is recommended. And the Logging Level determines how much information goes to the logs.
The contact information section is pretty self-explanatory; it will show up in the WMS-capabilities contact information section (the WFS 1.0 specification does not have a matching section, but we anticipate that a future version of the specification will).
8.4.2.3 Applying and saving your changes
To get your new contact information and configurations to show up in GeoServer, you must first hit the Submit button. You can preview the changes by hitting the Apply button on the lefthand side of the screen. The first place this should show up is in the contact link in the upper left corner of the screen, which should be replaced with your name. Clicking on it should take you to a page of the contact information you just submitted. The changes will also be reflected in the WMS Capabilities document; just issue a request like:
http://localhost:8080/geoserver/wms?request=GetCapabilities
The second section should have your updated information.
After previewing the changes with the Apply button, the changes can be persisted to the configuration files with the Save button. Then your changes will be there when GeoServer is next started. If you don't want to submit the changes made after hitting Apply, then hit Load to roll GeoServer back to the state it was in the last time a save was made.
Figure 8-4. GeoServer data management
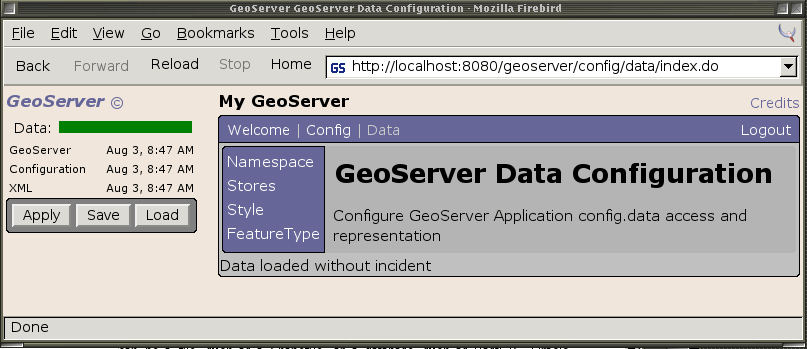
8.4.3. Publishing Your Own Data
After setting up the new contact information, the next step is to make your own data available. The Data page (Figure 8-4) is the place to do this. It is divided into four sections: Stores, which defines the connection parameters to various data formats; Namespace, which configures the XML namespaces available for FeatureTypes; Style, where WMS styles can be added; and FeatureType, which defines the specific FeatureTypes from the available DataStores.
A DataStore is the GeoTools abstraction for the location of geographic data. It can be a file, such as a shapefile, or a database, such as PostGIS, Oracle Spatial, or ArcSDE. A DataStore will contain one or more FeatureTypes. For databases, a FeatureType is generally a specific table; each row in the table is a feature. The current shapefile implementation contains only one FeatureType per DataStore, but one could imagine other file types where a DataStore is a directory that contains a number of different files. To create a new DataStore, click on the Stores link and then the New button. This will take you to a page like that shown in Figure 8-5.
Figure 8-5. Add a GeoServer DataStore
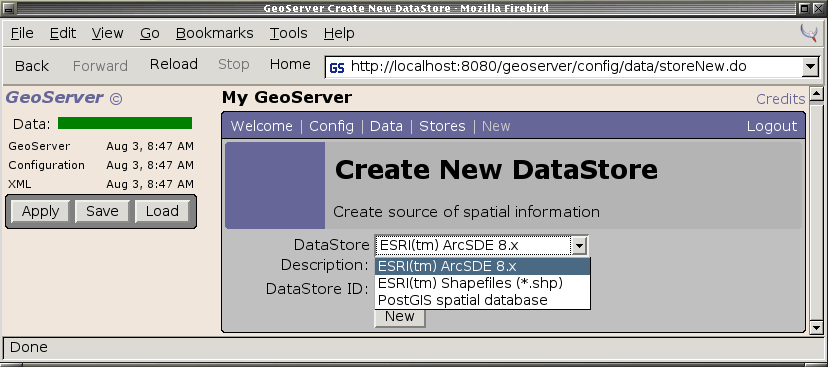
We'll add a PostGIS data store. [Hack #87] shows you how to get started, and [Hack #88] explains how to convert your tracklogs into an indexed PostGIS database.
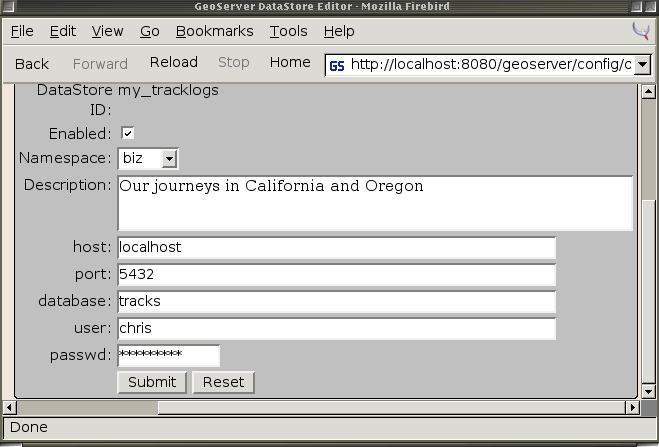
In the GeoServer DataStore screen, select "PostGIS Spatial Database" from the drop-down menu and enter a DataStore ID. The ID can be almost anything, but it's good to pick something fairly descriptive. After clicking New, you will get a screen like Figure 8-6. Putting the mouse over the text will pop up help notes describing what the fields are. Enabled should be set to True; choose a namespace from the list (you can add your own namespaces with the Namespace menu) and write a brief description of the DataStore. The next fields are the connection parameters for your PostGIS database. If it is running on the same machine, then Host should be "localhost"; otherwise, it should be the IP address of the computer where PostGIS is running. The default PostGIS port is 5432, and Database will be the name of the database that you set up. After filling in your values, hit Submit. Then apply the changes so that the FeatureTypes will be available.
|

Figure 8-6. A PostGIS data store in GeoServer
Next go to the FeatureType page and hit New. The tables of your PostGIS database should show up appended to the DataStore ID that you gave your newly created Store. Select one that you would like to make available to the geospatial web.
After hitting New, you will be taken to the FeatureTypeEditor screen. This information is primarily for the Capabilities document; it is the meta-information about the FeatureType. The SRS is probably the most important field; it should be an EPSG numbera serial number allocated by the European Petroleum Survey Groupfor the projection of your data. You can also edit the schema information to hide certain attributes and to make others mandatory. GeoServer generates the DescribeFeatureType responses automatically, depending on how you configure these attributes. After editing your feature, submit it and click Apply. Your feature should then show up in the Capabilities documents for WMS and WFS, and you can even query it.
|
8.4.4. Viewing Your Data with GeoServer's WMS
Though GeoServer started by focusing on the WFS specification, it soon became obvious that an integrated WMS would be a very useful feature to have. Users can simply set up their FeatureTypes in one place and have them available for WMS and WFS. After you've set up your FeatureType, you can issue a WMS GetMap request like the following:
http://localhost:8080/geoserver/wms?request=GetMap
&layers=topp:bc_roads
&bbox=489153,5433000,529000,5460816
&width=800&height=400
&srs=EPSG:27354
&styles=normal
&format=image/png
The bbox parameter specifies a bounding box that specifies the area of the data to be viewed. To figure out the size of the bbox to issue, the easiest thing to do is to issue a WFS request on the same FeatureType. So if you named your FeatureType nas:blorg, then you would perform the following GetFeature request:
http://localhost:8080/geoserver/wfs?request=GetFeature
&typename=nas:blorg
This will return a GML document of a FeatureCollection containing all your features. Every FeatureCollection must have a boundedBy element, and from the gml:Box contained therein, it is easy to figure out the bbox parameter. The top of the response will look something like:
-73.933217,40.78587 -73.933217,40.914404 -73.768722,40.914404 -73.768722,40.78587
The first coordinate (the lower lefthand corner of the box) and the third coordinate (the upper righthand corner of the box) make up the appropriate WMS bbox parameter. So for the previous request, the WMS request will look like:
http://localhost:8080/geoserver/wms?request=GetMap
&layers=nas:blorg
&bbox=-73.933217,40.78587,-73.768722,40.914404
&width=800&height=400
&srs=EPSG:4326
&styles=normal
&format=image/png
This should return a rendered map of your data. You can experiment with different image formats, which are advertised in the WMS Capabilities document. There is much more that you can do with GeoServer, including Transactions and Locking, advanced Filter queries, styling with SLD, and more. The GeoServer homepage has much more information, and the developer community is generally quite responsive. The easiest point of entry is the geotools-devel@lists.sourceforge.net email list.
|
Chris Holmes
Mapping Your Life
- Hacks 1-13
- Hack 1. Put a Map on It: Mapping Arbitrary Locations with Online Services
- Hack 2. Route Planning Online
- Hack 3. Map the Places Youve Visited
- Hack 4. Find Your House on an Aerial Photograph
- Hack 5. The Road Less Traveled by in MapQuest
- Hack 6. Make Route Maps Easier to Read
- Hack 7. Will the Kids Barf?
- Hack 8. Publish Maps of Your Photos on the Web
- Hack 9. Track the Friendly Skies with Sherlock
- Hack 10. Georeference Digital Photos
- Hack 11. How Far? How Fast? Geo-Enabling Your Spreadsheet
- Hack 12. Create a Distance Grid in Excel
- Hack 13. Add Maps to Excel Spreadsheets with MapPoint
Mapping Your Neighborhood
- Hacks 14-21
- Hack 14. Make Free Maps of the United States Online
- Hack 15. Zoom Right In on Your Neighborhood
- Hack 16. Who Are the Neighbors Voting For?
- Hack 17. Map Nearby Wi-Fi Hotspots
- Hack 18. Why You Cant Watch Broadcast TV
- Hack 19. Analyze Elevation Profiles for Wireless Community Networks
- Hack 20. Make 3-D Raytraced Terrain Models
- Hack 21. Map Health Code Violations with RDFMapper
Mapping Your World
- Hacks 22-34
- Hack 22. Digging to China
- Hack 23. Explore David Rumseys Historical Maps
- Hack 24. Explore a 3-D Model of the Entire World
- Hack 25. Work with Multiple Lat/Long Formats
- Hack 26. Work with Different Coordinate Systems
- Hack 27. Calculate the Distance Between Points on the Earths Surface
- Hack 28. Experiment with Different Cartographic Projections
- Hack 29. Plot Arbitrary Points on a World Map
- Hack 30. Plot a Great Circle on a Flat Map
- Hack 31. Plot Dymaxion Maps in Perl
- Hack 32. Hack on Base Maps in Your Favorite Image Editor
- Hack 33. Georeference an Arbitrary Tourist Map
- Hack 34. Map Other Planets
Mapping (on) the Web
- Hacks 35-46
- Hack 35. Search Local, Find Global
- Hack 36. Shorten Online Map URLs
- Hack 37. Tweak the Look and Feel of Web Maps
- Hack 38. Add Location to Weblogs and RSS Feeds
- Hack 39. View Your Photo Thumbnails on a Flash Map
- Hack 40. Plot Points on a Spinning Globe Applet
- Hack 41. Plot Points on an Interactive Map Using DHTML
- Hack 42. Map Your Tracklogs on the Web
- Hack 43. Map Earthquakes in (Nearly) Real Time
- Hack 44. Plot Statistics Against Shapes
- Hack 45. Extract a Spatial Model from Wikipedia
- Hack 46. Map Global Weather Conditions
Mapping with Gadgets
- Hacks 47-63
- How GPS Works
- Hack 47. Get Maps on Your Mobile Phone
- Hack 48. Accessorize Your GPS
- Hack 49. Get Your Tracklogs in Windows or Linux
- Hack 50. The Serial Port to USB Conundrum
- Hack 51. Speak in Geotongues: GPSBabel to the Rescue
- Hack 52. Show Your Waypoints on Aerial Photos with Terrabrowser
- Hack 53. Visualize Your Tracks in Three Dimensions
- Hack 54. Create Your Own Maps for a Garmin GPS
- Hack 55. Use Your Track Memory as a GPS Base Map
- Hack 56. Animate Your Tracklogs
- Hack 57. Connect to Your GPS from Multiple Applications
- Hack 58. Dont Lose Your Tracklogs!
- Hack 59. Geocode Your Voice Recordings and Other Media
- Hack 60. Improve the Accuracy of Your GPS with Differential GPS
- Hack 61. Build a Map of Local GSM Cells
- Hack 62. Build a Car Computer
- Hack 63. Build Your Own Car Navigation System with GpsDrive
Mapping on Your Desktop
- Hacks 64-77
- Hack 64. Mapping Local Areas of Interest with Quantum GIS
- Hack 65. Extract Data from Maps with Manifold
- Hack 66. Java-Based Desktop Mapping with Openmap
- Hack 67. Seamless Data Download from the USGS
- Hack 68. Convert Geospatial Data Between Different Formats
- Hack 69. Find Your Way Around GRASS
- Hack 70. Import Your GPS Waypoints and Tracklogs into GRASS
- Hack 71. Turn Your Tracklogs into ESRI Shapefiles
- Hack 72. Add Relief to Your Topographic Maps
- Hack 73. Make Your Own Contour Maps
- Hack 74. Plot Wireless Network Viewsheds with GRASS
- Hack 75. Share Your GRASS Maps with the World
- Hack 76. Explore the Effects of Global Warming
- Conclusion
- Hack 77. Become a GRASS Ninja
Names and Places
- Hacks 78-86
- Hack 78. What to Do if Your Government Is Hoarding Geographic Data
- Hack 79. Geocode a U.S. Street Address
- Hack 80. Automatically Geocode U.S. Addresses
- Hack 81. Clean Up U.S. Addresses
- Hack 82. Find Nearby Things Using U.S. ZIP Codes
- Hack 83. Map Numerical Data the Easy Way
- Hack 84. Build a Free World Gazetteer
- Hack 85. Geocode U.S. Locations with the GNIS
- Hack 86. Track a Package Across the U.S.
Building the Geospatial Web
- Hacks 87-92
- Hack 87. Build a Spatially Indexed Data Store
- Hack 88. Load Your Waypoints into a Spatial Database
- Hack 89. Publish Your Geodata to the Web with GeoServer
- Hack 90. Crawl the Geospatial Web with RedSpider
- Hack 91. Build Interactive Web-Based Map Applications
- Hack 92. Map Wardriving (and other!) Data with MapServer
Mapping with Other People
- Hacks 93-100
- Hack 93. Node Runner
- Hack 94. Geo-Warchalking with 2-D Barcodes
- Hack 95. Model Interactive Spaces
- Hack 96. Share Geo-Photos on the Web
- Hack 97. Set Up an OpenGuide for Your Hometown
- Hack 98. Give Your Great-Great-Grandfather a GPS
- Hack 99. Map Your Friend-of-a-Friend Network
- Hack 100. Map Imaginary Places
EAN: 2147483647
Pages: 172
- Chapter II Information Search on the Internet: A Causal Model
- Chapter V Consumer Complaint Behavior in the Online Environment
- Chapter VI Web Site Quality and Usability in E-Commerce
- Chapter X Converting Browsers to Buyers: Key Considerations in Designing Business-to-Consumer Web Sites
- Chapter XVII Internet Markets and E-Loyalty
