L.2. Breakpoints and the Continue Command
We begin our study of the debugger by investigating breakpoints, which are markers that can be set at any executable line of code. When program execution reaches a breakpoint, execution pauses, allowing you to examine the values of variables to help determine whether logic errors exist. For example, you can examine the value of a variable that stores the result of a calculation to determine whether the calculation was performed correctly. Note that attempting to set a breakpoint at a line of code that is not executable (such as a comment) will actually set the breakpoint at the next executable line of code in that function.
To illustrate the features of the debugger, we use the program listed in Fig. L.3, which creates and manipulates an object of class Account (Figs. L.1L.2). Execution begins in main (lines 1230 of Fig. L.3). Line 14 creates an Account object with an initial balance of $50.00. Account's constructor (lines 1022 of Fig. L.2) accepts one argument, which specifies the Account's initial balance. Line 17 of Fig. L.3 outputs the initial account balance using Account member function getBalance. Line 19 declares a local variable withdrawalAmount, which stores a withdrawal amount read from the user. Line 21 prompts the user for the withdrawal amount, and line 22 inputs the amount into withdrawalAmount. Line 25 subtracts the withdrawal from the Account's balance using its debit member function. Finally, line 28 displays the new balance.
Figure L.1. Header file for the Account class.
 1 // Fig. L.1: Account.h
 2 // Definition of Account class.
 3
 4 class Account
 5 {
 6 public:
 7 Account( int ); // constructor initializes balance
 8 void credit( int ); // add an amount to the account balance
 9 void debit( int ); // subtract an amount from the account balance
10 int getBalance(); // return the account balance
11 private:
12 int balance; // data member that stores the balance
13 }; // end class Account
|
Figure L.2. Definition for the Account class.
(This item is displayed on pages 1366 - 1367 in the print version)
 1 // Fig. L.2: Account.cpp
 2 // Member-function definitions for class Account.
 3 #include
 4 using std::cout;
 5 using std::endl;
 6
 7 #include "Account.h" // include definition of class Account
 8
 9 // Account constructor initializes data member balance
10 Account::Account( int initialBalance )
11 {
12 balance = 0; // assume that the balance begins at 0
13
14 // if initialBalance is greater than 0, set this value as the
15 // balance of the Account; otherwise, balance remains 0
16 if ( initialBalance > 0 )
17 balance = initialBalance;
18
19 // if initialBalance is negative, print error message
20 if ( initialBalance < 0 )
21 cout << "Error: Initial balance cannot be negative.
" << endl;
22 } // end Account constructor
23
24 // credit (add) an amount to the account balance
25 void Account::credit( int amount )
26 {
27 balance = balance + amount; // add amount to balance
28 } // end function credit
29
30 // debit (subtract) an amount from the account balance
31 void Account::debit( int amount )
32 {
33 if ( amount <= balance ) // debit amount does not exceed balance
34 balance = balance - amount;
35
36 else // debit amount exceeds balance
37 cout << "Debit amount exceeded account balance.
" << endl;
38 } // end function debit
39
40 // return the account balance
41 int Account::getBalance()
42 {
43 return balance; // gives the value of balance to the calling function
44 } // end function getBalance
|
Figure L.3. Test class for debugging.
 1 // Fig. L.3: figL_03.cpp
 2 // Create and manipulate Account objects.
 3 #include
 4 using std::cin;
 5 using std::cout;
 6 using std::endl;
 7
 8 // include definition of class Account from Account.h
 9 #include "Account.h"
10
11 // function main begins program execution
12 int main()
13 {
14 Account account1( 50 ); // create Account object
15
16 // display initial balance of each object
17 cout << "account1 balance: $" << account1.getBalance() << endl;
18
19 int withdrawalAmount; // stores withdrawal amount read from user
20
21 cout << "
Enter withdrawal amount for account1: "; // prompt
22 cin >> withdrawalAmount; // obtain user input
23 cout << "
attempting to subtract " << withdrawalAmount
24 << " from account1 balance

";
25 account1.debit( withdrawalAmount ); // try to subtract from account1
26
27 // display balances
28 cout << "account1 balance: $" << account1.getBalance() << endl;
29 return 0; // indicate successful termination
30 } // end main
|
In the following steps, you will use breakpoints and various debugger commands to examine the value of the variable withdrawalAmount declared in Fig. L.3.
|
1. |
Enabling the debugger. The debugger is enabled by default. If it is not enabled, you have to change the settings of the Solution Configurations combo box (Fig. L.4) in the toolbar. To do this, click the combo box's down arrow to access the Solution Configurations combo box, then select Debug. The toolbar will display Debug in the Solution Configurations combo box. Figure L.4. Enabling the debugger. 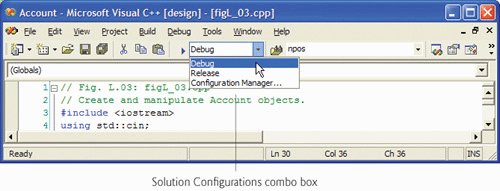
|
|
2. |
Inserting breakpoints in Visual Studio .NET. To insert a breakpoint in Visual Studio .NET, click inside the margin indicator bar (the gray margin at the left of the code window in Fig. L.5) next to the line of code at which you wish to break or right click that line of code and select Insert Breakpoint. You can set as many breakpoints as necessary. Set breakpoints at lines 21 and 25 of your code. A solid maroon circle appears in the margin indicator bar where you clicked, indicating that a breakpoint has been set (Fig. L.5). When the program runs, the debugger suspends execution at any line that contains a breakpoint. The program is said to be in break mode when the debugger pauses the program's execution. Breakpoints can be set before running a program, in break mode and while a program is running. Figure L.5. Setting two breakpoints. 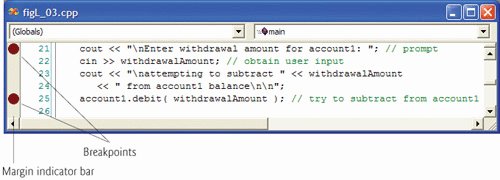
|
|
3. |
Beginning the debugging process. After setting breakpoints in the code editor, select Build > Build Solution to compile the program, then select Debug > Start to begin the debugging process. During debugging of a C++ program, a Command Prompt window appears (Fig. L.6), allowing program interaction (input and output). The program pauses when execution reaches the breakpoint at line 21. At this point, the title bar of the IDE will display [break] (Fig. L.7), indicating that the IDE is in break mode. Figure L.6. Inventory program running. 
Figure L.7. Title bar of the IDE displaying [break]. 
|
|
4. |
Examining program execution. Program execution suspends at the first breakpoint (line 21), and the IDE becomes the active window (Fig. L.8). The yellow arrow to the left of line 21 indicates that this line contains the next statement to execute. [Note: We have added the yellow highlighting to these images. Your code will not contain this highlighting.] Figure L.8. Program execution suspended at the first breakpoint. 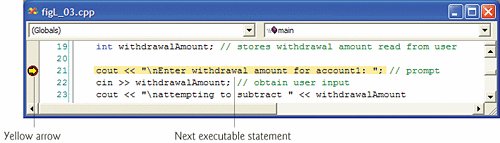
|
|
5. |
Using the Continue command to resume execution. To resume execution, select Debug > Continue. The Continue command will execute any statements between the next executable statement and the next breakpoint or the end of main, whichever comes first. The program continues executing and pauses for input at line 22. Input 13 as the withdrawal amount. The program executes until it stops at the next breakpoint, line 25. Notice that when you place your mouse pointer over the variable name withdrawalAmount, the value that the variable stores is displayed in a Quick Info box (Fig. L.9). In a sense, you are peeking inside the computer at the value of one of your variables. As you'll see, this can help you spot logic errors in your programs. Figure L.9. Setting a breakpoint at line 29. (This item is displayed on page 1370 in the print version) 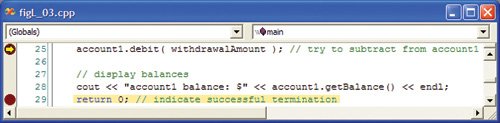
|
|
6. |
Setting a breakpoint at the return statement. Set a breakpoint at line 29 in the source code by clicking in the margin indicator bar to the left of line 29 (Fig. L.9). This will prevent the program from closing immediately after displaying its result. When there are no more breakpoints at which to suspend execution, the program will execute to completion and the Command Prompt window will close. If you do not set this breakpoint, you will not be able to view the program's output before the console window closes. |
|
|
|
|
7. |
Continuing program execution. Use the Debug > Continue command to execute line 25. The program displays the result of its calculation (Fig. L.10). Figure L.10. Program output. 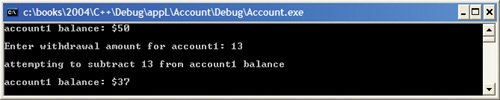
|
|
8. |
Disabling a breakpoint. To disable a breakpoint, right click a line of code on which a breakpoint has been set (or the breakpoint itself) and select Disable Breakpoint. The disabled breakpoint is indicated by a hollow maroon circle (Fig. L.11). Disabling rather than removing a breakpoint allows you to re-enable the breakpoint (by clicking inside the hollow circle) in a program. This also can be done by right clicking the line marked by the hollow maroon circle (or the maroon circle itself) and selecting Enable Breakpoint. Figure L.11. Disabled breakpoint. 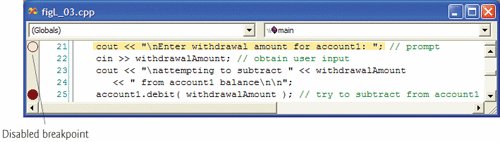
|
|
9. |
Removing a breakpoint. To remove a breakpoint that you no longer need, right click a line of code on which a breakpoint has been set and select Remove Breakpoint. You also can remove a breakpoint by clicking the maroon circle in the margin indicator bar. |
|
10. |
Finishing program execution. Select Debug > Continue to execute the program to completion. |
In this section, you learned how to enable the debugger and set breakpoints so that you can examine the results of code while a program is running. You also learned how to continue execution after a program suspends execution at a breakpoint and how to disable and remove breakpoints.
Introduction to Computers, the Internet and World Wide Web
- Introduction
- What Is a Computer?
- Computer Organization
- Early Operating Systems
- Personal, Distributed and Client/Server Computing
- The Internet and the World Wide Web
- Machine Languages, Assembly Languages and High-Level Languages
- History of C and C++
- C++ Standard Library
- History of Java
- FORTRAN, COBOL, Pascal and Ada
- Basic, Visual Basic, Visual C++, C# and .NET
- Key Software Trend: Object Technology
- Typical C++ Development Environment
- Notes About C++ and C++ How to Program, 5/e
- Test-Driving a C++ Application
- Software Engineering Case Study: Introduction to Object Technology and the UML (Required)
- Wrap-Up
- Web Resources
- Summary
- Terminology
- Self-Review Exercises
- Exercises
Introduction to C++ Programming
- Introduction
- First Program in C++: Printing a Line of Text
- Modifying Our First C++ Program
- Another C++ Program: Adding Integers
- Memory Concepts
- Arithmetic
- Decision Making: Equality and Relational Operators
- (Optional) Software Engineering Case Study: Examining the ATM Requirements Document
- Wrap-Up
- Summary
- Terminology
- Self-Review Exercises
- Exercises
Introduction to Classes and Objects
- Introduction
- Classes, Objects, Member Functions and Data Members
- Overview of the Chapter Examples
- Defining a Class with a Member Function
- Defining a Member Function with a Parameter
- Data Members, set Functions and get Functions
- Initializing Objects with Constructors
- Placing a Class in a Separate File for Reusability
- Separating Interface from Implementation
- Validating Data with set Functions
- (Optional) Software Engineering Case Study: Identifying the Classes in the ATM Requirements Document
- Wrap-Up
- Summary
- Terminology
- Self-Review Exercises
- Exercises
Control Statements: Part 1
- Introduction
- Algorithms
- Pseudocode
- Control Structures
- if Selection Statement
- if...else Double-Selection Statement
- while Repetition Statement
- Formulating Algorithms: Counter-Controlled Repetition
- Formulating Algorithms: Sentinel-Controlled Repetition
- Formulating Algorithms: Nested Control Statements
- Assignment Operators
- Increment and Decrement Operators
- (Optional) Software Engineering Case Study: Identifying Class Attributes in the ATM System
- Wrap-Up
- Summary
- Terminology
- Self-Review Exercises
- Exercises
Control Statements: Part 2
- Introduction
- Essentials of Counter-Controlled Repetition
- for Repetition Statement
- Examples Using the for Statement
- do...while Repetition Statement
- switch Multiple-Selection Statement
- break and continue Statements
- Logical Operators
- Confusing Equality (==) and Assignment (=) Operators
- Structured Programming Summary
- (Optional) Software Engineering Case Study: Identifying Objects States and Activities in the ATM System
- Wrap-Up
- Summary
- Terminology
- Self-Review Exercises
- Exercises
Functions and an Introduction to Recursion
- Introduction
- Program Components in C++
- Math Library Functions
- Function Definitions with Multiple Parameters
- Function Prototypes and Argument Coercion
- C++ Standard Library Header Files
- Case Study: Random Number Generation
- Case Study: Game of Chance and Introducing enum
- Storage Classes
- Scope Rules
- Function Call Stack and Activation Records
- Functions with Empty Parameter Lists
- Inline Functions
- References and Reference Parameters
- Default Arguments
- Unary Scope Resolution Operator
- Function Overloading
- Function Templates
- Recursion
- Example Using Recursion: Fibonacci Series
- Recursion vs. Iteration
- (Optional) Software Engineering Case Study: Identifying Class Operations in the ATM System
- Wrap-Up
- Summary
- Terminology
- Self-Review Exercises
- Exercises
Arrays and Vectors
- Introduction
- Arrays
- Declaring Arrays
- Examples Using Arrays
- Passing Arrays to Functions
- Case Study: Class GradeBook Using an Array to Store Grades
- Searching Arrays with Linear Search
- Sorting Arrays with Insertion Sort
- Multidimensional Arrays
- Case Study: Class GradeBook Using a Two-Dimensional Array
- Introduction to C++ Standard Library Class Template vector
- (Optional) Software Engineering Case Study: Collaboration Among Objects in the ATM System
- Wrap-Up
- Summary
- Terminology
- Self-Review Exercises
- Exercises
- Recursion Exercises
- vector Exercises
Pointers and Pointer-Based Strings
- Introduction
- Pointer Variable Declarations and Initialization
- Pointer Operators
- Passing Arguments to Functions by Reference with Pointers
- Using const with Pointers
- Selection Sort Using Pass-by-Reference
- sizeof Operators
- Pointer Expressions and Pointer Arithmetic
- Relationship Between Pointers and Arrays
- Arrays of Pointers
- Case Study: Card Shuffling and Dealing Simulation
- Function Pointers
- Introduction to Pointer-Based String Processing
- Wrap-Up
- Summary
- Terminology
- Self-Review Exercises
- Exercises
- Special Section: Building Your Own Computer
- More Pointer Exercises
- String-Manipulation Exercises
- Special Section: Advanced String-Manipulation Exercises
- A Challenging String-Manipulation Project
Classes: A Deeper Look, Part 1
- Introduction
- Time Class Case Study
- Class Scope and Accessing Class Members
- Separating Interface from Implementation
- Access Functions and Utility Functions
- Time Class Case Study: Constructors with Default Arguments
- Destructors
- When Constructors and Destructors Are Called
- Time Class Case Study: A Subtle TrapReturning a Reference to a private Data Member
- Default Memberwise Assignment
- Software Reusability
- (Optional) Software Engineering Case Study: Starting to Program the Classes of the ATM System
- Wrap-Up
- Summary
- Terminology
- Self-Review Exercises
- Exercises
Classes: A Deeper Look, Part 2
- Introduction
- const (Constant) Objects and const Member Functions
- Composition: Objects as Members of Classes
- friend Functions and friend Classes
- Using the this Pointer
- Dynamic Memory Management with Operators new and delete
- static Class Members
- Data Abstraction and Information Hiding
- Container Classes and Iterators
- Proxy Classes
- Wrap-Up
- Summary
- Terminology
- Self-Review Exercises
- Exercises
Operator Overloading; String and Array Objects
- Introduction
- Fundamentals of Operator Overloading
- Restrictions on Operator Overloading
- Operator Functions as Class Members vs. Global Functions
- Overloading Stream Insertion and Stream Extraction Operators
- Overloading Unary Operators
- Overloading Binary Operators
- Case Study: Array Class
- Converting between Types
- Case Study: String Class
- Overloading ++ and --
- Case Study: A Date Class
- Standard Library Class string
- explicit Constructors
- Wrap-Up
- Summary
- Terminology
- Self-Review Exercises
- Exercises
Object-Oriented Programming: Inheritance
- Introduction
- Base Classes and Derived Classes
- protected Members
- Relationship between Base Classes and Derived Classes
- Constructors and Destructors in Derived Classes
- public, protected and private Inheritance
- Software Engineering with Inheritance
- Wrap-Up
- Summary
- Terminology
- Self-Review Exercises
- Exercises
Object-Oriented Programming: Polymorphism
- Introduction
- Polymorphism Examples
- Relationships Among Objects in an Inheritance Hierarchy
- Type Fields and switch Statements
- Abstract Classes and Pure virtual Functions
- Case Study: Payroll System Using Polymorphism
- (Optional) Polymorphism, Virtual Functions and Dynamic Binding Under the Hood
- Case Study: Payroll System Using Polymorphism and Run-Time Type Information with Downcasting, dynamic_cast, typeid and type_info
- Virtual Destructors
- (Optional) Software Engineering Case Study: Incorporating Inheritance into the ATM System
- Wrap-Up
- Summary
- Terminology
- Self-Review Exercises
- Exercises
Templates
- Introduction
- Function Templates
- Overloading Function Templates
- Class Templates
- Nontype Parameters and Default Types for Class Templates
- Notes on Templates and Inheritance
- Notes on Templates and Friends
- Notes on Templates and static Members
- Wrap-Up
- Summary
- Terminology
- Self-Review Exercises
- Exercises
Stream Input/Output
- Introduction
- Streams
- Stream Output
- Stream Input
- Unformatted I/O using read, write and gcount
- Introduction to Stream Manipulators
- Stream Format States and Stream Manipulators
- Stream Error States
- Tying an Output Stream to an Input Stream
- Wrap-Up
- Summary
- Terminology
- Self-Review Exercises
- Exercises
Exception Handling
- Introduction
- Exception-Handling Overview
- Example: Handling an Attempt to Divide by Zero
- When to Use Exception Handling
- Rethrowing an Exception
- Exception Specifications
- Processing Unexpected Exceptions
- Stack Unwinding
- Constructors, Destructors and Exception Handling
- Exceptions and Inheritance
- Processing new Failures
- Class auto_ptr and Dynamic Memory Allocation
- Standard Library Exception Hierarchy
- Other Error-Handling Techniques
- Wrap-Up
- Summary
- Terminology
- Self-Review Exercises
- Exercises
File Processing
- Introduction
- The Data Hierarchy
- Files and Streams
- Creating a Sequential File
- Reading Data from a Sequential File
- Updating Sequential Files
- Random-Access Files
- Creating a Random-Access File
- Writing Data Randomly to a Random-Access File
- Reading from a Random-Access File Sequentially
- Case Study: A Transaction-Processing Program
- Input/Output of Objects
- Wrap-Up
- Summary
- Terminology
- Self-Review Exercises
- Exercises
Class string and String Stream Processing
- Introduction
- string Assignment and Concatenation
- Comparing strings
- Substrings
- Swapping strings
- string Characteristics
- Finding Strings and Characters in a string
- Replacing Characters in a string
- Inserting Characters into a string
- Conversion to C-Style Pointer-Based char * Strings
- Iterators
- String Stream Processing
- Wrap-Up
- Summary
- Terminology
- Self-Review Exercises
- Exercises
Web Programming
- Introduction
- HTTP Request Types
- Multitier Architecture
- Accessing Web Servers
- Apache HTTP Server
- Requesting XHTML Documents
- Introduction to CGI
- Simple HTTP Transactions
- Simple CGI Scripts
- Sending Input to a CGI Script
- Using XHTML Forms to Send Input
- Other Headers
- Case Study: An Interactive Web Page
- Cookies
- Server-Side Files
- Case Study: Shopping Cart
- Wrap-Up
- Internet and Web Resources
- Summary
- Terminology
- Self-Review Exercises
- Exercises
Searching and Sorting
- Introduction
- Searching Algorithms
- Sorting Algorithms
- Wrap-Up
- Summary
- Terminology
- Self-Review Exercises
- Exercises
Data Structures
- Introduction
- Self-Referential Classes
- Dynamic Memory Allocation and Data Structures
- Linked Lists
- Stacks
- Queues
- Trees
- Wrap-Up
- Summary
- Terminology
- Self-Review Exercises
- Exercises
- Special Section: Building Your Own Compiler
Bits, Characters, C-Strings and structs
- Introduction
- Structure Definitions
- Initializing Structures
- Using Structures with Functions
- typedef
- Example: High-Performance Card Shuffling and Dealing Simulation
- Bitwise Operators
- Bit Fields
- Character-Handling Library
- Pointer-Based String-Conversion Functions
- Search Functions of the Pointer-Based String-Handling Library
- Memory Functions of the Pointer-Based String-Handling Library
- Wrap-Up
- Summary
- Terminology
- Self-Review Exercises
- Exercises
Standard Template Library (STL)
- Introduction to the Standard Template Library (STL)
- Sequence Containers
- Associative Containers
- Container Adapters
- Algorithms
- Class bitset
- Function Objects
- Wrap-Up
- STL Internet and Web Resources
- Summary
- Terminology
- Self-Review Exercises
- Exercises
- Recommended Reading
Other Topics
- Introduction
- const_cast Operator
- namespaces
- Operator Keywords
- mutable Class Members
- Pointers to Class Members (.* and ->*)
- Multiple Inheritance
- Multiple Inheritance and virtual Base Classes
- Wrap-Up
- Closing Remarks
- Summary
- Terminology
- Self-Review Exercises
- Exercises
Appendix A. Operator Precedence and Associativity Chart
Appendix B. ASCII Character Set
Appendix C. Fundamental Types
Appendix D. Number Systems
- D.1. Introduction
- D.2. Abbreviating Binary Numbers as Octal and Hexadecimal Numbers
- D.3. Converting Octal and Hexadecimal Numbers to Binary Numbers
- D.4. Converting from Binary, Octal or Hexadecimal to Decimal
- D.5. Converting from Decimal to Binary, Octal or Hexadecimal
- D.6. Negative Binary Numbers: Twos Complement Notation
- Summary
- Terminology
- Self-Review Exercises
- Exercises
Appendix E. C Legacy Code Topics
- E.1. Introduction
- E.2. Redirecting Input/Output on UNIX/LINUX/Mac OS X and Windows Systems
- E.3. Variable-Length Argument Lists
- E.4. Using Command-Line Arguments
- E.5. Notes on Compiling Multiple-Source-File Programs
- E.6. Program Termination with exit and atexit
- E.7. The volatile Type Qualifier
- E.8. Suffixes for Integer and Floating-Point Constants
- E.9. Signal Handling
- E.10. Dynamic Memory Allocation with calloc and realloc
- E.11. The Unconditional Branch: goto
- E.12. Unions
- E.13. Linkage Specifications
- E.14. Wrap-Up
- Summary
- Terminology
- Self-Review Exercises
- Exercises
Appendix F. Preprocessor
- F.1. Introduction
- F.2. The #include Preprocessor Directive
- F.3. The #define Preprocessor Directive: Symbolic Constants
- F.4. The #define Preprocessor Directive: Macros
- F.5. Conditional Compilation
- F.6. The #error and #pragma Preprocessor Directives
- F.7. The # and ## Operators
- F.8. Predefined Symbolic Constants
- F.9. Assertions
- F.10. Wrap-Up
- Summary
- Terminology
- Self-Review Exercises
- Exercises
Appendix G. ATM Case Study Code
- Appendix G. ATM Case Study Code
- G.1. ATM Case Study Implementation
- G.2. Class ATM
- G.3. Class Screen
- G.4. Class Keypad
- G.5. Class CashDispenser
- G.6. Class DepositSlot
- G.7. Class Account
- G.8. Class BankDatabase
- G.9. Class Transaction
- G.10. Class BalanceInquiry
- G.11. Class Withdrawal
- G.12. Class Deposit
- G.13. Test Program ATMCaseStudy.cpp
- G.14. Wrap-Up
Appendix H. UML 2: Additional Diagram Types
Appendix I. C++ Internet and Web Resources
- Appendix I. C++ Internet and Web Resources
- I.1. Resources
- I.2. Tutorials
- I.3. FAQs
- I.4. Visual C++
- I.5. Newsgroups
- I.6. Compilers and Development Tools
- I.7. Standard Template Library
Appendix J. Introduction to XHTML
- J.1. Introduction
- J.2. Editing XHTML
- J.3. First XHTML Example
- J.4. Headers
- J.5. Linking
- J.6. Images
- J.7. Special Characters and More Line Breaks
- J.8. Unordered Lists
- J.9. Nested and Ordered Lists
- J.10. Basic XHTML Tables
- J.11. Intermediate XHTML Tables and Formatting
- J.12. Basic XHTML Forms
- J.13. More Complex XHTML Forms
- J.14. Internet and World Wide Web Resources
- Summary
- Terminology
Appendix K. XHTML Special Characters
Appendix L. Using the Visual Studio .NET Debugger
- L.1. Introduction
- L.2. Breakpoints and the Continue Command
- L.3. The Locals and Watch Windows
- L.4. Controlling Execution Using the Step Into, Step Over, Step Out and Continue Commands
- L.5. The Autos Window
- L.6. Wrap-Up
- Summary
- Terminology
- Self-Review Exercises
Appendix M. Using the GNU C++ Debugger
- M.1. Introduction
- M.2. Breakpoints and the run, stop, continue and print Commands
- M.3. The print and set Commands
- M.4. Controlling Execution Using the step, finish and next Commands
- M.5. The watch Command
- M.6. Wrap-Up
- Summary
- Terminology
- Self-Review Exercises
Bibliography
EAN: 2147483647
Pages: 627
