The Cisco Bulk Administration Tool
After you discover the Cisco BAT utility, it will quickly become your new best friend for most day-to-day administration of the IP telephony network. Although there will always be individual changes to the voice network, such as adding a phone extension or a new user, most of the changes you will perform will need to occur in bulk. For example, the accounting department needs different hold music or the department managers need specialized calling restrictions. You can attack these types of tasks one device at a time (which can quickly become tedious and time consuming) or with a few mouse button clicks using the Cisco BAT.
You can use BAT to work with the following types of devices and records:
- Add, update, and delete Cisco IP Phones
- Add, update, and delete users
- Add, update, and delete user device profiles
- Add, update, and delete Cisco IP Manager Assistant (IPMA) managers and assistants
- Add, update, and delete ports on a Cisco Catalyst 6000 FXS Analog Interface Module
- Add or delete Cisco VG200 analog gateways and ports
- Add or delete forced authorization codes
- Add or delete client matter codes
- Add or delete Call Pickup groups
- Update or delete locally significant certificates on Cisco IP Phones
BAT provides an optional application, TAPS, which retrieves the predefined configuration for auto-registered telephones. By using TAPS, CallManager no longer assigns auto-registered phones random extension numbers from the pool. Instead, after the user enters their extension number through an automated process, the TAPS system retrieves the complete configuration you have created for that user.
BAT Components
Every device includes a multitude of individual attributes, settings, and information fields that enable the device to function in the network and provide its telephony features. Many devices have the same attributes and settings in common, whereas other values, such as the directory number (DN), are unique to a user or to a device.
For bulk configuration transactions involving the Cisco CallManager database, the BAT process uses two components: a template for the device type that includes settings that devices have in common and a data file in comma-separated values (CSV) format that contains the unique values for configuring a new device or updating an existing record in the database. The CSV data file works in conjunction with the device template.
For instance, when you create a bulk transaction to import a group of Cisco IP Phones, you set up the CSV data file that contains the unique information for each phone, such as the DN and MAC address. In addition, you set up or choose the BAT template that contains the common settings for all phones in the transaction, such as a Cisco IP Phone 7960 template. By combining the unique settings defined in the CSV file with the common settings created in the IP Phone template, you have everything you need to import a group of IP Phones successfully.
Caution
Because bulk transactions can affect Cisco CallManager performance and call processing, use BAT only during off-peak hours.
BAT Installation
BAT must be installed on the same server as the publisher database for Cisco CallManager. During BAT installation, the setup program stops the following services:
- Microsoft Internet Information Server (IIS) administration
- World Wide Web publishing
- FTP publishing
These services automatically restart when the installation is complete.
When BAT is installed, the Microsoft Excel file BAT.xlt file for the BAT spreadsheet is placed on the publisher database server at the following path: C:CiscoWebsBATExcelTemplate. You can use this file to generate the necessary CSV files used to import groups of devices into the Cisco CallManager SQL database.
Note
You must install BAT directly on the publisher server (either through the console directly or using a program such as VNC); do not use Windows Terminal Services.
These steps describe the BAT installation process:
|
Step 1. |
Using administrator privileges, log in to the system running the publisher database for Cisco CallManager. |
|
Step 2. |
Choose Application > Install Plugins from the CallManager Administration web interface. The Install Plugins window is displayed, as shown in Figure 7-1. Figure 7-1. Cisco CallManager Plugins Installation Window 
|
|
Step 3. |
Click the setup icon for the Cisco Bulk Administration Tool. |
|
Step 4. |
A standard Windows dialog box appears. Determine whether to copy the BAT installation executable to the system or run it from the current location. |
|
Step 5. |
The Welcome screen appears. Click Next, and the Current Settings window appears. |
|
Step 6. |
Click Next to install to the default location C:CiscoWebsBAT. BAT installs to C:CiscoWebsBAT. You cannot change this path. The Start Copying Files window appears. The setup program begins copying files. |
|
Step 7. |
The Setup Complete window appears. You have successfully installed BAT. |
|
Step 8. |
To close setup, click Finish. |
|
Step 9. |
After you have installed BAT, from Cisco CallManager Administration, choose Application > BAT to access BAT. If after you have installed BAT, BAT is not visible under the Application menu, refresh your browser. |
Adding Cisco IP Phones Using BAT
BAT uses a multistep process to prepare the bulk configuration transaction. BAT Release 5.0(1) introduced a wizard to step you through bulk configurations. The BAT configuration process includes these tasks:
|
Step 1. |
Set up the template for data input. You can create BAT templates for the following types of device options:
|
|
Step 2. |
Define a format for the CSV data file. You can use the BAT Excel spreadsheet or a text editor to create the CSV data file. |
|
Step 3. |
Validate the data input files with the Cisco CallManager database. Cisco CallManager runs a validation routine that checks the CSV file and the template for errors against the publisher database. |
|
Step 4. |
Insert the devices into the Cisco CallManager database. |
Using BAT Wizard Step 1: Choosing Devices
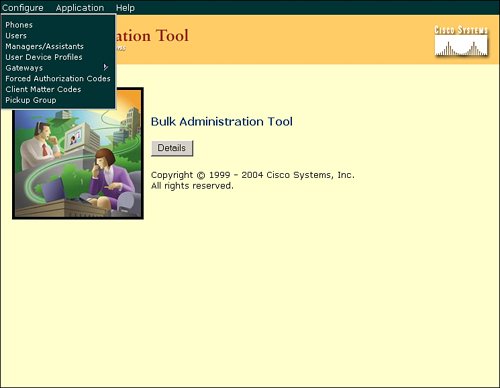
From the Configure menu shown in Figure 7-2, you can access the wizard by choosing one of these devices or configuration options:
- Phones
- Users
- Managers/Assistants
- User Device Profiles
- Gateways
- Forced Authorization Codes
- Client Matter Codes
- Pickup Group
- TAPS (optional, when installed)
Figure 7-2. Bulk Administration Tool Configure Menu
Using BAT Wizard Step 2: Device Specifics
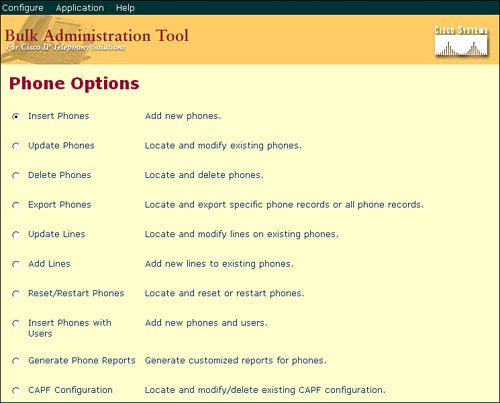
After you choose a device or configuration option, the wizard displays a list of configuration tasks that are specific to that option. For example, when you choose Phones, the following list of tasks is displayed (shown in Figure 7-3):
- Insert Phones Add new phones
- Update Phones Locate and modify existing phones
- Delete Phones Locate and delete phones
- Export Phones Locate and export specific phone records or all phone records
- Update Lines Locate and modify lines on existing phones
- Add Lines Add new lines to existing phones
- Reset/Restart Phones Locate and reset or restart phones
- Insert Phones with Users Add new phones and users
- Generate Phone Reports Generate customized reports for phones
- CAPF Configuration Locate and modify or delete the digital certificates (called locally significant certificates [LSCs]) issued by the Cisco Authority Proxy Function (CAPF) server to IP Phones
Figure 7-3. Bulk Administration Tool Wizard Phones Options Menu
Using BAT Wizard Step 3: Proceed with Task
After you choose the configuration task, the wizard provides a list of steps that are specific to the task. For example, to guide you through the Insert Phones task (shown in Figure 7-4), the wizard displays the following steps:
|
Step 1. |
Add, view, or modify existing phone templates. |
|
Step 2. |
Create the CSV data file. |
|
Step 3. |
Validate phone records. |
|
Step 4. |
Insert phones. |
Figure 7-4. Bulk Administration Tool Wizard Insert Phones Window
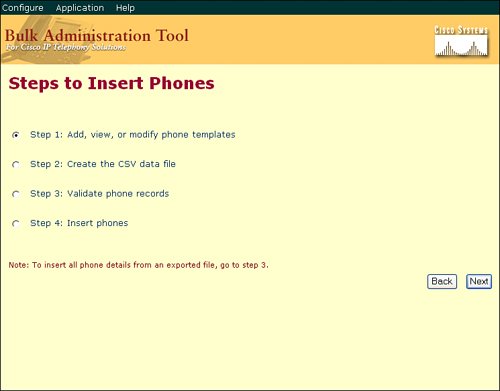
When you choose a step from the task list, you open a configuration window such as the Phone Template Configuration window. The configuration window provides the entry fields for defining a template.
Adding Phones Step 1: Configuring BAT Templates
The first task in creating the data for the BAT configuration process is to set up a template for the devices that you are configuring. You specify the type of phone or device that you want to add or modify, and then you create a BAT template that has features that are common to all the phones or devices in that bulk transaction.
Prior to creating the template, make sure that phone settings, such as device pool, location, calling search space, button template, and softkey templates, have already been configured in Cisco CallManager Administration. You cannot create new settings in BAT.
The first steps in configuring an IP Phone template are to give the phone template a unique name, and choose an IP Phone (device) type in the Phone Template Configuration window, as shown in Figure 7-5. Choose the template that encompasses all of the IP Phones in the group. If you have multiple telephone types in a given group, you must create multiple templates.
Figure 7-5. Bulk Administration Tool Phone Template Configuration Window
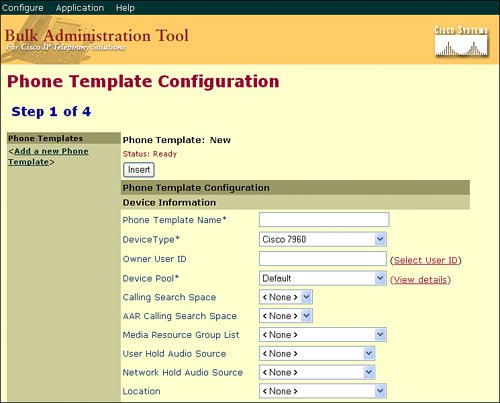
Next, assign the template to a device pool. After you have configured the initial template information, click Insert to add the template to the BAT utility.
After configuring the initial template settings, you can modify specific line configurations. From the initial template window, choose a line to configure, and a new configuration window appears. These general configuration settings can apply to multiple IP Phones, such as partitions, calling search spaces, and call waiting settings. BAT obtains line configurations that are specific to the user from the imported Microsoft Excel spreadsheet.
When you are adding a group of phones that have multiple lines, you can create a master phone template that provides multiple lines and the most common values for a specific phone model. You can use the master template to add phones that have differing numbers of lines, but do not exceed the number of lines in the master phone template. For example, you can create a master phone template for a Cisco IP Phone 7960 that has six lines. You can use this single template to add phones that have one line, two lines, or up to six lines (because the template provides the base configuration for up to six lines).
Adding Phones Step 2: Creating CSV Files
The CSV data file contains the unique settings and information for each individual device, such as its DN, MAC address, and description. Make sure that all phones and devices in a CSV data file are the same phone or device model and match the BAT template. The CSV data file can contain duplicates of some values from the BAT template. Values in the CSV data file override any values that were set in the BAT template. You can use the override feature for special configuration cases.
You can create CSV files in one of two ways: by using the Microsoft Excel spreadsheet BAT.xlt file or by using a text editor such as Microsoft Notepad. The BAT Excel spreadsheet simplifies the creation of CSV data files. You can add multiple devices and view the records for each device in a spreadsheet format. It allows you to customize the file format within the spreadsheet and provides validation and error checking automatically to help reduce configuration errors. Experienced BAT users who are comfortable with working in a CSV-formatted file can use a text editor to create a CSV data file.
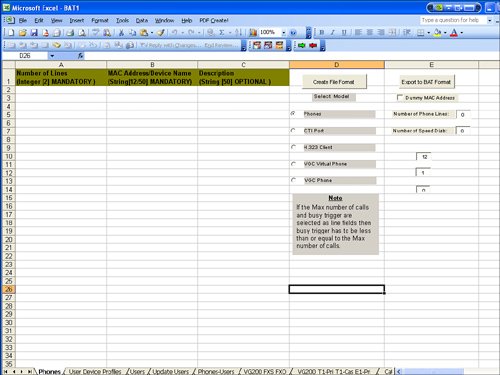
Figure 7-6 shows the BAT.xlt Microsoft Excel spreadsheet. You can find this spreadsheet in the directory C:CiscoWebsBATExcelTemplate on the publisher database server. You probably do not have Microsoft Excel running on the publisher, so you must copy the file to a local machine (using either a floppy disk or a mapped network drive). After you have copied the file, double-click BAT.xlt. When prompted, click Enable Macros.
Figure 7-6. Bulk Administration Tool Excel Spreadsheet
Tip
After you have installed BAT, a BAT shared folder is created automatically on the publisher. This can provide easier access to the BAT files; to access the share, click Start > Run and type \<CCM Server Name or IP Address>BAT.
The BAT spreadsheet includes tabs along the bottom of the spreadsheet for access to the required data input fields for the various devices and user combinations in BAT. The CSV data file works in combination with the BAT template. For example, when you choose the Phone tab in the BAT spreadsheet, you can leave Location, Forward Busy Destination, or Call Pickup Group blank. The values from the BAT phone template are used for these fields; however, if you specify values for Forward Busy Destination or Call Pickup Group, those values override the values for these fields that were set in the BAT phone template.
After entering the data into the BAT spreadsheet, click Export to BAT Format to create the CSV file. The format for CSV files is .txt. The system saves the file to C:XLSDataFiles or to a folder of your choice. You must move the converted CSV file from the C:XLSDataFiles folder on your local computer back to the publisher, where BAT can access the CSV file and place it in the appropriate folder under C:BATFiles. (For example, you could save a phone CSV data file to the C:BATFilesPhonesInsert folder on the publisher database for Cisco CallManager.)
Using a text editor is the other way to create a CSV file. When using a text editor, follow these steps:
|
Step 1. |
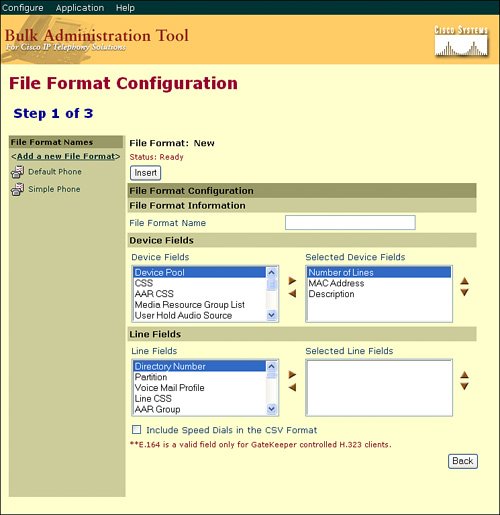
Create the customized file format using the BAT File Format Configuration window shown in Figure 7-7. The file format specifies the order in which you enter values in the text file. This allows you to add attributes to the file format that are also in the BAT template, and override the template entry with a specific attribute for a device. For instance, you can choose the route partition attribute for your file format and enter different partitions for each phone in the CSV data file. |
Figure 7-7. Bulk Administration Tool CSV File Format
Earlier versions of BAT supported only a default file format with a fixed and limited number of attributes and settings for each device and an All Details format that includes all attributes and settings for each device.
|
Step 2. |
Create the CSV data file using a basic text editor that follows the file format you defined in Step 1. |
|
Step 3. |
Associate the file format with the CSV data file in Cisco BAT. You can associate only one file format with a CSV data file. Use the Add File Format window, shown in Figure 7-8, to choose the name of the CSV data file .txt from the File Name drop-down menu. Next, you choose your file format from the File Format Name drop-down menu. The data in the CSV data file must match the custom file format that you have chosen. |
Figure 7-8. Bulk Administration Tool CSV Format Association

Adding Phones Step 3: Validating Phones
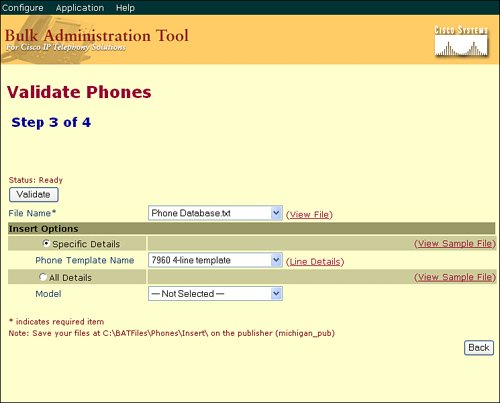
In the next task in the BAT wizard, you use the Validate option, shown in Figure 7-9, to validate the format of the text file you have chosen. In this task, you choose the name of the CSV data file and the BAT template for the device or the model when you have a CSV data file with all details. You have these options for how records are validated:
- Specific Details For validating records that follow the default or custom file format
- All Details For validating records from a file that was generated with the export utility by using the All Details option
Figure 7-9. Bulk Administration Tool Validate Phones Window
When you choose Validate, the system runs a validation routine to check for errors against the publisher database. These checks ensure the following:
- Fields, such as description, display text, and speed dial label, use valid characters.
- Cisco CallManager groups, device pools, partitions, and other referenced attributes are already configured.
- The number of lines that are configured on a device does not exceed the device template.
Validation does not check for the existence of a user or for mandatory or optional fields that are BAT-defined, such as the dummy MAC address.
Adding Phones Step 4: Inserting Phones
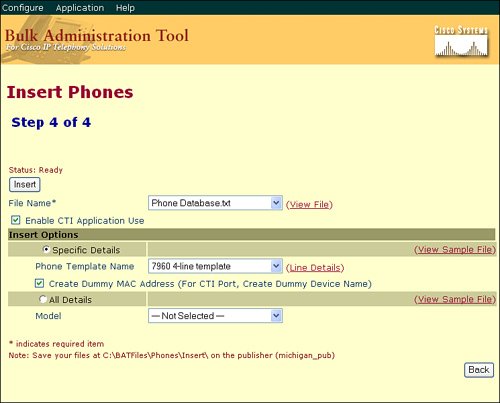
Inserting the device into the Cisco CallManager database is the last step in using BAT to perform bulk configurations, shown in Figure 7-10.
Figure 7-10. Bulk Administration Tool Insert Phones Window
The following steps are involved in this procedure:
|
Step 1. |
In the File Name field, choose the CSV data file that you created for this specific bulk transaction. |
|
Step 2. |
To enable the use of applications such as Cisco IP SoftPhone, check the Enable CTI Application Use check box (for CTI ports only). |
Note
CTI application use is not required for the Cisco IP Communicator.
|
Step 3. |
Choose the Insert option that corresponds to your CSV data file. |
|
Step 4. |
In the Phone Template Name field, choose the BAT phone template that you created for this type of bulk transaction. |
|
Step 5. |
If you did not enter individual MAC addresses in the CSV data file, check the Create Dummy MAC Address check box. |
|
Step 6. |
Click Insert to insert the phone records. |
Updating IP Phones Using BAT
In addition to using BAT for bulk device addition to the CallManager database, you can also use BAT to make bulk device updates to the system. This can be extremely useful when modifying a configuration for a large number of users. For example, a group of users might want to change their music on hold (MoH) to a new song. Rather than modifying the configuration of each phone individually, you can use BAT to make a bulk change to all phones based on unique match criteria (such as the department name or partition).
Figure 7-11 shows the Update Phones window. To update phone settings, such as changing or adding a device pool or calling search space for a group of similar phones, choose Phones > Update Phones in the BAT Configure window.
Figure 7-11. Bulk Administration Tool Update Phones Window
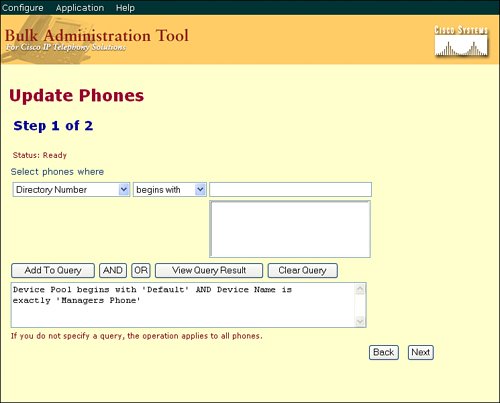
You can locate the existing phone records by using a query or a custom file containing the device names or DNs. You can query using any number of fields, such as the model, device name, DN, or description. You can also specify search criteria such as "begins with," "contains," or "is exactly." Choose View Query Result to check that the query returns the information that you need. Choose Clear Query to remove the query items.
After you have defined the query or custom file to search for phones, follow this procedure to update the IP Phones or users to the Cisco CallManager database in bulk:
|
Step 1. |
Specify the values to be updated within Cisco CallManager, as shown in Figure 7-12. Figure 7-12. Bulk Administration Tool Update Phones Detail Window 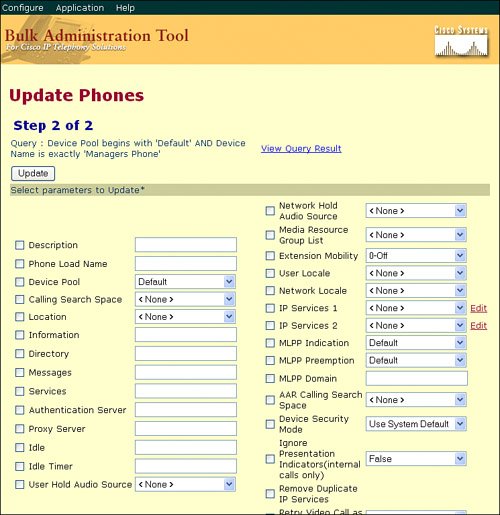
|
|
Step 2. |
Click Update. |
|
Step 3. |
Reset or restart the IP Phones through Cisco CallManager. |
To check the status of your insertion, read the status line, located above the Insert button.
If the status bar indicates a failure, click View Latest Log File to display a window that will help you to determine where the operation failed.
Part I: Cisco CallManager Fundamentals
Introduction to Cisco Unified Communications and Cisco Unified CallManager
Cisco Unified CallManager Clustering and Deployment Options
- Cisco Unified CallManager Clustering and Deployment Options
- The Two Sides of the Cisco Unified CallManager Cluster
- Cluster Redundancy Designs
- Call-Processing Deployment Models
- Summary
- Review Questions
Cisco Unified CallManager Installation and Upgrades
- Cisco Unified CallManager Installation and Upgrades
- Cisco Unified CallManager 4.x Clean Installation Process
- Upgrading Prior Cisco Unified CallManager Versions
- Summary
- Review Questions
Part II: IPT Devices and Users
Cisco IP Phones and Other User Devices
Configuring Cisco Unified CallManager to Support IP Phones
- Configuring Cisco Unified CallManager to Support IP Phones
- Configuring Intracluster IP Phone Communication
- IP Phone Configuration
- Case Study: Device Pool Design
- Summary
- Review Questions
Cisco IP Telephony Users
- Cisco IP Telephony Users
- Cisco CallManager User Database
- Cisco CallManager User Configuration
- User Logon and Device Configuration
- Summary
- Review Questions
Cisco Bulk Administration Tool
- Cisco Bulk Administration Tool
- The Cisco Bulk Administration Tool
- Using the Tool for Auto-Registered Phone Support
- Summary
- Review Questions
Part III: IPT Network Integration and Route Plan
Cisco Catalyst Switches
- Cisco Catalyst Switches
- Catalyst Switch Role in IP Telephony
- Powering the Cisco IP Phone
- Data and Voice VLANs
- Configuring Class of Service
- Summary
- Review Questions
Configuring Cisco Gateways and Trunks
- Configuring Cisco Gateways and Trunks
- Cisco Gateway Concepts
- Configuring Access Gateways
- Cisco Trunk Concepts
- Configuring Intercluster Trunks
- SIP and Cisco CallManager
- Summary
- Review Questions
Cisco Unified CallManager Route Plan Basics
- Cisco Unified CallManager Route Plan Basics
- External Call Routing
- Route Plan Configuration Process
- Summary
- Review Questions
Cisco Unified CallManager Advanced Route Plans
- Cisco Unified CallManager Advanced Route Plans
- Route Filters
- Discard Digit Instructions
- Transformation Masks
- Translation Patterns
- Route Plan Report
- Summary
- Review Questions
Configuring Hunt Groups and Call Coverage
- Configuring Hunt Groups and Call Coverage
- Call Distribution Components
- Configuring Line Groups, Hunt Lists, and Hunt Pilots
- Summary
- Review Questions
Implementing Telephony Call Restrictions and Control
- Implementing Telephony Call Restrictions and Control
- Class of Service Overview
- Partitions and Calling Search Spaces Overview
- Time-of-Day Routing Overview
- Configuring Time-of-Day Routing
- Time-of-Day Routing Usage Scenario
- Summary
- Review Questions
Implementing Multiple-Site Deployments
- Implementing Multiple-Site Deployments
- Call Admission Control
- Survivable Remote Site Telephony
- Summary
- Review Questions
Part IV: VoIP Features
Media Resources
- Media Resources
- Introduction to Media Resources
- Conference Bridge Resources
- Media Termination Point Resources
- Annunciator Resources
- Transcoder Resources
- Music on Hold Resources
- Media Resource Management
- Summary
- Review Questions
Configuring User Features, Part 1
- Configuring User Features, Part 1
- Basic IP Phone Features
- Softkey Templates
- Enhanced IP Phone Features
- Barge and Privacy
- IP Phone Services
- Summary
- Review Questions
Configuring User Features, Part 2
- Configuring User Features, Part 2
- Cisco CallManager Extension Mobility
- Client Matter Codes and Forced Authentication Codes
- Call Display Restrictions
- Malicious Call Identification
- Multilevel Precedence and Preemption
- Summary
- Review Questions
Configuring Cisco Unified CallManager Attendant Console
- Configuring Cisco Unified CallManager Attendant Console
- Introduction to Cisco CallManager Attendant Console
- Call Routing and Call Queuing
- Server and Administration Configuration
- Cisco Attendant Console Features
- Summary
- Review Questions
Configuring Cisco IP Manager Assistant
- Configuring Cisco IP Manager Assistant
- Cisco IP Manager Assistant Overview
- Cisco IP Manager Assistant Architecture
- Configuring Cisco IPMA for Shared-Line Support
- Summary
- Review Questions
Part V: IPT Security
Securing the Windows Operating System
- Securing the Windows Operating System
- Threats Targeting the Operating System
- Security and Hot Fix Policy
- Operating System Hardening
- Antivirus Protection
- Cisco Security Agent
- Administrator Password Policy
- Common Windows Exploits
- Security Taboos
- Summary
- Review Questions
Securing Cisco Unified CallManager Administration
- Securing Cisco Unified CallManager Administration
- Threats Targeting Remote Administration
- Securing CallManager Communications Using HTTPS
- Multilevel Administration
- Summary
- Review Questions
Preventing Toll Fraud
- Preventing Toll Fraud
- Toll Fraud Exploits
- Preventing Call Forward and Voice-Mail Toll Fraud Using Calling Search Spaces
- Blocking Commonly Exploited Area Codes
- Using Time-of-Day Routing
- Using FAC and CMC
- Restricting External Transfers
- Dropping Conference Calls
- Summary
- Review Questions
Hardening the IP Phone
Understanding Cryptographic Fundamentals
- Understanding Cryptographic Fundamentals
- What Is Cryptography?
- Symmetric Encryption
- Asymmetric Encryption
- Hash Functions
- Digital Signatures
- Summary
- Review Questions
Understanding the Public Key Infrastructure
- Understanding the Public Key Infrastructure
- The Need for a PKI
- PKI as a Trusted Third-Party Protocol
- PKI Entities
- PKI Enrollment
- PKI Revocation and Key Storage
- PKI Example
- Summary
- Review Questions
Understanding Cisco IP Telephony Authentication and Encryption Fundamentals
- Understanding Cisco IP Telephony Authentication and Encryption Fundamentals
- Threats Targeting the IP Telephony System
- How CallManager Protects Against Threats
- PKI Topologies in Cisco IP Telephony
- PKI Enrollment in Cisco IP Telephony
- Keys and Certificate Storage in Cisco IP Telephony
- Authentication and Integrity
- Encryption
- Summary
- Review Questions
Configuring Cisco IP Telephony Authentication and Encryption
- Configuring Cisco IP Telephony Authentication and Encryption
- Authentication and Encryption Configuration Overview
- Enabling Services Required for Security
- Using the CTL Client
- Working with Locally Significant Certificates
- Configuring the Device Security Mode
- Negotiating Device Security Mode
- Generating a CAPF Report
- Summary
- Review Questions
Part VI: IP Video
Introducing IP Video Telephony
- Introducing IP Video Telephony
- IP Video Telephony Solution Components
- Video Call Concepts
- Video Protocols Supported in Cisco CallManager
- Bandwidth Management
- Call Admission Control Within a Cluster
- Call Admission Control Between Clusters
- Summary
- Review Questions
Configuring Cisco VT Advantage
- Configuring Cisco VT Advantage
- Cisco VT Advantage Overview
- How Calls Work with Cisco VT Advantage
- Configuring Cisco CallManager for Video
- Configuring Cisco IP Phones for Cisco VT Advantage
- Installing Cisco VT Advantage on a Client
- Summary
- Review Questions
Part VII: IPT Management
Introducing Database Tools and Cisco Unified CallManager Serviceability
- Introducing Database Tools and Cisco Unified CallManager Serviceability
- Database Management Tools
- Cisco CallManager Serviceability Overview
- Tools Overview
- Summary
- Review Questions
Monitoring Performance
- Monitoring Performance
- Performance Counters
- Microsoft Event Viewer
- Microsoft Performance Monitor
- Real-Time Monitoring Tool Overview
- Summary
- Review Questions
Configuring Alarms and Traces
- Configuring Alarms and Traces
- Alarm Overview
- Alarm Configuration
- Trace Configuration
- Trace Analysis
- Trace Collection
- Bulk Trace Analysis
- Additional Trace Tools
- Summary
- Review Questions
Configuring CAR
- Configuring CAR
- CAR Overview
- CAR Configuration
- Report Scheduling
- System Database Configuration
- User Report Configuration
- Summary
- Review Questions
Using Additional Management and Monitoring Tools
- Using Additional Management and Monitoring Tools
- Remote Management Tools
- Dependency Records
- Password Changer Tool
- Cisco Dialed Number Analyzer
- Quality Report Tool
- Summary
- Review Questions
Part VIII: Appendix
Appendix A. Answers to Review Questions
Index
EAN: 2147483647
Pages: 329
