Layout Managers
Layout managers are provided to arrange GUI components in a container for presentation purposes. Programmers can use the layout managers for basic layout capabilities instead of determining the exact position and size of every GUI component. This functionality enables the programmer to concentrate on the basic look-and-feel and lets the layout managers process most of the layout details. All layout managers implement the interface LayoutManager (in package java.awt). Class Container's setLayout method takes an object that implements the LayoutManager interface as an argument. There are basically three ways for you to arrange components in a GUI:
- Absolute positioning: This provides the greatest level of control over a GUI's appearance. By setting a Container's layout to null, you can specify the absolute position of each GUI component with respect to the upper-left corner of the Container. If you do this, you also must specify each GUI component's size. Programming a GUI with absolute positioning can be tedious unless you have an integrated development environment (IDE) that can generate the code for you.
- Layout managers: Using layout managers to position elements can be simpler and faster than creating a GUI with absolute positioning, but you lose some control over the size and the precise positioning of GUI components.
- Visual programming in an IDE: IDEs provide tools that make it easy to create GUIs. Each IDE typically provides a GUI design tool that allows you to drag and drop GUI components from a tool box onto a design area. You can then position, size and align GUI components as you like. The IDE generates the Java code that creates the GUI. In addition, you can typically add event-handling code for a particular component by double-clicking the component. Some design tools also allow you to use the layout managers described in this chapter and in Chapter 22.
Look-and-Feel Observation 11.16
 |
Most Java programming environments provide GUI design tools that help a programmer graphically design a GUI; the design tools then write the Java code to create the GUI. Such tools often provide greater control over the size, position and alignment of GUI components than do the built-in layout managers. |
Look-and-Feel Observation 11.17
|
It is possible to set a Container's layout to null, which indicates that no layout manager should be used. In a Container without a layout manager, the programmer must position and size the components in the given container and take care that, on resize events, all components are repositioned as necessary. A component's resize events can be processed by a ComponentListener. |
Figure 11.38 summarizes the layout managers presented in this chapter. Other layout managers are discussed in Chapter 22.
|
Layout manager |
Description |
|---|---|
|
FlowLayout |
Default for javax.swing.JPanel. Places components sequentially (left to right) in the order they were added. It is also possible to specify the order of the components by using the Container method add, which takes a Component and an integer index position as arguments. |
|
BorderLayout |
Default for JFrames (and other windows). Arranges the components into five areas: NORTH, SOUTH, EAST, WEST and CENTER. |
|
GridLayout |
Arranges the components into rows and columns. |
11.17.1. FlowLayout
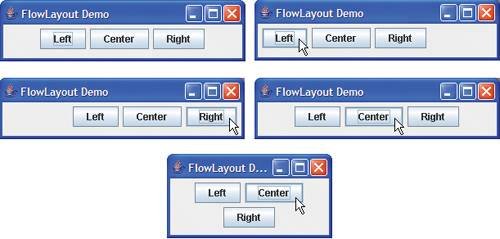
FlowLayout is the simplest layout manager. GUI components are placed on a container from left to right in the order in which they are added to the container. When the edge of the container is reached, components continue to display on the next line. Class FlowLayout allows GUI components to be left aligned, centered (the default) and right aligned.
The application of Fig. 11.39 and Fig. 11.40 creates three JButton objects and adds them to the application, using a FlowLayout layout manager. The components are center aligned by default. When the user clicks Left, the alignment for the layout manager is changed to a left-aligned FlowLayout. When the user clicks Right, the alignment for the layout manager is changed to a right-aligned FlowLayout. When the user clicks Center, the alignment for the layout manager is changed to a center-aligned FlowLayout. Each button has its own event handler that is declared with an inner class that implements ActionListener. The sample output windows show each of the FlowLayout alignments. Also, the last sample output window shows the centered alignment after the window has been resized to a smaller width. Notice that the button Right flows onto a new line.
Figure 11.39. FlowLayout allows components to flow over multiple lines.
(This item is displayed on pages 568 - 570 in the print version)
 1 // Fig. 11.39: FlowLayoutFrame.java
 2 // Demonstrating FlowLayout alignments.
 3 import java.awt.FlowLayout;
 4 import java.awt.Container;
 5 import java.awt.event.ActionListener;
 6 import java.awt.event.ActionEvent;
 7 import javax.swing.JFrame;
 8 import javax.swing.JButton;
 9
10 public class FlowLayoutFrame extends JFrame
11 {
12 private JButton leftJButton; // button to set alignment left
13 private JButton centerJButton; // button to set alignment center
14 private JButton rightJButton; // button to set alignment right
15 private FlowLayout layout; // layout object
16 private Container container; // container to set layout
17
18 // set up GUI and register button listeners
19 public FlowLayoutFrame()
20 {
21 super( "FlowLayout Demo" );
22
23 layout = new FlowLayout(); // create FlowLayout
24 container = getContentPane(); // get container to layout
25 setLayout( layout ); // set frame layout
26
27 // set up leftJButton and register listener
28 leftJButton = new JButton( "Left" ); // create Left button
29 add( leftJButton ); // add Left button to frame
30 leftJButton.addActionListener(
31
32 new ActionListener() // anonymous inner class
33 {
34 // process leftJButton event
35 public void actionPerformed( ActionEvent event )
36 {
37 layout.setAlignment( FlowLayout.LEFT );
38
39 // realign attached components
40 layout.layoutContainer( container );
41 } // end method actionPerformed
42 } // end anonymous inner class
43 ); // end call to addActionListener
44
45 // set up centerJButton and register listener
46 centerJButton = new JButton( "Center" ); // create Center button
47 add( centerJButton ); // add Center button to frame
48 centerJButton.addActionListener(
49
50 new ActionListener() // anonymous inner class
51 {
52 // process centerJButton event
53 public void actionPerformed( ActionEvent event )
54 {
55 layout.setAlignment( FlowLayout.CENTER );
56
57 // realign attached components
58 layout.layoutContainer( container );
59 } // end method actionPerformed
60 } // end anonymous inner class
61 ); // end call to addActionListener
62
63 // set up rightJButton and register listener
64 rightJButton = new JButton( "Right" ); // create Right button
65 add( rightJButton ); // add Right button to frame
66 rightJButton.addActionListener(
67
68 new ActionListener() // anonymous inner class
69 {
70 // process rightJButton event
71 public void actionPerformed( ActionEvent event )
72 {
73 layout.setAlignment( FlowLayout.RIGHT );
74
75 // realign attached components
76 layout.layoutContainer( container );
77 } // end method actionPerformed
78 } // end anonymous inner class
79 ); // end call to addActionListener
80 } // end FlowLayoutFrame constructor
81 } // end class FlowLayoutFrame
|
Figure 11.40. Test class for FlowLayoutFrame.
(This item is displayed on page 570 in the print version)
 1 // Fig. 11.40: FlowLayoutDemo.java
 2 // Testing FlowLayoutFrame.
 3 import javax.swing.JFrame;
 4
 5 public class FlowLayoutDemo
 6 {
 7 public static void main( String args[] )
 8 {
 9 FlowLayoutFrame flowLayoutFrame = new FlowLayoutFrame();
10 flowLayoutFrame.setDefaultCloseOperation( JFrame.EXIT_ON_CLOSE );
11 flowLayoutFrame.setSize( 300, 75 ); // set frame size
12 flowLayoutFrame.setVisible( true ); // display frame
13 } // end main
14 } // end class FlowLayoutDemo
|
As seen previously, a container's layout is set with method setLayout of class Container. Line 25 sets the layout manager to the FlowLayout declared at line 23. Normally, the layout is set before any GUI components are added to a container.
Look-and-Feel Observation 11.18
|
Each container can have only one layout manager. Separate containers in the same application can use different layout managers. |
Note in this example that each button's event handler is specified with a separate anonymous inner class object (lines 3043, 4861 and 6671, respectively). Each button's actionPerformed event handler executes two statements. For example, line 37 in method actionPerformed for button left uses FlowLayout method setAlignment to change the alignment for the FlowLayout to a left-aligned (FlowLayout.LEFT) FlowLayout. Line 40 uses LayoutManager interface method layoutContainer (which is inherited by all layout managers) to specify that the JFrame should be rearranged based on the adjusted layout. According to which button was clicked, the actionPerformed method for each button sets the FlowLayout's alignment to FlowLayout.LEFT (line 37), FlowLayout.CENTER (line 55) or FlowLayout.RIGHT (line 73).
11.17.2. BorderLayout
The BorderLayout layout manager (the default layout manager for a JFrame) arranges components into five regions: NORTH, SOUTH, EAST, WEST and CENTER. NORTH corresponds to the top of the container. Class BorderLayout extends Object and implements interface LayoutManager2 (a subinterface of LayoutManager that adds several methods for enhanced layout processing).
A BorderLayout limits a Container to containing at most five componentsone in each region. The component placed in each region can be a container to which other components are attached. The components placed in the NORTH and SOUTH regions extend horizontally to the sides of the container and are as tall as the components placed in those regions. The EAST and WEST regions expand vertically between the NORTH and SOUTH regions and are as wide as the components placed in those regions. The component placed in the CENTER region expands to fill all remaining space in the layout (which is the reason the JTextArea in Fig. 11.36 occupies the entire window). If all five regions are occupied, the entire container's space is covered by GUI components. If the NORTH or SOUTH region is not occupied, the GUI components in the EAST, CENTER and WEST regions expand vertically to fill the remaining space. If the EAST or WEST region is not occupied, the GUI component in the CENTER region expands horizontally to fill the remaining space. If the CENTER region is not occupied, the area is left emptythe other GUI components do not expand to fill the remaining space. The application of Fig. 11.41 and Fig. 11.42 demonstrates the BorderLayout layout manager by using five JButtons.
Figure 11.41. BorderLayout containing five buttons.
(This item is displayed on page 572 in the print version)
 1 // Fig. 11.41: BorderLayoutFrame.java
 2 // Demonstrating BorderLayout.
 3 import java.awt.BorderLayout;
 4 import java.awt.event.ActionListener;
 5 import java.awt.event.ActionEvent;
 6 import javax.swing.JFrame;
 7 import javax.swing.JButton;
 8
 9 public class BorderLayoutFrame extends JFrame implements ActionListener
10 {
11 private JButton buttons[]; // array of buttons to hide portions
12 private final String names[] = { "Hide North", "Hide South",
13 "Hide East", "Hide West", "Hide Center" };
14 private BorderLayout layout; // borderlayout object
15
16 // set up GUI and event handling
17 public BorderLayoutFrame()
18 {
19 super( "BorderLayout Demo" );
20
21 layout = new BorderLayout( 5, 5 ); // 5 pixel gaps
22 setLayout( layout ); // set frame layout
23 buttons = new JButton[ names.length ]; // set size of array
24
25 // create JButtons and register listeners for them
26 for ( int count = 0 ; count < names.length; count++ )
27 {
28 buttons[ count ] = new JButton( names[ count ] );
29 buttons[ count ].addActionListener( this );
30 } // end for
31
32 add( buttons[ 0 ], BorderLayout.NORTH ); // add button to north
33 add( buttons[ 1 ], BorderLayout.SOUTH ); // add button to south
34 add( buttons[ 2 ], BorderLayout.EAST ); // add button to east
35 add( buttons[ 3 ], BorderLayout.WEST ); // add button to west
36 add( buttons[ 4 ], BorderLayout.CENTER ); // add button to center
37 } // end BorderLayoutFrame constructor
38
39 // handle button events
40 public void actionPerformed( ActionEvent event )
41 {
42 // check event source and layout content pane correspondingly
43 for ( JButton button : buttons )
44 {
45 if ( event.getSource() == button )
46 button.setVisible( false ); // hide button clicked
47 else
48 button.setVisible( true ); // show other buttons
49 } // end for
50
51 layout.layoutContainer( getContentPane() ); // layout content pane
52 } // end method actionPerformed
53 } // end class BorderLayoutFrame
|
Figure 11.42. Test class for BorderLayoutFrame.
(This item is displayed on page 573 in the print version)
 1 // Fig. 11.42: BorderLayoutDemo.java
 2 // Testing BorderLayoutFrame.
 3 import javax.swing.JFrame;
 4
 5 public class BorderLayoutDemo
 6 {
 7 public static void main( String args[] )
 8 {
 9 BorderLayoutFrame borderLayoutFrame = new BorderLayoutFrame();
10 borderLayoutFrame.setDefaultCloseOperation( JFrame.EXIT_ON_CLOSE );
11 borderLayoutFrame.setSize( 300, 200 ); // set frame size
12 borderLayoutFrame.setVisible( true ); // display frame
13 } // end main
14 } // end class BorderLayoutDemo
|
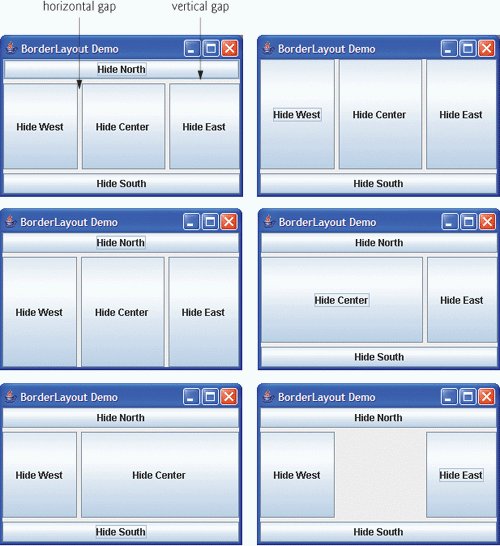
Line 21 of Fig. 11.41 creates a BorderLayout. The constructor arguments specify the number of pixels between components that are arranged horizontally (horizontal gap space) and between components that are arranged vertically (vertical gap space), respectively. The default is one pixel of gap space horizontally and vertically. Line 22 uses method setLayout to set the content pane's layout to layout.
We add Components to a BorderLayout with another version of Container method add that takes two argumentsthe Component to add and the region in which the Component should appear. For example, line 32 specifies that buttons[ 0 ] should appear in the NORTH region. The components can be added in any order, but only one component should be added to each region.
Look-and-Feel Observation 11.19
|
If no region is specified when adding a Component to a BorderLayout, the layout manager assumes that the Component should be added to region BorderLayout.CENTER. |
Common Programming Error 11.6
 |
When more than one component is added to a region in a BorderLayout, only the last component added to that region will be displayed. There is no error that indicates this problem. |
Note that class BorderLayoutFrame implements ActionListener directly in this example, so the BorderLayoutFrame will handle the events of the JButtons. For this reason, line 29 passes the this reference to the addActionListener method of each JButton. When the user clicks a particular JButton in the layout, method actionPerformed (lines 4052) executes. The enhanced for statement at lines 4349 uses an if...else to hide the particular JButton that generated the event. Method setVisible (inherited into JButton from class Component) is called with a false argument (line 46) to hide the JButton. If the current JButton in the array is not the one that generated the event, method setVisible is called with a true argument (line 48) to ensure that the JButton is displayed on the screen. Line 51 uses LayoutManager method layoutContainer to recalculate the layout of the content pane. Notice in the screen captures of Fig. 11.41 that certain regions in the BorderLayout change shape as JButtons are hidden and displayed in other regions. Try resizing the application window to see how the various regions resize based on the window's width and height. For more complex layouts, group components in JPanels, each with a separate layout manager. Place the JPanels on the JFrame using either the default BorderLayout or some other layout.
11.17.3. GridLayout
The GridLayout layout manager divides the container into a grid so that components can be placed in rows and columns. Class GridLayout inherits directly from class Object and implements interface LayoutManager. Every Component in a GridLayout has the same width and height. Components are added to a GridLayout starting at the top-left cell of the grid and proceeding left to right until the row is full. Then the process continues left to right on the next row of the grid, and so on. The application of Fig. 11.43 and Fig. 11.44 demonstrates the GridLayout layout manager by using six JButtons.
Figure 11.43. GridLayout containing six buttons.
(This item is displayed on pages 574 - 575 in the print version)
 1 // Fig. 11.43: GridLayoutFrame.java
 2 // Demonstrating GridLayout.
 3 import java.awt.GridLayout;
 4 import java.awt.Container;
 5 import java.awt.event.ActionListener;
 6 import java.awt.event.ActionEvent;
 7 import javax.swing.JFrame;
 8 import javax.swing.JButton;
 9
10 public class GridLayoutFrame extends JFrame implements ActionListener
11 {
12 private JButton buttons[]; // array of buttons
13 private final String names[] =
14 { "one", "two", "three", "four", "five", "six" };
15 private boolean toggle = true; // toggle between two layouts
16 private Container container; // frame container
17 private GridLayout gridLayout1; // first gridlayout
18 private GridLayout gridLayout2; // second gridlayout
19
20 // no-argument constructor
21 public GridLayoutFrame()
22 {
23 super( "GridLayout Demo" );
24 gridLayout1 = new GridLayout( 2, 3, 5, 5 ); // 2 by 3; gaps of 5
25 gridLayout2 = new GridLayout( 3, 2 ); // 3 by 2; no gaps
26 container = getContentPane(); // get content pane
27 setLayout( gridLayout1 ); // set JFrame layout
28 buttons = new JButton[ names.length ]; // create array of JButtons
29
30 for ( int count = 0; count < names.length; count++ )
31 {
32 buttons[ count ] = new JButton( names[ count ] );
33 buttons[ count ].addActionListener( this ); // register listener
34 add( buttons[ count ] ); // add button to JFrame
35 } // end for
36 } // end GridLayoutFrame constructor
37
38 // handle button events by toggling between layouts
39 public void actionPerformed( ActionEvent event )
40 {
41 if ( toggle )
42 container.setLayout( gridLayout2 ); // set layout to second
43 else
44 container.setLayout( gridLayout1 ); // set layout to first
45
46 toggle = !toggle; // set toggle to opposite value
47 container.validate(); // re-layout container
48 } // end method actionPerformed
49 } // end class GridLayoutFrame
|
Figure 11.44. Test class for GridLayoutFrame.
(This item is displayed on page 575 in the print version)
 1 // Fig. 11.44: GridLayoutDemo.java
 2 // Testing GridLayoutFrame.
 3 import javax.swing.JFrame;
 4
 5 public class GridLayoutDemo
 6 {
 7 public static void main( String args[] )
 8 {
 9 GridLayoutFrame gridLayoutFrame = new GridLayoutFrame();
10 gridLayoutFrame.setDefaultCloseOperation( JFrame.EXIT_ON_CLOSE );
11 gridLayoutFrame.setSize( 300, 200 ); // set frame size
12 gridLayoutFrame.setVisible( true ); // display frame
13 } // end main
14 } // end class GridLayoutDemo
|
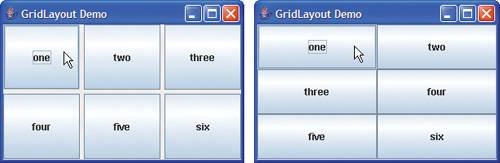
Lines 2425 create two GridLayout objects (variables grid1 and grid2 are declared at lines 1718). The GridLayout constructor used at line 24 specifies a GridLayout with 2 rows, 3 columns, 5 pixels of horizontal-gap space between Components in the grid and 5 pixels of vertical-gap space between Components in the grid. The GridLayout constructor used at line 25 specifies a GridLayout with 3 rows and 2 columns that uses the default gap space (1 pixel).
The JButton objects in this example initially are arranged using grid1 (set for the content pane at line 27 with method setLayout). The first component is added to the first column of the first row. The next component is added to the second column of the first row, and so on. When a JButton is pressed, method actionPerformed (lines 3948) is called. Every call to actionPerformed toggles the layout between grid2 and grid1, using boolean variable toggle to determine the next layout to set.
Line 47 illustrates another way to reformat a container for which the layout has changed. Container method validate recomputes the container's layout based on the current layout manager for the Container and the current set of displayed GUI components.
Introduction to Computers, the Internet and the World Wide Web
- Introduction
- What Is a Computer?
- Computer Organization
- Early Operating Systems
- Personal, Distributed and Client/Server Computing
- The Internet and the World Wide Web
- Machine Languages, Assembly Languages and High-Level Languages
- History of C and C++
- History of Java
- Java Class Libraries
- FORTRAN, COBOL, Pascal and Ada
- BASIC, Visual Basic, Visual C++, C# and .NET
- Typical Java Development Environment
- Notes about Java and Java How to Program, Sixth Edition
- Test-Driving a Java Application
- Software Engineering Case Study: Introduction to Object Technology and the UML (Required)
- Wrap-Up
- Web Resources
- Summary
- Terminology
- Self-Review Exercises
- Exercises
Introduction to Java Applications
- Introduction
- First Program in Java: Printing a Line of Text
- Modifying Our First Java Program
- Displaying Text with printf
- Another Java Application: Adding Integers
- Memory Concepts
- Arithmetic
- Decision Making: Equality and Relational Operators
- (Optional) Software Engineering Case Study: Examining the Requirements Document
- Wrap-Up
- Summary
- Terminology
- Self-Review Exercises
- Exercises
Introduction to Classes and Objects
- Introduction
- Classes, Objects, Methods and Instance Variables
- Declaring a Class with a Method and Instantiating an Object of a Class
- Declaring a Method with a Parameter
- Instance Variables, set Methods and get Methods
- Primitive Types vs. Reference Types
- Initializing Objects with Constructors
- Floating-Point Numbers and Type double
- (Optional) GUI and Graphics Case Study: Using Dialog Boxes
- (Optional) Software Engineering Case Study: Identifying the Classes in a Requirements Document
- Wrap-Up
- Summary
- Terminology
- Self-Review Exercises
- Exercises
Control Statements: Part I
- Introduction
- Algorithms
- Pseudocode
- Control Structures
- if Single-Selection Statement
- if...else Double-Selection Statement
- while Repetition Statement
- Formulating Algorithms: Counter-Controlled Repetition
- Formulating Algorithms: Sentinel-Controlled Repetition
- Formulating Algorithms: Nested Control Statements
- Compound Assignment Operators
- Increment and Decrement Operators
- Primitive Types
- (Optional) GUI and Graphics Case Study: Creating Simple Drawings
- (Optional) Software Engineering Case Study: Identifying Class Attributes
- Wrap-Up
- Summary
- Terminology
- Self-Review Exercises
- Exercises
Control Statements: Part 2
- Introduction
- Essentials of Counter-Controlled Repetition
- for Repetition Statement
- Examples Using the for Statement
- do...while Repetition Statement
- switch Multiple-Selection Statement
- break and continue Statements
- Logical Operators
- Structured Programming Summary
- (Optional) GUI and Graphics Case Study: Drawing Rectangles and Ovals
- (Optional) Software Engineering Case Study: Identifying Objects States and Activities
- Wrap-Up
- Summary
- Terminology
- Self-Review Exercises
- Exercises
Methods: A Deeper Look
- Introduction
- Program Modules in Java
- static Methods, static Fields and Class Math
- Declaring Methods with Multiple Parameters
- Notes on Declaring and Using Methods
- Method Call Stack and Activation Records
- Argument Promotion and Casting
- Java API Packages
- Case Study: Random-Number Generation
- Case Study: A Game of Chance (Introducing Enumerations)
- Scope of Declarations
- Method Overloading
- (Optional) GUI and Graphics Case Study: Colors and Filled Shapes
- (Optional) Software Engineering Case Study: Identifying Class Operations
- Wrap-Up
- Summary
- Terminology
- Self-Review Exercises
- Exercises
Arrays
- Introduction
- Arrays
- Declaring and Creating Arrays
- Examples Using Arrays
- Case Study: Card Shuffling and Dealing Simulation
- Enhanced for Statement
- Passing Arrays to Methods
- Case Study: Class GradeBook Using an Array to Store Grades
- Multidimensional Arrays
- Case Study: Class GradeBook Using a Two-Dimensional Array
- Variable-Length Argument Lists
- Using Command-Line Arguments
- (Optional) GUI and Graphics Case Study: Drawing Arcs
- (Optional) Software Engineering Case Study: Collaboration Among Objects
- Wrap-Up
- Summary
- Terminology
- Self-Review Exercises
- Exercises
- Special Section: Building Your Own Computer
Classes and Objects: A Deeper Look
- Introduction
- Time Class Case Study
- Controlling Access to Members
- Referring to the Current Objects Members with the this Reference
- Time Class Case Study: Overloaded Constructors
- Default and No-Argument Constructors
- Notes on Set and Get Methods
- Composition
- Enumerations
- Garbage Collection and Method finalize
- static Class Members
- static Import
- final Instance Variables
- Software Reusability
- Data Abstraction and Encapsulation
- Time Class Case Study: Creating Packages
- Package Access
- (Optional) GUI and Graphics Case Study: Using Objects with Graphics
- (Optional) Software Engineering Case Study: Starting to Program the Classes of the ATM System
- Wrap-Up
- Summary
- Terminology
- Self-Review Exercises
- Exercises
Object-Oriented Programming: Inheritance
- Introduction
- Superclasses and Subclasses
- protected Members
- Relationship between Superclasses and Subclasses
- Constructors in Subclasses
- Software Engineering with Inheritance
- Object Class
- (Optional) GUI and Graphics Case Study: Displaying Text and Images Using Labels
- Wrap-Up
- Summary
- Terminology
- Self-Review Exercises
- Exercises
Object-Oriented Programming: Polymorphism
- Introduction
- Polymorphism Examples
- Demonstrating Polymorphic Behavior
- Abstract Classes and Methods
- Case Study: Payroll System Using Polymorphism
- final Methods and Classes
- Case Study: Creating and Using Interfaces
- (Optional) GUI and Graphics Case Study: Drawing with Polymorphism
- (Optional) Software Engineering Case Study: Incorporating Inheritance into the ATM System
- Wrap-Up
- Summary
- Terminology
- Self-Review Exercises
- Exercises
GUI Components: Part 1
- Introduction
- Simple GUI-Based Input/Output with JOptionPane
- Overview of Swing Components
- Displaying Text and Images in a Window
- Text Fields and an Introduction to Event Handling with Nested Classes
- Common GUI Event Types and Listener Interfaces
- How Event Handling Works
- JButton
- Buttons that Maintain State
- JComboBox and Using an Anonymous Inner Class for Event Handling
- JList
- Multiple-Selection Lists
- Mouse Event Handling
- Adapter Classes
- JPanel Subclass for Drawing with the Mouse
- Key-Event Handling
- Layout Managers
- Using Panels to Manage More Complex Layouts
- JTextArea
- Wrap-Up
- Summary
- Terminology
- Self-Review Exercises
- Exercises
Graphics and Java 2D™
- Introduction
- Graphics Contexts and Graphics Objects
- Color Control
- Font Control
- Drawing Lines, Rectangles and Ovals
- Drawing Arcs
- Drawing Polygons and Polylines
- Java 2D API
- Wrap-Up
- Summary
- Terminology
- Self-Review Exercises
- Exercises
Exception Handling
- Introduction
- Exception-Handling Overview
- Example: Divide By Zero Without Exception Handling
- Example: Handling ArithmeticExceptions and InputMismatchExceptions
- When to Use Exception Handling
- Java Exception Hierarchy
- finally block
- Stack Unwinding
- printStackTrace, getStackTrace and getMessage
- Chained Exceptions
- Declaring New Exception Types
- Preconditions and Postconditions
- Assertions
- Wrap-Up
- Summary
- Terminology
- Self-Review Exercises
- Exercises
Files and Streams
- Introduction
- Data Hierarchy
- Files and Streams
- Class File
- Sequential-Access Text Files
- Object Serialization
- Random-Access Files
- Additional java.io Classes
- Opening Files with JFileChooser
- Wrap-Up
- Summary
- Terminology
- Self-Review Exercises
- Exercises
Recursion
- Introduction
- Recursion Concepts
- Example Using Recursion: Factorials
- Example Using Recursion: Fibonacci Series
- Recursion and the Method Call Stack
- Recursion vs. Iteration
- String Permutations
- Towers of Hanoi
- Fractals
- Recursive Backtracking
- Wrap-Up
- Internet and Web Resources
- Summary
- Terminology
- Self-Review Exercises
- Exercises
Searching and Sorting
- Introduction
- Searching Algorithms
- Sorting Algorithms
- Invariants
- Wrap-up
- Summary
- Terminology
- Self-Review Exercises
- Exercises
Data Structures
- Introduction
- Type-Wrapper Classes for Primitive Types
- Autoboxing and Auto-Unboxing
- Self-Referential Classes
- Dynamic Memory Allocation
- Linked Lists
- Stacks
- Queues
- Trees
- Wrap-Up
- Summary
- Terminology
- Self-Review Exercises
- Exercises
- Special Section: Building Your Own Compiler
Generics
- Introduction
- Motivation for Generic Methods
- Generic Methods: Implementation and Compile-Time Translation
- Additional Compile-Time Translation Issues: Methods That Use a Type Parameter as the Return Type
- Overloading Generic Methods
- Generic Classes
- Raw Types
- Wildcards in Methods That Accept Type Parameters
- Generics and Inheritance: Notes
- Wrap-Up
- Internet and Web Resources
- Summary
- Terminology
- Self-Review Exercises
- Exercises
Collections
- Introduction
- Collections Overview
- Class Arrays
- Interface Collection and Class Collections
- Lists
- Collections Algorithms
- Stack Class of Package java.util
- Class PriorityQueue and Interface Queue
- Sets
- Maps
- Properties Class
- Synchronized Collections
- Unmodifiable Collections
- Abstract Implementations
- Wrap-Up
- Summary
- Terminology
- Self-Review Exercises
- Exercises
Introduction to Java Applets
- Introduction
- Sample Applets Provided with the JDK
- Simple Java Applet: Drawing a String
- Applet Life-Cycle Methods
- Initializing an Instance Variable with Method init
- Sandbox Security Model
- Internet and Web Resources
- Wrap-Up
- Summary
- Terminology
- Self-Review Exercises
- Exercises
Multimedia: Applets and Applications
- Introduction
- Loading, Displaying and Scaling Images
- Animating a Series of Images
- Image Maps
- Loading and Playing Audio Clips
- Playing Video and Other Media with Java Media Framework
- Wrap-Up
- Internet and Web Resources
- Summary
- Terminology
- Self-Review Exercises
- Exercises
- Special Section: Challenging Multimedia Projects
GUI Components: Part 2
- Introduction
- JSlider
- Windows: Additional Notes
- Using Menus with Frames
- JPopupMenu
- Pluggable Look-and-Feel
- JDesktopPane and JInternalFrame
- JTabbedPane
- Layout Managers: BoxLayout and GridBagLayout
- Wrap-Up
- Summary
- Terminology
- Self-Review Exercises
- Exercises
Multithreading
- Introduction
- Thread States: Life Cycle of a Thread
- Thread Priorities and Thread Scheduling
- Creating and Executing Threads
- Thread Synchronization
- Producer/Consumer Relationship without Synchronization
- Producer/Consumer Relationship with Synchronization
- Producer/Consumer Relationship: Circular Buffer
- Producer/Consumer Relationship: ArrayBlockingQueue
- Multithreading with GUI
- Other Classes and Interfaces in java.util.concurrent
- Monitors and Monitor Locks
- Wrap-Up
- Summary
- Terminology
- Self-Review Exercises
- Exercises
Networking
- Introduction
- Manipulating URLs
- Reading a File on a Web Server
- Establishing a Simple Server Using Stream Sockets
- Establishing a Simple Client Using Stream Sockets
- Client/Server Interaction with Stream Socket Connections
- Connectionless Client/Server Interaction with Datagrams
- Client/Server Tic-Tac-Toe Using a Multithreaded Server
- Security and the Network
- Case Study: DeitelMessenger Server and Client
- Wrap-Up
- Summary
- Terminology
- Self-Review Exercises
- Exercises
Accessing Databases with JDBC
- Introduction
- Relational Databases
- Relational Database Overview: The books Database
- SQL
- Instructions to install MySQL and MySQL Connector/J
- Instructions on Setting MySQL User Account
- Creating Database books in MySQL
- Manipulating Databases with JDBC
- Stored Procedures
- RowSet Interface
- Wrap-Up
- Internet and Web Resources
- Recommended Readings
- Summary
- Terminology
- Self-Review Exercises
- Exercises
Servlets
- Introduction
- Servlet Overview and Architecture
- Setting Up the Apache Tomcat Server
- Handling HTTP get Requests
- Handling HTTP get Requests Containing Data
- Handling HTTP post Requests
- Redirecting Requests to Other Resources
- Multitier Applications: Using JDBC from a Servlet
- Welcome Files
- Wrap-Up
- Internet and Web Resources
- Summary
- Terminology
- Self-Review Exercises
- Exercises
JavaServer Pages (JSP)
- Introduction
- JavaServer Pages Overview
- First JSP Example
- Implicit Objects
- Scripting
- Standard Actions
- Directives
- Case Study: Guest Book
- Wrap-Up
- Internet and Web Resources
- Summary
- Terminology
- Self-Review Exercises
- Exercises
Formatted Output
- Introduction
- Streams
- Formatting Output with printf
- Printing Integers
- Printing Floating-Point Numbers
- Printing Strings and Characters
- Printing Dates and Times
- Other Conversion Characters
- Printing with Field Widths and Precisions
- Using Flags in the printf Format String
- Printing with Argument Indices
- Printing Literals and Escape Sequences
- Formatting Output with Class Formatter
- Wrap-Up
- Summary
- Terminology
- Self-Review Exercises
- Exercises
Strings, Characters and Regular Expressions
- Introduction
- Fundamentals of Characters and Strings
- Class String
- Class StringBuffer
- Class Character
- Class StringTokenizer
- Regular Expressions, Class Pattern and Class Matcher
- Wrap-Up
- Summary
- Terminology
- Self-Review Exercises
- Exercises
- Special Section: Advanced String-Manipulation Exercises
- Special Section: Challenging String-Manipulation Projects
Appendix A. Operator Precedence Chart
Appendix B. ASCII Character Set
Appendix C. Keywords and Reserved Words
Appendix D. Primitive Types
Appendix E. (On CD) Number Systems
Appendix F. (On CD) Unicode®
Appendix G. Using the Java API Documentation
Appendix H. (On CD) Creating Documentation with javadoc
Appendix I. (On CD) Bit Manipulation
Appendix J. (On CD) ATM Case Study Code
Appendix K. (On CD) Labeled break and continue Statements
Appendix L. (On CD) UML 2: Additional Diagram Types
Appendix M. (On CD) Design Patterns
Appendix N. Using the Debugger
Inside Back Cover
EAN: 2147483647
Pages: 615
