Fractals
A fractal is a geometric figure that often can be generated from a pattern repeated recursively an infinite number of times (Fig. 15.17). The figure is modified by applying the pattern to each segment of the original figure. Real geometric figures do not have their patterns repeated an infinite number of times, but after several repetitions appear as they would if repeated infinitely. We will look at a few such approximations in this section. [Note: We will refer to our geometric figures as fractals, even though they are approximations.] Although these figures had been studied before the 20th century, it was the Polish mathematician Benoit Mandelbrot who introduced the term "fractal" in the 1970s, along with the specifics of how a fractal is created and the practical applications of fractals. Mandelbrot's fractal geometry provides mathematical models for many complex forms found in nature, such as mountains, clouds and coastlines. Fractals have many uses in mathematics and science. Fractals can be used to better understand systems or patterns that appear in nature (e.g., ecosystems), in the human body (e.g., in the folds of the brain), or in the universe (e.g., galaxy clusters). Drawing fractals has become a popular art form. Fractals have a self-similar propertywhen subdivided into parts, each resembles a reduced-size copy of the whole. Many fractals yield an exact copy of the original when a portion of the original image is magnifiedsuch a fractal is said to be strictly self similar. Links are provided in Section 15.12 for various Web sites that discuss and demonstrate fractals.
Figure 15.17. Koch Curve fractal.
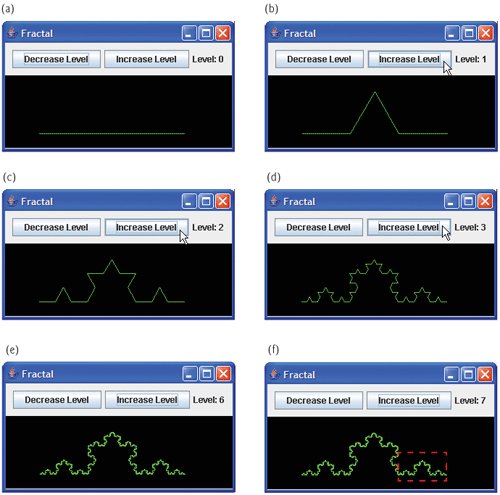
As an example, let us look at a popular strictly self-similar fractal known as the Koch Curve (Fig. 15.17). This fractal is formed by removing the middle third of each line in the drawing and replacing it with two lines that form a point, such that if the middle third of the original line remained, an equilateral triangle would be formed. Formulas for creating fractals often involve removing all or part of the previous fractal image. This pattern has already been determined for this fractalin this section we focus not on how to determine what formulas are needed for a specific fractal, but how to use those formulas within a recursive solution. Most formulas can be used to create fractals, but not all fractals will resemble objects in nature.
We start with a straight line (Fig. 15.17, Part a) and apply the pattern, creating a triangle from the middle third (Fig. 15.17, Part b). We then apply the pattern again to each straight line, resulting in Fig. 15.17, Part c. Each time the pattern is applied, we say that the fractal is at a new level, or depth (sometimes the term order is also used). Fractals can be displayed at many levelsfor instance, a fractal at level 3 has had three iterations of the pattern applied (Fig. 15.17, Part d). After only a few iterations, this fractal begins to look the same, like a portion of a snowflake (Fig. 15.17, Parts e and f). The applications of the pattern are now too small for the human eye to see a difference. Since this is a strictly self-similar fractal, each portion of the fractal contains an exact copy of the fractal. In Part f of Fig. 15.17, for example, we have highlighted a portion of the fractal with a dashed red box. If the image in this box were increased in size, it would look exactly like the entire fractal of Part f.
There is a similar fractal, the Koch Snowflake, which is the same as the Koch Curve but begins with a triangle rather than a line. The same pattern is applied to each side of the triangle, resulting in an image that looks like an enclosed snowflake. We have chosen to focus on the Koch Curve for simplicity. We will be moving on shortly to another fractal, but if the reader wishes to learn more about the Koch Curve and Koch Snowflake, see the links in Section 15.12.
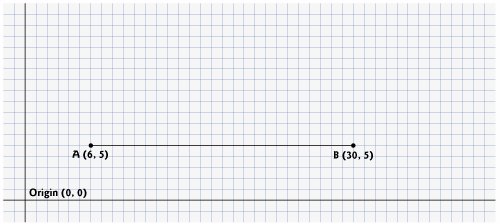
We now demonstrate the use of recursion to draw fractals by writing a program to create a strictly self-similar fractal. We call this the "Lo fractal," named for Sin Han Lo, a Deitel & Associates colleague who created it. The fractal will eventually resemble one-half of a feather (see the outputs in Fig. 15.24). The base case, or fractal level of 0, begins as a line between two points, A and B (Fig. 15.18). To create the next higher level, we find the midpoint (C) of the line. To calculate the location of point C, use the following formula: [Note: The x and y to the left of each letter refer to the x-coordinate and y-coordinate of that point, respectively. For instance, xA refers to the x-coordinate of point A, while yC refers to the y-coordinate of point C. In our diagrams we denote the point by its letter, followed by two numbers representing the x- and y-coordinates.]
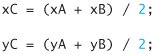
Figure 15.18'. "Lo fractal" at level 0.
(This item is displayed on page 766 in the print version)
To create this fractal, we also must find a point D that lies left of segment AC and creates an isosceles right triangle ADC. To calculate the location of point D, use the following formulas:

We continue the example in Fig. 15.18 by moving on to the next level (from level 0 to level 1) as follows: First, add points C and D (as in Fig. 15.19). Then, remove the original line and add segments DA, DC and DB. The remaining lines curve at an angle, causing our fractal to look like a feather. For the next level of the fractal, this algorithm is repeated on each of the three lines in level 1. For each line, the formulas above are applied, where the former point D is now considered to be point A, while the other end of each line is considered to be point B. Figure 15.20 contains the line from level 0 (now a dashed line) and the three added lines from level 1. We have changed point D to be point A, and the original points A, C and B to B1, B2 and B3 (the numbers are used to differentiate the various points). The preceding formulas have been used to find the new points C and D on each line. These points are also numbered 13 to keep track of which point is associated with each line. The points C1 and D1, for instance, represent points C and D associated with the line formed from points A to B1. To achieve level 2, the three lines in Fig. 15.20 are removed and replaced with new lines from the C and D points just added. Figure 15.21 shows the new lines (the lines from level 2 are shown as dashed lines for your convenience). Figure 15.22 shows level 2 without the dashed lines from level 1. Once this process has been repeated several times, the fractal created will begin to look like one-half of a feather, as shown in the output of Fig. 15.24. We will discuss the code for this application shortly.
Figure 15.19. Determining points C and D for level 1 of "Lo fractal."
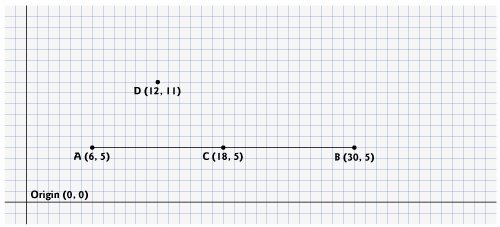
Figure 15.20. "Lo fractal" at level 1, with C and D points determined for level 2. [Note: The fractal at level 0 is included as a dashed line as a reminder of where the line was located in relation to the current fractal.
(This item is displayed on page 767 in the print version)
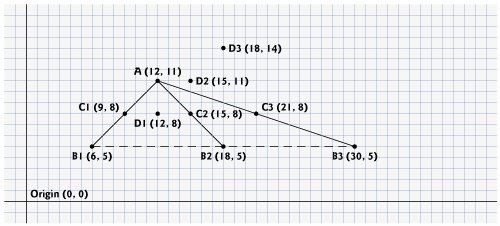
Figure 15.21. "Lo fractal" at level 2, with dashed lines from level 1 provided.
(This item is displayed on page 767 in the print version)
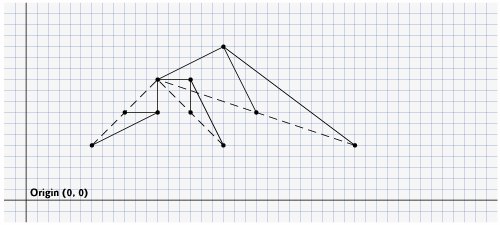
Figure 15.22. "Lo fractal" at level 2.
(This item is displayed on page 768 in the print version)
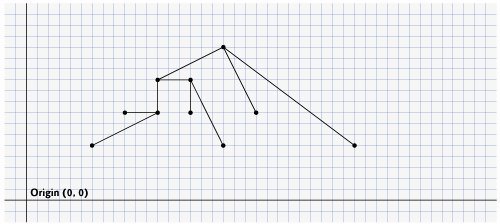
Figure 15.23. Demonstrating the fractal user interface.
(This item is displayed on pages 768 - 770 in the print version)
 1 // Fig. 15.23: Fractal.java
 2 // Demonstrates user interface for drawing a fractal.
 3 import java.awt.Color;
 4 import java.awt.FlowLayout;
 5 import java.awt.event.ActionEvent;
 6 import java.awt.event.ActionListener;
 7 import javax.swing.JFrame;
 8 import javax.swing.JButton;
 9 import javax.swing.JLabel;
10 import javax.swing.JPanel;
11 import javax.swing.JColorChooser;
12
13 public class Fractal extends JFrame
14 {
15 private final int WIDTH = 400; // define width of GUI
16 private final int HEIGHT = 480; // define height of GUI
17 private final int MIN_LEVEL = 0;
18 private Color color = Color.BLUE;
19
20 private JButton changeColorJButton, increaseLevelJButton,
21 decreaseLevelJButton;
22 private JLabel levelJLabel;
23 private FractalJPanel drawSpace;
24 private JPanel mainJPanel, controlJPanel;
25
26 // set up GUI
27 public Fractal()
28 {
29 super( "Fractal" );
30
31 // set up control panel
32 controlJPanel = new JPanel();
33 controlJPanel.setLayout( new FlowLayout() );
34
35 // set up color button and register listener
36 changeColorJButton = new JButton( "Color" );
37 controlJPanel.add( changeColorJButton );
38 changeColorJButton.addActionListener(
39 new ActionListener() // anonymous inner class
40 {
41 // process changeColorJButton event
42 public void actionPerformed( ActionEvent event )
43 {
44 color = JColorChooser.showDialog(
45 Fractal.this, "Choose a color", color );
46
47 // set default color, if no color is returned
48 if ( color == null )
49 color = Color.BLUE;
50
51 drawSpace.setColor( color );
52 } // end method actionPerformed
53 } // end anonymous inner class
54 ); // end addActionListener
55
56 // set up decrease level button to add to control panel and
57 // register listener
58 decreaseLevelJButton = new JButton( "Decrease Level" );
59 controlJPanel.add( decreaseLevelJButton );
60 decreaseLevelJButton.addActionListener(
61 new ActionListener() // anonymous inner class
62 {
63 // process decreaseLevelJButton event
64 public void actionPerformed( ActionEvent event )
65 {
66 int level = drawSpace.getLevel();
67 level--; // decrease level by one
68
69 // modify level if possible
70 if ( level >= MIN_LEVEL )
71 {
72 levelJLabel.setText( "Level: " + level );
73 drawSpace.setLevel( level );
74 repaint();
75 } // end if
76 } // end method actionPerformed
77 } // end anonymous inner class
78 ); // end addActionListener
79
80 // set up increase level button to add to control panel
81 // and register listener
82 increaseLevelJButton = new JButton( "Increase Level" );
83 controlJPanel.add( increaseLevelJButton );
84 increaseLevelJButton.addActionListener(
85 new ActionListener() // anonymous inner class
86 {
87 // process increaseLevelJButton event
88 public void actionPerformed( ActionEvent event )
89 {
90 int level = drawSpace.getLevel();
91 level++; // increase level by one
92
93 // modify level if possible
94 if ( level >= MIN_LEVEL )
95 {
96 levelJLabel.setText( "Level: " + level );
97 drawSpace.setLevel( level );
98 repaint();
99 } // end if
100 } // end method actionPerformed
101 } // end anonymous inner class
102 ); // end addActionListener
103
104 // set up levelJLabel to add to controlJPanel
105 levelJLabel = new JLabel( "Level: 0" );
106 controlJPanel.add( levelJLabel );
107
108 drawSpace = new FractalJPanel( 0 );
109
110 // create mainJPanel to contain controlJPanel and drawSpace
111 mainJPanel = new JPanel();
112 mainJPanel.add( controlJPanel );
113 mainJPanel.add( drawSpace );
114
115 add( mainJPanel ); // add JPanel to JFrame
116
117 setSize( WIDTH, HEIGHT ); // set size of JFrame
118 setVisible( true ); // display JFrame
119 } // end Fractal constructor
120
121 public static void main( String args[] )
122 {
123 Fractal demo = new Fractal();
124 demo.setDefaultCloseOperation( JFrame.EXIT_ON_CLOSE );
125 } // end main
126 } // end class Fractal
|
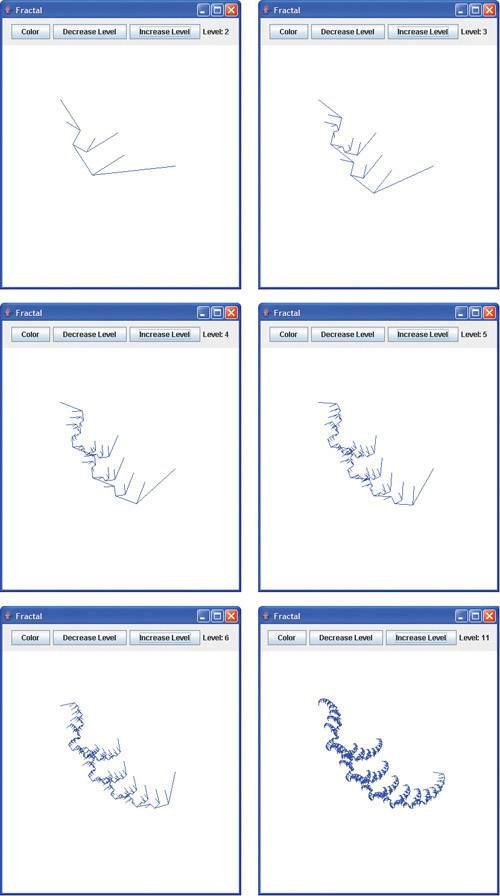
Figure 15.24. Drawing "Lo fractal" using recursion.
(This item is displayed on pages 771 - 773 in the print version)
 1 // Fig. 15.24: FractalJPanel.java
 2 // FractalJPanel demonstrates recursive drawing of a fractal.
 3 import java.awt.Graphics;
 4 import java.awt.Color;
 5 import java.awt.Dimension;
 6 import javax.swing.JPanel;
 7
 8 public class FractalJPanel extends JPanel
 9 {
10 private Color color; // stores color used to draw fractal
11 private int level; // stores current level of fractal
12
13 private final int WIDTH = 400; // defines width of JPanel
14 private final int HEIGHT = 400; // defines height of JPanel
15
16 // set the initial fractal level to the value specified
17 // and set up JPanel specifications
18 public FractalJPanel( int currentLevel )
19 {
20 color = Color.BLUE; // initialize drawing color to blue
21 level = currentLevel; // set initial fractal level
22 setBackground( Color.WHITE );
23 setPreferredSize( new Dimension( WIDTH, HEIGHT ) );
24 } // end FractalJPanel constructor
25
26 // draw fractal recursively
27 public void drawFractal( int level, int xA, int yA, int xB,
28  int yB, Graphics g )
29 {
30  // base case: draw a line connecting two given points
31  if ( level == 0 )
32  g.drawLine( xA, yA, xB, yB );
33  else // recursion step: determine new points, draw next level
34  {
35  // calculate midpoint between (xA, yA) and (xB, yB)
36  int xC = ( xA + xB ) / 2;
37  int yC = ( yA + yB ) / 2;
38
39  // calculate the fourth point (xD, yD) which forms an
40  // isosceles right triangle between (xA, yA) and (xC, yC)
41  // where the right angle is at (xD, yD)
42  int xD = xA + ( xC - xA ) / 2 - ( yC - yA ) / 2;
43  int yD = yA + ( yC - yA ) / 2 + ( xC - xA ) / 2;
44
45  // recursively draw the Fractal
46  drawFractal( level - 1, xD, yD, xA, yA, g );
47  drawFractal( level - 1, xD, yD, xC, yC, g );
48  drawFractal( level - 1, xD, yD, xB, yB, g );
49  } // end else
50 } // end method drawFractal
51
52 // start the drawing of fractal
53 public void paintComponent( Graphics g )
54 {
55 super .paintComponent( g );
56
57 // draw fractal pattern
58 g.setColor( color );
59 drawFractal( level, 100, 90, 290, 200, g );
60 } // end method paintComponent
61
62 // set the drawing color to c
63 public void setColor( Color c )
64 {
65 color = c;
66 } // end method setColor
67
68 // set the new level of recursion
69 public void setLevel( int currentLevel )
70 {
71 level = currentLevel;
72 } // end method setLevel
73
74 // returns level of recursion
75 public int getLevel()
76 {
77 return level;
78 } // end method getLevel
79 } // end class FractalJPanel
|
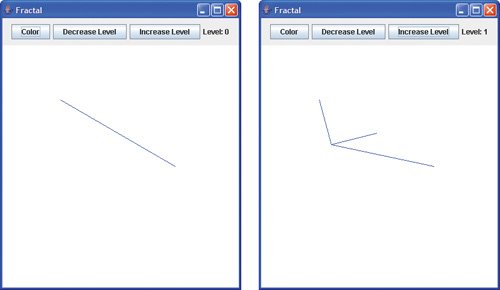
The application in Fig. 15.23 defines the user interface for drawing this fractal (shown at the end of Fig. 15.24). The interface consists of three buttonsone for the user to change the color of the fractal, one to increase the level of recursion and one to decrease the level of recursion. A JLabel will keep track of the current level of recursion, which is modified by calling method setLevel, to be discussed shortly. Lines 1516 specify constants WIDTH and HEIGHT to be 400 and 480 respectively for the size of the JFrame. The default color to draw the fractal will be blue (line 18). The user triggers an ActionEvent by clicking the Color button. The event handler for this button is registered in lines 3854. The method actionPerformed displays a JColorChooser. This dialog returns the selected Color object or blue (if the user presses Cancel or closes the dialog without pressing OK). Line 51 calls the setColor method in class FractalJPanel to update the color.
The event handler for the Decrease Level button is registered in lines 6078. In method actionPerformed, lines 6667 retrieve the current level of recursion and decrement it by 1. Line 70 checks to make sure that the level is greater than or equal to 0 (MIN_LEVEL). This is because the fractal is not defined for any recursion level lower than 0. The program allows the user to go up to any desired level, but it is important to note that at a certain point (level 10 and higher in this example) the rendering of the fractal becomes increasingly slower, as there is a lot of detail to be drawn. Lines 7274 reset the level label to reflect the changethe new level is set and the repaint method is called to update the image to show the fractal corresponding to the new level.
The Increase Level JButton works the same way as the Decrease Level JButton, except that the level is incremented rather than decremented to show more details of the fractal (lines 9091). When the application is first executed, the level will be set to 0, which will display a blue line between two points that were specified in the FractalJPanel class.
The FractalJPanel class in Fig. 15.24 specifies the dimensions of the drawing JPanel to be 400 by 400 (lines 1314). The FractalJPanel constructor (lines 1824) takes the current level as a parameter and assigns it to its instance variable level. Instance variable color is set to the default color blue. Lines 2223 change the background color of the JPanel to be white (for visibility of the colors used to draw the fractal), and set the new dimensions of the JPanel where the fractal will be drawn.
Lines 2750 define the recursive method that creates the fractal. This method takes six parameters: the level, four integers that specify the x and y coordinates of two points, and the Graphics object g. The base case for this method (line 31) occurs when level equals 0, at which time a line will be drawn between the two points given as parameters. Lines 3643 calculate (xC, yC), the midpoint between (xA, yA) and (xB, yB), and (xD, yD), the point that creates a right isosceles triangle with (xA, yA) and (xC, yC). Lines 4648 make three recursive calls on three different sets of points.
In method paintComponent, line 59 makes the first call to method drawFractal to start the drawing. This method call is not recursive, but all subsequent calls to drawFractal performed from the body of drawFractal are. Since the lines will not be drawn until the base case is reached, the distance between two points decreases on each recursive call. As the level of recursion increases, the fractal becomes smoother and more detailed. The shape of this fractal stabilizes as the level approaches 11. Fractals will stabilize at different levels based on the shape and size of the fractal.
Fig. 15.24 shows the development of the fractal from level zero to six. The last image shows the defining shape of the fractal at level 11. If we focus on one of the arms of this fractal, it would be identical to the whole image. This property defines the fractal to be strictly self-similar. See Section 15.12 for further resources on fractals.
Introduction to Computers, the Internet and the World Wide Web
- Introduction
- What Is a Computer?
- Computer Organization
- Early Operating Systems
- Personal, Distributed and Client/Server Computing
- The Internet and the World Wide Web
- Machine Languages, Assembly Languages and High-Level Languages
- History of C and C++
- History of Java
- Java Class Libraries
- FORTRAN, COBOL, Pascal and Ada
- BASIC, Visual Basic, Visual C++, C# and .NET
- Typical Java Development Environment
- Notes about Java and Java How to Program, Sixth Edition
- Test-Driving a Java Application
- Software Engineering Case Study: Introduction to Object Technology and the UML (Required)
- Wrap-Up
- Web Resources
- Summary
- Terminology
- Self-Review Exercises
- Exercises
Introduction to Java Applications
- Introduction
- First Program in Java: Printing a Line of Text
- Modifying Our First Java Program
- Displaying Text with printf
- Another Java Application: Adding Integers
- Memory Concepts
- Arithmetic
- Decision Making: Equality and Relational Operators
- (Optional) Software Engineering Case Study: Examining the Requirements Document
- Wrap-Up
- Summary
- Terminology
- Self-Review Exercises
- Exercises
Introduction to Classes and Objects
- Introduction
- Classes, Objects, Methods and Instance Variables
- Declaring a Class with a Method and Instantiating an Object of a Class
- Declaring a Method with a Parameter
- Instance Variables, set Methods and get Methods
- Primitive Types vs. Reference Types
- Initializing Objects with Constructors
- Floating-Point Numbers and Type double
- (Optional) GUI and Graphics Case Study: Using Dialog Boxes
- (Optional) Software Engineering Case Study: Identifying the Classes in a Requirements Document
- Wrap-Up
- Summary
- Terminology
- Self-Review Exercises
- Exercises
Control Statements: Part I
- Introduction
- Algorithms
- Pseudocode
- Control Structures
- if Single-Selection Statement
- if...else Double-Selection Statement
- while Repetition Statement
- Formulating Algorithms: Counter-Controlled Repetition
- Formulating Algorithms: Sentinel-Controlled Repetition
- Formulating Algorithms: Nested Control Statements
- Compound Assignment Operators
- Increment and Decrement Operators
- Primitive Types
- (Optional) GUI and Graphics Case Study: Creating Simple Drawings
- (Optional) Software Engineering Case Study: Identifying Class Attributes
- Wrap-Up
- Summary
- Terminology
- Self-Review Exercises
- Exercises
Control Statements: Part 2
- Introduction
- Essentials of Counter-Controlled Repetition
- for Repetition Statement
- Examples Using the for Statement
- do...while Repetition Statement
- switch Multiple-Selection Statement
- break and continue Statements
- Logical Operators
- Structured Programming Summary
- (Optional) GUI and Graphics Case Study: Drawing Rectangles and Ovals
- (Optional) Software Engineering Case Study: Identifying Objects States and Activities
- Wrap-Up
- Summary
- Terminology
- Self-Review Exercises
- Exercises
Methods: A Deeper Look
- Introduction
- Program Modules in Java
- static Methods, static Fields and Class Math
- Declaring Methods with Multiple Parameters
- Notes on Declaring and Using Methods
- Method Call Stack and Activation Records
- Argument Promotion and Casting
- Java API Packages
- Case Study: Random-Number Generation
- Case Study: A Game of Chance (Introducing Enumerations)
- Scope of Declarations
- Method Overloading
- (Optional) GUI and Graphics Case Study: Colors and Filled Shapes
- (Optional) Software Engineering Case Study: Identifying Class Operations
- Wrap-Up
- Summary
- Terminology
- Self-Review Exercises
- Exercises
Arrays
- Introduction
- Arrays
- Declaring and Creating Arrays
- Examples Using Arrays
- Case Study: Card Shuffling and Dealing Simulation
- Enhanced for Statement
- Passing Arrays to Methods
- Case Study: Class GradeBook Using an Array to Store Grades
- Multidimensional Arrays
- Case Study: Class GradeBook Using a Two-Dimensional Array
- Variable-Length Argument Lists
- Using Command-Line Arguments
- (Optional) GUI and Graphics Case Study: Drawing Arcs
- (Optional) Software Engineering Case Study: Collaboration Among Objects
- Wrap-Up
- Summary
- Terminology
- Self-Review Exercises
- Exercises
- Special Section: Building Your Own Computer
Classes and Objects: A Deeper Look
- Introduction
- Time Class Case Study
- Controlling Access to Members
- Referring to the Current Objects Members with the this Reference
- Time Class Case Study: Overloaded Constructors
- Default and No-Argument Constructors
- Notes on Set and Get Methods
- Composition
- Enumerations
- Garbage Collection and Method finalize
- static Class Members
- static Import
- final Instance Variables
- Software Reusability
- Data Abstraction and Encapsulation
- Time Class Case Study: Creating Packages
- Package Access
- (Optional) GUI and Graphics Case Study: Using Objects with Graphics
- (Optional) Software Engineering Case Study: Starting to Program the Classes of the ATM System
- Wrap-Up
- Summary
- Terminology
- Self-Review Exercises
- Exercises
Object-Oriented Programming: Inheritance
- Introduction
- Superclasses and Subclasses
- protected Members
- Relationship between Superclasses and Subclasses
- Constructors in Subclasses
- Software Engineering with Inheritance
- Object Class
- (Optional) GUI and Graphics Case Study: Displaying Text and Images Using Labels
- Wrap-Up
- Summary
- Terminology
- Self-Review Exercises
- Exercises
Object-Oriented Programming: Polymorphism
- Introduction
- Polymorphism Examples
- Demonstrating Polymorphic Behavior
- Abstract Classes and Methods
- Case Study: Payroll System Using Polymorphism
- final Methods and Classes
- Case Study: Creating and Using Interfaces
- (Optional) GUI and Graphics Case Study: Drawing with Polymorphism
- (Optional) Software Engineering Case Study: Incorporating Inheritance into the ATM System
- Wrap-Up
- Summary
- Terminology
- Self-Review Exercises
- Exercises
GUI Components: Part 1
- Introduction
- Simple GUI-Based Input/Output with JOptionPane
- Overview of Swing Components
- Displaying Text and Images in a Window
- Text Fields and an Introduction to Event Handling with Nested Classes
- Common GUI Event Types and Listener Interfaces
- How Event Handling Works
- JButton
- Buttons that Maintain State
- JComboBox and Using an Anonymous Inner Class for Event Handling
- JList
- Multiple-Selection Lists
- Mouse Event Handling
- Adapter Classes
- JPanel Subclass for Drawing with the Mouse
- Key-Event Handling
- Layout Managers
- Using Panels to Manage More Complex Layouts
- JTextArea
- Wrap-Up
- Summary
- Terminology
- Self-Review Exercises
- Exercises
Graphics and Java 2D™
- Introduction
- Graphics Contexts and Graphics Objects
- Color Control
- Font Control
- Drawing Lines, Rectangles and Ovals
- Drawing Arcs
- Drawing Polygons and Polylines
- Java 2D API
- Wrap-Up
- Summary
- Terminology
- Self-Review Exercises
- Exercises
Exception Handling
- Introduction
- Exception-Handling Overview
- Example: Divide By Zero Without Exception Handling
- Example: Handling ArithmeticExceptions and InputMismatchExceptions
- When to Use Exception Handling
- Java Exception Hierarchy
- finally block
- Stack Unwinding
- printStackTrace, getStackTrace and getMessage
- Chained Exceptions
- Declaring New Exception Types
- Preconditions and Postconditions
- Assertions
- Wrap-Up
- Summary
- Terminology
- Self-Review Exercises
- Exercises
Files and Streams
- Introduction
- Data Hierarchy
- Files and Streams
- Class File
- Sequential-Access Text Files
- Object Serialization
- Random-Access Files
- Additional java.io Classes
- Opening Files with JFileChooser
- Wrap-Up
- Summary
- Terminology
- Self-Review Exercises
- Exercises
Recursion
- Introduction
- Recursion Concepts
- Example Using Recursion: Factorials
- Example Using Recursion: Fibonacci Series
- Recursion and the Method Call Stack
- Recursion vs. Iteration
- String Permutations
- Towers of Hanoi
- Fractals
- Recursive Backtracking
- Wrap-Up
- Internet and Web Resources
- Summary
- Terminology
- Self-Review Exercises
- Exercises
Searching and Sorting
- Introduction
- Searching Algorithms
- Sorting Algorithms
- Invariants
- Wrap-up
- Summary
- Terminology
- Self-Review Exercises
- Exercises
Data Structures
- Introduction
- Type-Wrapper Classes for Primitive Types
- Autoboxing and Auto-Unboxing
- Self-Referential Classes
- Dynamic Memory Allocation
- Linked Lists
- Stacks
- Queues
- Trees
- Wrap-Up
- Summary
- Terminology
- Self-Review Exercises
- Exercises
- Special Section: Building Your Own Compiler
Generics
- Introduction
- Motivation for Generic Methods
- Generic Methods: Implementation and Compile-Time Translation
- Additional Compile-Time Translation Issues: Methods That Use a Type Parameter as the Return Type
- Overloading Generic Methods
- Generic Classes
- Raw Types
- Wildcards in Methods That Accept Type Parameters
- Generics and Inheritance: Notes
- Wrap-Up
- Internet and Web Resources
- Summary
- Terminology
- Self-Review Exercises
- Exercises
Collections
- Introduction
- Collections Overview
- Class Arrays
- Interface Collection and Class Collections
- Lists
- Collections Algorithms
- Stack Class of Package java.util
- Class PriorityQueue and Interface Queue
- Sets
- Maps
- Properties Class
- Synchronized Collections
- Unmodifiable Collections
- Abstract Implementations
- Wrap-Up
- Summary
- Terminology
- Self-Review Exercises
- Exercises
Introduction to Java Applets
- Introduction
- Sample Applets Provided with the JDK
- Simple Java Applet: Drawing a String
- Applet Life-Cycle Methods
- Initializing an Instance Variable with Method init
- Sandbox Security Model
- Internet and Web Resources
- Wrap-Up
- Summary
- Terminology
- Self-Review Exercises
- Exercises
Multimedia: Applets and Applications
- Introduction
- Loading, Displaying and Scaling Images
- Animating a Series of Images
- Image Maps
- Loading and Playing Audio Clips
- Playing Video and Other Media with Java Media Framework
- Wrap-Up
- Internet and Web Resources
- Summary
- Terminology
- Self-Review Exercises
- Exercises
- Special Section: Challenging Multimedia Projects
GUI Components: Part 2
- Introduction
- JSlider
- Windows: Additional Notes
- Using Menus with Frames
- JPopupMenu
- Pluggable Look-and-Feel
- JDesktopPane and JInternalFrame
- JTabbedPane
- Layout Managers: BoxLayout and GridBagLayout
- Wrap-Up
- Summary
- Terminology
- Self-Review Exercises
- Exercises
Multithreading
- Introduction
- Thread States: Life Cycle of a Thread
- Thread Priorities and Thread Scheduling
- Creating and Executing Threads
- Thread Synchronization
- Producer/Consumer Relationship without Synchronization
- Producer/Consumer Relationship with Synchronization
- Producer/Consumer Relationship: Circular Buffer
- Producer/Consumer Relationship: ArrayBlockingQueue
- Multithreading with GUI
- Other Classes and Interfaces in java.util.concurrent
- Monitors and Monitor Locks
- Wrap-Up
- Summary
- Terminology
- Self-Review Exercises
- Exercises
Networking
- Introduction
- Manipulating URLs
- Reading a File on a Web Server
- Establishing a Simple Server Using Stream Sockets
- Establishing a Simple Client Using Stream Sockets
- Client/Server Interaction with Stream Socket Connections
- Connectionless Client/Server Interaction with Datagrams
- Client/Server Tic-Tac-Toe Using a Multithreaded Server
- Security and the Network
- Case Study: DeitelMessenger Server and Client
- Wrap-Up
- Summary
- Terminology
- Self-Review Exercises
- Exercises
Accessing Databases with JDBC
- Introduction
- Relational Databases
- Relational Database Overview: The books Database
- SQL
- Instructions to install MySQL and MySQL Connector/J
- Instructions on Setting MySQL User Account
- Creating Database books in MySQL
- Manipulating Databases with JDBC
- Stored Procedures
- RowSet Interface
- Wrap-Up
- Internet and Web Resources
- Recommended Readings
- Summary
- Terminology
- Self-Review Exercises
- Exercises
Servlets
- Introduction
- Servlet Overview and Architecture
- Setting Up the Apache Tomcat Server
- Handling HTTP get Requests
- Handling HTTP get Requests Containing Data
- Handling HTTP post Requests
- Redirecting Requests to Other Resources
- Multitier Applications: Using JDBC from a Servlet
- Welcome Files
- Wrap-Up
- Internet and Web Resources
- Summary
- Terminology
- Self-Review Exercises
- Exercises
JavaServer Pages (JSP)
- Introduction
- JavaServer Pages Overview
- First JSP Example
- Implicit Objects
- Scripting
- Standard Actions
- Directives
- Case Study: Guest Book
- Wrap-Up
- Internet and Web Resources
- Summary
- Terminology
- Self-Review Exercises
- Exercises
Formatted Output
- Introduction
- Streams
- Formatting Output with printf
- Printing Integers
- Printing Floating-Point Numbers
- Printing Strings and Characters
- Printing Dates and Times
- Other Conversion Characters
- Printing with Field Widths and Precisions
- Using Flags in the printf Format String
- Printing with Argument Indices
- Printing Literals and Escape Sequences
- Formatting Output with Class Formatter
- Wrap-Up
- Summary
- Terminology
- Self-Review Exercises
- Exercises
Strings, Characters and Regular Expressions
- Introduction
- Fundamentals of Characters and Strings
- Class String
- Class StringBuffer
- Class Character
- Class StringTokenizer
- Regular Expressions, Class Pattern and Class Matcher
- Wrap-Up
- Summary
- Terminology
- Self-Review Exercises
- Exercises
- Special Section: Advanced String-Manipulation Exercises
- Special Section: Challenging String-Manipulation Projects
Appendix A. Operator Precedence Chart
Appendix B. ASCII Character Set
Appendix C. Keywords and Reserved Words
Appendix D. Primitive Types
Appendix E. (On CD) Number Systems
Appendix F. (On CD) Unicode®
Appendix G. Using the Java API Documentation
Appendix H. (On CD) Creating Documentation with javadoc
Appendix I. (On CD) Bit Manipulation
Appendix J. (On CD) ATM Case Study Code
Appendix K. (On CD) Labeled break and continue Statements
Appendix L. (On CD) UML 2: Additional Diagram Types
Appendix M. (On CD) Design Patterns
Appendix N. Using the Debugger
Inside Back Cover
EAN: 2147483647
Pages: 615
