Working with Views
Views are used to organize and display a collection of related data records in a series of rows and columns similar to a spreadsheet. Using a selection formula, Lotus Notes determines which documents are displayed in the view. All documents that meet the selection criteria rule or rules are subsequently included when the view is opened. Every Notes database must have at least one view.
There are two methods for specifying a selection formulasimple action and Formula Language. Using simple actions, you can build a selection formula using a wizard. Alternatively, you can use Formula Language to create more advanced or complex rules for the view.
Let's say, for instance, that you have a database with multiple forms. Using views, you could create a separate view for each form. To ensure that each view only displays the related documents, a unique selection formula is specified for each view. In this case, the selection criteria for one of the views would look something like
SELECT Form = "Reservation";
where "Reservation" is one of the forms in the database.
Note
Use a selection formula or simple action to refine the information displayed in the view. If no formula is specified, all documents will be returned for the view.
In addition to selecting the content for a view, Designer allows you to specify the sort order, column content, and display appearance. Again, using the properties dialog, you can define a sort sequence for each column in the view. Information can be sorted in ascending order, descending order, or not at all.
From an appearance perspective, there are two types of displaysStandard Outline and Calendar. The Standard Outline view displays information in rows and columns. A Calendar view, on the other hand, changes the user interface into a calendar where the documents display based on a specific date and time. Both display documents based on a selection formula.
For example, Figure 4.27 illustrates three different Standard Outline views. Each view contains the same information, simply sorted differently. The views could also be modified to include or exclude fields by changing what's displayed in the columns. In the first example, all of the documents are sorted by First Name and Lastname.
Figure 4.27. Example view sorted by Name

In Figure 4.28, all of the documents are sorted by the Record Number. In many applications, a unique document number is assigned to each record in the database. This view permits users to quickly locate a document based on the document identifier.
Figure 4.28. Example view sorted by Record Number

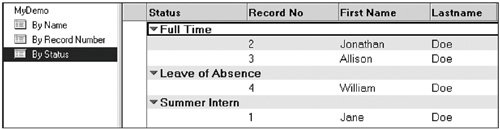
In Figure 4.29, information is grouped based on a particular fieldthe document Status. This is called a "categorized" view. In this view, all documents that have the same status are grouped together and displayed under the green trianglecalled a twistie, as mentioned earlier.
Figure 4.29. Example view categorized by Status
Tip
The small green triangle, located to the left of each of the three status values (refer to Figure 4.29), is called a twistie. The twistie can be displayed or hidden by setting a checkbox in the view properties dialog.

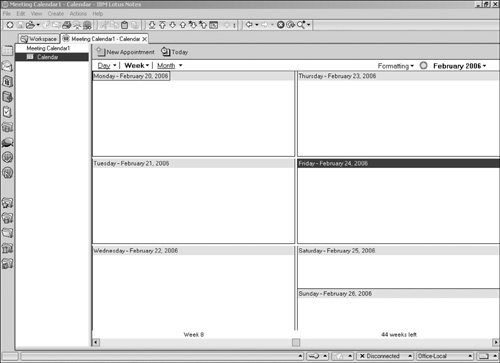
Finally, Figure 4.30 depicts a Calendar view. To display documents on a Calendar view, the document must contain a date and duration, and the first two columns in the view must contain the start date and duration in minutes (which can be zero). See Chapter 8, "Calendar Applications," for detailed instructions for building a calendar application.
Figure 4.30. Sample Calendar view
Tip
Designer allows you to sort multiple data columns in a view. Columns are sorted from left to right in the view with the data being displayed in either ascending or descending order.
Hidden Views
Views are typically used to display information to the users. However, views can also be used to manage the application. In many cases, programming-related views are hidden from the end-user to simplify the overall navigation of the Notes database. In many cases, hidden views are used to provide values for keyword fields or for calculations.
For example, let's say you want to assign a unique, sequential tracking number for each new document added to the database. Any time a user creates a new document, Lotus Notes increments the current tracking number by one and assigns it to the document.
This could be achieved by using a view that contains one column, "Tracking Number," sorted in descending order. As new documents are created, the application retrieves the first record in the view (e.g., the top-most number) and increments the number. As soon as the document is saved, the new document becomes the top-most record in the view. Functionally, the view could be displayed or hidden. However, because users probably will find little benefit from a view that only contains numbers, you could hide it and reduce the number of views displayed to the end-user.
Tip
Hidden views can be displayed in the application by holding down both the Control and Shift keys while opening (or double-clicking on) the database icon. If navigators or outlines are used, then select the View > Go to menu options to display the view.
To hide a view, add the open and close parentheses "( )" when specifying the view name. For example, "TrackingNo" would be visible to the user, whereas "(TrackingNo)" would be hidden.
Creating a Standard Outline View
Follow these instructions to create a standard outline view.
|
1. |
From the menu bar, select Create > Design > View to create a new view. Alternatively, navigate to the View section of the Design pane and click New View. A Create View dialog box window will now appear. |
|
2. |
Specify a view name. To hide the view, enclose the view name in parentheses. In most cases, you'll want to keep the View type as Shared. This will enable the general user community to access the view. To create a view that only you can access, change this value to Private. |
|
3. |
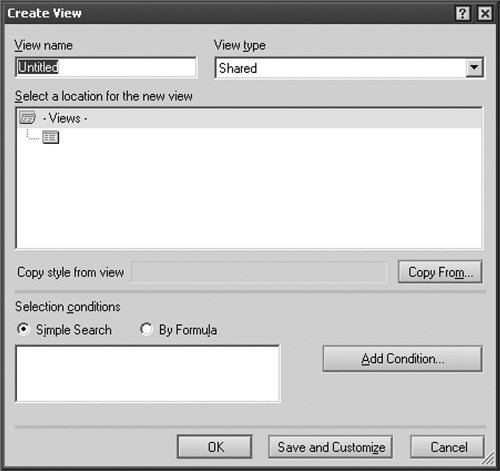
Next, you can elect to create a blank view or base the design on an existing view in the database. If you have specified a default view, this view will be displayed in the Copy style from view field (see Figure 4.31). Otherwise, the field value will be set to -Blank-. To change this value, click the Copy From button and select a new option. Figure 4.31. Create View dialog
|
|
4. |
Now specify the selection conditions for the view. At this point, you have three options available to youuse the wizard, specify a formula, or leave the field blank. To add a query or set of rules using the wizard, click the Add Condition button and complete the form. Alternatively, click the By Formula radio button to create rules using Formula Language. If no conditions are specified, the view will automatically display all documents stored in the database. Tip The selection conditions for the view can be changed at any time. If you're not sure what the formula should be when creating the view, you can omit the conditions and specify them later. To set or change the conditions, select the View Selection object in the Object pane in the Designer client. |
|
5. |
Click Save and Customize to create the view and open it in the Domino Designer Work pane. |
|
6. |
To add columns to the view, select Create>Insert New Column orAppend New Column. This will add a column to the view. To define the value of the column, locate the Column Value pane and specify a value. Here you can select a simple function (which contains a list of predefined formula values), change the display type to Field and select a field from the list of values, or use a Formula to determine the column contents. |
|
7. |
Finally, to set the sort order, click on the column header and select Edit > Properties. Click on the second tab to change the sort preferences or to create a categorized view. |
Creating a Calendar View
Follow these instructions to create a calendar view.
|
1. |
From the menu bar, select Create > Design > View to create a new view. Alternatively, navigate to the View section of the Design pane and click New View. A Create View dialog box window will now display. |
|
2. |
Specify a view name. |
|
3. |
Next, click the Copy style from view button and set the value to -Blank- if not already set to this option. |
|
4. |
Now specify the selection conditions for the view. At this point, you have three options available to youuse the wizard, specify a formula, or leave the field blank. To create a rule or set of rules using the Designer wizard, click the Add Condition button and complete the form. Alternatively, click the By Formula checkbox to create rules using Formula Language. If no conditions are specified, the view will automatically display all documents stored in the database. |
|
5. |
Click OK to build the view. |
|
6. |
Locate the view in the Design pane and open the view. Select Edit > Properties and change the Style from Standard Outline to Calendar. By default, Designer will display a warning message "Changing to a calendar view may change the attributes of this view. Continue?" Click Yes and close the properties window. |
|
7. |
The first column in the view must contain a date/time field value. Change the sort order to ascending. Depending on the application, you may want to hide this column using the properties dialog. |
|
8. |
The second column in the view must contain the duration field value or a hard-coded value of zero. In most cases, you will want to hide this column using the properties dialog. |
Note
The calendar view will not display if the first and second columns do not respectively contain a date/time and duration value.
Working with Application Menus |
An Introduction to the Lotus Domino Tool Suite
Getting Started with Designer
- Getting Started with Designer
- Installing the Designer Client
- Launching the Designer Client
- Creating My First Notes Database
- Links to developerWorks
Navigating the Domino Designer Workspace
- Navigating the Domino Designer Workspace
- An Introduction to Designer
- The Design Pane
- The Work Pane
- The Object Pane
- The Programmers Pane
- The Action Pane
- Design Tabs
- Language Selector
- Client and Browser Selector
- Status Bar
- Links to developerWorks
Domino Design Elements
- Domino Design Elements
- Building Blocks of a Notes Database
- Naming Design Elements
- Working with Forms
- Working with Fields
- Working with Layout Regions
- Working with Sections
- Working with Buttons
- Working with Views
- Working with Application Menus
- Working with Folders
- Working with Framesets
- Working with Pages
- Working with Shared Code
- Working with Shared Resources
- Links to developerWorks
An Introduction to Formula Language
- An Introduction to Formula Language
- What Is Formula Language?
- What Is a Formula?
- Working with Variables
- Formula Language Keywords
- Working with Operators
- General Syntax Rules
- What Are Functions and Commands?
- What Are Commands?
- Working with Text Strings
- Working with Conditional Branching
- Working with Iterative Loops
- Working with Lookup Functions
- Working with Dates
- Working with Lists
- Working with User Prompts
- Links to developerWorks
An Introduction to LotusScript
- An Introduction to LotusScript
- Introduction to Object-Oriented Programming
- LotusScript Classes
- Keywords
- Variables
- Constants
- Operators
- Comments
- Defining Variables and Constants
- Defining Object Reference Variables
- Working with Conditional Branching
- Working with Iterative Loops
- Communicating with Users
- Working with Arrays
- Using Formula Language in LotusScript Code
- Compiling LotusScript Code
- Links to developerWorks
Fundamentals of a Notes Application
- Fundamentals of a Notes Application
- The Five Primary Application Types
- The Application Development Life Cycle
- Elements of a Project Plan
- Elements of a Project Schedule
- Questions to Ask When Designing a Database
- Designing a Notes Application
- Links to developerWorks
Calendar Applications
- Calendar Applications
- Application Architecture
- Managing Recurring Events Using Single Documents
- Managing Recurring Events Using Multiple Documents
- Project A: Build an Event Calendar
- Project B: Build a Conference Room Reservation System
- Links to developerWorks
Collaborative Applications
- Collaborative Applications
- Project A: Build a Discussion Forum
- Project B: Build a Project Control Notebook
- Links to developerWorks
Reference Library Applications
- Reference Library Applications
- Project A: Build a Connection Document Database
- Project B: Build a Spreadsheet Generator
Workflow Applications
- Workflow Applications
- Defining a Workflow Application
- Project: Building a Workflow Database
- Links to developerWorks
Web Applications
- Web Applications
- Defining a Web Application
- Project: Building a Domino Web Site
- Security
- Troubleshooting
- Links to developerWorks
Design Enhancements Using LotusScript
- Design Enhancements Using LotusScript
- Custom LotusScript Functions and Routines
- Compare Two Dates
- Check for an Element in an Array
- Replace an Element in an Array
- Remove a Character from a String
- Remove an Element from an Array
- Compare Two Arrays
- Working with Dynamic Arrays
- Create a Custom Popup Dialog Box
- Refresh a Document from the User Interface
- Search for a Document
- Working with Dates and Times
- Compute the Day of the Week
- How to Reference $ Fields
- How to Set the ReturnReceipt for LotusScript-Generated Email
- Add Field Validation to a Form
- Display an Are You Sure? Message
- Format a Users Name
- Automatically Update a History Field When a Document Changes
- Prompt the User to Describe Document Changes and Update the History Log
- Create a Unique Document Record Number
- Limit the Ability to Create Documents on a Local Database
- How to Zero Pad a Text Number
- How to Add Text to a Rich Text Object
- How to Attach a File to a Rich Text Object
- How to Format Text in a Rich Text Object
- Change Document to Edit Mode
- Obtain the Current Roles Assigned to a User
- Generate a Document in Another Database
- Generate a New Document by Duplicating an Existing Document
- Prompt in LotusScript
- Sending Email to Multiple Recipients Using LotusScript
- Add a View Icon and Mood Stamp to an Email
- Retrieve and Update NOTES.INI Environment Values
- Assign One Rich Text Object to Another Rich Text Object
- Add a Document, View, or Database Link to a Rich Text Field
- Create a Button to Add a Calendar Event
- Links to developerWorks
Design Enhancements Using Formula Language
- Design Enhancements Using Formula Language
- Formula Language Enhancements
- Compare Two Lists
- Expand and Collapse All Document Sections
- Expand and Collapse All View Categories
- Get the Current Day of the Week
- Get the Current Month of the Year
- Create a Formatted Date String
- Create an Attach File Button
- Display the Windows File Finder Dialog
- Create a New Document
- Create a Last Updated By Field
- Create a Last Modified On Date Stamp
- Format a Users Name
- Hide Text and Design Elements Based on a Users Role
- Working with @DBColumn
- Working with @DBLookup
- Parse a Text String
- How to Format Field Values Using Input Translation
- How to Add Field Validation
- Display an Are You Sure? Warning Message
- Generate Email Using Formula Language
- How to Sort a List of Values
View Enhancements
- View Enhancements
- Create a New Document by Double-Clicking on a Calendar Date
- Display Documents in a View by Year and Month
- Display an Icon in a View
- Retrieve All Views in a Database
- Retrieve All Columns in a View
- Retrieve All Columns for Each View in a Database
- How to Manage Conflict Documents
- Display All Documents by Form Name
- Disable the Ability to Paste Documents into a View
- Links to developerWorks
Sample Agents
- Sample Agents
- Agent Enhancements
- Simple Action Agent to Modify All Documents
- LotusScript Agent to Modify All Documents Containing a Specific Field Value
- Agent to Manually Generate an Email Report
- Schedule Agent to Send a Daily, Weekly, or Monthly Email Report
- Links to developerWorks
Miscellaneous Enhancements and Tips for Domino Databases
- Miscellaneous Enhancements
- Disable the Ability to Print, Copy, Cut, and Forward Documents
- Using Field Hints on a Form
- Using Static Popups to Display Help Messages
- How to Inherit Fields Between Forms
- Add an Icon to an Action Button
- Create a Custom Application Interface
- How to Set the Field Tab Order on a Form
- Domino Shortcut Keys
Data Management
- Data Management
- Importing Data
- Exporting Data
- Migrating Data
- Creating Tables
- Modifying Data Using a LotusScript Agent
- Archiving Data Using an Agent
- Refreshing All Documents
Security
- Security
- Access Control List Fundamentals
- Managing Database Access
- How to Enforce Consistent ACL Settings Across Replicas
- Encrypt the Database
- Managing Access to Views
- Managing Access to Forms and Documents
- Managing Access to Fields
- Managing Access to Source Code
- Hiding a Database Design
- Hiding a LotusScript Library
- How to Sign a Database
- How to Cross Certify Domino Servers
- Links to developerWorks
Application Deployment and Maintenance
- Application Deployment and Maintenance
- What Are Templates?
- Establishing a Development Environment
- Migrating a Database Design
- Preserve a Copy of the Database Design
- Deploying the Production Database
- The Importance of Database Backups
- Process Synopsis
- Links to developerWorks
Troubleshooting
- Troubleshooting
- Troubleshooting LotusScript
- Troubleshooting Agents
- Common Database Problems
- Where to Find Additional Assistance
- Links to developerWorks
Appendix A. Online Project Files and Sample Applications
- Appendix A. Online Project Files and Sample Applications
- About the Online Materials
- About the Companion Web Site
- About the Development Tools and Files Folder
- Installing a Notes Database
Appendix B. IBM® Lotus® Notes® and Domino®Whats Next?
EAN: 2147483647
Pages: 293
