Layout of Widgets
A widget can be popped up on the screen, like a dialog, or it can be made a part of a larger window. Whenever we wish to arrange smaller widgets inside larger ones, we use layouts. A layout is an object that belongs to exactly one widget. Its sole responsibility is to organize the space occupied by its owner's child widgets.
Although each widget has a setGeometry() function that allows you to set its size and position, absolute sizing and positioning are rarely used in a windowing application because they impose an undesirable rigidity on the design. Proportional resizing, splitters, scrollbars when needed, and flexible arrangement of visual space are all achieved quite naturally through the use of layouts.
The process of specifying the way that your widgets will be arranged on the screen consists of dividing the screen into regions, each controlled by a QLayout. Layouts can arrange their widgets
- Vertically (QVBoxLayout)
- Horizontally (QHBoxLayout)
- In a grid (QGridLayout)
- In a stack where only one widget is visible at any time (QStackedLayout)
Widgets are added to QLayouts using the addWidget() function.
Layouts are not widgets, and they have no visual representation. Qt supplies an abstract base class named QLayout plus several concrete QLayout subclasses: QBoxLayout (particularized to QHBoxLayout and QVBoxLayout), QGridLayout, and QStackedLayout. Each of the layout types has an appropriate set of functions to control the spacing, sizing, alignment, and access to its widgets.
For its geometry management to work, each QLayout object must have a parent that is either a QWidget or another QLayout. The parent of a QLayout can be specified when the layout is constructed by passing the constructor a pointer to the parent widget or layout. It is also possible to construct a QLayout without specifying its parent, in which case you can call QWidget::addLayout() at some later time.
Layouts can have child layouts. One layout can be added as a sub-layout to another by calling addLayout(). The exact signature depends on the kind of layout used. If the parent of a layout is a widget, that widget cannot be the parent of any other layout.
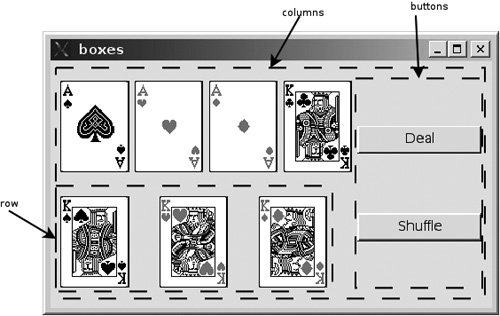
The CardTable class defined in Example 11.10 reuses libcards2, for easy access to QPixmaps of playing cards (see Section 11.4). Constructing a CardTable object puts Figure 11.5 on the screen.
Figure 11.5. Rows and columns
Example 11.10. src/layouts/boxes/cardtable.h
#ifndef CARDTABLE_H
#define CARDTABLE_H
#include
#include

class CardTable : public QWidget {
 public:
 CardTable();
 private:
 CardDeck m_deck;

};

#endif // #ifndef CARDTABLE_H
|
CardTable is implemented in Example 11.11 by making use of the fact that a QLabel can hold an image. This implementation demonstrates some simple but useful layout techniques.
Example 11.11. src/layouts/boxes/cardtable.cpp
[ . . . . ]
// Given a pixmap, return a label with that pixmap on it.
static QLabel* label(QPixmap pm) {
 QLabel* retval = new QLabel();
 retval->setPixmap(pm);
 return retval;
}

CardTable::CardTable() {

 // create 2 rows of cards:
 QHBoxLayout *row = new QHBoxLayout();
 row->addWidget(label(m_deck.get(1)));
 row->addWidget(label(m_deck.get(2)));
 row->addWidget(label(m_deck.get(3)));
 row->addWidget(label(m_deck.get(4)));

 QVBoxLayout* rows = new QVBoxLayout();
 rows->addLayout(row);

 row = new QHBoxLayout();
 row->addWidget(label(m_deck.get(5)));
 row->addWidget(label(m_deck.get(6)));
 row->addWidget(label(m_deck.get(7)));
 rows->addLayout(row);

 // create a column of buttons:
 QVBoxLayout *buttons = new QVBoxLayout();
 buttons->addWidget(new QPushButton("Deal"));
 buttons->addWidget(new QPushButton("Shuffle"));

 // Bring them together:
 QHBoxLayout* cols = new QHBoxLayout();
 setLayout(cols); <-- 1
 cols->addLayout(rows); <-- 2
 cols->addLayout(buttons); <-- 3
}
[ . . . .]
|
The simple piece of client code shown in Example 11.12 suffices to put the window on the screen.
Example 11.12. src/layouts/boxes/boxes.cpp
#include
#include "cardtable.h"

int main(int argc, char* argv[]) {
 QApplication app (argc, argv);
 CardTable ct;
 ct.show();
 return app.exec();
}
|
If you build and run this example and use your mouse to resize the window, you will notice that the width of the buttons stretches first to gobble up extra space, but that there is also stretchable spacing between the cards, as well as between the buttons. If we removed the buttons, we could observe that the horizontal spacing between the cards would grow evenly and uniformly.
11.5.1. Spacing, Stretching, and Struts
To get finer control over the layout of widgets, we can use the API of the QLayout class. Box layouts, for example, offer the following functions:
- addSpacing(int size) adds a fixed number of pixels to the end of the layout.
- addStretch(int stretch = 0) adds a stretchable number of pixels. It starts at a minimum amount and stretches to use all available space. In the event of multiple stretches in the same layout, this can be used as a growth factor.
- addStrut(int size) imposes a minimum size to the perpendicular dimension (i.e., the width of a VBoxLayout or the height of an HboxLayout).
Revisiting Example 11.11, we will make the layout behave a little better during resizing. Figure 11.6 shows the results of adding some stretch and some spacers to this application.
Figure 11.6. Improved layout with stretch and spacers
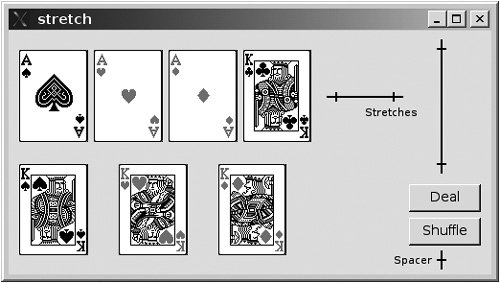
Normally, layouts try to treat all widgets equally. When we want one widget to be off to a side, or pushed away from another, we can use stretches and spacing to deviate from that norm. Example 11.13 demonstrates how to use stretches and spacing.
Example 11.13. src/layouts/stretch/cardtable.cpp
[ . . . . ]
QVBoxLayout *buttons = new QVBoxLayout();

 buttons->addStretch(1); <-- 1
 buttons->addWidget(new QPushButton("Deal"));
 buttons->addWidget(new QPushButton("Shuffle"));
 buttons->addSpacing(20); <-- 2

 QHBoxLayout* cols = new QHBoxLayout();
 setLayout(cols);
 cols->addLayout(rows);
 cols->addStretch(30); <-- 3
 cols->addLayout(buttons);
}
[ . . . . ]
|
If you build and run this application using the code from Example 11.13 instead of Example 11.11, you can resize the main window and observe that the buttons no longer grow, and are pushed off to the corner. The horizontal spacing between the cards does not grow, but the vertical spacing does.
11.5.2. Moving Widgets across Layouts
Figure 11.7 shows the basic layout for our next example, which demonstrates what happens when a widget is added to more than one layout.
Figure 11.7. Moving labels application
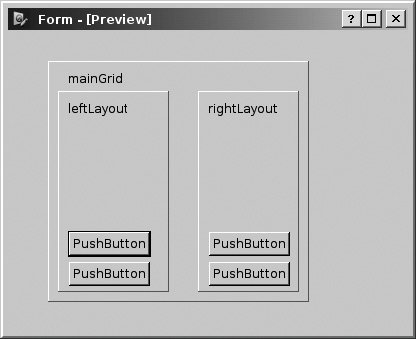
This application moves QLabels from one layout to the other in response to the button press. In Example 11.14 we derive from QApplication a class that defines the GUI.
Example 11.14. src/layouts/moving/moving.h
[ . . . . ]

class MovingApp : public QApplication {
 Q_OBJECT
 public:
 MovingApp(int argc, char* argv[]);

 public slots:
 void moveLeft();
 void moveRight();
 void newLeft();
 void newRight();
 private:
 QString nextLabel();
 QMainWindow m_MainWindow;
 QQueue m_LeftQueue, m_RightQueue;
 QVBoxLayout *m_LeftLayout, *m_RightLayout;
 int m_Count;
};
[ . . . . ]
|
The constructor starts by creating the layouts and the various widgets, as we see in Example 11.15.
Example 11.15. src/layouts/moving/moving.cpp
[ . . . . ]

MovingApp::MovingApp(int argc, char* argv[]) :
 QApplication(argc, argv),
 m_MainWindow(),
 m_Count(0) {

 QWidget *center = new QWidget(&m_MainWindow);
 m_MainWindow.setCentralWidget(center); <-- 1

 QGridLayout *mainGrid = new QGridLayout;

 m_LeftLayout = new QVBoxLayout;
 m_RightLayout = new QVBoxLayout;

 mainGrid->addLayout(m_LeftLayout, 0,0);
 mainGrid->addLayout(m_RightLayout, 0, 1);
 QPushButton *moveRight = new QPushButton("Move Right");
 QPushButton *moveLeft = new QPushButton("Move Left");
 mainGrid->addWidget(moveRight, 1,0);
 mainGrid->addWidget(moveLeft, 1,1);

 QPushButton *addRight = new QPushButton("Add Right");
 QPushButton *addLeft = new QPushButton("Add Left");

 mainGrid->addWidget(addLeft, 2,0);
 mainGrid->addWidget(addRight, 2,1);
 center->setLayout(mainGrid);
|
After creation of the various layouts and widgets, signals must be connected to slots, as we see in Example 11.16.
Example 11.16. src/layouts/moving/moving.cpp
[ . . . . ]

 connect(moveRight, SIGNAL(pressed()), this, SLOT(moveRight()));
 connect(moveLeft, SIGNAL(pressed()), this, SLOT(moveLeft()));
 connect(addRight, SIGNAL(pressed()), this, SLOT(newRight()));
 connect(addLeft, SIGNAL(pressed()), this, SLOT(newLeft()));
 // What do the insertStretch lines do?
 m_LeftLayout->insertStretch(0);
 m_RightLayout->insertStretch(0);

 newLeft(); <-- 1
 newRight(); <-- 2
 m_MainWindow.move(200,200);
 m_MainWindow.resize(300, 500);
 m_MainWindow.show();
|
Because a widget cannot exist in more than one layout at any given time, it disappears from the first layout and shows up in the new one. Each widget retains its parent after the layout change. The code for the movement slots is shown in Example 11.17.
Example 11.17. src/layouts/moving/moving.cpp
[ . . . . ]

void MovingApp::moveLeft() {
 if (m_RightQueue.isEmpty()) return;
 QLabel *top = m_RightQueue.dequeue();
 m_LeftQueue.enqueue(top);
 m_LeftLayout->addWidget(top); <-- 1
}

void MovingApp::moveRight() {
 if (m_LeftQueue.isEmpty()) return;
 QLabel *top = m_LeftQueue.dequeue();
 m_RightQueue.enqueue(top);
 m_RightLayout->addWidget(top);
}
|
Exercises: Layout of Widgets
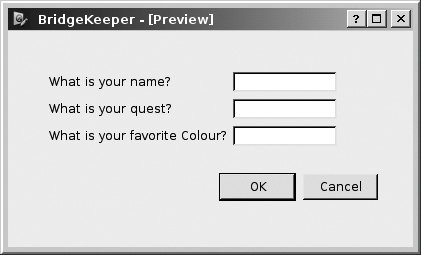
| 1. |
There are many ways of getting information from the user. The keeper of the Bridge of Death wants to know the answers to three questions, as we see in the following figure.
|
| 2. |
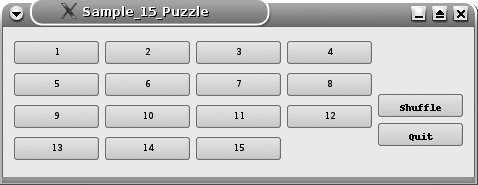
The 15 puzzle (or n2 - 1 puzzle) involves a 4 x 4 (n x n) grid that contains 15 tiles numbered 1 to 15 (1 to n2 - 1), and one empty space. The only tiles that can move are those next to the empty space.
|

Model-View-Controller Design for Puzzle

Part I: Introduction to C++ and Qt 4
C++ Introduction
- C++ Introduction
- Overview of C++
- A Brief History of C++
- Setup: Open-Source Platforms
- Setup: Win32
- C++ First Example
- Input and Output
- Identifiers, Types, and Literals
- C++ Simple Types
- C++ Standard Library Strings
- Streams
- The Keyword const
- Pointers and Memory Access
- const* and *const
- Reference Variables
- Points of Departure
- Review Questions
Classes
- Classes
- Structs
- Class Definitions
- Member Access Specifiers
- Encapsulation
- Introduction to UML
- Friends of a Class
- Constructors
- Subobjects
- Destructors
- The Keyword static
- Copy Constructors and Assignment Operators
- Conversions
- const Member Functions
- Review Questions
Introduction to Qt
- Introduction to Qt
- Example Project: Using QApplication and QLabel
- Makefile, qmake, and Project Files
- Getting Help Online
- Style Guidelines and Naming Conventions
- The Qt Core Module
- Streams and Dates
- Points of Departure
- Review Questions
Lists
Functions
- Functions
- Function Declarations
- Overloading Functions
- Optional Arguments
- Operator Overloading
- Parameter Passing by Value
- Parameter Passing by Reference
- References to const
- Function Return Values
- Returning References from Functions
- Overloading on const-ness
- Inline Functions
- Inlining versus Macro Expansion
- Review Questions
Inheritance and Polymorphism
- Inheritance and Polymorphism
- Simple Derivation
- Derivation with Polymorphism
- Derivation from an Abstract Base Class
- Inheritance Design
- Overloading, Hiding, and Overriding
- Constructors, Destructors, and Copy Assignment Operators
- Processing Command-Line Arguments
- Points of Departure
- Review Questions
Part II: Higher-Level Programming
Libraries
- Libraries
- Code Containers
- Reusing Other Libraries
- Organizing Libraries: Dependency Management
- Installing Libraries: A Lab Exercise
- Frameworks and Components
- Review Questions
Introduction to Design Patterns
QObject
- QObject
- QObjects Child Managment
- Composite Pattern: Parents and Children
- QApplication and the Event Loop
- Q_OBJECT and moc: A Checklist
- Values and Objects
- tr() and Internationalization
- Point of Departure
- Review Questions
Generics and Containers
- Generics and Containers
- Generics and Templates
- Containers
- Managed Containers, Composites, and Aggregates
- Implicitly Shared Classes
- Generics, Algorithms, and Operators
- Serializer Pattern
- Sorted Map Example
- Review Questions
Qt GUI Widgets
- Qt GUI Widgets
- Widget Categories
- QMainWindow and QSettings
- Dialogs
- Images and Resources
- Layout of Widgets
- QActions, QMenus, and QMenuBars
- QActions, QToolbars, and QActionGroups
- Regions and QDockWidgets
- Views of a QStringList
- Points of Departure
- Review Questions
Concurrency
- Concurrency
- QProcess and Process Control
- Threads and QThread
- Summary: QProcess and QThread
- Review Questions
Validation and Regular Expressions
- Validation and Regular Expressions
- Validators
- Regular Expressions
- Regular Expression Validation
- Review Questions
Parsing XML
Meta Objects, Properties, and Reflective Programming
- Meta Objects, Properties, and Reflective Programming
- Anti-patterns
- QMetaObject: The MetaObject Pattern
- Type Identification and qobject_cast
- Q_PROPERTY Macro: Describing QObject Properties
- QVariant Class: Accessing Properties
- DataObject: An Extension of QObject
- Property Containers: PropsMap
- Review Questions
More Design Patterns
- More Design Patterns
- Creational Patterns
- Serializer Pattern Revisited
- The Façade Pattern
- Points of Departure
- Review Questions
Models and Views
- Models and Views
- M-V-C: What about the Controller?
- Dynamic Form Models
- Qt 4 Models and Views
- Table Models
- Tree Models
- Review Questions
Qt SQL Classes
Part III: C++ Language Reference
Types and Expressions
- Types and Expressions
- Operators
- Evaluation of Logical Expressions
- Enumerations
- Signed and Unsigned Integral Types
- Standard Expression Conversions
- Explicit Conversions
- Safer Typecasting Using ANSI C++ Typecasts
- Run-Time Type Identification (RTTI)
- Member Selection Operators
- Point of Departure
- Review Questions
Scope and Storage Class
- Scope and Storage Class
- Declarations and Definitions
- Identifier Scope
- Storage Class
- Namespaces
- Review Questions
Statements and Control Structures
Memory Access
- Memory Access
- Pointer Pathology
- Further Pointer Pathology with Heap Memory
- Memory Access Summary
- Introduction to Arrays
- Pointer Arithmetic
- Arrays, Functions, and Return Values
- Different Kinds of Arrays
- Valid Pointer Operations
- What Happens If new Fails?
Chapter Summary
Inheritance in Detail
- Inheritance in Detail
- Virtual Pointers and Virtual Tables
- Polymorphism and virtual Destructors
- Multiple Inheritance
- Point of Departure
- public, protected, and private Derivation
- Review Questions
Miscellaneous Topics
Part IV: Programming Assignments
MP3 Jukebox Assignments
- MP3 Jukebox Assignments
- Data Model: Mp3File
- Visitor: Generating Playlists
- Preference: An Enumerated Type
- Reusing id3lib
- PlayListModel Serialization
- Testing Mp3File Related Classes
- Simple Queries and Filters
- Mp3PlayerView
- Models and Views: PlayList
- Source Selector
- Persistent Settings
- Edit Form View for FileTagger
- Points of Departure
Part V: Appendices
MP3 Jukebox Assignments
- MP3 Jukebox Assignments
- Appendix A. C++ Reserved Keywords
- Appendix B. Standard Headers
- Appendix C. The Development Environment
- Section C.1. The Preprocessor: For #including Files
- Section C.2. Understanding the Linker
- Section C.3. Debugging
- Section C.4. Qt Assistant and Designer
- Section C.5. Open-Source IDEs and Development Tools
Bibliography
MP3 Jukebox Assignments
EAN: 2147483647
Pages: 268
