Determining Margins
The importance of margins is often overlooked. It's easy to fall back on even margins of 1 inch or 25 mm, but by doing so you can miss a big opportunity to establish the margins of your document as an integral design element. Margins are an essential part of design. Glance at any pagemargins are the first space you see and thus play a vital role in determining the reader's initial impression of a page. Margins serve the following functions:
- First and foremost margins are a frame for the pageand if you've ever done any picture framing you'll appreciate how dramatically a frame can increase a picture's impact.
- A place for readers to put their thumbs
- A space to write notes
- A place to put the page foliosin either the top or bottom margins
Tip: Setting Up a Spread
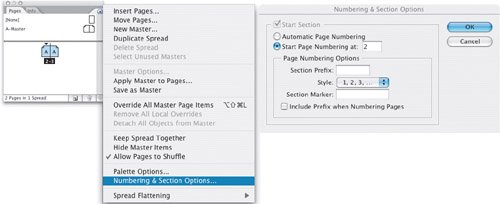
The first page of a two-page document is considered a right-hand page (or recto) meaning that the two pages will not appear next to each other as a spread. To make them do so, define your opening page as being an even-numbered page (or verso). Select the first page, and from the Pages palette fly-out menu choose Numbering and Section options. Choose Start page number, and type an even number.
Figure 15.3. Creating a Spread.
Margins define the type area or text block but they are not absolute. Certain text elements like drop caps, pull quotes, and captions may hang outside the marginsas will punctuation if you are using Optical Margin Alignment. Pictures frequently break out of the text area, disrupting the rectilinear nature of the page andpotentiallymaking for a more dynamic layout.
Relative Size of Margins
Choosing even margins (click the linking icon to make sure it is unbroken) will make the rectangle of your type area the same aspect ratio as the rectangle of your page. However, an equally proportioned rectangle within a rectangle can look static, and, besides, other factors come into playlike extra space on the outer margins for convenient handling and extra space at the bottom or top for folios. It's a big generalization, but margins typically progress from smallest to largest in the following order: inside, top, outside, bottom:
- Starting with the Inside margin and moving clockwise around your page, this should be the smallest dimension. This margin should be at least 10mm.
- Next, comes the Top margin (a.k.a. Head).
- Then the Outside margin (a.k.a. Foredge), which should be big enough so the type doesn't look confined by the page, and to allow space for the reader to handle the document.
- Lastly, the Bottom margin (a.k.a. Foot) should be the biggest so as to avoid the type area looking bottom heavy and also to allow room for the folios. The top and bottom margins can be switched if the folios will be placed above the type area.
Note
When setting the inside margin, bear in mind that the binding will change the reader's perception of the amount of space at the inside of the page. At worst, if the inside margin is too small, text will be "lost" in the shadow between the pages.
Figure 15.4. A Thumbnail Sketch.
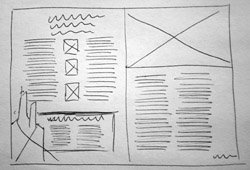
Tip: Do a Thumbnail Sketch
When working on a layout, no matter how zippy you are with InDesign, you'll save yourself loads of time (and create a better-looking page) if you first draw thumbnails sketches. Don't be embarrassedno one but you need see them, but they are the fastest way of trying out ideas and for getting a sense of scale.
Golden Section margins call for a ratio of 3:5:8:13 (starting with the inside margin and moving clockwise). While this makes for harmonious proportions, it also makes for economically impractical margins.
Another popular ratio is 2:3:4:6, which produces margins that are still generous, yet look more familiar to a 21st Century eye.
If you are using a leading grid, the margins should be in increments of the grid. See Chapter 16: Everything in its Right Place: Working with Grids.
Figure 15.5. A page using Golden Section proportions 1:1.618 and margins 3:5:8:13 (example A) and an A4 page using margin ratios 2:3:4:6 (example B).

When working with single-page designs, like a poster or business card, equal margins at least on the left and right, might be more applicable. Here's a simple formula that I often use: Find a printed piece that you admire at the same or similar size to the piece you're working on. Measure its margins, and replicate them. Works like a charm.
Determining Column Width |
Part I: Character Formats
Getting Started
- Getting Started
- An InDesign Type Map: Where to Find Stuff
- Viewing Your Page
- Creating a Typography Workspace
- Up Next
Going with the Flow
- Going with the Flow
- A Blank Sheet: Typing on Your Page
- Text Flow
- Threading Text Frames
- Using Placeholder Text
- Pasting Text
- Importing Word Text
- Up Next
Character Reference
- Character Reference
- Less is More, Maybe
- Type Anatomy
- Type Classification
- Character Formatting Options
- Readability
- Up Next
Getting the Lead Out
- Getting the Lead Out
- How Much Is Enough?
- (Not) Using Auto Leading
- Keep It Consistent, Except. . .
- Leading Menu Options and Keyboard Shortcuts
- See Also
- Up Next
Kern, Baby, Kern
- Kern, Baby, Kern
- When to Kern
- Metrics Kerning
- Optical Kerning
- Manual Kerning
- How Much to Kern
- Tracking
- When to Track
- Controlling Widows and Orphans
- Up Next
Sweating the Small Stuff: Special Characters, White Space, and Glyphs
- Sweating the Small Stuff: Special Characters, White Space, and Glyphs
- Typographers Quotes
- Apostrophes
- Dashes
- Ellipses
- End Marks
- White Space Characters
- The Glyphs Palette
- Footnotes
- Footnote Options
- Up Next
OpenType: The New Frontier in Font Technology
- OpenType: The New Frontier in Font Technology
- Ligatures
- Discretionary Ligatures
- Ordinals/Raised and Lowered Characters
- Swash Characters
- Fractions
- Oldstyle Figures
- Contextual Alternates
- Opticals
- Glyph Positioning
- Stylistic Sets
- Up Next
Part II: Paragraph Formats
Aligning Your Type
- Aligning Your Type
- Centering Type
- Clean Shaven or Rugged: Justified vs. Ragged Type
- How InDesign Justifies Type
- Balancing Ragged Lines
- Right-Aligned Type
- Optical Margin Alignment
- Indent to Here
- Vertical Alignment
- Up Next
Paragraph Indents and Spacing
First Impressions: Creating Great Opening Paragraphs
- First Impressions: Creating Great Opening Paragraphs
- Creating a Simple Drop Cap
- Drop Cap Aesthetics
- Tricks with Drop Caps
- Up Next
Dont Fear the Hyphen
Mastering Tabs and Tables
- Mastering Tabs and Tables
- Setting Tabs
- Creating Decimal Tabs
- Using Tab Leaders
- Reply Forms
- Numbered Lists
- Right Indent Tab
- Working with Tables
- Creating a Table
- Working with Rows and Columns
- Working with Table Cells
- Up Next
Part III: Styles
Stylin with Paragraph and Character Styles
- Stylin with Paragraph and Character Styles
- Creating Styles
- Applying Styles
- Editing Styles
- Redefining Styles
- Creating Default Styles
- A Typical Style Sheet
- Up Next
Mo Style
Part IV: Page Layout
Setting Up Your Document
- Setting Up Your Document
- Choosing a Page Size
- Determining Margins
- Determining Column Width
- Changing Columns
- Break Characters
- Page Numbers
- Section Markers
- Up Next
Everything in Its Right Place: Using Grids
- Everything in Its Right Place: Using Grids
- Things to Consider
- Your Grid Tool Kit
- Calculating the Height of the Type Area
- Align to Grid
- First Baseline Options
- Snap to Guides
- Up Next
Text Wraps: The Good, the Bad, and the Ugly
- Text Wraps: The Good, the Bad, and the Ugly
- Applying Text Wraps
- Wrapping Type Around Irregularly Shaped Graphics
- Text Wrap Preferences
- Ignoring Text Wrap
- Anchored Objects
- Up Next
Type Effects
EAN: 2147483647
Pages: 186
