Connecting to PBXs
Digital Trunks
Connecting the voice gateway to the PBX using digital trunks has many advantages. Among these advantages are higher capacity, more reliable signaling methods, and advanced features, such as caller number and name display.
Configuring E1/T1 Physical Layer Connections
Successful implementation of digital tie trunks between a PBX and a voice gateway begins with establishing correct physical connections. You must properly set line coding, framing, and clocking on each end of the link. When the PSTN service provider connects to a PSTN trunk, it establishes the parameters to use for the link. When you connect to a PBX, you typically have control over both ends of the link and can optimize the configuration for your particular application.
Line coding and framing configuration are discussed in detail in Chapter 6. Be sure that you configure these parameters in the voice gateway to match what is configured on the PBX.
Clocking
It is important that you understand how clocking will be set up on a digital trunk. Improper clocking configuration shows up as clock slips on the controller interface. Slips can cause a wide variety of voice problems, including poor voice quality, static, echo, and one-way audio. Understanding how to set up a stable clocking domain prevents these problems.
In addition to the trunks, Cisco voice gateways that have a built-in TDM bus must be clocked correctly for voice traffic to flow properly and to avoid problems. By default, the time-division multiplexing (TDM) bus uses the internal oscillator as a clock source. However, this causes problems with connected circuits that use a different clock source. You can use the show network-clocks command to see which of the available clock sources is currently being used to time the TDM bus. In Example 7-5, a primary and a secondary clock source are configured. The secondary source link is not active at the moment, and the primary is in use. The internal oscillator (called the Backplane in this output) is also listed as a "last ditch" clock source to be used if no better clock is available.
In Cisco Integrated Services Routers (ISR), you must synchronize the clock for the digital signal processor (DSP) resources on the motherboard with the circuit to be used. The DSP resources are clocked from the TDM bus.
Miami#show network-clocks Network Clock Configuration Priority Clock Source Clock State Clock Type 1 T1 1/0 GOOD T1 2 T1 1/1 LINK DOWN T1 10 Backplane GOOD PLL Current Primary Clock Source Priority Clock Source Clock State Clock Type 1 T1 1/0 GOOD T1 |
When selecting a clock source to use, choose the best available one. PSTN circuits are generally the best clock sources available. Most PBX systems can pass the clock from a "master" source, such as a PSTN circuit, to other trunk ports. If the PBX has a PSTN circuit attached and can use that circuit as a master clock source, use the PBX timing on the tie trunk and set the voice gateway for loop timing, as shown in Figure 7-1.
Figure 7-1. Using PSTN Trunk to the PBX as Master Clock Source
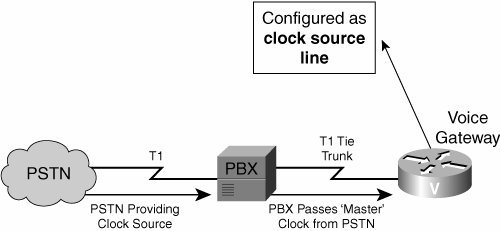
With this configuration, you can also use the clock that you recovered from the PSTN (using the PBX) for the TDM bus within the gateway. Example 7-6 shows the configuration necessary. The network-clock-participate command enables the module on slot 1 to be a clock source for the TDM bus. The network-clock-select command sets clocking recovered on T1 1/0 to be used as the priority 1 clock for the TDM bus. If additional clock sources are available, you can add them as candidates using the network-clock-select command and different priorities. Only one clock is in use at any given time. In controller configuration mode, the clock source line command instructs the voice gateway to use the clock recovered from the bit stream received on that interface as a clock source, rather than the internal clock.
Miami#show running-config ! ! Unnecessary output deleted ! network-clock-participate slot 1 network-clock-select 1 T1 1/0 ! ! controller T1 1/0 framing esf clock source line linecode b8zs ds0-group 1 timeslots 1-24 type e&m-wink-start ! end |
You can also reverse this configuration. If the PSTN trunk goes to the Cisco voice gateway instead of the PBX, the voice gateway can recover the clock from the PSTN circuit and use it to clock both the internal TDM bus and the tie trunk to the PBX, thus providing clocking for the PBX. Figure 7-2 shows an example of this scenario.
Figure 7-2. Using the PSTN Trunk to the Voice Gateway as the Master Clock Source
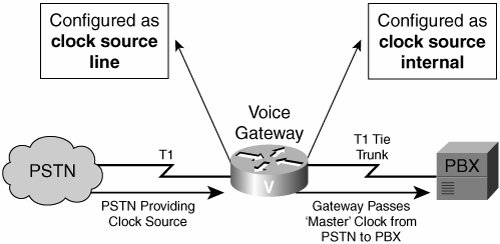
Example 7-7 shows the voice gateway configuration necessary. Notice that T1 1/1 goes to the PBX and uses the clock source internal command. That command gets clocking from the TDM bus, which is in turn being clocked by PSTN T1 1/0.
Miami#show running-config ! ! Unnecessary output deleted ! network-clock-participate slot 1 network-clock-select 1 T1 1/0 ! ! controller T1 1/0 description PSTN Trunk framing esf clock source line linecode b8zs ds0-group 1 timeslots 1-24 type e&m-wink-start ! controller T1 1/1 description Tie Trunk to PBX framing esf clock source internal linecode b8zs ds0-group 1 timeslots 1-24 type e&m-wink-start ! end |
Another possibility is that two connections to the voice gateway exist and both are good clock sources. As an example, suppose that there is a PSTN trunk to the voice gateway, a PSTN trunk to the PBX, and a tie trunk from the PBX to the voice gateway. In this case, a viable clock source for the voice gateway exists on both ports. Figure 7-3 shows this scenario.
Figure 7-3. Multiple Usable Clock Sources
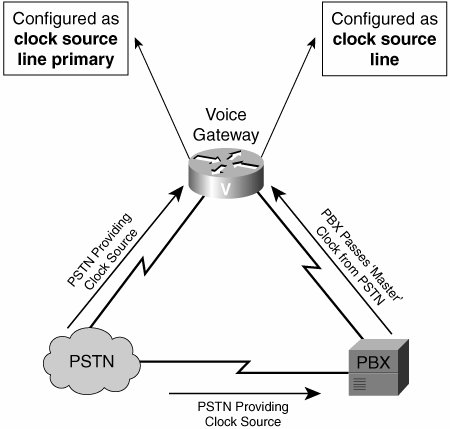
Example 7-8 shows the configuration of the voice gateway that is necessary to support this clocking scenario. The PSTN trunk uses the clock source line primary command, and the PBX trunk uses the clock source line command. The primary keyword indicates that, whenever possible, you should use the clock from the PSTN trunk to time the Phase-Locked Loop (PLL) on this controller.
Miami#show running-config ! ! Unnecessary output deleted ! network-clock-participate slot 1 network-clock-select 1 T1 1/0 network-clock-select 2 T1 1/1 ! ! controller T1 1/0 description PSTN Trunk framing esf clock source line primary linecode b8zs ds0-group 1 timeslots 1-24 type e&m-wink-start ! controller T1 1/1 description Tie Trunk to PBX framing esf clock source line linecode b8zs ds0-group 1 timeslots 1-24 type e&m-wink-start ! end |
When using a two-port network module, such as a VWIC2-2MFT-T1/E1 for two voice circuits, both ports must use the same clock source. The same DSP resources used for both ports and differences in clocking can cause sips and interface flaps. If multiple different clocks sources are present (such as circuits from different carriers), divide them across modules using different DSP resources. For example, one could use motherboard DSPs and another could use DSPs on a network module (NM), such as the NM-HDV2. In this case, you should not include the NM-HDV2 in the network-clock-participate list. Because the NM has a different clock than the other circuits in this example, it should not be a fallback candidate to clock the TDM bus.
For voice circuits, all interfaces that share a common pool of DSP resources must have synchronized clocks.
Verifying and Troubleshooting
You can verify the correct operation of the digital trunk at a physical level by using the show controller t1 | e1 slot/subunit/port command. The output shows a great deal of information about the current state of the link, in addition to historical information. This information can help you isolate problems with line coding, framing, and clocking of the link. In Example 7-9, you can see that numerous slips have been recorded, which indicates a clocking issue with the circuit. Notice in this example that the clock source is set to internal. This information can immediately lead you to investigate the clocking configuration as a starting point in troubleshooting.
|
[View full width] Miami#show controller t1 1/1 T1 1/1 is up. Applique type is Channelized T1 Cablelength is long gain36 0db Receiver has loss of signal. alarm-trigger is not set Version info Firmware: 20040713, FPGA: 15, spm_count = 0 Framing is ESF, Line Code is B8ZS, Clock Source is Internal. CRC Threshold is 320. Reported from firmware is 320. Data in current interval (890 seconds elapsed): 2 Line Code Violations, 798 Path Code Violations 114 Slip Secs, 0 Fr Loss Secs, 0 Line Err Secs, 0 Degraded Mins 114 Errored Secs, 0 Bursty Err Secs, 0 Severely Err Secs, 757 Unavail Secs Unavail Secs
|
Additional troubleshooting information, as well as a description of all the fields in the output of the show controller command, is covered in detail in Chapter 6.
Configuring ISDN PRI Trunks
Configuring a PRI trunk to a PBX and configuring one to the PSTN has two main differences:
- The need to determine the network versus user role Layer 2 communications are established on an ISDN link using a master-slave relationship. The master side is called the network side, and the slave side is called the user side. When connecting to the PSTN, the voice gateway is always the user side and the PSTN is always the network side. This is not necessarily the case when connecting a voice gateway to a PBX.
PBX manufacturers typically assume that the PRI trunk ports will be connecting to the PSTN, so they default to user side. The Cisco voice gateway also defaults to user side. If a connection is made from user side to user side or network side to network side, Layer 2 communications are not established. You must decide which device will be the network side of the connection and configure it correctly. Many older or smaller PBX systems do not have the option of running the PRI trunk port as the network side.
If this is the case, you need to configure the voice gateway to be the network side. You accomplish this by using the isdn protocol-emulate network command. You apply this command to the serial interface that is created when you define the pri-group.
- The need to determine the ISDN switch type to be used The ISDN switch type determines the format of the Layer 3 messages to be used on the ISDN D-channel. When you connect to the PSTN, the service provider specifies the ISDN switch type to use. When you connect to a PBX, it is important to select a switch type that is supported and provides the highest level of interoperability for supplementary services and information exchange.
Many PBX vendors support "native" switch types that provide the highest level of capabilities for their systems. These include 5ESS for AT&T or Lucent, DMS-100 for Nortel PBX systems, and so on. Most PBX systems also support standard switch types such as NI2 for North America and NET5 for the UK, Europe, Asia, and Australia.
The QSIG protocol was developed specifically to provide interoperability between PBXs and can be used if your PBX system supports it. Many PBX vendors have chosen to support QSIG only as an added cost upgrade. You can find more information about QSIG later in this chapter.
After you have the physical connection running and verified, have determined which side will be network and user, and have selected a switch type, you can begin to configure the PRI trunk.
Configuration begins by setting a global ISDN switch type for the voice gateway. You do this by using the isdn switch-type type command in global configuration mode. You can override this setting on a port-by-port basis later on if necessary. After you have defined the global switch type, enter controller configuration mode using the controller T1 | E1 slot/subunit/port command. Add the PRI group to the interface using the pri-group timeslots num command. The num parameter is 1-24 for T1 or 1-31 for E1. You can only create one PRI group on an interface. The Cisco IOS includes the D-channel automatically.
After you have defined the PRI group, IOS automatically creates a corresponding voice port and serial interface. You can manipulate parameters, such as locale, station name and number, and so on, on the voice port.
The serial interface is for controlling Layer 3 (and some Layer 2) functions. This is where you can override the switch type for an individual port, change the B-channel selection order, and configure network-side protocol emulation.
Example 7-10 shows a voice gateway connected to both the PSTN and a PBX. The PSTN is connected to T1 1/0, and the PBX is connected to T1 1/1. Twelve B-channels are available on the PSTN link, which is using the NI2 protocol. The PBX has all 23 B-channels available, and it is using the 5ESS protocol. The voice gateway is the network side of the PBX connection and the user side of the PSTN connection. It is deriving clock from the PSTN trunk and supplying clock to the PBX.
Miami#show running-config ! ! Unnecessary output deleted ! network-clock-participate slot 1 network-clock-select 1 T1 1/0 ! ! Global ISDN Switch Type ! isdn switch-type primary-ni ! ! controller T1 1/0 description PSTN Trunk framing esf clock source line linecode b8zs pri-group timeslots 1-12, 24 ! controller T1 1/1 description PBX Tie Trunk framing esf linecode b8zs clock source internal pri-group timeslots 1-24 ! ! ! interface Serial1/0:23 description PSTN Trunk no ip address isdn switch-type primary-ni isdn incoming-voice voice isdn bchan-number-order ascending no cdp enable ! interface Serial1/1:23 description PBX Tie Trunk no ip address isdn switch-type primary-5ess isdn protocol-emulate network isdn incoming-voice voice no cdp enable ! ! voice-port 1/0:23 ! voice-port 1/1:23 ! end |
Verifying and Troubleshooting
For the PRI to be operating properly, the Layer 1, Layer 2, and Layer 3 protocols must be functioning correctly. Layer 1 is discussed in the earlier section "Configuring E1/T1 Physical Layer Connections." To verify Layer 2, use the show isdn status command. If Layer 2 is up and operating, you should see the status Multiple Frame Established, as shown in Example 7-11.
Miami#show isdn status Global ISDN Switchtype = primary-ni ISDN Serial1/0:23 interface ******* Network side configuration ******* dsl 0, interface ISDN Switchtype = primary-5ess Layer 1 Status: ACTIVE Layer 2 Status: TEI = 0, Ces = 1, SAPI = 0, State = MULTIPLE_FRAME_ESTABLISHED Layer 3 Status: 0 Active Layer 3 Call(s) Active dsl 0 CCBs = 0 The Free Channel Mask: 0x80000FFF Number of L2 Discards = 0, L2 Session ID = 3 |
In Example 7-11, the ISDN switch type that is defined globally is primary-ni, whereas the switch type for this interface is primary-5ess. This interface is defined as network side, and Layer 2 is up. If Layer 2 was not up, the status would show TEI Assigned instead of Multiple Frame Established. If Layer 1 is active, indicating that the physical circuit is available, the Layer 2 failure might be caused by having both sides of the connection defined as either user or network. You can diagnose this using the debug isdn q921 command.
Example 7-12 shows the output from a debug isdn q921 trace in which Layer 2 has failed to come up properly. Notice that the Layer 2 status is shown as TEI Assigned. This output shows that this router is the user side and is receiving bad frames. That likely means that the remote end of the connection is set up as user side, too. To correct this error, configure one side of the trunk as the network side and the opposite side of the trunk as the user side.
Miami#show isdn status Global ISDN Switchtype = primary-ni ISDN Serial1/0:23 interface dsl 0, interface ISDN Switchtype = primary-5ess Layer 1 Status: ACTIVE Layer 2 Status: TEI = 0, Ces = 1, SAPI = 0, State = TEI_ASSIGNED Layer 3 Status: 0 Active Layer 3 Call(s) Active dsl 0 CCBs = 0 The Free Channel Mask: 0x80000FFF Number of L2 Discards = 0, L2 Session ID = 4 Miami#debug isdn q921 *Nov 9 07:44:49.543: ISDN Se1/0:23 Q921: User RX <- BAD FRAME(0x00017F) *Nov 9 07:44:55.547: ISDN Se1/0:23 Q921: User RX <- BAD FRAME(0x00017F) *Nov 9 07:44:56.543: ISDN Se1/0:23 Q921: User RX <- BAD FRAME(0x00017F) |
Example 7-13 shows the same interface after you have configured isdn protocol-emulate network.
|
[View full width] Miami#config t Miami(config)#interface s1/0:23 Miami(config-if)#isdn protocol-emulate network Miami(config-if)#end Miami#debug isdn q921 *Nov 9 07:48:40.555: ISDN Se1/0:23 Q921: Net RX <- SABMEp sapi=0 tei=0 *Nov 9 07:48:40.555: ISDN Se1/0:23 Q921: S4_SABME: Sending UA *Nov 9 07:48:40.559: %ISDN-6-LAYER2UP: Layer 2 for Interface Se1/0:23, TEI 0 changed to up *Nov 9 07:48:40.559: ISDN Se1/0:23 Q921: Net TX -> UAf sapi=0 tei=0
|
Troubleshooting Layer 3 problems on a PRI that is connected to a PBX can be more difficult. If you are having problems with call completion, you can trace the Layer 3 messages with the debug isdn q931 command. Example 7-14 shows the output of a debug isdn q931 trace. The lobby phone at 919-555-3456 called 911 on B-channel 1, and the call ended normally. This trace validates that both the calling and called numbers are being passed correctly, the calling name is being provided correctly, and the calls can complete normally.
|
[View full width] *Nov 9 08:02:55.955: ISDN Se1/0:23 Q931: TX -> SETUP pd = 8 callref= 0x000E Bearer Capability i = 0x9090A2 Standard = CCITT Transfer Capability = 3.1kHz Audio Transfer Mode = Circuit Transfer Rate = 64 kbit/s Channel ID i = 0xA98381 Exclusive, Channel 1 Progress Ind i = 0x8583 - Origination address is non-ISDN Display i = 'Lobby Phone' Calling Party Number i = 0xA1, '9195553456' Plan:ISDN, Type:National Called Party Number i = 0x80, '911' Plan:Unknown, Type:Unknown *Nov 9 08:02:55.999: ISDN Se1/0:23 Q931: RX <- CALL_PROC pd = 8 callref = 0x80 0E Channel ID i = 0xA98381 Exclusive, Channel 1 *Nov 9 08:02:56.003: ISDN Se1/0:23 Q931: RX <- CONNECT pd = 8 callref = 0x800E *Nov 9 08:02:56.003: ISDN Se1/0:23 Q931: TX -> CONNECT_ACK pd = 8 callref = 0x 000E *Nov 9 08:02:58.879: ISDN Se1/0:23 Q931: RX <- DISCONNECT pd = 8 callref = 0x8 00E Cause i = 0x8090 - Normal call clearing
|
Occasionally, slight differences in the implementation of the Layer 3 protocol can cause problems, even though calls complete properly. These problems can manifest themselves as missing or improperly displayed caller name or number display, call transfer failures, and so on. Use the debug isdn q931 trace information in conjunction with placing test calls to verify that everything is working correctly. If you encounter problems that are related to variations in protocol implementation, the debug isdn q931 information can help you determine whether the problem is with the PBX or the voice gateway. You might also be able to find a case study on Cisco.com that can help. Cisco has tested interoperability with many brands of PBX systems and published case studies that can provide insight into the correct configuration parameters to use on both the voice gateway and the PBX.
MGCP
The configuration process changes when you use MGCP to control the T1 or E1 PRI trunk. The configuration on the voice gateway sets up MGCP control. This begins when you specify on the controller configuration that you will use the MGCP protocol. You do this by using the pri-group timeslots num service mgcp configuration command. When you are configuring CallManager MGCP, all the parameters that control the trunk are defined on the CallManager, rather than on the gateway. Further, the Layer 3 Q.931 traffic is backhauled to CallManager for processing. The Layer 3 backhaul is configured using the isdn bind-l3 ccm-manager command on the serial interface configuration.
Example 7-15 shows the full configuration parameters that are necessary to set up a CallManager MGCP-controlled T1 PRI tie trunk on controller 1/0. The IP address of the CallManager is specified on the mgcp call-agent command. The configured dial peer associates call control for port 1/0:23 to the MGCP application.
Miami#show running-config ! ! Unnecessary output deleted ! ccm-manager mgcp ! controller T1 1/0 description Tie Trunk to PBX - MGCP Controlled framing esf linecode b8zs pri-group timeslots 1-24 service mgcp ! ! interface Serial1/0:23 no ip address isdn switch-type primary-ni isdn incoming-voice voice isdn bind-l3 ccm-manager no cdp enable ! ! voice-port 1/0:23 ! mgcp mgcp call-agent 10.1.5.2 service-type mgcp version 0.1 ! mgcp profile default ! dial-peer voice 1 pots application mgcpapp port 1/0:23 ! end |
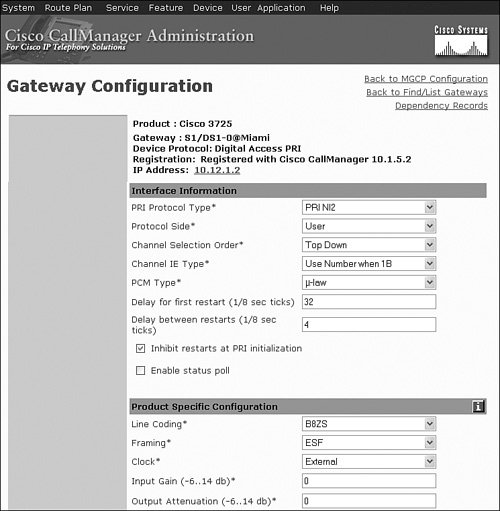
Figure 7-4 is an excerpt of the CallManager configuration showing how both the physical line and ISDN signaling information are configured for an MGCP-controlled PRI trunk. In CallManager configuration, the Protocol Side drop-down box controls whether the ISDN trunk operates as network or user side. You also configure line coding, framing, and clocking here.
Figure 7-4. CallManager Configuration of MGCP PRI
Verifying and Troubleshooting
You can verify the operational status of an MGCP-controlled PRI trunk by using the show isdn status command. In Example 7-16, you can see that Layer 1 is active, and Layer 2 shows Multiple Frame Established and is operational. The display also indicates that Layer 3 is backhauled to CallManager.
|
[View full width] Miami#show isdn status Global ISDN Switchtype = primary-ni %Q.931 is backhauled to CCM MANAGER 0x0003 on DSL 0. Layer 3 outputmay not apply ISDN Serial1/0:23 interface dsl 0, interface ISDN Switchtype = primary-ni L2 Protocol = Q.921 0x0000 L3 Protocol(s) = CCM MANAGER 0x0003 Layer 1 Status: ACTIVE Layer 2 Status: TEI = 0, Ces = 1, SAPI = 0, State = MULTIPLE_FRAME_ESTABLISHED Layer 3 Status: 0 Active Layer 3 Call(s) Active dsl 0 CCBs = 0 The Free Channel Mask: 0x80000FFF Number of L2 Discards = 0, L2 Session ID = 4 Total Allocated ISDN CCBs = 0
|
For information about the ISDN Layer 3 backhaul, use the show ccm-manager command, as shown in Example 7-17. Example 7-17 shows that the voice gateway is registered to a CallManager at IP address 10.1.5.2, and the backhaul link is open. The PRI at slot 1, port 0 is being backhauled, and you can see that messages have flowed across the backhaul link with no receive or transmit failures.
Miami#show ccm-manager MGCP Domain Name: Miami Priority Status Host ============================================================ Primary Registered 10.1.5.2 First Backup None Second Backup None Current active Call Manager: 10.1.5.2 Backhaul/Redundant link port: 2428 ! Unnecessary output deleted ! Backhaul Link info: Link Protocol: TCP Remote Port Number: 2428 Remote IP Address: 10.1.5.2 Current Link State: OPEN Statistics: Packets recvd: 10 Recv failures: 0 Packets xmitted: 13 Xmit failures: 0 PRI Ports being backhauled: Slot 1, port 0 |
To view the traffic on the backhaul link, you can use the debug ccm-manager packets trace command. Although this command does show the actual traffic on the backhaul link, it is typically not as useful in troubleshooting as the debug isdn q931 trace command discussed in the previous section.
Q Signaling
The QSIG protocol is a set of international standards that define services and signaling protocols for private integrated services networks (PISN). QSIG is based on ISDN Q.921 and Q.931 and is a worldwide standard for PBX interconnection. QSIG allows you to route calls from one private integrated services network exchange (PINX) to another PINX using Cisco voice gateways. A PINX can be a PBX, key system, or CallManager node that supports the QSIG protocol. Using the QSIG protocol, all of the features that are available as a PBX user operate transparently across the network.
It is important to note that although many PBX manufacturers provide support for QSIG, the support is frequently not included as a standard feature; instead, it is offered as an extra-cost option. If the connection to the PBX is being made as an interim measure during a conversion to an IP telephony system, it might not make financial sense to pay for the QSIG option. Verify the status of QSIG support on the PBX prior to planning a QSIG implementation.
The Cisco QSIG implementation supports basic calls, identification and message waiting indication services, call forwarding, and call transfer. QSIG can transparently route call services from a PBX to a voice gateway, across a WAN or virtual private network (VPN) connection to another voice gateway, and back to a PBX. A far more common topology is a T1 or E1 PRI connection to a CallManager-controlled voice gateway.
Cisco has tested CallManager QSIG feature interoperability with the following PBX vendors: Lucent/Avaya Definity G3R, Avaya MultiVantage and Communication Manager all using T1 or E1, Alcatel 4400 using E1 or T1, Ericsson MD110 using E1, Nortel Meridian using E1 or T1, Siemens Hicom 300 E CS using T1, Siemens Hicom 300 E and Siemens HiPath 4000 both using E1.
CallManager supports many call features with QSIG, including the following:
- Retry on busy When the number you are calling is busy, you can request that the call complete when the busy destination hangs up the phone and becomes available.
- Retry on no answer When your call is not answered, you can request that the call be retried after activity occurs on the phone of the called party.
- Identification service The ability to present or restrict the display of caller or called party number and name is configurable in CallManager.
- Message waiting services Turn on or turn off voice mail message waiting indicator (MWI) indications based on QSIG directives. When a call that has been forwarded is redirected to voice mail, the called number can be determined through supplementary services, and the message is placed in the correct voice mailbox.
- Call forwarding and call transfer Forwarding and transferring calls.
QSIG offers a high level of functionality and provides interoperability between equipment from different manufacturers, making its use desirable on an interconnect tie trunk between a PBX system and a voice gateway in an IP telephony environment.
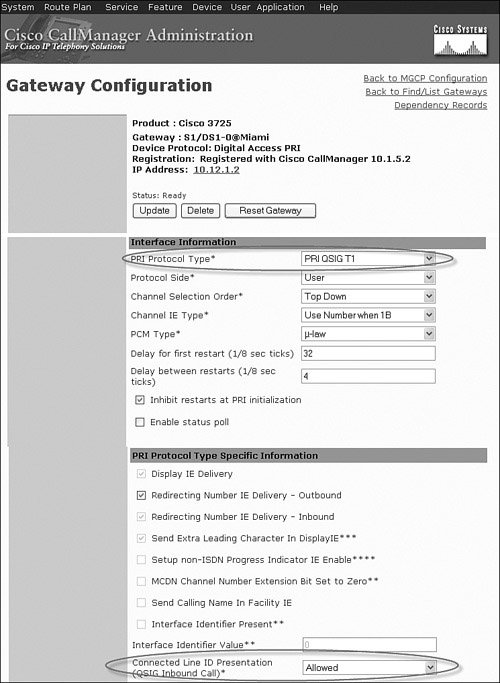
Configuration of a CallManager-controlled QSIG trunk is done in the same way as an MGCP-controlled ISDN PRI trunk. The QSIG protocol is selected with the isdn switch-type primary-qsig command on the voice gateway or by selecting PRI QSIG T1 or PRI QSIG E1 on the PRI Protocol Type drop-down box in CallManager. An excerpt of the CallManager configuration page with QSIG selected is shown in Figure 7-5. Note that this also enables the Connected Line ID Presentation field, which allows you to control the display of the connected line number.
Figure 7-5. CallManager Configuration for a QSIG Trunk
Configuring E1 R2 or T1 CAS Trunks
When setting up tie trunks to a PBX, it is always preferable to use a PRI or QSIG trunk if you can. Some PBX systems do not have PRI capability, which might force you to use a channel-associated signaling (CAS) trunk. If you must use an E1 R2 or T1 CAS connection, be sure to select a supported signaling method that provides the highest level of reliability and functionality.
Configuration of the interface on the voice gateway is done in the same way that it is for a PSTN connection. For more information, see Chapter 6.
Configuring Transparent Common Channel Signaling |
Part I: Voice Gateways and Gatekeepers
Gateways and Gatekeepers
- Gateways and Gatekeepers
- The Role of Voice Gateways
- The Role of Voice Gatekeepers
- The Role of IP-to-IP Gateways
- Introduction to Voice Protocols
- Call Control Agents
- Deployment Scenarios
- Case Study: Introduction
- Chapter Review Questions
Part II: Gateways
Media Gateway Control Protocol
- Media Gateway Control Protocol
- Introduction to MGCP
- MGCP Operation
- Call Flow with MGCP
- Dial Plan Considerations
- Implementing MGCP Gateways
- Securing MGCP Gateways
- Troubleshooting Tools
- Case Study: Configuring an MGCP Gateway
- Review Questions
H.323
- H.323
- H.323 Specifications
- H.323 Network Components
- Call Flow
- H.323 Protocol Pros and Cons
- When to Use H.323
- Dial Plan Considerations
- Implementing H.323 Gateways
- Securing H.323 Gateways
- Troubleshooting Tools
- Case Study: Configuring an H.323 Gateway
- Review Questions
Session Initiation Protocol
- Session Initiation Protocol
- Description of SIP
- SIP Call Flow
- SIP Pros and Cons
- When to Use SIP
- Dial Plan Considerations
- Implementing SIP Gateways
- Securing SIP Gateways
- Allowing H.323 to SIP Connections
- Troubleshooting Tools
- Case Study: Configuring SIP Between a Gateway and CallManager 5.x
- Review Questions
Circuit Options
Connecting to the PSTN
- Connecting to the PSTN
- PSTN Circuit Selection Overview
- Analog Trunks
- Digital Trunks
- Case Study: Add an E1 R2 Connection to the Leeds Gateway
- Review Questions
Connecting to PBXs
- Connecting to PBXs
- Analog Trunks
- Digital Trunks
- Configuring Transparent Common Channel Signaling
- Case Study: Implementing a Cisco Voice Gateway at the Shanghai Office
- Review Questions
Connecting to an IP WAN
- Connecting to an IP WAN
- Applications for Connecting to an IP WAN
- Design Considerations
- Quality of Service
- Providing Fax and Modem Services
- Security
- Case Study: Using a T1 Link as a Tie Line
- Review Questions
Dial Plans
- Dial Plans
- Numbering Plans
- Overlapping Numbering Plans
- Building a Scalable Dial Plan
- Dial Peers
- Dial Peer Matching
- Case Study: Configuring PSTN Access
- Review Questions
Digit Manipulation
- Digit Manipulation
- Basic Digit Manipulation
- Number Expansion
- Voice Translation Rules and Profiles
- Manipulating Caller ID
- Order of Operation in Digit Manipulation
- Troubleshooting Digit Manipulation
- Case Study
- Review Questions
Influencing Path Selection
- Influencing Path Selection
- Hunt Groups
- Using Trunk Groups
- Tail-End Hop-Off
- Call Admission Control
- POTS-to-POTS Call Routing Considerations
- Case Study: Implementing Gateway-Controlled RSVP
- Review Questions
Configuring Class of Restrictions
- Configuring Class of Restrictions
- COR Overview
- COR Operation
- Implementing COR
- Assigning COR Lists with SRST
- Assigning COR Lists with Cisco CallManager Express
- Restricting Inbound Calls
- Case Study: Implementing COR for Miami
- Review Questions
SRST and MGCP Gateway Fallback
- SRST and MGCP Gateway Fallback
- SRST Overview
- Configuring SRST
- Dial Plan Considerations
- SRST Features
- SIP SRST
- Call Preservation
- Secure SRST
- MGCP Gateway Fallback
- Configuring MGCP Gateway Fallback
- Verifying and Troubleshooting SRST
- Verifying and Troubleshooting MGCP Gateway Fallback
- Case Study: Integrating SRST with an Analog Voice-Mail System
- Review Questions
DSP Resources
- DSP Resources
- Need for DSP Resources
- Determining the DSP Resources Required
- Configuring DSP Resources
- Transcoding for CallManager Express
- Case Study: Add DSP Resources to the Miami Gateway
- Review Questions
Using Tcl Scripts and VoiceXML
- Using Tcl Scripts and VoiceXML
- Tcl IVR and VoiceXML Application Overview
- Sample Applications
- Downloading Tcl Scripts from Cisco.com
- Configuring the Gateway to Use a Tcl Script
- Implementing the AA Tcl Script
- Creating Audio Files
- Restrictions and Caveats
- Case Study: Implementing ACD Application
- Review Questions
Part III: Gatekeepers
Deploying Gatekeepers
- Deploying Gatekeepers
- Gatekeeper Functionality
- Gatekeeper Signaling
- E.164 Number Resolution
- Call Admission Control
- Gatekeeper Deployment Models
- Gatekeepers with CallManager
- Security with Gatekeepers
- Review Questions
Gatekeeper Configuration
- Gatekeeper Configuration
- Configuring Basic Gatekeeper Functionality
- Multiple Gatekeeper Configurations
- Configuring Directory Gatekeepers
- Troubleshooting Gatekeepers
- CallManager and Gatekeepers
- Gatekeeper Redundancy
- Configuring Resource Availability Indicator
- Configuring Gatekeeper Security
- Case Study: Deploying Gatekeepers to Assist in Migration to VoIP
- Review Questions
Part IV: IP-to-IP Gateways
Cisco Multiservice IP-to-IP Gateway
- Cisco Multiservice IP-to-IP Gateway
- IP-to-IP Gateway Overview
- Cisco Multiservice IP-to-IP Gateway
- Basic Configuration
- IP-to-IP Gateway Features
- Case Study: Providing Enterprise VoIP Trunking to VoIP Service of the Service Provider
- Review Questions
Appendix A. Answers to Chapter-Ending Review Questions
Index
EAN: 2147483647
Pages: 218
