Deployment
You can install ayour application on end users' machines in many different ways, depending on the requirements of the user base, the supporting organization (which might be you), and the infrastructure in place. The .NET Framework offers a range of deployment options, ranging from traditional installation programs, which must be physically run on every end user machine, to on-demand installations over the wireeither LAN or WAN.
Of all the improvements offered by the .NET Framework over previous technologies such as COM and DCOM, deployment is near the top of the list for many developers. If the application does not require any shared assemblies, you need only to copy all files to a specific directory structure. There is no interaction with the Registry. Whether the assemblies are shared or not, versioning problems have been mostly eliminated, relegating DLL Hell to the unpleasant past.
In addition to these improvements over traditional deployment methods, .NET Windows Forms applications can be deployed over the wire, via a URL in a browser or as a linkin an email message, on a web page, or in a shortcut on the desktop. Doing so automatically brings the most current version of any required assemblies onto the end user's machine (as long as that machine has a connection to the Internet). This model offers all the functional benefits of Windows Forms (especially when compared to HTML based browser applications), along with an ease of deployment that rivals traditional web applications.
22.5.1 Private (XCOPY) Installations
As mentioned earlier, to install an application that does not use any shared assemblies, you need only to copy all the application files to a specified directory structure. This is referred to as XCOPY installation, after the old DOS XCOPY command that copies files and directories.
XCOPY deployment is well suited to relatively simple applications, especially if the person doing the installation is technically proficient at a command prompt. It is especially good for deployment during the development process. (You can increase the sophistication of the installation process a bit and simultaneously make it easier to use, if a series of DOS commands are grouped within a batch or scripting file.) To uninstall the application, you need only to delete the application directory.
The directory containing the program executable is called the AppBase. All files that comprise the application are contained either in the AppBase or in a subdirectory of the AppBase. (Any assemblies shared with other applications would typically be found in the GAC, as described in previous sections of this chapter.)
XCOPY installations do not create such niceties as program shortcuts and entries in the Start  Programs menu, unless you get very creative with your command-line commands. For that and other functionality, you must use either the Windows Installer (described in the next section) or a third-party tool. XCOPY installations are not appropriate if any of the following situations apply:
- A service needs to be installed.
- A file being updated is exclusively lockede.g., by a service.
- COM components must be installed and registered.
- Assemblies must be installed to the GAC or other shared location.
- Shortcuts and Start menu entries need to be created.
The syntax of the XCOPY command is as follows:
xcopy
[switches]
where
is the file or directory (directories) to be copied, is the destination for the copied stuff, and a series of optional switches control the copy process. As with most DOS commands, /? displays a help file for the command.
A typical use of XCOPY would be:
xcopy \myServerAppsmyApp c:"Program Files"myApp /e /k /r /i
where the source directory is myApp in a directory named Apps on myServer, the target directory is c:Program FilesmyApp on the local machine, and the switches have the meanings listed in Table 22-4. Switches are not case sensitive.
|
Switch |
Description |
|---|---|
|
/? |
Displays help. |
|
/e |
Copies directories and subdirectories, including empty ones. |
|
/i |
Assumes that the destination is a directory and creates it if necessary. |
|
/k |
Copies attributes as-is. Omitting this switch resets the read-only attribute. |
|
/r |
Forces overwrite of read-only files. |
|
/s |
Copies directories and subdirectories, excepting empty ones. |
|
/t |
Creates a directory structure without copying any files or empty directories. /t /e copies empty directories. |
22.5.2 Windows Installer
For most real-world deployment situations, XCOPY deployment simply cannot do the job, and an installation tool with more robust capabilities is required. Several third-party installation tools are available, such as InstallShield, InstallAnywhere, and ActiveInstall.
Windows has its own installation technology, known as Windows Installer, which is included with all the Windows operating systems starting with Windows 2000.
|
Windows Installer runs as a service, providing installation, removal, and management of applications. It also supports features such as automatic repair of existing installations, transactional operations (any operation performed by the installer can be undone if it does not complete successfully), installation on demand (where application features are not installed until the first time a user tries to use that feature), and installation in locked-down environments if an administrator approves an installation package by means of group policy.
The Windows Installer is based on a relational database. Each application to be installed has a file associated with it, with an extension of .msi, which contains the data for that application, including rules for controlling the installation.
There are several ways of opening an .msi file. Double-clicking on the file opens the Windows Installer for that application. If the application is not currently installed on the machine, you will be presented with a series of dialog boxes for installing the application. Depending upon how the installation package was customized, these dialogs allow the user to select a target destination, select installation for the current user or all users, present software license information, and so on. If the application is already installed on the machine, you are presented with a dialog box offering the choice to either repair or remove the installation.
If you right-click on an .msi file in Windows Explorer, the context menu includes three relevant menu items: Install, Repair, and Uninstall. These options perform the same operations you might access by double-clicking on the file.
You can execute the Windows Installer from a command prompt. To install an application, use the following command:
msiexec /i MyApp.msi
To uninstall the application, use the following command:
msiexec /x MyApp.msi
To repair an installation, use this line:
msiexec /f MyApp.msi
|
Probably the easiest way to run the Installer is to execute setup.exe, the Installer Bootstrapper that is created by Visual Studio .NET, along with an associated .ini file, in a process described later.
The Windows Installer automatically logs installations and removals in the Application Log of the Event Viewer found in Control Panel Administrative Tools. Each entry in the log has a value for Source of MsiInstaller.
22.5.3 Using Visual Studio .NET
The Windows Installer is integrated into Visual Studio .NET. Create installation packages for your application by adding one or more setup projects to the solution. Each setup project sets up a specific configuration (Debug or Release). By having more than one setup project as part of a solution, the same application can be deployed easily with different configurations.
To demonstrate how to use Visual Studio .NET to build deployment packages, you will add setup projects to the Deploy application created previously in this chapter in Section 22.3.4 (the applications are named csDeploy for the C# version and vbDeploy for the VB.NET version). The design of this application (and the source code for the class file in VB.NET) is shown in Figure 22-5 and the C# source code for the class file is listed in Example 22-10. The source code for the main project is listed in Example 22-11 in C# and in Example 22-12 in VB.NET.
22.5.3.1 Using the wizard to create a debug version
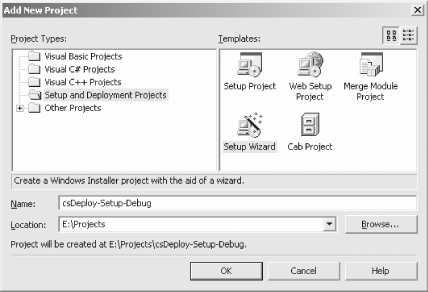
Open the Deploy solution (csDeploy or vbDeploy) in Visual Studio .NET so that it looks similar to Figure 22-5. (Make sure the active configuration is set to Debug.) Right-click on the solution in Solution Explorer and select Add New Project....When the Add New Project dialog box comes up, select Setup and Deployment Projects from the list of Project Types on the left and Setup Wizard from the Templates on the right. Enter a suitable name, as shown in Figure 22-14.
|
Figure 22-14. Add New Project dialog box
The wizard takes you through five screens. The first is a splash screen. The second screen asks you to choose a Project Type. Leave the default selection of Create a setup for a Windows application.
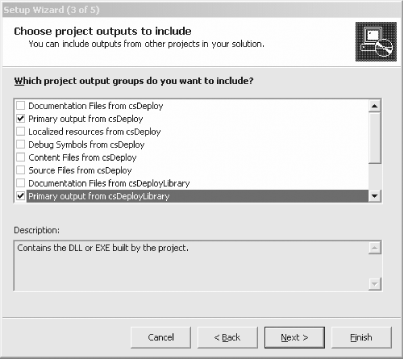
The third screen asks you to select the outputs from all the projects in the solution. Click on the primary output from both projectsDeploy and DeployLibraryso that the screen looks like Figure 22-15. Click the Next button.
Figure 22-15. Project outputs screen in Setup Wizard
The next screen lets you include other files, such as readmes. The final screen displays a summary of all the settings for this setup project. Click Finish.
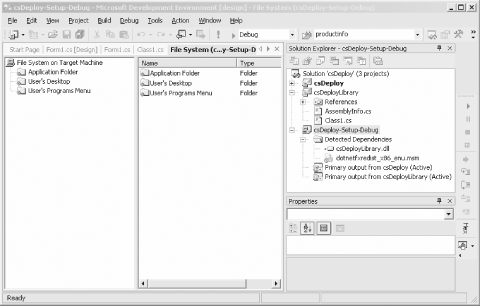
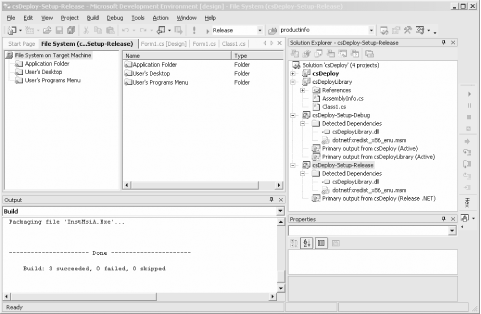
A project is added to Solution Explorer and the main design window now shows a File System editor for the setup project, similar to the screenshot shown in Figure 22-16.
Figure 22-16. Setup project added to solution
Build the setup project by right-clicking on the project name in Solution Explorer and selecting the Build menu item.
Build will build the application, taking all dependencies into account, but not building components that are up to date. In a large solution where current development work is only done on one or two projects, it results in a faster build process.
The Rebuild menu item first deletes all intermediary files and previous build outputs, and then it builds the entire application from scratch. It may take longer, but it is smart to do a Rebuild before testing the final build.
You can open the Output window to view a log of the build process by clicking on View Other Windows Output. At the end of the build process, it should say:
Build: 3 succeeded, 0 failed, 0 skipped
The number 3 refers to the three projects in this solution.
22.5.3.2 Creating a release version
This section of the chapter should be more properly titled "Creating a version using a configuration different from the Current Active Configuration," but that would be a bit too wordy. In the previous section, you used the Setup Wizard to create a Debug version. It was Debug only because the current active configuration, as set in the Configuration Manager (accessed either from the toolbar or the Build menu), was Debug.
To create a version using a specified configuration, regardless of the current configuration, use a plain vanilla Setup Project, not a Setup Wizard project. Repeat the process of right-clicking on the solution name in Solution Explorer, then select Add New Project.... This time select the Setup Project template, and name the project csDeploy-Setup-Release (or vbDeploy-Setup-Release).
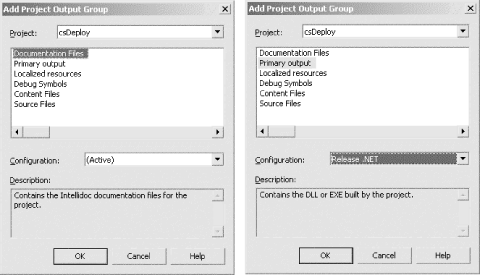
You must manually add the output files, so right-click on the project in Solution Explorer and select Add Project Output. You'll see the dialog box shown twice in Figure 22-17. On the left is the default condition. Notice that the Configuration is set to (Active). This is the configuration used by the Setup Wizard. Change that drop-down menu to Release .NET. Then select Primary Output from the list at the top of the dialog box, as shown on the right of Figure 22-17.
Figure 22-17. Adding project output manually
|
Although it would not hurt anything, it is not necessary to repeat the Add Project Output for csDeployLibrary. As soon as the primary output from csDeploy (or vbDeploy) is added, the dependency of that EXE on csDeployLibrary.dll (vbDeployLibrary.dll) is detected and the class library is automatically included in the build.
The new project with that name displays in Solution Explorer with the primary outputs, similar to that shown in Figure 22-18.
Figure 22-18. Adding project output manually
|

22.5.3.3 Further customizations
Whether the setup project came from the wizard or not, several customizations are available to you. Specifically, right-clicking on a setup project in Solution Explorer and selecting View or clicking on the View Editor menu item brings up six different editor choices.
Clicking on any editor will display that editor for that project in the main pane. (When you first added a setup project, the File System editor is what you are looking at.)
22.5.3.3.1 File System
This editor, displayed in Figure 22-18, allows you to control where files are added to the end user's machine. The items in the left-most pane are named folders on the target machine (e.g., the Application folderthe directory where the application is installed), the user's desktop, or the user's program menu. Clicking on any of them displays their contents in the right pane.
Right-clicking on an item displays a context menu. Select Add to add either a folder, a file, an assembly, or a project output. You can add shortcuts to either the desktop or the Start Programs menu by right-clicking on the appropriate item.
|
Use this editor to add shared assemblies to the GAC on the target machine. To do so, right-click on the root of the left pane, File System on Target Machine, and select Add Special Folder. You will see a plethora of special folders, many of which should be familiar to you. Click on Global Assembly Cache Folder to add it to the left pane. Right-click on it and select Add Assembly... to add an assembly to the GAC. Remember: for an assembly to be added to the GAC, it must first have a strong name.
22.5.3.3.2 Registry
The Registry editor allows your setup program to make entries in the Registry of the target machine. The screenshot in Figure 22-19 shows a new key called TestValue inserted in HKEY_LOCAL_MACHINESoftware[Manufacturer], where [Manufacturer] will be replaced with the value of the Manufacturer property of the setup project. (It defaults to the organization entered when Visual Studio .NET was installed.)
Figure 22-19. Registry editor
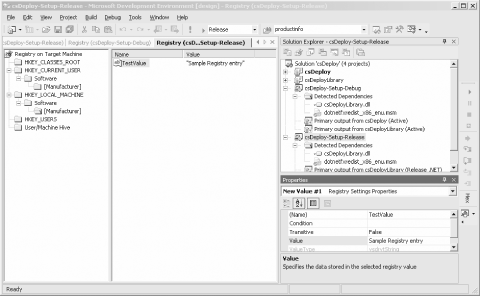
Get to the Registry editor, shown in Figure 22-19, by right-clicking on the right pane, selecting New, and then clicking on one of the following:
- String Value
- Environment String Value
- Binary Value
- DWORD Value
Set the name of the new key and its value in the Property window.
22.5.3.3.3 File Types
The File Types editor lets you associate file extensions with the application. If an associated file type is double-clicked in Windows Explorer, the application will open with that filename passed in as an argument.
To add a file type to the project, right-click on File Types on Target Machine and select Add File Type. A default document type will appear with the &Open command below it. In the Properties window, change the name to something meaningful, say MyApp Data File, and enter the extension in the Extensions property, such as abc, as shown in Figure 22-20.
Figure 22-20. File Types editor
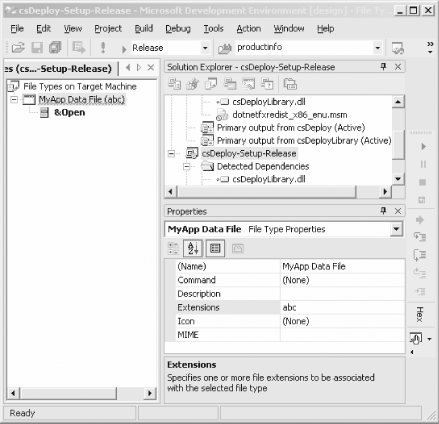
Now if a file on the target machine with an extension of .abc, such as SomeData.abc, is double-clicked in Windows Explorer, the application will open with that file.
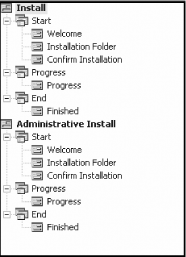
22.5.3.3.4 User Interface
The User Interface editor allows you to customize the dialog boxes that are displayed during the installation process. The process is divided into two categories: Install and Administrative Install. The first is for normal installation by users on their local machine, and the latter is for installation to a network for use by members of a workgroup.
Within each category, the editor is further divided into three phases: Start, Progress, and End. The default configuration looks like Figure 22-21.
Figure 22-21. User Interface editor
Right-clicking on any item in the window and selecting the Add Dialog menu item brings up a selection of standard dialog boxes that can be added and further customized, such as dialogs with radio buttons, checkboxes or textboxes, a customer information screen, a splash screen, and a license agreement.
Any dialog box added this way will have properties for text files or bitmaps to display and executables to run.
22.5.3.3.5 Custom Actions
The Custom Actions editor displays four phases of the installation process: Install, Commit, Rollback, and Uninstall. You can assign an executable or script file to execute at the conclusion of any phase.
22.5.3.3.6 Launch Conditions
The Launch Conditions editor lets you create conditional installs. For example, you can specify that a certain version of Windows be installed, a certain file be present, or a certain Registry entry have the correct value.
22.5.4 Internet Deployment
If you want to deploy shared assemblies, add shortcuts to the user's desktop or Start Programs menu, make Registry entries, or add other customizations, then Windows Installer is the way to go. However, one of the major shortcomings of this approach is that Windows Installer must be run on each target machine.
On the other hand, you often do not need any of these features, or can give them up in exchange for incredibly easy deployment over the Internet or Intranet. There are several ways to accomplish this, as discussed next.
22.5.4.1 Auto deployment via Cabinet (CAB) files
You learned in the previous section how to add a Setup project to your application in Visual Studio .NET so that a Windows Installer file was created. That file could then be installed on a local machine.
In an analogous manner, you can add a Visual Studio .NET project to your solution that will create a Cabinet (CAB) file. CAB files are a means of including multiple installation files in a compressed format. CAB files can be either distributed on CDs or over the LAN or included as part of a Windows Installer package, but more significantly, they can also be downloaded over the Internet via a browser.
To demonstrate how to create a CAB file, open the csDeploy or vbDeploy solution in Visual Studio .NET. Right-click on the solution in Solution Explorer and add a new project, similar to what was shown earlier in Figure 22-14, except this time select a Cab Project, rather than a Setup Wizard or Setup Project. Name the project appropriately.
You must explicitly add the Primary Outputs for both the main executable and the DLL, unlike the situation with a normal Setup Project, where dependencies are detected automatically and any required DLLs are included automatically. Other than this, creating a CAB setup project is exactly the same as a normal Setup project.
Once the CAB setup project is built, the resulting CAB file contains both the EXE and the DLL. This CAB file can be copied to any machine and the files extracted either with the EXPAND command-line tool or third-party tools such as WinZip (http://www.winzip.com).
To use EXPAND, open a command window and enter:
expand csDeploy-cab.cab -f:* "c:Program FilescsDeploy"
where the name of the CAB file is csDeploy-cab.cab and the destination directory is c:Program FilescsDeploy. Notice the quotes around the destination directory, which are necessary because of the space embedded in the directory name. The -f argument allows you to specify which files to extract; the asterisk says to extract all the files. You can see all the available syntax and arguments for the command with the /? switch.
The useful part comes when you copy the CAB file to a virtual directory on a web server, accessible over the Intranet or Internet. Entering the CAB file as a URI in a browser lets you copy the file to the end user machine, where the files can then be extracted.
22.5.4.2 Auto deployment via URL
One of the most interesting models enabled by the .NET Framework is auto deployment, the direct distribution and execution of applications over the Net: Intra- or Inter-. The user accomplishes this by calling an executable as part of a URL, either in a browser or as a link, such as in an email or in a shortcut on a user's desktop.
To a first approximation, you need only to place the executable and any required assemblies in a virtual directory on a web server. However, as enticing as this approach is, it has some serious limitations arising from security issues, discussed shortly.
As a quick demonstration of this capability, return to the application shown earlier in Figure 22-6. Either copy both the EXE and DLL from that application to an existing virtual directory on your machine or virtualize the directory containing the EXE, using one of the techniques described in the sidebar Sidebar 22-3.
Suppose you made a virtual directory called MultiModuleAssy. Open a browser and enter the following URL:
localhost/MultiModuleAssy/csDeploy.exe
The application will appear on your desktop, with no browser window around it, exactly as if it had been started from the Start button. Hoo hah!
.NET applications can be deployed this way to any client machine that has the .NET Framework installed. (Installing the .NET Redistributable on end users' machines will be covered shortly.) It is not necessary for the web server to have the .NET Framework installed, nor must it be running either IIS or Windows.
The CLR on the client machine downloads the executable from the web server and caches it in two different locations: the browser download cache (typically located at c:Documents and SettingsusernameLocal SettingsTemporary Internet Files) and the .NET download cache. This latter cache is part of the GAC and can be managed by using the GacUtil tool. To list the contents of the .NET download cache, use the following command:
gacutil /ldl
To empty the .NET download cache, use this command:
gacutil /cdl
To clear the browser download cache in Internet Explorer, go to Tools Internet Options, and click on the Delete Files button on the General tab.
The next time this same application is executed from the same URL, the CLR first checks to see if it is present in the cache. If not, it is downloaded and cached. If it is, then the last-modified date on the cached copy is compared with the last-modified date on the server copy. If the server has a more recent copy, it is downloaded and the cached copy is replaced.
If the executable references another assembly, i.e., if a class, method, or property from another assembly is invoked, then the CLR checks the download cache to see if the referenced assembly is present. As with all assembly references, if the required assembly is not present, it is downloaded from the same location as the original assembly (the AppBase) and cached. If it is present in the download cache, then its last-modified date is compared with the copy on the web server and the more recent copy is used.
Notice that the version, as known to a strongly named assembly, is not part of this picture. If an older version of an assembly has been built more recently, and hence has a more recent last-modified date, then it will be downloaded and will replace the newer version in the download cache.
|
This trickle-down approach to deployment can minimize the delay the first time an application is run. By splitting rarely invoked classes, or groups of classes generally called together, into separate assemblies, you can minimize load times if those assemblies are never referenced by the user. (This strategy may also promote more efficient code reuse.) In any event, several smaller downloads may seem more palatable to the user than one large download. To front-load the download time, reference all the assemblies you will use in the form constructor.
Now to get a hint of the problems that auto deployment can raise, call the application in a browser again. This time use the standard IP address for localhost, as in:
127.0.0.1/MultiModuleAssy/csDeploy.exe
The application will run again, but this time a prominently displayed message will say:
Microsoft .NET Security Information
This application is running in a partially trusted context. Some functionality
in the application may be disabled due to security restriction.
The difference is that localhost is interpreted as an Intranet address, while its equivalent 127.0.0.1, or any IP address or dotted domain name, is considered an Internet address.
In the old days, code downloaded over the Internet say a script or an ActiveX component on a web page executed with the permissions of the user. This meant, as a practical matter, that a lot of code from unknown sources was executing, often with Administrative privileges. To add insult to the very real possibility of injury, the user was presented with an inscrutable dialog box asking if this code was to be trusted. Even if you could vouch for the morals of the software developer, who can guarantee that an application will be perfectly well behaved and bug-free?
The .NET Framework corrects this security gap with the introduction of Code Access Security (CAS). CAS assigns permissions to assemblies based on evidence. One of the prime pieces of evidence is the originating location of the code.
Several predefined security zones are listed in Table 22-5. All assemblies come from one of these zones. The system imposes a set of restrictions based, in part, on the individual zones, as defined by the security policy set by the administrator on that machine (or network). Data can only be transferred from less trusted to more trusted zones. This allows Intranet applications to access data on the Internet, but not vice versa.
|
Zone |
Permission Set |
Description |
|---|---|---|
|
Internet |
Internet (Framework Version 1 & 1.1.) Nothing (Framework Version 1 SP1 & SP2) |
Internet permission set: Access to open file dialog only, isolated storage (10 KB maximum quota), code execution, safe windowing and own clipboard, and safe printing. Nothing permission set: no access to any restricted resources. |
|
Intranet |
LocalIntranet |
Access to isolated storage (effectively unlimited quota), full UI, reflection emit, limited environment variables, file dialogs, code execution, DNS, and default printing. |
|
MyComputer |
FullTrust |
Full access to all resources. |
|
Trusted |
Internet |
Access to open file dialog only, isolated storage, code execution, safe windowing and own clipboard, and safe printing. |
|
Untrusted |
Nothing |
Corresponds to Restricted sites in IE. No access to any restricted resources. |
The CLR determines which security zone an assembly is from by the form of the path to its originating location, as shown in Table 22-6.
|
Zone |
Path |
Examples |
|---|---|---|
|
Internet |
Numeric IP Address Dotted URL |
http://207.46.134.190/AppDir/MyApp.exe http://127.0.0.1/AppDir/MyApp.exe http://www.MyDomain.com/AppDir/MyApp.exe |
|
Intranet |
UNC Name Non-dotted URL Network Share |
\serverNameAppDirMyApp.exe http://localhost/AppDir/MyApp.exe z:AppDirMyApp.exe |
|
MyComputer |
local file |
c:AppDirMyApp.exe |
As you can see from Table 22-5, depending on the zone from which an assembly originates, it may not have access to much of the functionality you have come to expect. Operations that are especially restricted include file access, interaction with the Registry, accessing environment variables, and printing.
|
Test your application under all the zones in which it might be deployed. Any operation that might fail in a given security zone should be wrapped in a try block. Then if an operation fails, the application can handle the situation gracefully, rather than present the user with an error message and then crash.
An alternative strategy is to test which zone the assembly is in, and then disable the features that might cause a problem, although some organizations modify the security policy so that certain zones may have more or less access than would normally be expected. Your code can determine the zone it is from by using the static Zone.CreateFromUrl method in the System.Security.Policy namespace.
|
22.5.4.3 Auto deployment via calling program
Deploying via a URL is fine for a single application, but such an approach may be too cumbersome for multiple applications. Suppose you want to provide a programmatic way of allowing the user to choose the application to run, such as by selecting from a drop-down list populated from a database.
In this situation, you need a stub, or calling, program. Typically the stub is a very simple program that does nothing other than call the real application. The name and URL of the assembly containing the application to run is captured as a string by the stub program. For example:

string strUrl = "http" + "://localhost/MultiModuleAssy/csDeploy.exe";

dim strUrl as String = "http" & _
"://localhost/MultiModuleAssy/vbDeploy.exe"
|
Then an assembly is instantiated by making a call to the static (Shared in VB.NET) Assembly.LoadFrom( ) method, passing in the name and URL of the assembly:
Assembly a = Assembly.LoadFrom(strUrl);
dim a as [Assembly] = [Assembly].LoadFrom(strUrl)
|
Once you have an instance of the assembly, the form can be instantiated in a three-step process: a Type object is obtained for the form using the Assembly.GetType method, an Object is instantiated from that Type object, and that Object is cast to a Form:
Type t = a.GetType("csDeploy.Form1");
Object o = Activator.CreateInstance(t);
Form frm = (Form)o;
dim t as Type = a.GetType("Form1")
dim o as Object = Activator.CreateInstance(t)
dim frm as Form = CType(o, Form)
Finally, you show the form:
frm.Show( );
The whole thing is wrapped inside a try block, so if there are any problems along the way, e.g., the connection to the net is lost, they will be handled gracefully.
For this code to run, you must reference the System.Reflection namespace. Include the following line of code in the project:
using System.Reflection;
imports System.Reflection
The complete code for implementing the stub code in a button click event handler is shown in Example 22-19 in C# and in Example 22-20 in VB.NET.
Example 22-19. Programmatic auto deployment in C#
private void button1_Click(object sender, System.EventArgs e)
{
 try
 {
 string strUrl = "http" + "://localhost/MultiFileAssy/csDeploy.exe";
 Assembly a = Assembly.LoadFrom(strUrl);
 Type t = a.GetType("csDeploy.Form1");
 Object o = Activator.CreateInstance(t);
 Form frm = (Form)o;
 frm.Show( );
 }
 catch (Exception ex)
 {
 MessageBox.Show(ex.ToString( ));
 }
}
Example 22-20. Programmatic auto deployment in VB.NET
Private Sub Button1_Click(ByVal sender As System.Object, _
 ByVal e As System.EventArgs) _
 Handles Button1.Click
 try
 dim strUrl as String = "http" & _
 "://localhost/MultiFileAssy/csDeploy.exe"
 dim a as [Assembly] = [Assembly].LoadFrom(strUrl)
 dim t as Type = a.GetType("Form1")
 dim o as Object = Activator.CreateInstance(t)
 dim frm as Form = CType(o, Form)
 frm.Show( )
 catch ex as Exception
 MessageBox.Show(ex.ToString)
 End Try
End Sub
When an application is deployed this way, the assembly containing the form is downloaded automatically, as described earlier in Section 22.5.4.2. The download cache is checked to see if it contains a copy of the assembly and, if so, the last-modified date of that copy is compared with the copy on the server. Any referenced assemblies are automatically trickled down to the client machine.
All security issues pertaining to Internet deployment via URL's apply to programmatic deployment as well. This means that deployment over the Internet may be problematic beyond practicality for many applications, but deployment over the Intranet or LAN is a real possibility in many cases.
22.5.5 .NET Runtime Redistributable
The .NET Framework must be installed on a client machine before any .NET application will run. For a developer's machine, this is not an issue. However, for deployment of .NET applications to most end user machines, the Framework must first be installed. If the Framework has been installed on a machine for one application, it does not need to be installed again for the next.
The .NET Framework is included in Windows 2003 Server and as an optional installation from Windows XP Service Pack 1. Presumably it will be either an optional or standard part of every future Microsoft operating system. It is also likely to become part of the standard installation for major .NET-enabled applications from Microsoft, including Internet Explorer (IE) and Office XP. Any machine with the Framework installed, from any source, can run .NET applications.
A virgin machine can get the.NET Framework by installing the .NET Framework Redistributable, available either on a Visual Studio .NET installation disk or from the Microsoft web site.
|
The Redistributable file is called Dotnetfx.exe. When executed, it installs the Framework, unless it is already installed. If the Framework is already installed, Dotnetfx.exe tells you before quitting harmlessly.
|
As of this writing, the .NET Redistributable can be installed on the following operating systems:
- Windows 98
- Windows 98 SE
- Windows NT 4.0 (SP 6a required)
- Windows Me
- Windows 2000 (SP2 recommended)
- Windows XP Home
- Windows XP Professional

The .NET Runtime cannot be installed on Windows 95. Time to upgrade.
The system must have IE 5.01 installed, although you might want to upgrade to at least IE 6.0.
The minimum hardware configuration for installing the .NET Redistributable is a 90 MHz Pentium or faster, and 32 MB of RAM for a client machine or 128 MB of RAM for a server. The recommended hardware is 96 MB of RAM for a client and 256 MB of RAM for a server.
If any of the .NET applications to be run on the machine require data access, then MDAC needs to be present. (.NET runs with MDAC 2.6, but 2.7 is recommended.) If MDAC is not already on the machine, it can be downloaded from Microsoft.com and installed.
If you look at a deployment project in Solution Explorer, you will notice that a node called Detected Dependencies always has the subnode dotnetfxredist_x86_xxx.msm, where xxx is replaced with the language code. (This can best be seen in Figure 22-18.) The Framework uses this node to prevent individual Framework assemblies from being listed as dependencies. It is intentionally excluded from the project; do not include it. In any case, the presence of this dependency will not cause the Framework redistributable to be installed if the Framework is missing from the machine.
This point bears emphasis. The only way to install a .NET application on a machine that has never had the .NET Framework installed is to first install the .NET Redistributable, and then run the deployment package for the application itself. You would think that a Visual Studio .NET deployment project would allow you to install the Framework if it were missing, but that assumption is problematic. The .NET installer requires the Framework to run, and vice versa. The easiest solution is have the user run the Redistributable and then install your application. Several third-party installation tools on the market can automate the installation of the Framework, MDAC, and an application.
An administrator can push the .NET Framework Redistributable across the network onto end-user machines by using either Systems Management Server (SMS) or Active Directory. The details are beyond the scope of this book. For more information, check out Microsoft Knowledgebase articles 318434 (for SMS) or 329191 (for Active Directory), or search the Framework SDK documentation for the article "Redistributing the .NET Framework."
Windows Forms and the .NET Framework
Getting Started
Visual Studio .NET
- Overview
- Start Page
- Projects and Solutions
- The Integrated Development Environment (IDE)
- Building and Running
Events
Windows Forms
- Windows Forms
- Web Applications Versus Windows Applications
- The Forms Namespace
- Form Properties
- Forms Inheritance
- User Interface Design
Dialog Boxes
- Dialog Boxes
- Modal Versus Modeless
- Form Properties
- DialogResult
- Termination Buttons
- Apply Button
- CommonDialog Classes
Controls: The Base Class
Mouse Interaction
Text and Fonts
Drawing and GDI+
Labels and Buttons
Text Controls
Other Basic Controls
TreeView and ListView
List Controls
Date and Time Controls
Custom Controls
- Custom Controls
- Specializing an Existing Control
- Creating a User Control
- Creating Custom Controls from Scratch
Menus and Bars
ADO.NET
- ADO.NET
- Bug Database: A Windows Application
- The ADO.NET Object Model
- Getting Started with ADO.NET
- Managed Providers
- Binding Data
- Data Reader
- Creating a DataGrid
Updating ADO.NET
- Updating ADO.NET
- Updating with SQL
- Updating Data with Transactions
- Updating Data Using DataSets
- Multiuser Updates
- Command Builder
Exceptions and Debugging
- Exceptions and Debugging
- Bugs Versus Exceptions
- Exceptions
- Throwing and Catching Exceptions
- Bugs
- Debugging in Visual Studio .NET
- Assert Yourself
Configuration and Deployment
EAN: 2147483647
Pages: 148
