Objective 5. Add Records to a Table
When you buy a new address book, it is not very useful until you fill it with names, addresses, and phone numbers. Likewise, a new database is not useful until you populate, or fill, a table with data. After a table is created, you can populate it with records by typing data directly into the table.
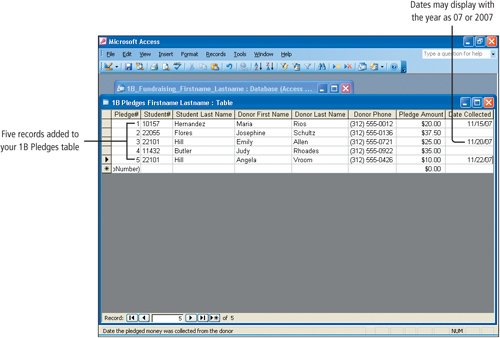
Activity 1.12. Adding Records to a Table
Activity 1.13. Creating a Second Table
When you see duplicate information in a table, it may be a signal that you have an inefficient database design. For example, in your 1B Pledges table, the student name Hill already appears twice. When you see the same data repeating itself within a table, it is likely that another table is necessary. In this activity, you will create a second table in your database.
1. | In the Database window, double-click the Create table in Design view command. | ||||||||||||||||||
2. | In the first Field Name box, type Student# press | ||||||||||||||||||
3. | Set the Field Size of the Student# field to 5 and then press | ||||||||||||||||||
4. | Press
| ||||||||||||||||||
5. | Click anywhere in the Student# field and then, on the Table Design toolbar, click the Primary Key button | ||||||||||||||||||
6. | On the Table Design toolbar, click the Save button Figure 1.33.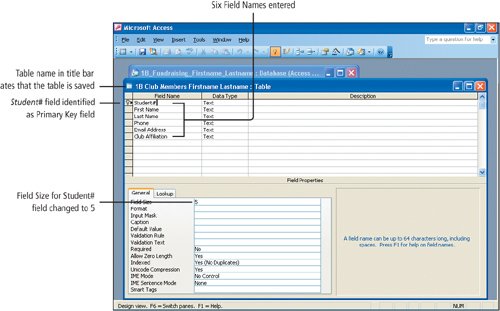
More Knowledge: Changing Field Size After Records Are Entered If you change the field size or other properties after records have been entered in a table, you may see a message box warning that the change may affect the data. For example, if you change a field size in a table with data from 50 to 10, if any of the data in the table requires more than ten characters, the data will be lost. For this reason, it is best to set the field size before adding data. However, if you change the field size to a smaller size after the data has been entered, be sure that the size is large enough to accommodate the largest entry. |
Activity 1.14. Adding Records to the Second Table
1. | On the Table Design toolbar, click the View button | ||||||||||||||||||||||||||||||||||||
2. | Beginning in the first row, under Student#, and using the techniques you have practiced, enter the following five records, and then compare your screen with Figure 1.34. Do not press Figure 1.34.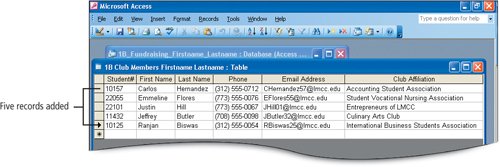
| ||||||||||||||||||||||||||||||||||||
3. | On your 1B Club Members table title bar, click the Close button |
|
Windows XP
Outlook 2003
Internet Explorer
Computer Concepts
Word 2003 Chapter One. Creating Documents with Microsoft Word 2003
Chapter Two. Formatting and Organizing Text
Chapter Three. Using Graphics and Tables
Chapter Four. Using Special Document Formats, Columns, and Mail Merge
Excel 2003 Chapter One. Creating a Worksheet and Charting Data
Chapter Two. Designing Effective Worksheets
Chapter Three. Using Functions and Data Tables
Access 2003 Chapter One. Getting Started with Access Databases and Tables
Chapter Two. Sort, Filter, and Query a Database
Chapter Three. Forms and Reports
Powerpoint 2003 Chapter One. Getting Started with PowerPoint 2003
Chapter Two. Creating a Presentation
Chapter Three. Formatting a Presentation
Integrated Projects Chapter One. Using Access Data with Other Office Applications
Chapter Two. Using Tables in Word and Excel
Chapter Three. Using Excel as a Data Source in a Mail Merge
Chapter Four. Linking Data in Office Documents
Chapter Five. Creating Presentation Content from Office Documents GO! with Microsoft Office 2003 Brief (2nd Edition) ISBN: 0131878646
EAN: 2147483647 Year: 2004
Pages: 448
Flylib.com © 2008-2020. If you may any questions please contact us: flylib@qtcs.net 
|