Muting Keyframes
You may have wished for the ability to temporarily disable keyframes in After Effects. Your wish is granted via the simplest possible expression: a static value.
Close-Up: Creative Accounting
There are, of course, workarounds to the limitations of expressions. The commonly used Levels effect, for example, has an Individual Controls version that was created expressly (pun intended) for use with expressions.
For sampling sound, Trapcode (www.trapcode.com) offers Sound Keys, which can translate waveforms into numerical data suitable for expressions.
As for such unreachable data as mask vertices, scripting, not expressions, is capable of interacting with their values. Although scripting and expressions use the same language, there is at present no way to call a script with an expression.
Where would you use this? Let's say that you have an element whose Opacity is keyframed to 0% at its starting frame of an animation. Or perhaps you want to adjust an element to match the rest of a scene at a time when it is out of frame. The idea is to temporarily change the property value without touching the keyframes.
The expressions solution for this is trivially easy, and it doesn't require an understanding of JavaScript. It might even help you understand something basic about expressions: They hold a value that can be the result of calculating various properties or can simply be typed in.
Open 10_basicExpression.aep and look at the composition called bouncing ball for expression. A Tint effect has been added that turns the ball red each time it hits the floor. Suppose that you wish to disable this effect temporarily without deleting its keyframes altogether.
Begin by revealing Tint (with the layer highlighted, press E to reveal effects or U for all keyframed properties) and set an expression for the Amount to Tint property. To do this, you can use Animation > Add Expression or its keyboard shortcut (Alt+Shift+=/Option+Shift+=), but the most direct method is to Alt-click (Option-click) the stopwatch of the property that requires the expression.
A few changes occur as the result of setting an expression (Figure 10.1). A new line is revealed below the Amount to Tint property that reads Expression: Amount to Tint. A button whose icon looks like an equals sign appears to the right, highlighted; this Enable Expression toggle activates and deactivates the expression. The other icons come into play a little later. Over in the main area of the Timeline (Graph Editor off for now), the text effect("Tint")(3) is automatically highlighted, and a cursor blinks to the right of this text, indicating that you can edit it by typing.
Figure 10.1. The expression is activated by Alt-clicking on the stopwatch. The value for Amount to Tint is now displayed in red, and a second line appears containing the Expression controls; the expression text itself appears in the main area of the Timeline and is highlighted until you click elsewhere.
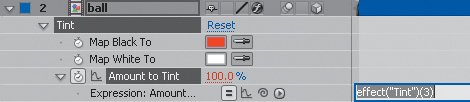
The default expression effect("Tint")(3) tells After Effects to look at the layer's effects for the one called Tint and to use the value of its third property (Amount to Tint). Simply applying an expression changes nothing about where the value comes from.
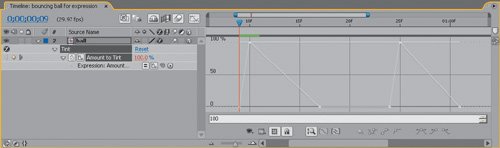
Now write your own expression by typing a number. Replace effect("Tint")(3) with 100 and either press Enter (not Return) or just click outside the text area. Amount to Tint now uses this one value, 100, on every frame of the composition (Figure 10.2). The keyframes have effectively been "frozen" or "muted" (whichever term you prefer), replaced with a constant value.
Figure 10.2. If a numerical property contains keyframes, entering a number in the expressions field overrides those keyframes with the specified value. The flat white line along the top of the Graph Editor demonstrates what's going on, relative to the gray lines below showing the previous animated values.
Notes
This example is admittedly a bit esoteric for the sake of simplicity; situations in which I've found this technique useful include removing transforms from an element I want to color correct, and holding opacity at 100% for an element that is blinking or animating at a nearly invisible level in the scene.
Toggling the Expressions button (that equals sign in the expression controls) enables and disables the keyframes. What could possibly go wrong here? Why, you could forget to disable or delete (Alt/Option-click on the stopwatch) the expression when you're done and want the animated values to render. That's about it.
Things do get a little more complex with properties that contain more than one value, such as Position. These are called arrays and are detailed in the next section.
Linking Animation Data |
Section I. Working Foundations
The 7.0 Workflow
- The 7.0 Workflow
- Workspaces and Panels
- Making the Most of the UI
- Settings: Project, Footage, Composition
- Previews and OpenGL
- Effects & Presets
- Output: The Render Queue
- Study a Shot like an Effects Artist
The Timeline
- The Timeline
- Organization
- Animation Methods
- Keyframes and The Graph Editor
- Uber-mastery
- Transform Offsets
- Motion Blur
- Manipulating Time Itself
- In Conclusion
Selections: The Key to Compositing
- Selections: The Key to Compositing
- The Many Ways to Create Selections
- Compositing: Science and Nature
- Alpha Channels and Premultiplication
- Masks
- Combining Multiple Masks
- Putting Masks in Motion
- Blending Modes: The Real Deal
- Track Mattes
Optimizing Your Projects
- Optimizing Your Projects
- Navigating Multiple Compositions
- Precomposing and Nesting
- Adjustment and Guide Layers
- Understanding Rendering Order
- Optimizing After Effects
- Onward to Effects
Section II. Effects Compositing Essentials
Color Correction
Color Keying
- Color Keying
- Good Habits and Best Practices
- Linear Keyers and Hi-Con Mattes
- Blue-Screen and Green-Screen Keying
- Understanding and Optimizing Keylight
- Fixing Typical Problems
- Conclusion
Rotoscoping and Paint
- Rotoscoping and Paint
- Articulated Mattes
- Working Around Limitations
- Morphing
- Paint and Cloning
- Conclusion
Effective Motion Tracking
- Effective Motion Tracking
- The Essentials
- Optimizing Tracking Using 3D
- Extending a Track with Expressions
- Tracking for Rotoscoping
- Using 3D Tracking Data
- Conclusion
Virtual Cinematography
- Virtual Cinematography
- 5D: Pick Up the Camera
- Storytelling and the Camera
- Camera Blur
- The Role of Grain
- Film and Video Looks
- Conclusion
Expressions
- Expressions
- Logic and Grammar
- Muting Keyframes
- Linking Animation Data
- Looping Animations
- Smoothing and Destabilizing
- Offsetting Layers and Time
- Conditionals and Triggers
- Tell Me More
Film, HDR, and 32 Bit Compositing
- Film, HDR, and 32 Bit Compositing
- Details
- Film 101
- Dynamic Range
- Cineon Log Space
- Video Gamma Space
- Battle of the Color Spaces
- Floating Point
- 32 Bits per Channel
- Conclusion
Section III. Creative Explorations
Working with Light
- Working with Light
- Light Source and Direction
- Creating a Look with Color
- Backlighting, Flares, Light Volume
- Shadows and Reflected Light
- HDR Lighting
- Conclusion
Climate: Air, Water, Smoke, Clouds
- Climate: Air, Water, Smoke, Clouds
- Particulate Matter
- Sky Replacement
- The Fog, Smoke, or Mist Rolls In
- Billowing Smoke
- Wind
- Water
- Conclusion
Pyrotechnics: Fire, Explosions, Energy Phenomena
- Pyrotechnics: Fire, Explosions, Energy Phenomena
- Firearms
- Sci-Fi Weaponry
- Heat Distortion
- Fire
- Explosions
- In a Blaze of Glory
Learning to See
Index
EAN: 2147483647
Pages: 157
