Uber-mastery
Über mastery
With a nod to Friedrich Nietzsche, who hypothesized the übermensch (literally the "over-man" a.k.a. superman), let's focus in on the shortcuts that will make you a rapid-fire animator. This section is not only about the überkey, which is among the most useful shortcuts in all of After Effects, but also about taking control of keyframe data in general.
The überkey is available in two delicious flavors: U and UU. In the same 02_graphEditor.aep project, highlight the ball layer, and press U. All properties with keyframes (Position and Scale in this case) are revealed. Press U again to toggle, and they are concealed. You could arrive cold at an animation you've never seen and immediately find out what's been animated and where.
Tip
To reveal only applied effects on a selected layer, use the E key. Or, if the überkey reveals effects and transforms and you want only the transforms, use Shift+E to toggle off revealed effects.
But wait, there's more. Now highlight the bg layer, which contains no keyframes whatsoever, and press UU (two Us in quick succession). All of the properties that have been set to any value other than their defaultincluding those with keyframes (of which there are none in this case)are revealed.
The utility of the U shortcut is immediately obvious: It's a quick way to get at keyframes to edit them or to find a keyframe that you suspect is hiding somewhere. But UUnow that is a full-on problem-solving tool all to itself. It allows you to quickly investigate what has been edited on a given layer, is helpful when troubleshooting your own layer settings, and is priceless when investigating an unfamiliar project. Highlight all of the layers in your comp, press UU, and you have before you all of the edits that have been made to all of the layer properties.
Notes
What's missing from the UU shortcut's reach? Any settings in nested compositions cannot be seen, other than by Alt-clicking (Option-clicking) to open them and UU on their layers as well. Locked layers are not affected by UU, and shy layers remain shy (and thus potentially hidden, although their properties are revealed). Key settings that affect a layer's appearance but are not properties, such as Blending Modes and Motion Blur (discussed later) are not revealed by UU.
Dissecting a Project
If you've been handed an unfamiliar project and need to make sense of it quickly, there are a couple of other tools to help you.
The Flowchart view offers a broad overview of the project's structure; it can be enabled with the right-most button along the bottom of the Composition panel, via Window > Flowchart or using Ctrl+F11/Cmd+F11. You have to see it to believe it: a nodal interface in After Effects (Figure 2.25), the least nodal of any of the major compositing applications.
Figure 2.25. What node-based compositing application is this? Why, the decidedly non-nodal After Effects. You cannot interact with this view the way a Shake user might expect, although you can open (or even delete) compositions (or even footage and layers) from this view.
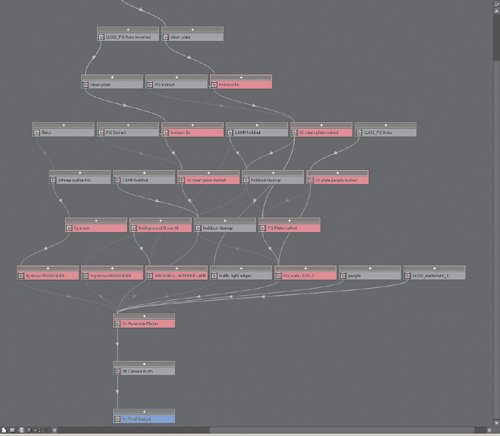
This view shows how objects (layers, compositions and effects) have been used and how they interrelate. The + button above a composition reveals its components; for the cleanest view, toggle layers and effects off at the lower left.
In the panel menu you can choose your view; Left to Right fits well on a typical monitor. Whether you choose straight or curved connecting lines is up to you, but you can clean up the view by clicking this toggle holding the Alt/Option key.
You can open any comp by double-clicking it in the Flowchart. Turn off the Shy toggle at the top if it's on, highlight all of the layers (Ctrl+A/Cmd+A), and enter UU to reveal all altered properties. Now preview the composition, stopping at any frame where you have questions and investigating which settings and animations apply to that point in time. If you find a nested composition, open it and investigate in the same manner.
It's most effective to start with the top-level compositions (those not contained in other compositions) and work your way backward. I wouldn't call this process speedy with a complex project, but if you approach it in this logical manner, you can escape feeling like you're in that dream where you showed up to work without any pants on.
Keyframe Navigation and Selection
Although no shortcut can hold a candle to the überkey, there are several other useful animation shortcuts:
- J and K keys navigate backward and forward, respectively, through all visible keyframes (and layer markers, and Work Area boundaries).
Tip
J and K hit all revealed keyframes, so to navigate in one channel only, you can click the arrows that appear under A/V Features (the Keys column). Or reveal only the keyframes in that channel; J and K will ignore the rest.
- To select all keyframes for a property, click that property's name.
- Context-click on a keyframe to Select Previous Keyframes or Select Following Keyframes. There is even an option to Select Equal Keyframes (those with an identical value).
- You can use Alt/Option+Shift+the shortcut corresponding to a transform property (P, A, S, R, or T) to set the first keyframe.
- You can also use any stopwatch in the Effect Controls to set the first keyframe for an effect property at the current frame.
- To add a keyframe in Effect Controls without changing any values, context-click on the stopwatch and choose Add Keyframe.
Read on; you are not a keyframe Jediyet.
Notes
Multi-selection works differently with keyframes in the Layer Bar view than anywhere else in the application. To add or subtract a single frame from a selected group, Shift-click. Ctrl/Cmd-clicking on keyframes converts them to Auto-Bezier mode. This is not the case in the Graph Editor view.
Keyframe Offsets
To offset the values of multiple keyframes by the same amount, select them all, make certain that the Current Time Indicator is resting on a frame with one of the selected keyframes, and drag the text value of one of them by your offset amount. If instead, you edit one of these by typing in a new value, all keyframes will be set to that valuenot, in most cases, what you want.
Other tips for working with multiple keyframes include
- Nudge selected keyframes (one or many) forward or backward in time using Alt+Right/Left Arrow (Option+Right/Left Arrow), respectively.
- Deselect keyframes using Shift+F2 only. Select all visible keyframes (without selecting their layers) using Ctrl+Alt+A (Cmd+Option+A).
- Delete a bunch of keyframes (using the Delete key), and the value of the first keyframe remains; turn off the stopwatch to clear them, and the current value remains.
Tip
Ctrl+Alt+A/Cmd+Option+A is useful for deleting a bunch of keyframes while leaving the source layers.
Transform Offsets |
Section I. Working Foundations
The 7.0 Workflow
- The 7.0 Workflow
- Workspaces and Panels
- Making the Most of the UI
- Settings: Project, Footage, Composition
- Previews and OpenGL
- Effects & Presets
- Output: The Render Queue
- Study a Shot like an Effects Artist
The Timeline
- The Timeline
- Organization
- Animation Methods
- Keyframes and The Graph Editor
- Uber-mastery
- Transform Offsets
- Motion Blur
- Manipulating Time Itself
- In Conclusion
Selections: The Key to Compositing
- Selections: The Key to Compositing
- The Many Ways to Create Selections
- Compositing: Science and Nature
- Alpha Channels and Premultiplication
- Masks
- Combining Multiple Masks
- Putting Masks in Motion
- Blending Modes: The Real Deal
- Track Mattes
Optimizing Your Projects
- Optimizing Your Projects
- Navigating Multiple Compositions
- Precomposing and Nesting
- Adjustment and Guide Layers
- Understanding Rendering Order
- Optimizing After Effects
- Onward to Effects
Section II. Effects Compositing Essentials
Color Correction
Color Keying
- Color Keying
- Good Habits and Best Practices
- Linear Keyers and Hi-Con Mattes
- Blue-Screen and Green-Screen Keying
- Understanding and Optimizing Keylight
- Fixing Typical Problems
- Conclusion
Rotoscoping and Paint
- Rotoscoping and Paint
- Articulated Mattes
- Working Around Limitations
- Morphing
- Paint and Cloning
- Conclusion
Effective Motion Tracking
- Effective Motion Tracking
- The Essentials
- Optimizing Tracking Using 3D
- Extending a Track with Expressions
- Tracking for Rotoscoping
- Using 3D Tracking Data
- Conclusion
Virtual Cinematography
- Virtual Cinematography
- 5D: Pick Up the Camera
- Storytelling and the Camera
- Camera Blur
- The Role of Grain
- Film and Video Looks
- Conclusion
Expressions
- Expressions
- Logic and Grammar
- Muting Keyframes
- Linking Animation Data
- Looping Animations
- Smoothing and Destabilizing
- Offsetting Layers and Time
- Conditionals and Triggers
- Tell Me More
Film, HDR, and 32 Bit Compositing
- Film, HDR, and 32 Bit Compositing
- Details
- Film 101
- Dynamic Range
- Cineon Log Space
- Video Gamma Space
- Battle of the Color Spaces
- Floating Point
- 32 Bits per Channel
- Conclusion
Section III. Creative Explorations
Working with Light
- Working with Light
- Light Source and Direction
- Creating a Look with Color
- Backlighting, Flares, Light Volume
- Shadows and Reflected Light
- HDR Lighting
- Conclusion
Climate: Air, Water, Smoke, Clouds
- Climate: Air, Water, Smoke, Clouds
- Particulate Matter
- Sky Replacement
- The Fog, Smoke, or Mist Rolls In
- Billowing Smoke
- Wind
- Water
- Conclusion
Pyrotechnics: Fire, Explosions, Energy Phenomena
- Pyrotechnics: Fire, Explosions, Energy Phenomena
- Firearms
- Sci-Fi Weaponry
- Heat Distortion
- Fire
- Explosions
- In a Blaze of Glory
Learning to See
Index
EAN: 2147483647
Pages: 157
