Firearms
Re-creating gunplay is relatively straightforward via compositing. The key is that everything happens very quicklyusually over the course of a frame or two, three at most.
Two basic types of shots are outlined here: the firing of the gun itself and the result of bullet hits in the scene. The former can be done entirely with compositing. For the latter, compositing helps, but more active scenes of mayhem typically require practical elements, photographed on set.
Tip
There's undoubtedly a scene in some movie somewhere that contains excellent gunplay reference for any scene imaginable. As you prepare to stage these effects, you are encouraged to carefully study, frame by frame and loop after loop, sequences similar to those you wish to createbe they from cheesy television westerns and cop shows to such high-end shoot-'em-ups as The Matrix and Terminator 2.
Ready, Fire, Aim
It can be difficult for actors to work on set without practical effects. The lack of a kick from a handgun, however, shouldn't pose much of a problem. A prop gun clicks when the trigger is pulled, and the actor need only mime the motion of the recoil, or kick. The kick is minor with small handguns, and a much bigger deal with a shotgun (check reference).
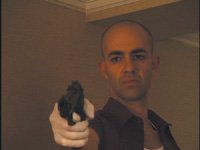
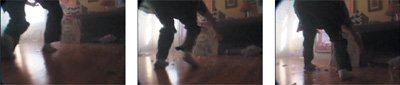
So that's how you start, with a shot of an actor pulling the trigger and miming the kick (Figure 14.1). From there, you typically add just a few basic elements via compositing:
- The muzzle flash
- A smoke puff (optional depending on the lighting and type of gun)
- Discharge of the cartridge or shell (on a semi-automatic)
- Interactive light on the subject firing the gun (depending on the scene lighting and angle)
Figure 14.1. Just by virtue of pulling the trigger on the prop handgun, the actor creates enough motion to set the reaction over which the ensuing muzzle flash will be added. (Image courtesy The Orphanage.)
The actual travel of the bullet out of the barrel is not something you have to worry about; at roughly one kilometer per second, it is generally moving too fast to see amid all the other effects. The bullet is usually evident more by what it causes to happen when it hits something, which is covered in the next section.
Muzzle Flash and Smoke
The clearest indication that a gun has gone off is the flash of light around the muzzle, at the end of the barrel. This small, bright explosion of gunpowder typically lasts only one frame per shot (a repeating firearm is just a series of disconnected single frame flashes), and it can be painted by hand, cloned in from a practical image, or composited from stock reference (Figure 14.2).
Figure 14.2. The angle of the shot and the type of gun affect the muzzle flash effect. The first image is from an M16 rifle; the other is from a handgun. (Images courtesy Artbeats.)
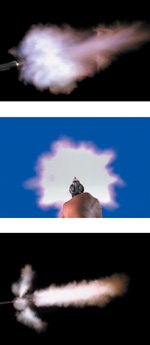
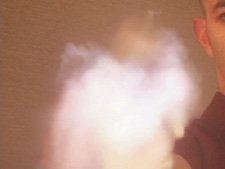
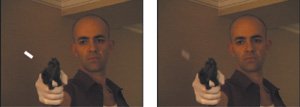
Figure 14.3 shows the addition of a single-frame muzzle flash for the firing of a handgun. Because it is in close-up, the flash obscures much of the frame. It is a mixture of flash and smoke matted in from a pyrotechnic reference shot. All that is really required for this single shot is a single-frame overlay; there's no need to carefully dissipate the smoke to make the shot believable.
Figure 14.3. This close-up of a muzzle flash was added to the plate from Figure 14.1, using only a single frame of smoke from a photographed source via Add mode. (Image courtesy The Orphanage.)
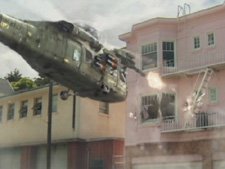
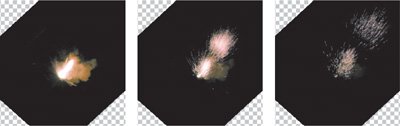
Contrast that with Figure 14.4, which shows a Gatling gun fired from a helicopter. Clearly, this scene has a lot more going on in it than just muzzle flash and smoke. Because it's a repeating gun, the flashes occur on successive frames and the smoke builds up along with debris caused by bullet impacts. The way the shape of the muzzle flash varies over time as well as its relative size and placement are the keys to the shot, picked up from reference.
Figure 14.4. The fiery muzzle flash of a Gatling gun has a characteristic teardrop profile shape; here it was painted in from fire source. (Image courtesy The Orphanage.)
The shape of the muzzle flash depends on the type of gun being fired. Just as with lens flares and other equipment-specific visual elements, you are encouraged to find a movie that has your gun in it. You can even consult the NRA-ILA Web site (www.nraila.org) to learn details such as the relationship of the color and amount of smoke to the type of gunpowder.
Tip
Typically, an explosion travels in two directions from the end of the barrel: arrayed outward from the firing point and in a straight line out from the barrel. If you don't have source that makes this shape at the correct angle, it may be simplest to paint it.
To summarize, you can easily create custom muzzle flashes as follows:
- Search for (or create) smoke, explosion, or fire source (a still image is good enough).
- Add it as a layer with a blending mode (typically Add).
- Automatic weaponry demands that you paint frame by frame (unless you shoot matching effects source), but especially with good reference showing how crude these flashes are, and their basic shape, this can be quick and dirty work, as there is no need for one frame to match the next.
- With any budget for stock footage, you can buy muzzle flashes (such as the Artbeats Gun Stock collection, www.artbeats.com); these are shot over blue or black, ready to be matted, blended, or painted into your shot.
Shells and Interactive Light
If the gun in your scene calls for it, that extra little bit of realism can be added with a secondary animation of a shell popping off the top of a semi-automatic. Figure 14.5 shows just such an element in action. All you need is a four-point mask of a white solid, animated and motion blurred (Figure 14.6). You don't have to worry about the color; instead adjust the element's Opacity to blend it into the scene.
Figure 14.5. A shell pops off of the fired handgun. Note that the shell appears only as a blurred, elongated white element in frame with no discernable detail. A blue-screen shot of an automatic weapon shows a much more discernable shell. (Images courtesy The Orphanage and Artbeats.)
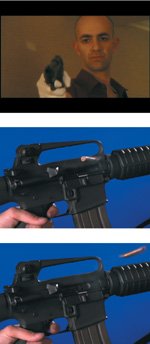
Figure 14.6. All that is required to transform a four-point masked white solid to a shell popping off the gun is heavy motion blur and a sufficiently low Opacity setting. (Images courtesy The Orphanage.)
The bright flash of the muzzle may also cause a brief reflected flash on objects near the gun as well as the subject firing it. Chapter 12, "Working with Light," offers the basic methodology: Softly mask a highlight area, then flash it using an adjustment layer containing a Levels effect or a colored solid with a suitable blending mode.
As a general rule, the lower the ambient light and the larger the weapon, the greater the likelihood of interactive lighting. A literal "shot in the dark" would fully illuminate the face of whomever (or whatever) fired it, just for a single frame. It's a great dramatic effect, but one that is very difficult to re-create in post. This is a rare case where firing blanks on set might be called for, unless you can fake it by dropping in a single-frame still of the brightly lit assassin.
Bullet Hits
Bullets that ricochet on set are known as squib hits because they typically make use of squibs, small explosives with the approximate power of a firecracker that go off during the take. Sometimes squibs are actual firecrackers. It is possible to add bullet hits without using explosives on set, but frenetic gunplay will typically demand a mixture of on-set action and post-production wizardry.
Figure 14.7 shows a before-and-after shot adding a bullet hit purely in After Effects. In this case, the bullet does not ricochet, but is embedded directly into the solid metal of the truck. In such a case, all you need to do is to add the results of the damage on a separate layer at the frame where the bullet hits; you can paint this, or acquire it from stock footage. The element can then be motion tracked to marry it solidly to the background (Figure 14.8).
Figure 14.7. This sequence of frames shows a second bullet hitting the cab of the truck, using two elements: the painted bullet hit and the spark element, whose source was shot on black and added via Screen mode. (Images courtesy markandmatty.com.)
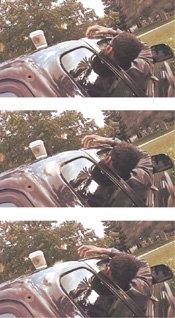
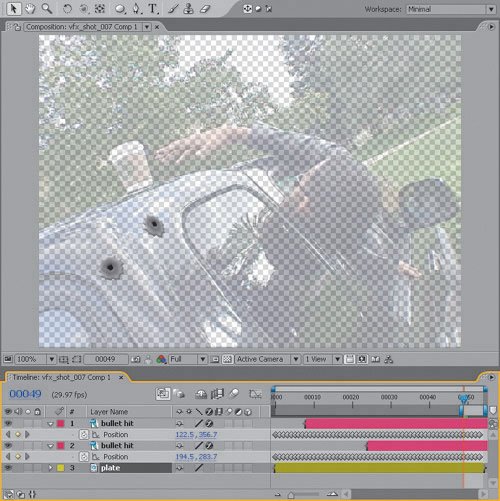
Figure 14.8. The bullet hit is one opportunity to develop your paint skills. The example shows a bullet hole in metal, which has a fairly consistent look. Here, the result is motion tracked to match the source background plate. (Images courtesy markandmatty.com.)
At the frame of impact, and continuing a frame or two thereafter, a shooting spark and possibly a bit of smoke (if the target is combustiblenot in the case of a steel vehicle) will convey the full violence of the bullets. As with the muzzle flash, this can vary from a single frame to a more fireworks-like shower of sparks tracked in over a few frames (Figure 14.9).
Figure 14.9. A source spark element using Add or Screen blending mode to drop out all of the black background. (Images courtesy markandmatty.com.)
A bullet hit explosion can be created via a little miniature effects shoot, using a fire-retardant black background (a flat, black card might do it) and some firecrackers (assuming you can get them). The resulting flash, sparks, and smoke stand out against the black, allowing the element to be composited via a blending mode (such as Add or Screen), a hi-con matte (Chapter 6, "Color Keying"), or a plug-in such as Knoll UnMult. If dangerous explosives aren't your thing, even in a controlled situation, stock footage is available.
Figure 14.10 shows a before-and-after shot of a scene that demanded a lot of extra flying debris as the character's apartment was strafed by the previously depicted helicopter. Compositing in this debris after the shot was taken would be highly inconvenient, causing an impractical amount of extra work when compared with firing a BB gun at items on the set and enhancing the effect with sparks and smoke in After Effects (the actual method used).
Figure 14.10. A BB gun was aimed at various breakaway objects on location while assistants hurled other small objects into the scene to add the necessary amount of debris and mayhem on location. Practical debris is very difficult to add after the fact. (Images courtesy The Orphanage.)
So to recap, a good bullet hit should include
- Smoke or sparks at the frame of impact, typically lasting between one and five frames
- The physical result of the bullet damage (if any) painted and tracked into the scene
- Debris in cases where the target is prone to shattering or scattering
Later in this chapter, you'll see how larger explosions have much in common with bullet hits, which are essentially just miniature explosions. In both cases, a bit of practical debris will often enhance believability.
Sci Fi Weaponry |
Section I. Working Foundations
The 7.0 Workflow
- The 7.0 Workflow
- Workspaces and Panels
- Making the Most of the UI
- Settings: Project, Footage, Composition
- Previews and OpenGL
- Effects & Presets
- Output: The Render Queue
- Study a Shot like an Effects Artist
The Timeline
- The Timeline
- Organization
- Animation Methods
- Keyframes and The Graph Editor
- Uber-mastery
- Transform Offsets
- Motion Blur
- Manipulating Time Itself
- In Conclusion
Selections: The Key to Compositing
- Selections: The Key to Compositing
- The Many Ways to Create Selections
- Compositing: Science and Nature
- Alpha Channels and Premultiplication
- Masks
- Combining Multiple Masks
- Putting Masks in Motion
- Blending Modes: The Real Deal
- Track Mattes
Optimizing Your Projects
- Optimizing Your Projects
- Navigating Multiple Compositions
- Precomposing and Nesting
- Adjustment and Guide Layers
- Understanding Rendering Order
- Optimizing After Effects
- Onward to Effects
Section II. Effects Compositing Essentials
Color Correction
Color Keying
- Color Keying
- Good Habits and Best Practices
- Linear Keyers and Hi-Con Mattes
- Blue-Screen and Green-Screen Keying
- Understanding and Optimizing Keylight
- Fixing Typical Problems
- Conclusion
Rotoscoping and Paint
- Rotoscoping and Paint
- Articulated Mattes
- Working Around Limitations
- Morphing
- Paint and Cloning
- Conclusion
Effective Motion Tracking
- Effective Motion Tracking
- The Essentials
- Optimizing Tracking Using 3D
- Extending a Track with Expressions
- Tracking for Rotoscoping
- Using 3D Tracking Data
- Conclusion
Virtual Cinematography
- Virtual Cinematography
- 5D: Pick Up the Camera
- Storytelling and the Camera
- Camera Blur
- The Role of Grain
- Film and Video Looks
- Conclusion
Expressions
- Expressions
- Logic and Grammar
- Muting Keyframes
- Linking Animation Data
- Looping Animations
- Smoothing and Destabilizing
- Offsetting Layers and Time
- Conditionals and Triggers
- Tell Me More
Film, HDR, and 32 Bit Compositing
- Film, HDR, and 32 Bit Compositing
- Details
- Film 101
- Dynamic Range
- Cineon Log Space
- Video Gamma Space
- Battle of the Color Spaces
- Floating Point
- 32 Bits per Channel
- Conclusion
Section III. Creative Explorations
Working with Light
- Working with Light
- Light Source and Direction
- Creating a Look with Color
- Backlighting, Flares, Light Volume
- Shadows and Reflected Light
- HDR Lighting
- Conclusion
Climate: Air, Water, Smoke, Clouds
- Climate: Air, Water, Smoke, Clouds
- Particulate Matter
- Sky Replacement
- The Fog, Smoke, or Mist Rolls In
- Billowing Smoke
- Wind
- Water
- Conclusion
Pyrotechnics: Fire, Explosions, Energy Phenomena
- Pyrotechnics: Fire, Explosions, Energy Phenomena
- Firearms
- Sci-Fi Weaponry
- Heat Distortion
- Fire
- Explosions
- In a Blaze of Glory
Learning to See
Index
EAN: 2147483647
Pages: 157
