Backlighting, Flares, Light Volume
Situations in which light sources appear prominently in a scene are something of a gift to a compositor: They offer a clear target. Nail them, and you will sell your scene in ways that the viewer can hardly perceive. This is the kiss of love, that something extra that isn't necessary to get the shot finaled but that adds to the shot.
Notes
"Kiss of love" is not a technical term. It is attributed to Stu Maschwitz from when he supervised Star Wars, Episode One: The Phantom Menace at Industrial Light + Magic. "I still use that term today," he says. "It's a great way to get an artist to think of a shot as theirs. Examples of kisses of love are reflections in things that might not strictly need it, aperture flares for lights leaving the frame (carefully matched to reference), or animating a starfighter pilot's head to turn as he banks."
The early days of computer graphics were littered with bad light artifacts. In one particular sci-fi series, any shot in outer space that included a sun or a star (which seemed to be most of them) got a big, prominent lens flare. This was based not on visual reference, but stereotyped ideas and tricks based on cool new tools. It was years before NewTek's LightWave 3D, which actually can render beautiful images, lost its reputation as "the lens flare software."
Ironically, big, bold, daring choices about light can and should become almost invisible if they are appropriate to a scene. Generally, the rule about strong lighting choices is this: If the choice is going to stand out, it should do something to place the viewer's attention where it needs to be to serve the story. If a strong choice doesn't serve the story, maybe it had better not hog the focus of the shot.
Backlighting and Light Wrap
The conditions of a backlit scene are a classic example where the compositor often does not go far enough to match what actually happens in the real world. This is the general subject of Chapter 15, "Learning to See," which alludes specifically to light wrap. Here, then, is the methodology for creating your own light wrap.
Notes
As you may know, light wrap plug-in effects do exist for After Effects. This is a case where "roll your own" works just as well, if not better.
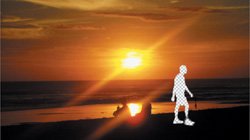
This technique is designed for scenes that contain backlighting conditions and a foreground that, although it may be lit to match those conditions, lacks light wrapping around the edges (Figure 12.17).
Figure 12.17. The silhouetted figure has been color corrected to match the scene, but lacks any of the light wrap clearly visible around the figures seated on the beach.

You set up the light wrap effect as follows:
|
1. |
Create a new composition that contains the background and foreground layers, exactly as they are positioned and animated in the master composition. You can do this simply by duplicating the master comp and renaming it something intuitive, such as Light Wrap. If the foreground or background consists of several layers, it will probably be simpler to prcompose them into two layers, one each for the foreground and background. |
|
2. |
Set Silhouette Alpha Blending mode for the foreground layer, punching a hole in the background (Figure 12.18). Figure 12.18. Using the alpha of the layer to which it's applied, Silhouette Alpha punches a hole through that layer and all underlying layers.
|
|
3. |
Add an adjustment layer at the top, and apply Fast Blur. |
|
4. |
In Fast Blur, check the Repeat Edge Pixels toggle on and crank up the blurriness (Figure 12.19). Figure 12.19. Heavy Fast Blur causes the background image color to bleed into the area of the underlying alpha channel.
|
|
5. |
Duplicate the foreground layer, move the copy to the top, and set its Blending mode to Stencil Alpha, leaving a halo of background color that matches the shape of the foreground (Figure 12.20). Figure 12.20. Stencil Alpha provides the inverse effect, preserving only the areas of the composition inside the alpha of the top layer to which it is applied. You have your light wrap.
|
|
6. |
Place the resulting comp in the master comp and adjust opacity (and optionally switch the Blending mode to Add, Screen, or Lighten) until you have what you're after. You may need to go back to the Light Wrap comp to further adjust the blur (Figure 12.21). Figure 12.21. The addition of light wrap causes the figure to appear as part of the scene.
|


One final thing to keep in mind as you adjust a scene with backlit conditions: If there is no fill light on the foreground subject whatsoever, most cameras are incapable of picking up as much detail in the foreground as your eye might see. In your reference photo, an unlit foreground subject might appear completely silhouetted. Because the foreground subjects are often the stars of the scene, you might have to compensate, allowing enough light and detail in the foreground that the viewer can see facial expressions and other important dramatic detail.
In other words, this might be a case where your reference conflicts with what is needed for the story. Try to strike a balance, but remember, if the story loses, everyone loses.
Close-Up: Three-Way Blur
After Effects offers lots of different blur effects, but most artists use one of three. Some automatically reach for Gaussian Blur; others have noticed that Fast Blur, applied to a layer set to best quality, is no different (except that it renders faster); and finally, there is Box Blur, which if used correctly supercedes the other two.
The key is the Iterations setting. At the default (1), the result of a Box Blur can seem crude and, well, boxy, but it also approximates the look of a defocused lens (in some ways obviating the need for Lens Blur, which is not HDR compatible). But you can raise this setting as high as you want, up to 50, which not only amplifies but also refines the blur kernel.
Box Blur has a couple of other advantages as well. Blur Dimensions can be set to Horizontal or Vertical only, creating a directional blurring effect. Finally, there is a bug with Fast Blur in After Effects 7.0: Applied to a masked layer, with Repeat Edge Pixels activated, it fails to blur beyond the boundaries of the mask (making it virtually unusable in such a case).
Glints and Flares
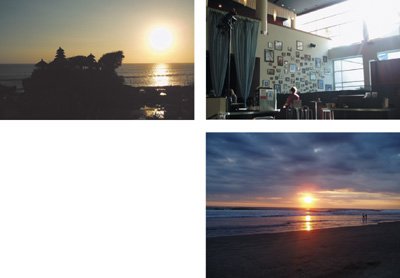
Just because that big lens flare coming from the sun peeking around the side of that sci-fi moon looks cheesy doesn't mean all lens flares are cheesy. Of course, real lens flares are never cheesy: Our eyes accept them as natural, even beautiful artifacts without necessarily understanding anything about what actually causes them (Figure 12.22a, b, and c).
Figures 12.22a, b, and c. Three situations in which what the camera yielded in reality might not be what you'd expect in theory. Figures 12.22a has no lens flare, when you might expect one; 12.22b has just the barest suggestion of a flare spiking out of the huge light source pouring in through the window, and 12.22c has a lens flare that is more natural but far less apparent than the flares you would get from the Lens Flare effect.
To get lens flares or even simple glints right, it is vital to look at good reference. This will seem strange if you consider it; probably only a tiny percentage of your viewers can tell the difference between lens flares from a 50 mm prime and a 120 mm zoom lens. Yet somehow, if you get the lens flare wrong, it reads as phony to a majority of viewers. Weird.
Notes
You won't see lens flares in many Hollywood films made prior to the 1970s. Flares were long regarded as errors on the part of the cinematographer, and shots containing them were carefully noted on the camera report and retaken. This all changed with the appearance of such films as Easy Rider, which seemed to demand a casual, documentary style, as well as pictures from space that showed the sun emerging brilliantly around the curve of our own planet.
As is acknowledged in Chapter 15, it's possible to create a lens flare effect from scratch, potentially using well over a dozen nested compositions, based on reference. This brings up two very cool points:
- Lens flares are consistent for a given lens. Their angles vary according to the position of the light, but not the shape or arrangement of the component flares, so nothing need stop you from re-creating your own.
- Although a 17-element lens flare makes for a good battle story, some of the most natural-looking lens flares barely grab your attention at first and have only one or two simple componentseven just a bright spot in the frame, sometimes.
Moreover, not every bright light source that appears in frame will cause a lens flarenot even the sun. (Look again at Figure 12.22a.)
Most After Effects users will prefer a built-in solution that goes beyond the three settings included with the program's rather useless built-in Lens Flare (useless because everyone knows those three flares; they haven't changed in the better part of a decade). There is more than one option available on the market.
John Knoll is responsible for a great lens flare package called Knoll Light Factory, available from Red Giant Software. A demo is included on the book's disc. Without lapsing into a full-fledged product endorsement, there are two very helpful things about this set: First is that John knows flares, and the presets that are contained in these plug-ins are derived from careful studies of the corresponding lenses. If they're in there, it's probably because Industrial Light + Magic shot a project with that lens, and John took the time to get the preset right. Second, you don't have to rely on presets with this one; it is modular, allowing you to pick and choose various flare effects. In the interest of fairness, I will say that many users like to use the lens flare plug-in offered by The Foundry as part of Tinderbox. You can create a realistic looking flare with that plug-in, but some pretty goofy-looking flares are made with its default settings. No matter which software you use, the key, as always, is to do your visual research.
Close-Up: Geek Alert: What Causes a Lens Flare?
Lens flares are artifacts that are never seen with your naked eye. They are artifacts created within the camera lens itself, caused by secondary reflections bouncing around between the camera elements. Because they are caused within the lens, they will always appear superimposed over the image, even over objects in the foreground that partially block the background light.
Unlike your eye, which has only one very flexible lens, camera lenses are typically made up of a series of inflexible lens elements. These elements are coated to prevent light reflecting off of them under normal circumstances. Extreme amounts of light, however, are reflected somewhat by each element.
Zoom lenses contain many focusing elements and tend to generate a complex-looking flare with lots of individual reflections. Prime lenses generate fewer.
Several other factors besides the lens elements also contribute to the look of a flare. Aperture blades within the lens cause highly reflective corners that often result in streaks, the number of streaks corresponding to the number of blades. The shape of the flares sometimes corresponds to the shape of the aperture (a pentagon for a five-sided aperture, a hexagon for six). Dust and scratches on the lens also reflect light.
Finally, lens flares look very different depending on whether they were shot on film or video, the excess light bleeding out in different directions and patterns.
Glints
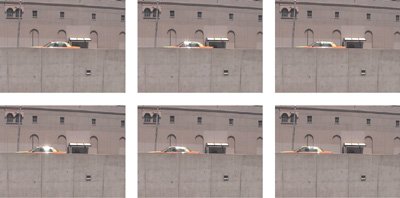
Glints are related to lens flares in that they are also the result of bright light found directly in the scene, but glints are unique in that they are a natural effect, commonly seen with the naked eye, not a lens effect. Figure 12.23 shows an example of a glint in the footage that was used in the Chapter 5 color matching example.
Figure 12.23. This sequence shows the glint that plays off the chrome areas of the taxi as it passes a spot in the frame where the sun is reflected directly into the camera lens.
The glints observed on passing cars, then, represent an opportunity to replicate them directly on the computer-generated plane passing through the shot. This is a great example of a detail that is rarely added, which constitutes a kiss of love for the shot.
The great thing about glints is that they're easily observed (especially if they're already in the shot) and nearly as easily replicated, although in the taxi example shown, getting them right may involve adding unique glints to several frames in a row. The glint is caused when something in the frame (chrome along the taxi's windows in the example) acts like a mirror, reflecting the overhead sun directly toward the camera.
In the shot from Chapter 5, the plane moves rather quickly through frame, and the glints on the taxi seem to occur just to the left of the frame's center, so that's the reference. You're looking for a hotspot on the plane that passes that point in the frame, and you get one on the tail.
By zooming in on your reference, you get the color and shape of a typical isolated glint (Figure 12.24). And behold: It's a white blotch with six thin streaks coming off of it (which probably corresponds to a six-sided aperture). Looks like something you can paint rather quickly, no?
Figure 12.24. There's not a whole lot to a glint when you look at it closely, especially at video resolution.

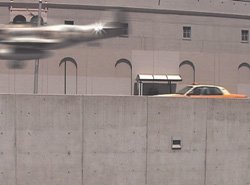
This is a perfect case in which it's best not to be a perfectionist. Close-up, the result of my quickly painted glint looks most unimpressive indeed. But place it into a fast-moving shot that was never meant to be studied frame by frame, and I've just bought myself a good dose of extra realism for a few minutes' extra work (Figure 12.25).
Figure 12.25. The plane passes by, hand-painted glints added to its tail.
Light Scattering and Volume
The phenomena of light scattering and its most dramatic and visible result, volumetric light, are also the result of what happens to rays of light as they encounter particles in the air. The atmosphere does not permit light to travel directly to the camera, uninterrupted. Instead, the light ricochets off tiny particles in the air, revealing its path.
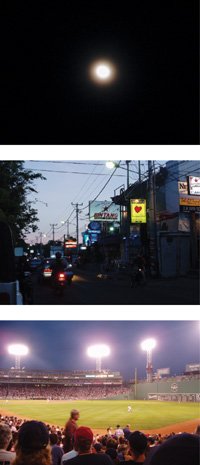
There are other situations in which this phenomenon occurs, closer up and more dramatically. Lights that appear in the scene, casting their beams at the camera, tend to have a glowing halo around them. If the light traveled directly to the camera, the outline of the source light would be clear. Instead, light rays hit particles on their way to the camera and head off in slightly new directions, causing the halo (Figure 12.26).
Figure 12.26. The glows of a full moon on a clear night, of a taillight receding into the distance, of stadium lights at duskwe get so used to seeing the halo around these we hardly notice it after a while.
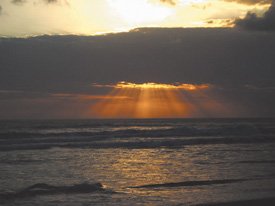
Place more particles in the air (in the form of smoke, fog, or mist), and you get more of a halo, as well as the conditions under which volume light and such related phenomena as God rays can occur. These are the result not only of light scattering, but of the fact that light from an omnidirectional source, such as the sun, travels away from the source via a continuous arc of potential angles (Figure 12.27).
Figure 12.27. The cathedral of light known to the pious and pagan alike as God rays.
What does all this mean to you? You ought to re-create these phenomena when they're called for, not only because they look realistic but because they tend to look cool. As a compositor you don't want to miss an opportunity like that. After Effects has no built-in, one-button function for adding these types of effects, and so your method will vary depending on the shot.
A soft feathered mask roughly the shape of the source, applied to a solid that is roughly the color of the intended effect is often all you need. For visible particulate matter, a Fractal Noise effect can be animated (as is detailed in the following chapter).
Notes
On The Day After Tomorrow, one of the shots done at The Orphanage required "inverse" God rays (occlusion, really) caused by the Empire State Building blocking the sun in a heavy snowfall. In other words, just as the rays themselves array outward, so do the shadows caused by large objects blocking them. With this phenomenon nailed, the shot was not only more accurate but more interesting to watch.
Although After Effects contains no ability to create and render direct visible lights and their effects (for example, if you place a point light in your scene, you see its result but not the light itself), a plug-in from Trapcode called Lux adds that capability, so it is an option as well. A demo of Lux is included on the book's disc.
Shadows and Reflected Light |
Section I. Working Foundations
The 7.0 Workflow
- The 7.0 Workflow
- Workspaces and Panels
- Making the Most of the UI
- Settings: Project, Footage, Composition
- Previews and OpenGL
- Effects & Presets
- Output: The Render Queue
- Study a Shot like an Effects Artist
The Timeline
- The Timeline
- Organization
- Animation Methods
- Keyframes and The Graph Editor
- Uber-mastery
- Transform Offsets
- Motion Blur
- Manipulating Time Itself
- In Conclusion
Selections: The Key to Compositing
- Selections: The Key to Compositing
- The Many Ways to Create Selections
- Compositing: Science and Nature
- Alpha Channels and Premultiplication
- Masks
- Combining Multiple Masks
- Putting Masks in Motion
- Blending Modes: The Real Deal
- Track Mattes
Optimizing Your Projects
- Optimizing Your Projects
- Navigating Multiple Compositions
- Precomposing and Nesting
- Adjustment and Guide Layers
- Understanding Rendering Order
- Optimizing After Effects
- Onward to Effects
Section II. Effects Compositing Essentials
Color Correction
Color Keying
- Color Keying
- Good Habits and Best Practices
- Linear Keyers and Hi-Con Mattes
- Blue-Screen and Green-Screen Keying
- Understanding and Optimizing Keylight
- Fixing Typical Problems
- Conclusion
Rotoscoping and Paint
- Rotoscoping and Paint
- Articulated Mattes
- Working Around Limitations
- Morphing
- Paint and Cloning
- Conclusion
Effective Motion Tracking
- Effective Motion Tracking
- The Essentials
- Optimizing Tracking Using 3D
- Extending a Track with Expressions
- Tracking for Rotoscoping
- Using 3D Tracking Data
- Conclusion
Virtual Cinematography
- Virtual Cinematography
- 5D: Pick Up the Camera
- Storytelling and the Camera
- Camera Blur
- The Role of Grain
- Film and Video Looks
- Conclusion
Expressions
- Expressions
- Logic and Grammar
- Muting Keyframes
- Linking Animation Data
- Looping Animations
- Smoothing and Destabilizing
- Offsetting Layers and Time
- Conditionals and Triggers
- Tell Me More
Film, HDR, and 32 Bit Compositing
- Film, HDR, and 32 Bit Compositing
- Details
- Film 101
- Dynamic Range
- Cineon Log Space
- Video Gamma Space
- Battle of the Color Spaces
- Floating Point
- 32 Bits per Channel
- Conclusion
Section III. Creative Explorations
Working with Light
- Working with Light
- Light Source and Direction
- Creating a Look with Color
- Backlighting, Flares, Light Volume
- Shadows and Reflected Light
- HDR Lighting
- Conclusion
Climate: Air, Water, Smoke, Clouds
- Climate: Air, Water, Smoke, Clouds
- Particulate Matter
- Sky Replacement
- The Fog, Smoke, or Mist Rolls In
- Billowing Smoke
- Wind
- Water
- Conclusion
Pyrotechnics: Fire, Explosions, Energy Phenomena
- Pyrotechnics: Fire, Explosions, Energy Phenomena
- Firearms
- Sci-Fi Weaponry
- Heat Distortion
- Fire
- Explosions
- In a Blaze of Glory
Learning to See
Index
EAN: 2147483647
Pages: 157
