Blending Modes: The Real Deal
Blending Modes The Real Deal
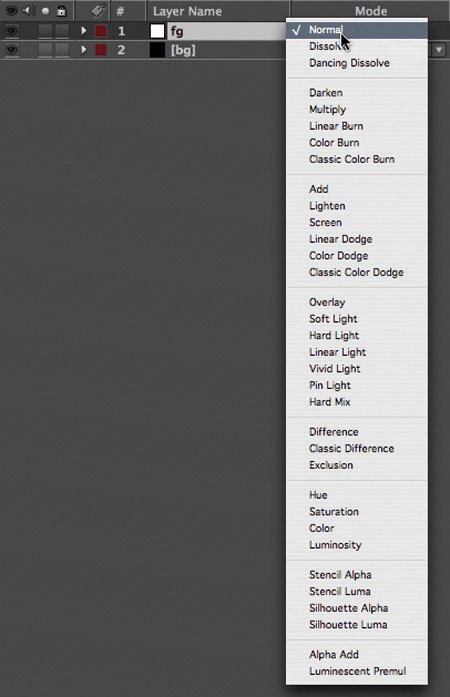
After Effects includes 34 blending modes, each created with a specific purpose (Figure 3.22)although no one is quite sure in what context Dancing Dissolve was ever useful (and I'm only half joking). For effects work, moreover, the majority of them are not particularly recommended. In fact, traditional optical compositing would effectively include only two of them: Add and Multiply.
Figure 3.22. With 34 blending modes to choose from, it's virtually guaranteed that less experienced users will be easily overwhelmed and compelled to play hunt and peck. You will likely use a small subset of these 90% of the time.
Notes
"Traditional optical compositing" includes all effects films made prior to the 1990s. The optical compositor was capable of bi-packing (multiplying) and double-exposing (adding) two source frames (layers). Many sophisticated effects films were completed using these limited methods.
So that's it? Use these two or none at all? Not quiteI'll point out a few other useful modes as well. Once you understand how your options work, you can make informed compositing decisions, rather than lazily playing Go Fish by trying one mode after the other until you see something you kind of like.
Notes
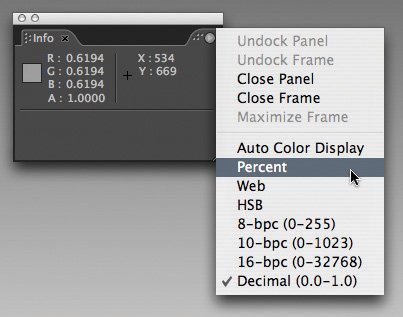
These mathematical descriptions of blended pixel values use a color range normalized to 1; in other words, the full range of pixel values is described as 0 to 1 instead of 0 to 255, as it typically appears in your color controls. A medium gray on any channel is 0.5 instead of 128, pure white is 1, and pure black is 0 (Figure 3.23). This makes it much simpler to show the calculations that are actually used to create the blended pixels, because the internal math typically is based this way. For information about overbright values, which have a value greater than 1, see Chapter 11, "Film, HDR, and 32 Bit Compositing."
Figure 3.23. The Info panel can display pixel values in several optional modes (accessed via the panel menu). Shown here are decimal values with the cursor on medium gray. Visible decimal values are "normalized" to the range of 0.0 to 1.0, which makes calculations more straightforward than 0 to 255, the standard 8-bit range (or the even more obtuse 0 to 32768 for 16-bit). Select a color mode for the Info palette via its wing menu; whatever mode you select is thereafter also used by the Adobe Color Picker.
Remember, blending modes are all based on mathematical operations for combining pixels in the layer containing the given blending mode and the pixels behind iteither below it in the stack, if all the layers are 2D, or positioned behind it in 3D space, if all the layers are 3D.
To help you understand what the various blending modes are doing, Figures 3.24 through 3.30 blend a grayscale gradient over a fully saturated background. Contextual examples using these blending modes follow in the next section.
Figure 3.24. Compare Figures 3.25 through 3.30 to this one, which shows a black-to-white gradient (created using the Ramp effects) over a gradient of fully bright and saturated color. Blending in this figure is set to Normal.

Figure 3.25. The same combination with Add mode applied to the foreground layer. Each background pixel is lightened by the brightness of the foreground pixel up to a value of full white (1.0). The darker the foreground pixel, the less the visibility. Figure 3.31c shows Add using photographed elements.

Figure 3.26. Screen mode is an attenuated Add, pushing fewer values to full white. Figure 3.32 further illustrates the difference between Screen and Add (Figure 3.31c).

Figure 3.27. Multiply mode sends values toward 0.0, or full black. This is the equivalent of laying one frame of film over the other (a.k.a. "bi-packing"); the resulting combination is darker as the denser (darker) areas are built up. A practical example is shown in Figure 3.33.

Figure 3.28. Overlay combines Screen and Multiply; areas of the background below 50% brightness are multiplied, those above 50% are screened. A practical example is shown in Figure 3.34.
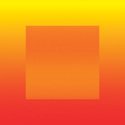
Figure 3.29. Hard Light is the inverse of Overlay; areas of the foreground below 50% brightness are multiplied, those above 50% are screened.

Figure 3.30. Difference bases the luminance of the foreground pixels on the amount of difference between the foreground and background source; the greater the difference, the brighter the value. Practical usage of Difference is demonstrated in Figure 3.36.
Add and Screen
Add and Screen modes both brighten the image. Screen typically yields a subtler effect than Add, which results in brighter values overall.
Add mode is every bit as simple as it sounds; the formula is
newPixel = A + B
where A is a pixel from the foreground layer and B is a background pixel (although they are obviously interchangeable in this formula). The result is clipped at 1 for 8- and 16-bit pixels (but can exceed 1 in 32 bpc mode); any pixels that add up to a value of more than 1 take the value of 1, full white.
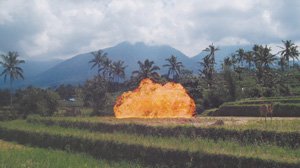
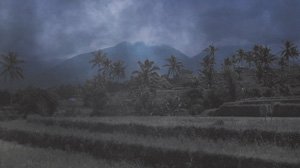
In 32 bpc mode, this is likely to be your most commonly used blending mode. It generally brightens the overall image, but any black in the foreground acts transparent by adding a value of 0 to the background. It is useful for laying fire and explosion elements shot in negative space (against black) into a scene, adding noise or grain to an element, or any other element that is made up of light and texture (Figures 3.31a, b, and c).
Figures 3.31a, b, and c. Add mode takes the source foreground element, the fire shot against a black background shown in 3.31a, and adds its pixel values channel by channel to the background (b), causing the pure black pixels to disappear completely (c).

Notes
What is the difference between Add and Linear Dodge? The name! Open Photoshop and you'll notice it contains no blending mode called Add. Apparently Photoshop lacks the legal rights to use this term, hence Linear Dodge, which exists in After Effects only to match Photoshop. They are identical.
Screen mode has an influence similar to Add mode's, but via a slightly different formula. The pixel values are inverted, multiplied together, and the result is inverted:
newPixel = 1((1A) * (1B))
Note that with this formula, fully white pixels stay white, fully black pixels stay black, but a midrange pixel (0.5) takes on a brighter value (0.75), just not as bright as would be with Add (1).
You use Screen much like Add when working in 8 bpc and 16 bpc modes. Screen is most useful in situations where Add would blow out the highlights too muchglints, flares, glow passes, and so on (Figure 3.32).
Figure 3.32. The difference between Screen and Add (Figure 3.31) may be subtle in printed figures until you look closely; notice there's less brightness in the "hottest" areas of the fire.
Notes
Technically speaking, Add mode doesn't work entirely correctly in 8 bpc and 16 bpc modes, where white values clip at 1, and Screen mode doesn't work at all in 32 bpc mode; more on this in Chapters 11 and 12.
Multiply
Multiply is another mode that is as simple as it sounds; it uses the formula
newPixel = A * B
This would seem to make the values much higher until you recollect that we are calculating values between 0 and 1; when you multiply by a fraction, the result is lower than the source value. Multiplying two images together, therefore, actually has the effect of reducing midrange pixels and darkening an image overall, although pixels that are full white in both images remain full white.
In optical compositing (the crude method used to do this stuff photochemically before we had computers that could manage it) the equivalent of multiply was layering two images, one over the other, combining their densities such that the dark areas of each image held out light from the other. This process was known as bi-packing.
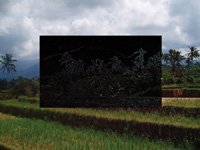
Multiply literally has the inverse effect of Screen mode, darkening the midrange values of one image with another. It is useful in cases where you wish to emphasize dark tones in the foreground without replacing the lighter tones in the background, for example to layer in texture, shadow, or dark fog (Figure 3.33).
Figure 3.33. Dark smoke (actually a grayscale fractal noise pattern) is multiplied over the background, darkening the areas that are dark in either the foreground or background further.
Overlay and the Light Modes
Overlay uses the bottom layer to determine whether to screen or multiply. Above a threshold of 50% gray (or .5 in normalized terms), it is screened. Below 50%, it is multiplied. Hard Light operates similarly, instead using the top layer to determine whether to screen or multiply, so the two are inverse effects. Reversing layer order and swapping Overlay for Hard Light yields an identical result.
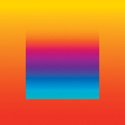
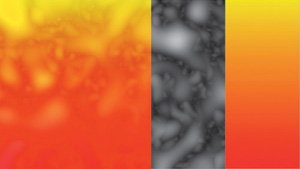
These modes, along with Linear and Vivid Light, can be most useful for combining a layer that is predominantly color with another layer that is predominantly luminance, or contrast detail (Figure 3.34). This is how you create textures; for example, some of the lava texturing in the Level 4 sequence of Spy Kids 3D was created by using Hard Light to combine a hand-painted color heat map with moving fractal noise patterns.
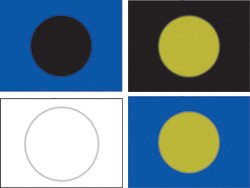
Figure 3.34. Overlay and its inverse, Hard Light, are useful for combining color and texture. Here, an instant lava lamp texture was created using the components shown at the right: a solid with Fractal Noise applied set to Overlay mode on top of a red-to-yellow gradient.
This type of usage is fine in 8 bpc or 16 bpc projects, but try to avoid fishing in the various Light modes when combining more detailed and specific elements. These methods don't work properly with 32 bpc overbright levels (explored in Chapter 11), and this method of adjusting images is a warning sign that you haven't thought things through in terms of what you're trying to do.
Difference
Difference is a subtraction mode that inverts a pixel in the background according to how bright the foreground pixel is. There is one very specific use for Difference that has nothing to do with creating a blended look: You can line up two identical layers using this mode. When all of the pixels line up properly, layer details disappear (Figure 3.35).
Figure 3.35. Difference mode can help you line up two layers that were shot at the same time, from the same camera setup. You know that the two layers are perfectly lined up when all of the pixels turn black.
HSB and Color Modes
The Hue, Saturation, and Brightness modes each combine the given value from the foreground layer with the other two from the background layer. Saturation applies the foreground saturation to the background hue and luminance values, Hue combines the foreground hue with the background saturation and luminance, and Brightness uses the foreground luminance in combination with the hue and saturation of the background.
Color takes both the hue and saturation of the top layer, using only the luminance from the underlying background (Figure 3.36).
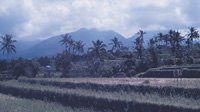
Figure 3.36. Setting a deep-blue-colored solid to Color mode and overlaying it on the plate footage has the effect of tinting the colors in the image blue. Artistic uses of this mode are explored in Chapter 12, "Working with Light."
Keep these modes in mind as shortcuts to channel operations in which you might want the color from a foreground combined with the detail (luminance) of the existing background.
Stencil and Silhouette
The Stencil and Silhouette blending modes apply transparency information to all of the layers below them in the composition. The Stencil modes use the light pixels, and Silhouette the dark pixels, of either the Alpha or Luminance values to determine the areas that remain visible in the layers below the current layer. You can keep these in mind for occasions in which they save you extra setup work.
Notes
An effective use of both Stencil Alpha and Silhouette Alpha is the creation of a light wrap effect, detailed in Chapter 12.
Alpha Add and Luminescent Premultiply
Alpha Add and Luminescent Premultiply are special-case blending modes that affect semi-transparent edge pixels only.
Have you ever tried matting a layer with an alpha channel over the same layer with the alpha channel inverted? Figures 3.37a through d show the typical result: a semi-opaque line tracing the edge of the alpha, where the pixels remain semi-transparent because they are blended together in the same manner as semi-opaque layers. Alpha Add adds the actual values of the alpha pixels without compensating for the opacity effect, so two 50% opaque pixels become 100% opaque.
Figures 3.37a through d. Placing a matted object over a background with the exact inverse matte (a, b) seems as though it should result in a fully opaque image. Instead, edge pixels form a semi-transparent halo in the alpha channel (c). Alpha Add does just what the title implies, adding the alpha values together so that inverse mattes total up to 100% throughout the image (d) (left to right).
Why would you combine a layer with itself, inverting the alpha? You probably wouldn't. But you might combine two layers with overlapping transparency that would require this methodfor example, two parts of the same layer.
Luminescent Premultiply is an alternative method of removing premultiplication from source footage, retaining bright values that would otherwise be clipped. Premultiplication over black causes all semi-transparent pixels to become darker; removing the black values while adding transparency, which is what removing premultiplication does, can cause them to appear dimmer than they should. This is useful for bright overlaid elements that come in with alpha channels and premultiplication, such as flares and explosions; you can set the footage to interpret as Straight on import and use this mode instead of Normal to overlay the element. It's another trick to keep in your arsenal should you ever see the symptoms (dim translucent elements) for which it is recommended.
Track Mattes |
Section I. Working Foundations
The 7.0 Workflow
- The 7.0 Workflow
- Workspaces and Panels
- Making the Most of the UI
- Settings: Project, Footage, Composition
- Previews and OpenGL
- Effects & Presets
- Output: The Render Queue
- Study a Shot like an Effects Artist
The Timeline
- The Timeline
- Organization
- Animation Methods
- Keyframes and The Graph Editor
- Uber-mastery
- Transform Offsets
- Motion Blur
- Manipulating Time Itself
- In Conclusion
Selections: The Key to Compositing
- Selections: The Key to Compositing
- The Many Ways to Create Selections
- Compositing: Science and Nature
- Alpha Channels and Premultiplication
- Masks
- Combining Multiple Masks
- Putting Masks in Motion
- Blending Modes: The Real Deal
- Track Mattes
Optimizing Your Projects
- Optimizing Your Projects
- Navigating Multiple Compositions
- Precomposing and Nesting
- Adjustment and Guide Layers
- Understanding Rendering Order
- Optimizing After Effects
- Onward to Effects
Section II. Effects Compositing Essentials
Color Correction
Color Keying
- Color Keying
- Good Habits and Best Practices
- Linear Keyers and Hi-Con Mattes
- Blue-Screen and Green-Screen Keying
- Understanding and Optimizing Keylight
- Fixing Typical Problems
- Conclusion
Rotoscoping and Paint
- Rotoscoping and Paint
- Articulated Mattes
- Working Around Limitations
- Morphing
- Paint and Cloning
- Conclusion
Effective Motion Tracking
- Effective Motion Tracking
- The Essentials
- Optimizing Tracking Using 3D
- Extending a Track with Expressions
- Tracking for Rotoscoping
- Using 3D Tracking Data
- Conclusion
Virtual Cinematography
- Virtual Cinematography
- 5D: Pick Up the Camera
- Storytelling and the Camera
- Camera Blur
- The Role of Grain
- Film and Video Looks
- Conclusion
Expressions
- Expressions
- Logic and Grammar
- Muting Keyframes
- Linking Animation Data
- Looping Animations
- Smoothing and Destabilizing
- Offsetting Layers and Time
- Conditionals and Triggers
- Tell Me More
Film, HDR, and 32 Bit Compositing
- Film, HDR, and 32 Bit Compositing
- Details
- Film 101
- Dynamic Range
- Cineon Log Space
- Video Gamma Space
- Battle of the Color Spaces
- Floating Point
- 32 Bits per Channel
- Conclusion
Section III. Creative Explorations
Working with Light
- Working with Light
- Light Source and Direction
- Creating a Look with Color
- Backlighting, Flares, Light Volume
- Shadows and Reflected Light
- HDR Lighting
- Conclusion
Climate: Air, Water, Smoke, Clouds
- Climate: Air, Water, Smoke, Clouds
- Particulate Matter
- Sky Replacement
- The Fog, Smoke, or Mist Rolls In
- Billowing Smoke
- Wind
- Water
- Conclusion
Pyrotechnics: Fire, Explosions, Energy Phenomena
- Pyrotechnics: Fire, Explosions, Energy Phenomena
- Firearms
- Sci-Fi Weaponry
- Heat Distortion
- Fire
- Explosions
- In a Blaze of Glory
Learning to See
Index
EAN: 2147483647
Pages: 157
