Linear Keyers and Hi-Con Mattes
There are cases in which edge detail is not a factor because an element does not need to be completely isolated; perhaps you are merely creating a holdout area of an image using a high-contrast (hi-con) matte. For cases where you just need to specify one area of a clip to adjust it, a linear key will often do the trick.
We begin here before bringing out the big keying guns for a couple of reasons. Linear keyers are relatively simple and useful in a wide variety of cases, beyond just blue- and green-screen shots. Their fundamental underlying concepts carry forward into more specialized keyers, such as Keylight, designed specifically to handle full color keying.
Linear keyers differ from dedicated matte tools in that they do not compare one channel or set of values against another (which is the key to effective blue- and green-screen keys); they are based merely on defining a range within a single set of values.
Tip
Color Key and Luma Key offer no softness in the matte thresholds; they can only Edge Thin and Edge Feather, which are crude methods for choking, spreading, and blurring a binary matte (consisting of pixels that are only transparent or opaque). Subtleties of transparency are tacked on without reference to source data. There is no reason ever to use themseriously.
The most useful linear keyers are
- Extract
- Linear Color Key
The keyers to be avoided at all times are
- Luma Key
- Color Key
Linear Color Key and Extract
Although both are linear keying tools, Linear Color Key and Extract have different uses. Extract is most useful for luminance (luma) keying, using the black and white points of an image or any of its individual channels. Linear Color Key is more appropriate in cases in which you need to isolate a particular color (or color range).
Close-Up: When, Exactly, Is Linear Keying Useful?
It's useful to key using a single channel (or the average of multiple channels) in order to
- Isolate a color range for the purpose of correcting it to a different color (because After Effects has no dedicated Three-Way Color Corrector).
- Create simple garbage mattes and holdouts (detailed later in this chapter).
- Matte elements shot over a pure black (or white) background. For example, fire is not typically photographed on a blue-screen stage, but outdoors at night, or in an unlit studio with black backdrops.
- Matte an element using its own luminance data, in order to hold out specific portions of the element for enhancement. For example, you duplicate a layer and matte its highlights to bloom them (see Chapter 12, "Working with Light").
Extract
Extract employs a histogram to help isolate the black and white cut-off points in the matte and then gradates the thresholds with black and white softness settings. It's not just for averaged RGB luminance, either, as it offers a pull-down menu to access histogram controls for all four color channels (red, green, blue, and alpha).
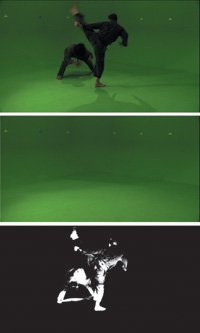
Keep in mind when luma keying, one of the three color channels often contains more initial useful contrast than overall luminance, which is merely an average of the three. Either green or red is typically the brightest and most contrasty channel, and blue is generally dimmest and often noisiest (Figures 6.5a, b, and c). If you work in full RGB instead of a single channel, keep in mind that the luminance values are weighted prior to image calculations that average them.
Figures 6.5a, b, and c. Although the blue screen is dominant, the blue channel is comparatively dim and noisy (c), despite that the footage is uncompressed. The matte contains some green (b), and the greatest contrast is in the red channel (a). (Source footage courtesy Pixel Corps.)

Extract is interactive and easy to use; it's a cousin to Levels. It displays a histogram to show where the white or black values you're keying are; changing the Channel setting changes the histogram as well as the controls. The typical way to use it is to bring in the White Point or Black Point (the upper of the small square controls below the histogram), then threshold (soften) that adjustment with the White Softness or Black Softness controls (the lower of the small squares). It is intuitive and relatively easy to use.
Close-Up: All Channels Are Not Created Equal
If you set an RGB image as a luma matte, the red, green, and blue channels are averaged together to determine the luminance of the overall image. However, they are not weighted evenly.
Compare Figure 6.6 with Figure 6.5c, and you will note that the background of the averaged result is far less bright than the blue channel of the same image. In most internal color calculations, the three channels are weighted according to how brightly the eye perceives them: Red at 29%, Green at 59%, and Blue at 12% luminance (instead of 33.33% per channel, which would be an even distribution). This topic is explored in greater depth in Chapter 12, in the section on "Creating a Look with Color."
Figure 6.6. This grayscale conversion (using Tint) of the channels shown in Figures 6.5a, b, and c weights the three channels according to how the eye sees them, and the eye is far less sensitive to blue than green, thus the background is far darker than it is in the blue channel.
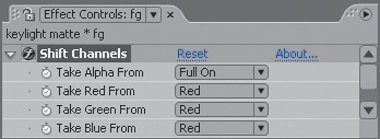
If you find yourself wanting to use a particular channel as a luma matte, you can employ the Shift Channels effect (Figure 6.7).
Figure 6.7. Here the Shift Channels effect is set to use Red for all channels. Alpha is set to Full On as a precaution against transparency data, which should not be used for a luma matte.
Linear Color Key
Linear Color Key offers direct selection of a key color using an eyedropper tool. The default color is blue (ironic given that blue-screen keying is exactly what you don't want to do with this tool). The other odd thing about the defaults is the 10% Matching Softness setting, which is arbitrary and gives a rather loose range of matched tones. I often end up with settings closer to 1%.
Note that there are, in fact, three eyedropper tools in the Linear Color Key effect. The top one replicates the Key Color eyedropper, and the other two add and subtract from the Matching Tolerance. You can click the eyedroppers directly on either of the adjacent thumbnail images, or if these are too small, you can open the Layer panel and choose the effect in its View pull-down, using the eyedropper there (Figure 6.8).
Figure 6.8. The Key Color eyedropper can be used in the Composition viewer, but the individual eyedroppers to refine the color range (in the Preview section of the effect) work in the Effect Controls panel or a Layer panel only. This tool is useful for matting a non-primary color range; in this case, the magenta sign on the bus is selected. The source clip, ext_busPassby_uncorrectedHD.mov, can be found on this book's disc (Source footage courtesy Pixel Corps.)

You can match the color using RGB, Hue, or Chroma values. In most cases, RGB will do the trick, but the best idea in unusual situations may be to sample each one before you start fine-tuning the controls. You can adjust the Tolerance, which specifies how close the colors have to be to the chosen value to be fully matted, and Softness, which then grades the threshold, softening the edges according to how close the color values are to the target range.
The default setting for the Key Operation is to Key Colors, which is straightforward enough. You might guess, therefore, that the other option, Keep Colors, would simply invert the result. In fact, Keep Colors was designed for cases in which the first instance of the effect eliminates something you want to bring back. First instance, you ask? That's right, you have the opportunity to recover foreground colors by adding a second copy of Linear Color Key targeting a second range, set to Keep Colors.
Difference Mattes
A difference matte sounds simple in principle: Frame two shots identically, the first containing the foreground subject, the other without it (commonly called a clean plate). Now, have the computer compare the two images and remove everything that matches identically, leaving only the foreground subject. Great idea.
Tip
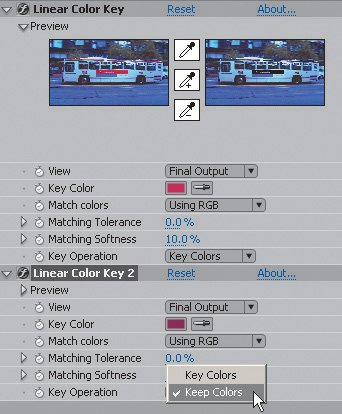
To set up a second instance of Linear Color Key to Keep Colors, you should turn off the first instance (set to Key Colors), so that you can set the color to keep (Figure 6.9). When you are done, enable both instances.
Figure 6.9. Two instances of Linear Color Key: The first is set to Key Colors, the second set to Keep Colors.
Unfortunately, there are all sorts of criteria that preclude this from actually working very well, specifically
- Both shots must be locked off or motion stabilized to match, and even then, any offseteven of a fraction of a pixelcan preclude a clean key.
- The foreground element probably is not completely devoid of whatever is in the background; low luminance areas, in particular, are prone to appear as background to the Difference Matte effect.
- Even such subtleties as grain and slight changes of lighting can cause a mismatch to two otherwise identical shots. Raising the Blur Before Difference setting helps correct for this, but by introducing inaccuracy.
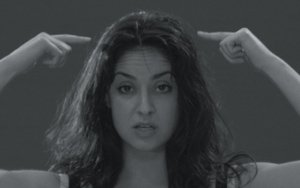
You can gauge the challenges involved yourself, using any locked-off shot with movement in it, ideally one in which a character enters the frame (such as the footage used for Figure 6.10, included on your DVD). Lock off a frame of the source shot; you can apply Time Remap and use a single keyframe with the time of the clean plate shot. Turn off visibility of that layer, and apply Difference Matte to the other layer. Viewing final output, adjust Tolerance and Softness to try to get the key you're after. If the result has noise in it, try raising the Blur Before Difference value.
Figures 6.10a, b, and c. This effects shot (a) includes a clean plate; (b) the alpha channel of a Difference Matte effect between them (c) demonstrates that this is not an effective way to key a foreground, but notice that other unwanted features such as the tracking markersthose little triangles on the backgroundare removed, making this matte useful if multiplied or otherwise combined with a regular green-screen key.
Figures 6.10a, b, and c show the likely result of attempting to key this footage using only Difference Matte. It's not a terrible way to isolate something when clean edges are not critical, but it cannot compare with more sophisticated methods for removing a solid color background.
Close-Up: Luma Mattes
In the interest of full disclosure, I often use track mattes (as detailed in Chapter 3) with a duplicate of the layer, instead of the luminance keys described here, applied directly to the layer. With a track matte, I can use Levels to work with color ranges on all channels, in order to refine transparency. Other artists may consider this approach more cumbersome, preferring to work with a single layer and an effect.
Notes
The hand-to-hand green-screen shots in this chapter (such as Figure 6.10) include tracking markers on the background. These are intended to provide dimensional perspective for 3D camera tracking (a.k.a. match moving), which otherwise might not be possible. More on match moving is included at the end of Chapter 8.
Blue Screen and Green Screen Keying |
Section I. Working Foundations
The 7.0 Workflow
- The 7.0 Workflow
- Workspaces and Panels
- Making the Most of the UI
- Settings: Project, Footage, Composition
- Previews and OpenGL
- Effects & Presets
- Output: The Render Queue
- Study a Shot like an Effects Artist
The Timeline
- The Timeline
- Organization
- Animation Methods
- Keyframes and The Graph Editor
- Uber-mastery
- Transform Offsets
- Motion Blur
- Manipulating Time Itself
- In Conclusion
Selections: The Key to Compositing
- Selections: The Key to Compositing
- The Many Ways to Create Selections
- Compositing: Science and Nature
- Alpha Channels and Premultiplication
- Masks
- Combining Multiple Masks
- Putting Masks in Motion
- Blending Modes: The Real Deal
- Track Mattes
Optimizing Your Projects
- Optimizing Your Projects
- Navigating Multiple Compositions
- Precomposing and Nesting
- Adjustment and Guide Layers
- Understanding Rendering Order
- Optimizing After Effects
- Onward to Effects
Section II. Effects Compositing Essentials
Color Correction
Color Keying
- Color Keying
- Good Habits and Best Practices
- Linear Keyers and Hi-Con Mattes
- Blue-Screen and Green-Screen Keying
- Understanding and Optimizing Keylight
- Fixing Typical Problems
- Conclusion
Rotoscoping and Paint
- Rotoscoping and Paint
- Articulated Mattes
- Working Around Limitations
- Morphing
- Paint and Cloning
- Conclusion
Effective Motion Tracking
- Effective Motion Tracking
- The Essentials
- Optimizing Tracking Using 3D
- Extending a Track with Expressions
- Tracking for Rotoscoping
- Using 3D Tracking Data
- Conclusion
Virtual Cinematography
- Virtual Cinematography
- 5D: Pick Up the Camera
- Storytelling and the Camera
- Camera Blur
- The Role of Grain
- Film and Video Looks
- Conclusion
Expressions
- Expressions
- Logic and Grammar
- Muting Keyframes
- Linking Animation Data
- Looping Animations
- Smoothing and Destabilizing
- Offsetting Layers and Time
- Conditionals and Triggers
- Tell Me More
Film, HDR, and 32 Bit Compositing
- Film, HDR, and 32 Bit Compositing
- Details
- Film 101
- Dynamic Range
- Cineon Log Space
- Video Gamma Space
- Battle of the Color Spaces
- Floating Point
- 32 Bits per Channel
- Conclusion
Section III. Creative Explorations
Working with Light
- Working with Light
- Light Source and Direction
- Creating a Look with Color
- Backlighting, Flares, Light Volume
- Shadows and Reflected Light
- HDR Lighting
- Conclusion
Climate: Air, Water, Smoke, Clouds
- Climate: Air, Water, Smoke, Clouds
- Particulate Matter
- Sky Replacement
- The Fog, Smoke, or Mist Rolls In
- Billowing Smoke
- Wind
- Water
- Conclusion
Pyrotechnics: Fire, Explosions, Energy Phenomena
- Pyrotechnics: Fire, Explosions, Energy Phenomena
- Firearms
- Sci-Fi Weaponry
- Heat Distortion
- Fire
- Explosions
- In a Blaze of Glory
Learning to See
Index
EAN: 2147483647
Pages: 157
