Battle of the Color Spaces
Right about now, many of you are looking around to see which window to throw this book out of. You have done perfectly fine working with unconverted video, thank you very much.
Truly, much great work has already been created by artists working in nonlinear color spaces, some even in log space. But the color space you work in is going to affect the final image, so you must pick the one that helps you accomplish what you've set out to do, which is to simulate how the world is photographed by a camera. When you brighten a scene, you want to mimic the addition of another on-set floodlight or an expanding camera aperture. An image is blurred to imitate light from out-of-focus objects spreading out across the film gate. To do this properly, you need the compositing math to mimic light in the real world.
In the real world, light behaves linearly. The nonlinear encoding in video and film is introduced after all the light has been added linearly. Turn on two lightbulbs of equivalent wattage where you previously had one and your entire scene will become exactly twice as bright. By working in a linear color space, you can perfectly simulate this effect simply by doubling your pixel values. You are getting back to the color space of the original scene. For this reason, linear pixels are often referred to as scene-referred values.
The examples in Table 11.1 show the difference between making adjustments to digital camera photos in their native video space and performing those same operations in linear space. In all cases, an unaltered photograph featuring the real in-camera effect is shown for comparison.
|
BRIGHTEN ONE STOP |
LENS DEFOCUS |
MOTION BLUR |
|
|---|---|---|---|
|
Original Image |
|
|
|
|
Filtered in Video Space |
|
|
|
|
Filtered in Linear Space |
|
|
|
|
Real-World Photo |
|
|
|


The table's first example brightens the image by one stop. A stop refers to clicks on a camera's aperturethe iris that controls how much light coming through the lens will expose the film within. Widening the aperture by one stop allows twice as much light to enter, and each additional stop redoubles the exposure again. An increase of three stops brightens the image by a factor of eight (2 x 3 x 2 x 3 x 2, or 23).
Doubling the pixels in video space causes bright areas in the image to blow out very quickly. Video pixels are already encoded with extra brightness and can't take much more. Notice how the curtain and computer screen have lost detail in video space, while the same operation performed in linear space has retained detail. Also notice how the linear image is nearly indistinguishable from the actual photo for which camera exposure time was doubled (another practical way to brighten by one stop).
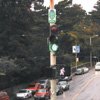
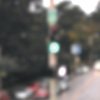
The second example simulates an out-of-focus scene using Fast Blur, one of the most common operations performed in After Effects. You may be surprised to see that it actually causes an overall darkening with bright highlights fading into the backgroundat least when applied in video space. In linear, the highlights pop much better. See how the little man in the Walk sign stays bright in linear but almost fades away in video because of the extra emphasis given to dark pixels in video space.
Try squinting your eyes as you look at these images to see how only the video image has darkened overall. Because a defocused lens doesn't cause any less light to enter it, the video blur is not behaving like a true defocus. Comparison with the real-world defocus drives the point home even more, although this simple linear example doesn't mimic the camera's aperture shape or the scene's overbright information, so it isn't completely identical to the real photograph either, but it's close.
The table's third example uses After Effects' built-in motion blur to simulate the streaking caused by quick panning as the photo was taken. Pay particular attention to the highlight on the lamp; notice how it leaves a long, bright streak in the linear and in-camera examples. Artificial dulling of highlights is the most obvious giveaway of nonlinear image processing.
Artists have dealt with the problems of working directly in video space for years without even knowing. A perfect example is the Screen transfer mode, which is additive in nature but whose calculations are clearly convoluted when compared with the pure Add transfer mode. Screen uses a multiply-toward-white function with the advantage of avoiding the clipping associated with Add. But Add's reputation comes from its application in bright video-space images. Screen was invented only to help people be productive when working in video space, without overbrights; Screen darkens overbrights (Figures 11.11a, b, and c). Real light doesn't Screen, it Adds. Add is the new Screen, Multiply is the new Hard Light, and many other Blending modes become evident as mere kludges in linear floating point.
Figures 11.11a, b, and c. Adding in video space blows out (a), but Screen in video looks better (b). Adding in linear is best (c).

Floating Point |
Section I. Working Foundations
The 7.0 Workflow
- The 7.0 Workflow
- Workspaces and Panels
- Making the Most of the UI
- Settings: Project, Footage, Composition
- Previews and OpenGL
- Effects & Presets
- Output: The Render Queue
- Study a Shot like an Effects Artist
The Timeline
- The Timeline
- Organization
- Animation Methods
- Keyframes and The Graph Editor
- Uber-mastery
- Transform Offsets
- Motion Blur
- Manipulating Time Itself
- In Conclusion
Selections: The Key to Compositing
- Selections: The Key to Compositing
- The Many Ways to Create Selections
- Compositing: Science and Nature
- Alpha Channels and Premultiplication
- Masks
- Combining Multiple Masks
- Putting Masks in Motion
- Blending Modes: The Real Deal
- Track Mattes
Optimizing Your Projects
- Optimizing Your Projects
- Navigating Multiple Compositions
- Precomposing and Nesting
- Adjustment and Guide Layers
- Understanding Rendering Order
- Optimizing After Effects
- Onward to Effects
Section II. Effects Compositing Essentials
Color Correction
Color Keying
- Color Keying
- Good Habits and Best Practices
- Linear Keyers and Hi-Con Mattes
- Blue-Screen and Green-Screen Keying
- Understanding and Optimizing Keylight
- Fixing Typical Problems
- Conclusion
Rotoscoping and Paint
- Rotoscoping and Paint
- Articulated Mattes
- Working Around Limitations
- Morphing
- Paint and Cloning
- Conclusion
Effective Motion Tracking
- Effective Motion Tracking
- The Essentials
- Optimizing Tracking Using 3D
- Extending a Track with Expressions
- Tracking for Rotoscoping
- Using 3D Tracking Data
- Conclusion
Virtual Cinematography
- Virtual Cinematography
- 5D: Pick Up the Camera
- Storytelling and the Camera
- Camera Blur
- The Role of Grain
- Film and Video Looks
- Conclusion
Expressions
- Expressions
- Logic and Grammar
- Muting Keyframes
- Linking Animation Data
- Looping Animations
- Smoothing and Destabilizing
- Offsetting Layers and Time
- Conditionals and Triggers
- Tell Me More
Film, HDR, and 32 Bit Compositing
- Film, HDR, and 32 Bit Compositing
- Details
- Film 101
- Dynamic Range
- Cineon Log Space
- Video Gamma Space
- Battle of the Color Spaces
- Floating Point
- 32 Bits per Channel
- Conclusion
Section III. Creative Explorations
Working with Light
- Working with Light
- Light Source and Direction
- Creating a Look with Color
- Backlighting, Flares, Light Volume
- Shadows and Reflected Light
- HDR Lighting
- Conclusion
Climate: Air, Water, Smoke, Clouds
- Climate: Air, Water, Smoke, Clouds
- Particulate Matter
- Sky Replacement
- The Fog, Smoke, or Mist Rolls In
- Billowing Smoke
- Wind
- Water
- Conclusion
Pyrotechnics: Fire, Explosions, Energy Phenomena
- Pyrotechnics: Fire, Explosions, Energy Phenomena
- Firearms
- Sci-Fi Weaponry
- Heat Distortion
- Fire
- Explosions
- In a Blaze of Glory
Learning to See
Index
EAN: 2147483647
Pages: 157
