Heat Distortion
Heat distortion, that strange rippling in the air that occurs when hot air is dissipated into cooler air, is another one of those effects compositors love. Like a lens flare, it's a highly visible effect that, if properly motivated and adjusted, lends realism to your scene rather than distracting from its story.
Figures 14.13a and b show the fabricated results of heat distortion in a scene. Its rippling effect adds to the dynamism or chaos of the scene. When your eye sees heat distortion, it understands that the environment is dynamic, containing an abrupt mix of hot air with cold air. This adds to the visceral reality of the shot, whether it's a desert exterior, a day at the racetrack, jet engine exhaust, or all three (which describes the pod race sequence from Star Wars pretty well). When the fire itself is in the shot and you can see through it or anywhere above it, you expect the fire to heavily distort whatever is visible behind its heat.
Figures 14.13a and b. The effect of heat haze has been added to the general mayhem being issued by the helicopter (a). A comparison with an unaltered shot of the building (b) emphasizes the amount of distortion. (Images courtesy The Orphanage.)

What Is Actually Happening
Stare into a swimming pool, and you can see displacement caused by the bending of light as it travels through the water. Rippled waves in the water cause rippled bending of light. There are cases in which our atmosphere behaves like this as well, when ripples are caused in it by the collision of warmer and cooler air, a medium which is not quite as transparent as it seems.
Notes
It can be useful to generate heat distortion particles in 3D animation software, when the distortion needs to be attached to a 3D animated object, such as a jet engine or rocket exhaust.
As you know from basic physics, hot air rises and hot particles move faster than cool ones. Air is not a perfectly clear medium but a translucent gas that can act as a lens. This "lens" is typically static and appears flat, but the application of heat causes an abrupt mixture of fast-moving hot air particles rising into cooler ambient air. This creates ripples that have the effect of displacing and distorting what is behind the moving air, just like ripples in the pool or ripples in the windows of an old house.
You might assume, therefore, that a physics model devised in 3D animation software would be more accurate than faking this effect in 2D. However, 3D software generally does not take into account the role of air in a shot. In any case, this effect behaves like an overlaid distortion on top of whatever lays beyond the hot air from the point of view of the camera. Therefore it's a perfectly appropriate compositing effect, useful when there is an object in the scene capable of generating a significant amount of hot air.
How to Re-create It
The basic steps for re-creating heat distortion from an invisible source in After Effects are
- Create a basic particle animation that simulates the movement and dissipation of hot air particles in the scene.
- Make two similar but unique passes of this particle animationone to displace the background vertically, the other to displace it horizontallyand precompose them.
- Add an adjustment layer containing the Displacement Map effect, which should be set to use the particle animation comp to create the distortion effect, and apply it to the background.
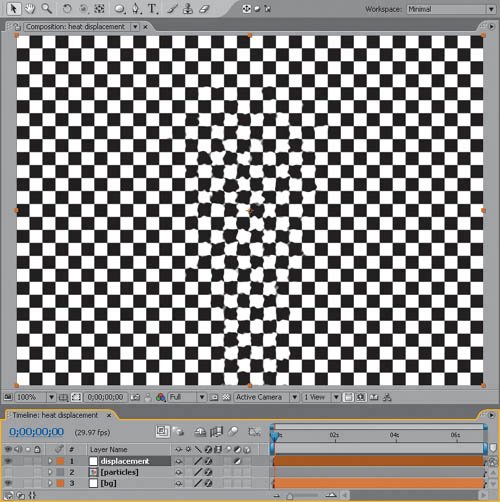
On the book's DVD, 14_heatDisplacement.aep contains the effect applied over a checkerboard background. You can easily see the results even in a still image (Figure 14.14). Setting up the particles is potentially the trickiest part, and of course the settings are unique for each scene.
Figure 14.14. A subtle effect, the heat displacement has been laid over a checkerboard where it is clearly visible traveling up the center of the image.
Particle Playground is perfectly adequate for this type of use, and it is included with After Effects Professional. Unfortunately, Particle Playground is generally slow to render and cumbersome, full of not-quite-intuitive properties. The help documents are thorough, but there are dozens of pages of documentation. Thankfully, this effect requires only a few simple adjustments:
- Under Cannon, move Position to the source in the frame where the heat haze originates (in this case, the bottom center, but it could even be out of frame).
- Open up Barrel Radius from the default of 0.0 to the width, in pixels, of the source. I chose 50, only because 720, the width of the frame, would require many more particles and slow down the example.
- Boost Particles Per Second to 200. The larger the Barrel Radius, the more particles needed.
- Under Gravity, set Force to 0.0 to prevent the default fountain effect.
The default color and scale of the particles is fine for this video resolution example, but you might have to adjust them as well according to your shot. A larger format (in pixels) or a bigger heat source might require bigger, softer particles.
- Now duplicate the particles layer and set the color of the duplicated layer to pure green. To vary it slightly so that the particles don't overlap, raise Direction Random Spread and Velocity Random Spread from their defaults of 20 to 25.
- The heat animation is almost complete; it only needs some softening. Add an adjustment layer with a moderate Fast Blur setting of 4.0 (Figure 14.15).
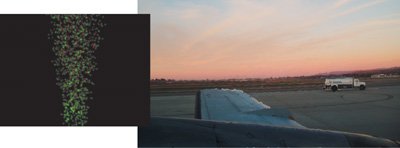
Figure 14.15. The particles used to create the displacement. By default, Displacement Map uses red for horizontal displacement and green for vertical displacement. A slight amount of blur was added to soften the effect of each individual particle. The effect is exaggerated (to show up in a still figure) at the left of the plane wing.
Tip
Heat displacement often dissipates before it reaches the top of the frame. Making particles behave so that their lifespan ends before they reach the top of the frame is accurate, but painstaking. A simpler solution is to add a solid with a black-to-white gradient (created with the Ramp effect) as a luma matte to hold out the adjustment layer containing the displacement effect.
Now to put the animation to use: Drag it into the main comp, and turn off its visibility. The actual Displacement Map effect is applied either directly to the background plate or preferably to an adjustment layer sitting above all the layers that should be affected by the heat haze. Displacement Map is set by default to use the red channel for horizontal displacement and the green channel for vertical displacement; all you need to do is select the layer containing the red and green particles under the Displacement Map Layer pull-down.
Fire |
Section I. Working Foundations
The 7.0 Workflow
- The 7.0 Workflow
- Workspaces and Panels
- Making the Most of the UI
- Settings: Project, Footage, Composition
- Previews and OpenGL
- Effects & Presets
- Output: The Render Queue
- Study a Shot like an Effects Artist
The Timeline
- The Timeline
- Organization
- Animation Methods
- Keyframes and The Graph Editor
- Uber-mastery
- Transform Offsets
- Motion Blur
- Manipulating Time Itself
- In Conclusion
Selections: The Key to Compositing
- Selections: The Key to Compositing
- The Many Ways to Create Selections
- Compositing: Science and Nature
- Alpha Channels and Premultiplication
- Masks
- Combining Multiple Masks
- Putting Masks in Motion
- Blending Modes: The Real Deal
- Track Mattes
Optimizing Your Projects
- Optimizing Your Projects
- Navigating Multiple Compositions
- Precomposing and Nesting
- Adjustment and Guide Layers
- Understanding Rendering Order
- Optimizing After Effects
- Onward to Effects
Section II. Effects Compositing Essentials
Color Correction
Color Keying
- Color Keying
- Good Habits and Best Practices
- Linear Keyers and Hi-Con Mattes
- Blue-Screen and Green-Screen Keying
- Understanding and Optimizing Keylight
- Fixing Typical Problems
- Conclusion
Rotoscoping and Paint
- Rotoscoping and Paint
- Articulated Mattes
- Working Around Limitations
- Morphing
- Paint and Cloning
- Conclusion
Effective Motion Tracking
- Effective Motion Tracking
- The Essentials
- Optimizing Tracking Using 3D
- Extending a Track with Expressions
- Tracking for Rotoscoping
- Using 3D Tracking Data
- Conclusion
Virtual Cinematography
- Virtual Cinematography
- 5D: Pick Up the Camera
- Storytelling and the Camera
- Camera Blur
- The Role of Grain
- Film and Video Looks
- Conclusion
Expressions
- Expressions
- Logic and Grammar
- Muting Keyframes
- Linking Animation Data
- Looping Animations
- Smoothing and Destabilizing
- Offsetting Layers and Time
- Conditionals and Triggers
- Tell Me More
Film, HDR, and 32 Bit Compositing
- Film, HDR, and 32 Bit Compositing
- Details
- Film 101
- Dynamic Range
- Cineon Log Space
- Video Gamma Space
- Battle of the Color Spaces
- Floating Point
- 32 Bits per Channel
- Conclusion
Section III. Creative Explorations
Working with Light
- Working with Light
- Light Source and Direction
- Creating a Look with Color
- Backlighting, Flares, Light Volume
- Shadows and Reflected Light
- HDR Lighting
- Conclusion
Climate: Air, Water, Smoke, Clouds
- Climate: Air, Water, Smoke, Clouds
- Particulate Matter
- Sky Replacement
- The Fog, Smoke, or Mist Rolls In
- Billowing Smoke
- Wind
- Water
- Conclusion
Pyrotechnics: Fire, Explosions, Energy Phenomena
- Pyrotechnics: Fire, Explosions, Energy Phenomena
- Firearms
- Sci-Fi Weaponry
- Heat Distortion
- Fire
- Explosions
- In a Blaze of Glory
Learning to See
Index
EAN: 2147483647
Pages: 157
