Navigating Multiple Compositions
When working with a complicated project, you can easily lose track of how everything is organized. This section will show you
- The benefits of designing and perhaps standardizing a project template with your specific project in mind
- Simple methods for keeping your compositions displayed so that you can visually remember their order or look at one while editing another
- Shortcuts that can help you when you've lost track of something
These tips have come in very handy when I've found myself working with artists who understood compositing quite well, but were nonetheless wrestling with tracking down and solving problems in After Effects.
Project Template Benefits
If you're working on your own, you're basically free to organize your projects however you like, just as if you live alone, you're free never to tidy your apartment. Successful collaborative projects at studios, however, make use of project templates that specify where different types of items live in the Project panel. Your personal value to those projects will in large part depend on your ability to play nicely with others by contributing to that organizational system.
Figure 4.1 shows a typical project template containing multiple compositions. It's a simplified version of a comp template used at The Orphanage for feature film work. Considering the days or even weeks that can be involved doing multiple takes of a visual effects shot, a template like this can be a lifesaver. Here are some of the template's useful attributes:
- The Master comps are numbered so that they show up in order at the top of a list (sorted by name) in the Project panel.
- The Final Output comp is preset to the exact format and length specified for it to be filmed out for the movie. No work whatsoever occurs in this comp; previews are not done here, so its work area does not change, and no effects, animations, or expressions are created here that might inadvertently be left off at render time.
- There is a locked placeholder layer at the top of various comps reminding you how to use them.
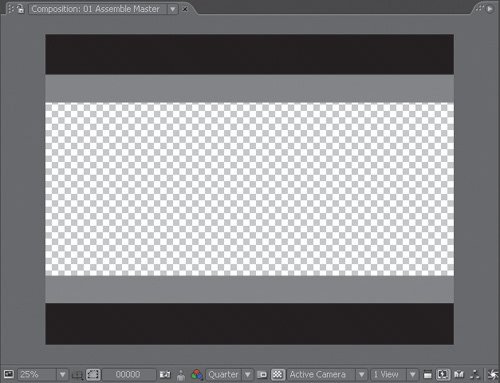
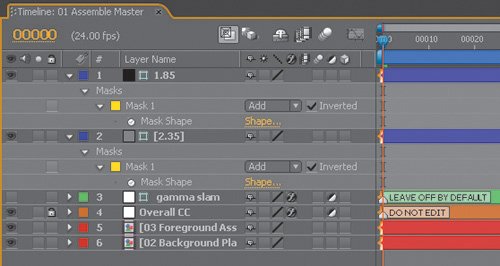
- Helpful guide layers, such as masks for different formats and preset adjustment layers with Levels set to high contrast (for checking black and white level matches), are placed in ahead of time (Figure 4.2).
Figure 4.1. Here's a top-level look at the organization of an unpopulated composition template that could be used on a feature film effects shot. There are two basic categories of folders (Source and Comps) and numbered, preconfigured compositions listed in correct render order. This template and an even more simplified version are included in the CH04 folder on the book's disc.
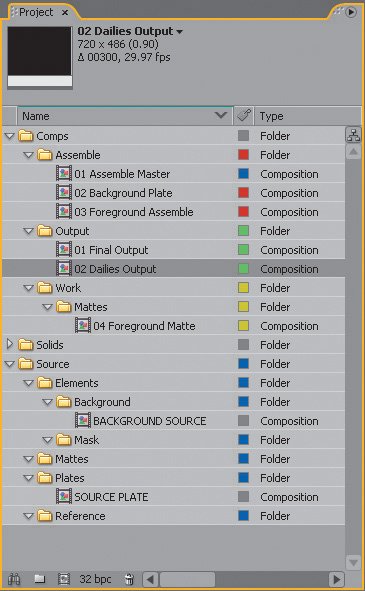
Figure 4.2. This default Assemble Master composition for a film project includes preset layers that would be specified by the comp supervisor. These might include non-rendering layers, showing the holdout areas for delivery formats as well as a Levels adjustment to "slam" the gamma (more about that in Section II). There is a color correction that is specified not to be edited, as well as pre-populated foreground and background layers.
- A Source folder is organized with preset compositions to hold elements, such as the background plate, as well as reference items. These comps, rather than the footage items themselves, are used thereafter in the project. Like the Final Output comp, this seems to prevent careless errors that can occur when footage is replaced.
- Standardized organization means that anyone, a supervisor or someone coming in to help clean up, can much more quickly recognize where the elements of the project reside.
You can take this idea as far as you want. The basic concepts of a Master comp, source comps, and a render comp seem useful on just about any shot to which you will be devoting more than a couple of hours of work, but a template can include a lot more than that. The Orphanage designs a custom template .aep file for each film production, and the template alone can be 4 MB or more before any work has been added (big for an empty .aep file!), including custom expressions, camera rigs, log/linear conversions, and recurring effects setups.
Working with Tabs
Because your compositing operations are primarily done via the Timeline rather than a tree/node interface, it is incumbent upon you, the artist, to keep your Timeline panels organized in a way that makes sense to you. After Effects 7.0 offers a huge improvement over previous versions by having only one Composition panel by default, but it is still possible to have an unlimited number of Timelines open. If you've ever found yourself hunting around for a particular comp's tab in the Timeline panel, I have a couple of suggestions.
Tip
To navigate quickly forward or backward through a set of open comp tabs, press Alt+Shift+comma or Alt+Shift+period (Option+Shift+comma or Option+Shift+period on a Mac). You can remember them as the < and > keys, as if they were arrows.
First of all, and most obviously, you may have too many tabs open. It can be helpful to close all Timeline tabs and start over (with any Timeline highlighted, choose Ctrl+Alt+A/Cmd+Opt+A): Reopen your Master composition. Alt/Option-double-click on the subcomp you want to work on, and if the specific composition you want is three or four layers deep, keep going until you've reached that one. Now your reopened tabs follow, right to left, the basic render order.
If you need to see two compositions at once, editing the viewer of one while you work in the Timeline of the other, you will be very happy you upgraded to version 7.0. At the upper left of the Composition tab is a lock icon. Click this to lock any composition, and that comp always is displayed in its Composition panel, no matter which Timeline is forward. This makes it easy to see the effect of subcomposition changes on a Master composition.
Tip
Want to quickly create a second viewer alongside the current one, which is locked and remains a reference? Ctrl+Alt+Shift+N (Cmd+Option+Shift+N) creates a new locked viewer and splits the current view.
Alternatively, if it's only at preview time that you want to see the Master comp, remember the Always Preview This View toggle at the lower left of the Composition panel, which displays the toggled composition during a RAM Preview. Not everyonemyself includeduses this feature, because inevitably it will be left on after you no longer want it, showing you the same preview after you've moved on. Always Preview This View can be considered the old way of doing things, and locked viewers the new, preferred method.
Notes
If you're adjusting properties in the Timeline panel and nothing seems to be happening, it may be that you've closed the Composition panel but left its Timeline open (which you can do by Alt-clicking to close the Composition panel). Far more likely, however, is that you have a Layer panel open and have mistaken it for the Composition panel.
Where Am I?
We all lose our bearings sometimes. For that reason, context menu shortcuts in the Timeline panel enable you to select a layer and reveal it, either in the Project panel or in Project Flowchart view.
Notes
New in After Effects 7.0, you can context-click on the empty region of any Timeline panel (below the layers) and choose Reveal Composition in Project from the bottom of the context menu.
Although you can use the Project Flowchart view to map out an existing project, I find it more helpful to keep the Project panel as clearly and hierarchically organized as is usefully possible, thereby continuing in the spirit of the templates. This might sound about as much fun as keeping your room clean, but if you think in terms of helping someone new to your project to understand it, you may find that you help yourself as well. For example, if you want to refer back to that project in a few months' time, you effectively are in the same shoes as that other artist arriving at the project completely cold.
Descriptive Names
It's rather obvious, but you can help yourself a lot by using descriptive names for your compositions. For example, if you want to keep track of composition order, you can number the Master comp 00, the first nested comp 01, and so on, using descriptive names after the numbers, for example 00_master and so on. Some After Effects veterans have joked that leaving the name of a composition at the default Comp 1 is a firing offense.
Close-Up: Debugging a Shot
Compositing is not altogether unlike computer programming, in that a complicated shot is made up of a series of individual decisions, any one of which can affect the whole. If you ever find yourself needing to troubleshoot a complicated shot, in which some unidentified variable seems to have crept in uninvited, you can attack the problem beginning from the Master comp. Solo layers one by one until you find the culprit, and if it's a comp, Alt/Option-double-click to open it, and repeat the process, until you've isolated the culprit and nailed it.
Precomposing and Nesting |
Section I. Working Foundations
The 7.0 Workflow
- The 7.0 Workflow
- Workspaces and Panels
- Making the Most of the UI
- Settings: Project, Footage, Composition
- Previews and OpenGL
- Effects & Presets
- Output: The Render Queue
- Study a Shot like an Effects Artist
The Timeline
- The Timeline
- Organization
- Animation Methods
- Keyframes and The Graph Editor
- Uber-mastery
- Transform Offsets
- Motion Blur
- Manipulating Time Itself
- In Conclusion
Selections: The Key to Compositing
- Selections: The Key to Compositing
- The Many Ways to Create Selections
- Compositing: Science and Nature
- Alpha Channels and Premultiplication
- Masks
- Combining Multiple Masks
- Putting Masks in Motion
- Blending Modes: The Real Deal
- Track Mattes
Optimizing Your Projects
- Optimizing Your Projects
- Navigating Multiple Compositions
- Precomposing and Nesting
- Adjustment and Guide Layers
- Understanding Rendering Order
- Optimizing After Effects
- Onward to Effects
Section II. Effects Compositing Essentials
Color Correction
Color Keying
- Color Keying
- Good Habits and Best Practices
- Linear Keyers and Hi-Con Mattes
- Blue-Screen and Green-Screen Keying
- Understanding and Optimizing Keylight
- Fixing Typical Problems
- Conclusion
Rotoscoping and Paint
- Rotoscoping and Paint
- Articulated Mattes
- Working Around Limitations
- Morphing
- Paint and Cloning
- Conclusion
Effective Motion Tracking
- Effective Motion Tracking
- The Essentials
- Optimizing Tracking Using 3D
- Extending a Track with Expressions
- Tracking for Rotoscoping
- Using 3D Tracking Data
- Conclusion
Virtual Cinematography
- Virtual Cinematography
- 5D: Pick Up the Camera
- Storytelling and the Camera
- Camera Blur
- The Role of Grain
- Film and Video Looks
- Conclusion
Expressions
- Expressions
- Logic and Grammar
- Muting Keyframes
- Linking Animation Data
- Looping Animations
- Smoothing and Destabilizing
- Offsetting Layers and Time
- Conditionals and Triggers
- Tell Me More
Film, HDR, and 32 Bit Compositing
- Film, HDR, and 32 Bit Compositing
- Details
- Film 101
- Dynamic Range
- Cineon Log Space
- Video Gamma Space
- Battle of the Color Spaces
- Floating Point
- 32 Bits per Channel
- Conclusion
Section III. Creative Explorations
Working with Light
- Working with Light
- Light Source and Direction
- Creating a Look with Color
- Backlighting, Flares, Light Volume
- Shadows and Reflected Light
- HDR Lighting
- Conclusion
Climate: Air, Water, Smoke, Clouds
- Climate: Air, Water, Smoke, Clouds
- Particulate Matter
- Sky Replacement
- The Fog, Smoke, or Mist Rolls In
- Billowing Smoke
- Wind
- Water
- Conclusion
Pyrotechnics: Fire, Explosions, Energy Phenomena
- Pyrotechnics: Fire, Explosions, Energy Phenomena
- Firearms
- Sci-Fi Weaponry
- Heat Distortion
- Fire
- Explosions
- In a Blaze of Glory
Learning to See
Index
EAN: 2147483647
Pages: 157
