Light Source and Direction
Often, when you need to match elements to a source, the steps outlined in Chapter 5 to match brightness, contrast, and hue are sufficient. In many scenes, however, there is clearly more involved with light than brightness and contrast. In some cases, the direction of the light plays a role, especially where the quality of the light is hard (direct) rather than soft (diffuse).
Such a huge variety of light situations is possible in a shot, and in an infinite array of combinations, that it becomes difficult to make any broad statements stand up about lighting. This section, however, tries to pin down some general guidelines and workflows for manipulating the light situation of your scene.
Location and Quality
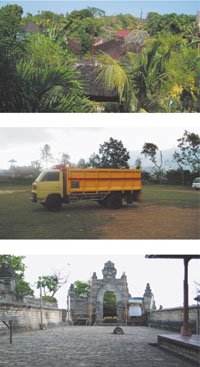
You may have specific information about the lighting conditions that existed when your plate footage was shot. On a set, you can easily enough identify the placement and type of each light; this information is contained to some extent in a camera report also. If the source shot was taken only with natural lighting, you're seeking the position of the sun relative to the camera (Figure 12.1). This information can help you puzzle out highlights and shadows when it's not clear how to match the lighting of the plate.
Figure 12.1. Three shots lit only by the sun; in each case shadows tell you the light is coming from behind and to the right of camera, but as the sky becomes more overcast, the light becomes more diffuse and its direction more difficult to discern.
Sometimes the location and direction of light is readily apparent, but surprisingly often, it's not. As I write this, I'm looking out the window on an overcast day. The sunlight is coming from the south (on my left), but as I look at objects in my backyard, it seems to have no direction at all, because it's not direct, it's diffuse. Furthermore, it keeps changing.
The quality of light in a scene is the most subjective and elusive of criteria. Hard, direct light casts clear shadows and raises contrast, and soft, diffuse light lowers contrast and casts soft shadows (if visible at all). That much seems clear enough. But these are broad stereotypes, which do not always hold as expected. For example, hard light aimed directly at a subject from the camera's point of view flattens out features, effectively decreasing contrast. And when multiple lights combine to light a subject, hard shadows can be diffused, a typical result of artificial lighting (Figure 12.2).
Figure 12.2. It's typical on a larger stage to use multidirectional lighting, causing light and shadow areas to overlap and cancel one another out to some degree. (Image courtesy Pixel Corps.)
Heightening Drama with Light
Although the color and contrast of the scene can be nailed down precisely, light direction and quality can be slippery, surprising, changeable, and difficult to re-create. All true, but there's still plenty you can re-createor get away withby following a few basic guidelines:
- Use elements with similar source lighting. This is the most obvious point. Matching hard- and soft-lit elements is generally difficult, if not impossible. Sometimes contrast of soft shadows can be raised, or existing shadows can be softened, but there's always a limit. If possible, use elements that were shot, rendered, or painted with a similar quality of light to the plate.
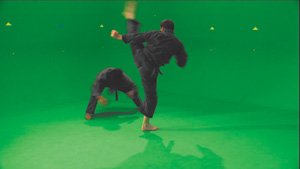
- Changing apparent light direction is just about impossible, particularly in a hard-lit scene (Figure 12.3). Incorrect light direction, in cases where it's evident, is one of the big giveaways of bad compositing, although for what-ever reason it isn't always noticed by the audience the way matte lines and other such basic compositing mistakes are noticed.
Figure 12.3. It sounds good in theory to keep lighting even and diffuse in order to be able to change it later, but most dramatic shotsand in particular, those which include facesdemand the opposite, strong lighting choices that enhance expressions. (Image courtesy Kenwood Media Group.)
- Shadows are often broken up by indirect or reflected (bounced) light. This phenomenon has given rise to global illumination in 3D rendering programs. Study the world around you, and you start to notice interesting things that light does as the result of reflected light mixing with direct light. A clear, black cast shadow is rarely as interesting as one contaminated by secondary light. This knowledge can free you from the need to faithfully play it straight with cast shadows.
Tip
If you minimize its effects, mismatched light direction seems to be one category where you can get away with something.
- Natural light can change rapidly over time. Clouds overhead, trees rustling, an open flame, the sunlight reflected off of a shimmering poolall of these create dramatic interactive lighting in a scene, helping bring it to life (and distracting the viewer if there's too much of it). If they're part of the story, you want these elements, but there are only limited ways to add them in 2D (Figure 12.4). Some are explored in this chapter.
Figure 12.4. Trying to re-create the effect of dappled natural light caused by an overhanging canopy of trees blowing in the breeze? Good luckbetter to get this lighting set, perhaps using an old trick such as a bicycle wheel with pieces of paper woven through its spokes slowly moving in front of the key light.

- Foreground elements that you add can change the lighting situation. Be aware that if an element is highly reflective (and even more so, if self-illuminating), you must account for its interaction with the rest of the scene.
Mastering the use of light in a scene is no simple matter. For centuries, painters defined themselves as much by their observation and use of light as anything; a new school of thought would develop, typically driven by a "master" who had observed something novel and revolutionary about how light works, and the course of art history would change. So instead of looking for the lazy quick fix, keep studying reference for details you can steal.
Neutralizing Light Direction
If your source was shot with a light direction that is incorrect for the composited shot, that's a pretty big problem, depending on how hard and directional the light actually is. The solution is generally to neutralizethat is, isolate and then minimizerather than to attempt to actually fix the discrepancy.
Because every camera setup in the world has unique light characteristics, it's hard to offer a "fix" that will apply to a majority of shots; it depends on the lighting you have (the source) and the lighting you want (the result). For the purposes of discussion, consider a situation in which shadows and highlights clearly indicate the key light position. Also assume that a simple quick fix, such as flopping the shot, is not possible (which it usually isn't). Then you can
- Isolate and remove directional clues from the element, such as cast shadows (probably via matting and rotoscoping).
- Isolate and reduce contrast of highlights and shadows; this may use a combination of a luma key (to isolate highlights or shadows) and a Levels or Curves adjustment. Color Finesse is also often a sophisticated tool for these types of overall image corrections.
You can also flatten out uneven lighting, especially on a background that is meant to be relatively uniform, using the following technique.
Leveling Uneven Light and Hotspots
There is a simple trick that can be used to even out lighting in cases where it should appear uniform and does not. The basic idea is simple: Create a counter gradient that weights an image adjustment by bringing up the shadows, bringing down the highlights, or both. What's surprising is how powerful the technique isand to how many situations it applies.
You can create the gradient to do this by eye. In some cases, such as scenes with low contrast, you can use the inverted, blurred source itself to create the matte. But as a compositor used to looking at light, you should be able to discern where the hotspot is, and how far it reaches (Figure 12.5). You might even find this kind of fun.
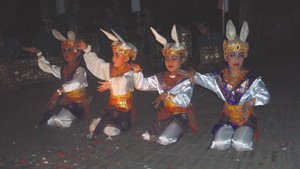
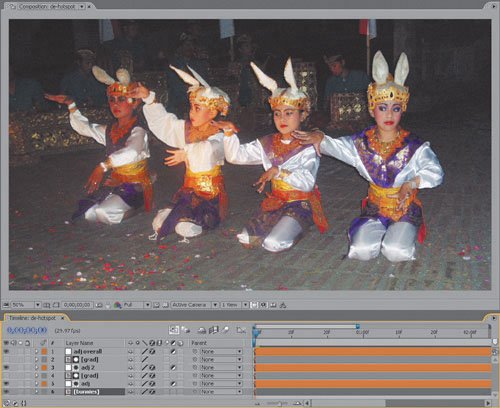
Figure 12.5. This scene is lit by a single key light aimed at the center of the scene, causing a distracting hotspot on the torso of the second bunny from the left.
The next step is to create a white-to-black gradient using the Ramp effect that matches your perception of the hotspot in the scene (Figure 12.6). You could apply the result directly to the scene with a Blending mode, but you'll have more control if you apply it as a luma track matte to an adjustment layer containing a Levels or Curves effect. This allows you to select whether you're adjusting highlights and shadows or gamma.
Figure 12.6. A simple gradient created to match the offensive area of the hotspot. The center and edge of the radial gradient, created with the Ramp effect, have been positioned by eye to match Figure 12.7.

The result won't necessarily obliterate all evidence that there was hot lighting anywhere in the scene (Figure 12.7), but as always, the goal is not only aesthetic beauty but also the viewer's focus. If there seems to be a distracting spotlight on the middle of some part of the scene, there's a problem.
Figure 12.7. It's not as though all traces of the single hard key light have been eliminated, but that was not the aim of this adjustment. Instead, the effect of the light has been reduced so that it no longer puts the viewer's focus in the wrong place.
Tip
The examples depicted here are included on the disk using still images, as if shot with a static camera. However, should the camera move during the shot, the gradient start or end points can be joined to a tracker, via either expressions or parenting. (See Chapter 8, "Effective Motion Tracking," as well as Chapter 10, "Expressions," for details.)
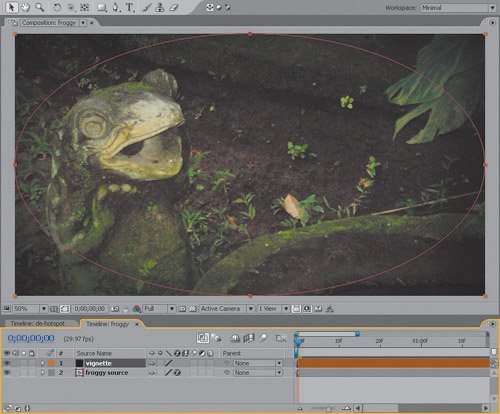
Conversely, you can also add a vignette or eye light effect using a radial gradient at the center of the frame, with the corners slipping away to darkness. This is often associated with projected or heavily treated film and with handheld low-light shooting. The easiest way to do this is not with Ramp but with a heavily feathered and inverted elliptical mask applied to a black solid, which is easier to move and scale (Figure 12.8).
Figure 12.8. Reference of film footage that was shot and processed with a vignette, and addition of the equivalent vignette effect in After Effects. Double-click the Elliptical Mask tool to fill the frame, then open the mask controls (MM), check Invert, and set a high Mask Feather (500 for this 2K resolution source).
Close-Up: Geek Alert: Inverse Square Law
3D artists and lighting directors out there will be aware that a linear gradient is not the perfect model for light falloff and that light's intensity diminishes proportionally to its distance from the source squared. So if I'm twice as far from a single light source as you are, I will be illuminated by one-quarter the amount of light.
So I suppose you want a gradient that behaves this way? Simple. Duplicate your layer with the radial gradient, and set the upper of the two layers to a Multiply Blending mode. There you have it: inverse square dissipation of intensity (Figure 12.9). Instead of using a gradient layer directly as a luma matte, put the two combined gradients into a single precomposition, and you're good to go.
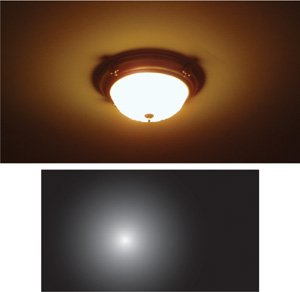
Figure 12.9. The same gradient as in Figure 12.6, but duplicated with a Multiply Blending mode, creating the inverse-square fall-off. Ordinary incandescent lights such as the one depicted exhibit this phenomenon.
Who knows, maybe you'll even find a situation where you notice the difference; the number of shots taken with a single light source is not high, but the same adjustment would work with any single light that is too hot. If nothing else, you've just avoided paying money for one more third-party plug-in that offers one more capability you can easily create for yourself.
Creating a Look with Color |
Section I. Working Foundations
The 7.0 Workflow
- The 7.0 Workflow
- Workspaces and Panels
- Making the Most of the UI
- Settings: Project, Footage, Composition
- Previews and OpenGL
- Effects & Presets
- Output: The Render Queue
- Study a Shot like an Effects Artist
The Timeline
- The Timeline
- Organization
- Animation Methods
- Keyframes and The Graph Editor
- Uber-mastery
- Transform Offsets
- Motion Blur
- Manipulating Time Itself
- In Conclusion
Selections: The Key to Compositing
- Selections: The Key to Compositing
- The Many Ways to Create Selections
- Compositing: Science and Nature
- Alpha Channels and Premultiplication
- Masks
- Combining Multiple Masks
- Putting Masks in Motion
- Blending Modes: The Real Deal
- Track Mattes
Optimizing Your Projects
- Optimizing Your Projects
- Navigating Multiple Compositions
- Precomposing and Nesting
- Adjustment and Guide Layers
- Understanding Rendering Order
- Optimizing After Effects
- Onward to Effects
Section II. Effects Compositing Essentials
Color Correction
Color Keying
- Color Keying
- Good Habits and Best Practices
- Linear Keyers and Hi-Con Mattes
- Blue-Screen and Green-Screen Keying
- Understanding and Optimizing Keylight
- Fixing Typical Problems
- Conclusion
Rotoscoping and Paint
- Rotoscoping and Paint
- Articulated Mattes
- Working Around Limitations
- Morphing
- Paint and Cloning
- Conclusion
Effective Motion Tracking
- Effective Motion Tracking
- The Essentials
- Optimizing Tracking Using 3D
- Extending a Track with Expressions
- Tracking for Rotoscoping
- Using 3D Tracking Data
- Conclusion
Virtual Cinematography
- Virtual Cinematography
- 5D: Pick Up the Camera
- Storytelling and the Camera
- Camera Blur
- The Role of Grain
- Film and Video Looks
- Conclusion
Expressions
- Expressions
- Logic and Grammar
- Muting Keyframes
- Linking Animation Data
- Looping Animations
- Smoothing and Destabilizing
- Offsetting Layers and Time
- Conditionals and Triggers
- Tell Me More
Film, HDR, and 32 Bit Compositing
- Film, HDR, and 32 Bit Compositing
- Details
- Film 101
- Dynamic Range
- Cineon Log Space
- Video Gamma Space
- Battle of the Color Spaces
- Floating Point
- 32 Bits per Channel
- Conclusion
Section III. Creative Explorations
Working with Light
- Working with Light
- Light Source and Direction
- Creating a Look with Color
- Backlighting, Flares, Light Volume
- Shadows and Reflected Light
- HDR Lighting
- Conclusion
Climate: Air, Water, Smoke, Clouds
- Climate: Air, Water, Smoke, Clouds
- Particulate Matter
- Sky Replacement
- The Fog, Smoke, or Mist Rolls In
- Billowing Smoke
- Wind
- Water
- Conclusion
Pyrotechnics: Fire, Explosions, Energy Phenomena
- Pyrotechnics: Fire, Explosions, Energy Phenomena
- Firearms
- Sci-Fi Weaponry
- Heat Distortion
- Fire
- Explosions
- In a Blaze of Glory
Learning to See
Index
EAN: 2147483647
Pages: 157
- Integration Strategies and Tactics for Information Technology Governance
- A View on Knowledge Management: Utilizing a Balanced Scorecard Methodology for Analyzing Knowledge Metrics
- Governing Information Technology Through COBIT
- Governance in IT Outsourcing Partnerships
- The Evolution of IT Governance at NB Power
